2000 DODGE NEON turn signal
[x] Cancel search: turn signalPage 308 of 1285
LAMPS
TABLE OF CONTENTS
page page
LAMP DIAGNOSIS......................... 1
HEADLAMP ALIGNMENT.................... 4
LAMP BULB SERVICE...................... 7LAMP SERVICE........................... 12
LAMP SYSTEMS.......................... 16
BULB APPLICATION....................... 17
LAMP DIAGNOSIS
TABLE OF CONTENTS
page page
DESCRIPTION AND OPERATION
DIAGNOSTIC PROCEDURES................1
SAFETY PRECAUTIONS....................1
DAYTIME RUNNING LAMP MODULE...........1DIAGNOSIS AND TESTING
HEADLAMP DIAGNOSIS....................1
FOG LAMP..............................3
DESCRIPTION AND OPERATION
DIAGNOSTIC PROCEDURES
When a vehicle experiences problems with the
headlamp system, verify the condition of the battery
connections, fuses, charging system, headlamp bulbs,
wire connectors, relay, high beam switch, dimmer
switch, and headlamp switch. Refer to Group 8W,
Wiring Diagrams for component locations and circuit
information.
SAFETY PRECAUTIONS
WARNING: EYE PROTECTION SHOULD BE USED
WHEN SERVICING GLASS COMPONENTS. PER-
SONAL INJURY CAN RESULT.
CAUTION: Do not touch the glass of halogen bulbs
with fingers or other possibly oily surface, reduced
bulb life will result.
Do not use bulbs with higher candle power than
indicated in the Bulb Application table at the end of
this group. Damage to lamp and/or Daytime Run-
ning Lamp Module can result.
Do not use fuses, circuit breakers or relays hav-
ing greater amperage value than indicated on the
fuse panel or in the Owners Manual.When it is necessary to remove components to ser-
vice another, it should not be necessary to apply
excessive force or bend a component to remove it.
Before damaging a trim component, verify hidden
fasteners or captured edges are not holding the com-
ponent in place.
DAYTIME RUNNING LAMP MODULE
PL vehicles built for use in Canada are equipped
with a Daytime Running Lamp (DRL) system. Turn
signal lamp circuitry always comes from the multi-
function switch, and goes to the cluster connector,
into the cluster, then back out to the front turn sig-
nal switch lamps. The Canadian cluster provides
steady illumination of the front turn signal when the
ignition switch is in the ON position. The DRL func-
tion may be inhibited by activating the turn signals,
the hazard flashers, the headlamp switch, or park
brake.
DIAGNOSIS AND TESTING
HEADLAMP DIAGNOSIS
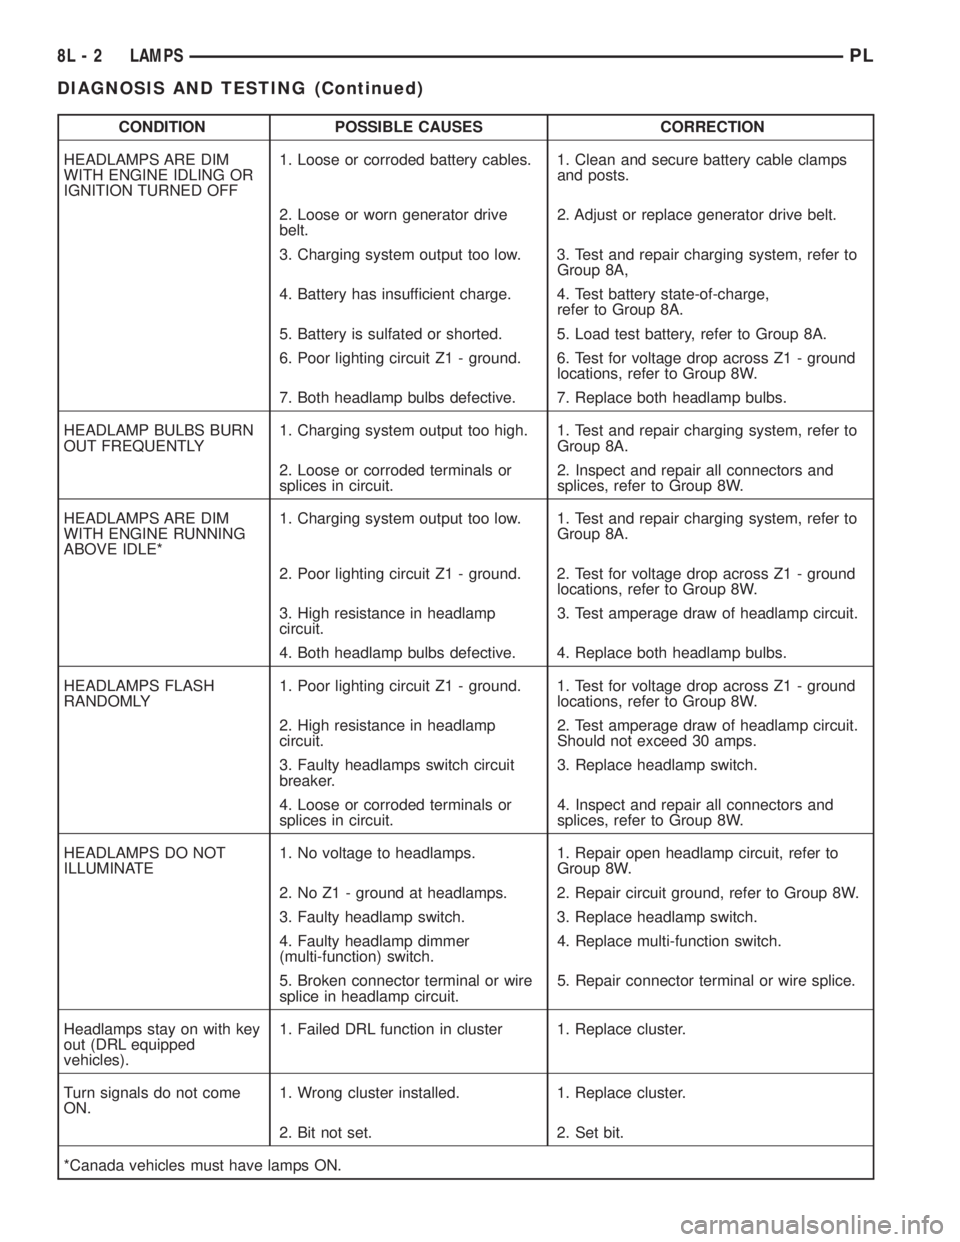
Always begin any diagnosis by testing all of the
fuses and circuit breakers in the system. Refer to
Group 8W, Wiring Diagrams.
Conventional and halogen headlamps are inter-
changeable. It is recommended that they not be
intermixed on a given vehicle.
PLLAMPS 8L - 1
Page 309 of 1285
CONDITION POSSIBLE CAUSES CORRECTION
HEADLAMPS ARE DIM
WITH ENGINE IDLING OR
IGNITION TURNED OFF1. Loose or corroded battery cables. 1. Clean and secure battery cable clamps
and posts.
2. Loose or worn generator drive
belt.2. Adjust or replace generator drive belt.
3. Charging system output too low. 3. Test and repair charging system, refer to
Group 8A,
4. Battery has insufficient charge. 4. Test battery state-of-charge,
refer to Group 8A.
5. Battery is sulfated or shorted. 5. Load test battery, refer to Group 8A.
6. Poor lighting circuit Z1 - ground. 6. Test for voltage drop across Z1 - ground
locations, refer to Group 8W.
7. Both headlamp bulbs defective. 7. Replace both headlamp bulbs.
HEADLAMP BULBS BURN
OUT FREQUENTLY1. Charging system output too high. 1. Test and repair charging system, refer to
Group 8A.
2. Loose or corroded terminals or
splices in circuit.2. Inspect and repair all connectors and
splices, refer to Group 8W.
HEADLAMPS ARE DIM
WITH ENGINE RUNNING
ABOVE IDLE*1. Charging system output too low. 1. Test and repair charging system, refer to
Group 8A.
2. Poor lighting circuit Z1 - ground. 2. Test for voltage drop across Z1 - ground
locations, refer to Group 8W.
3. High resistance in headlamp
circuit.3. Test amperage draw of headlamp circuit.
4. Both headlamp bulbs defective. 4. Replace both headlamp bulbs.
HEADLAMPS FLASH
RANDOMLY1. Poor lighting circuit Z1 - ground. 1. Test for voltage drop across Z1 - ground
locations, refer to Group 8W.
2. High resistance in headlamp
circuit.2. Test amperage draw of headlamp circuit.
Should not exceed 30 amps.
3. Faulty headlamps switch circuit
breaker.3. Replace headlamp switch.
4. Loose or corroded terminals or
splices in circuit.4. Inspect and repair all connectors and
splices, refer to Group 8W.
HEADLAMPS DO NOT
ILLUMINATE1. No voltage to headlamps. 1. Repair open headlamp circuit, refer to
Group 8W.
2. No Z1 - ground at headlamps. 2. Repair circuit ground, refer to Group 8W.
3. Faulty headlamp switch. 3. Replace headlamp switch.
4. Faulty headlamp dimmer
(multi-function) switch.4. Replace multi-function switch.
5. Broken connector terminal or wire
splice in headlamp circuit.5. Repair connector terminal or wire splice.
Headlamps stay on with key
out (DRL equipped
vehicles).1. Failed DRL function in cluster 1. Replace cluster.
Turn signals do not come
ON.1. Wrong cluster installed. 1. Replace cluster.
2. Bit not set. 2. Set bit.
*Canada vehicles must have lamps ON.
8L - 2 LAMPSPL
DIAGNOSIS AND TESTING (Continued)
Page 314 of 1285
LAMP BULB SERVICE
TABLE OF CONTENTS
page page
DESCRIPTION AND OPERATION
BULB...................................7
REMOVAL AND INSTALLATION
HEADLAMP BULB.........................7
FOG LAMP BULB..........................8
PARK AND TURN SIGNAL LAMP BULB.........8
FRONT SIDE MARKER LAMP BULB...........9
CENTER HIGH MOUNTED STOP LAMP BULB....9
TAIL, STOP, BACK-UP AND TURN SIGNAL
LAMP BULB............................9LICENSE PLATE LAMP BULB...............10
UNDERHOOD LAMP BULB.................10
REAR CARGO LAMP BULB.................10
DOME LAMP BULB.......................10
TRANSAXLE RANGE INDICATOR LAMP BULB . . 10
GLOVE BOX LAMP BULB...................11
FLOOR CONSOLE LAMP BULB..............11
VISOR VANITY LAMP BULB.................11
DESCRIPTION AND OPERATION
BULB
The electric light bulb is a source of electromag-
netic radiation which generates light. Vehicles use
many different types of bulbs:
²Headlamp bulb
²Fog Lamp bulb
²Tail Lamp bulb
²Stop Lamp bulb
²Turn Signal bulb
²Back up Lamp bulb
²Dome Lamp bulb
²Transaxle Range Indicator Lamp bulb (PRNDL)
²Glove Box Lamp bulb
²Floor Console Lamp bulb
²Rear Cargo Lamp bulb
²Visor Vanity Lamp bulb
²Underhood Lamp bulb
²etc.
REMOVAL AND INSTALLATION
HEADLAMP BULB
REMOVAL
(1) Release hood latch and open hood.
(2) Remove screws attaching headlamp module to
upper crossmember.
(3) Remove headlamp module from vehicle.
(4) Disconnect wire connector from back of head-
lamp bulb.
(5) Rotate retaining ring counterclockwise one
quarter turn.
(6) Remove retaining ring from headlamp module.
(7) Remove bulb from headlamp module (Fig. 1).
INSTALLATION
CAUTION: Do not touch the glass of halogen bulbs
with fingers or other possibly oily surface, reduced
bulb life will result.
(1) Install bulb into headlamp module.
(2) Install retaining ring to headlamp module.
(3) Rotate retaining ring clockwise one quarter
turn.
(4) Connect wire connector to the back of head-
lamp bulb.
(5) Place headlamp module in position.
(6) Install screws attaching headlamp module to
upper crossmember.
(7) Close hood.
PLLAMPS 8L - 7
Page 315 of 1285
FOG LAMP BULB
REMOVAL
(1) Remove nuts attaching fog lamp to fascia.
(2) Disconnect wire connector from fog lamp.
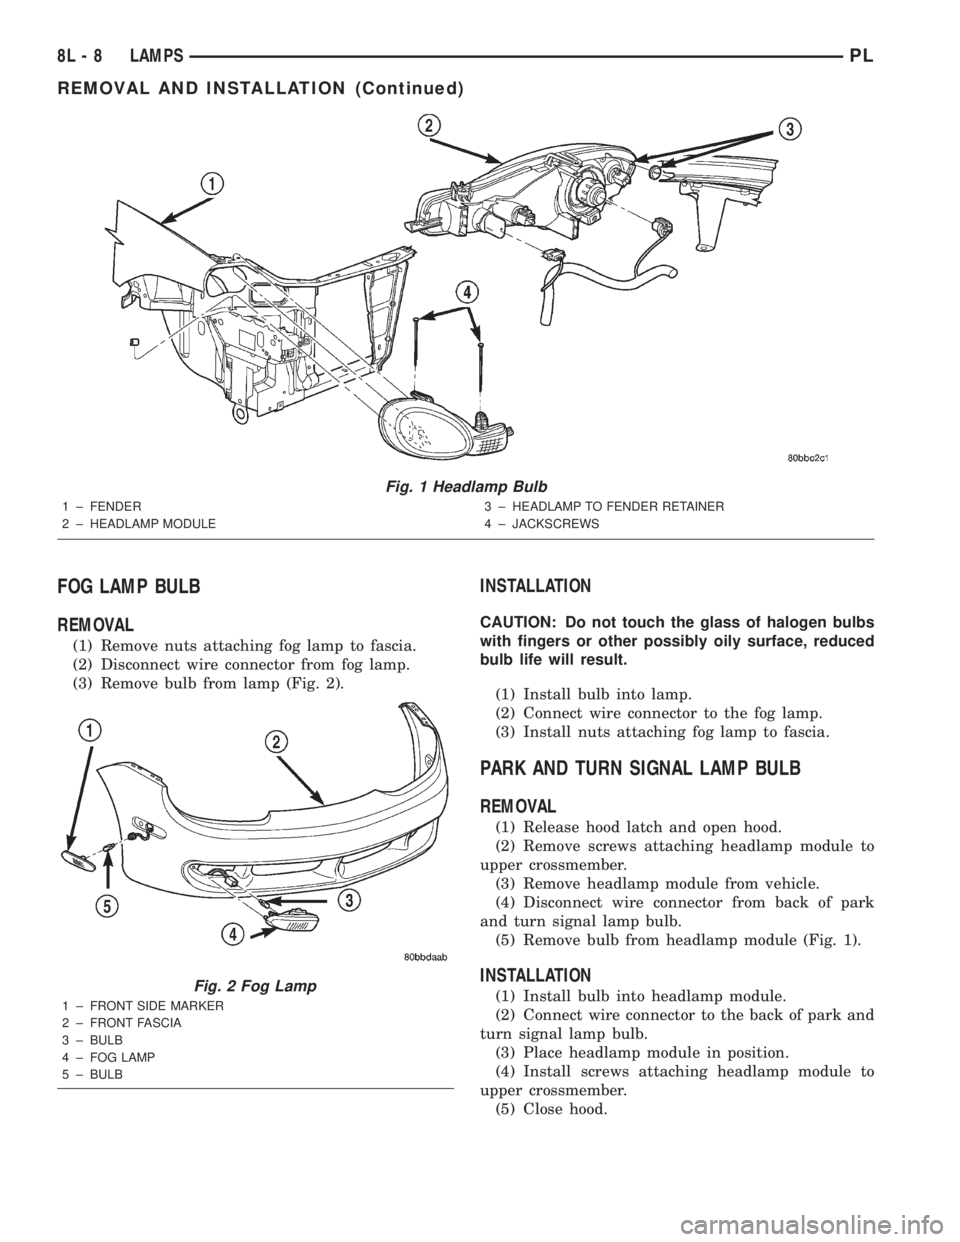
(3) Remove bulb from lamp (Fig. 2).
INSTALLATION
CAUTION: Do not touch the glass of halogen bulbs
with fingers or other possibly oily surface, reduced
bulb life will result.
(1) Install bulb into lamp.
(2) Connect wire connector to the fog lamp.
(3) Install nuts attaching fog lamp to fascia.
PARK AND TURN SIGNAL LAMP BULB
REMOVAL
(1) Release hood latch and open hood.
(2) Remove screws attaching headlamp module to
upper crossmember.
(3) Remove headlamp module from vehicle.
(4) Disconnect wire connector from back of park
and turn signal lamp bulb.
(5) Remove bulb from headlamp module (Fig. 1).
INSTALLATION
(1) Install bulb into headlamp module.
(2) Connect wire connector to the back of park and
turn signal lamp bulb.
(3) Place headlamp module in position.
(4) Install screws attaching headlamp module to
upper crossmember.
(5) Close hood.
Fig. 1 Headlamp Bulb
1 ± FENDER
2 ± HEADLAMP MODULE3 ± HEADLAMP TO FENDER RETAINER
4 ± JACKSCREWS
Fig. 2 Fog Lamp
1 ± FRONT SIDE MARKER
2 ± FRONT FASCIA
3 ± BULB
4 ± FOG LAMP
5 ± BULB
8L - 8 LAMPSPL
REMOVAL AND INSTALLATION (Continued)
Page 316 of 1285
FRONT SIDE MARKER LAMP BULB
REMOVAL
(1) Reach behind front bumper fascia forward of
front wheel and remove attaching clip from the front
side marker lamp.
(2) Remove bulb from socket (Fig. 2).
INSTALLATION
(1) Install bulb into socket.
(2) Install attaching clip to the front side marker
lamp.
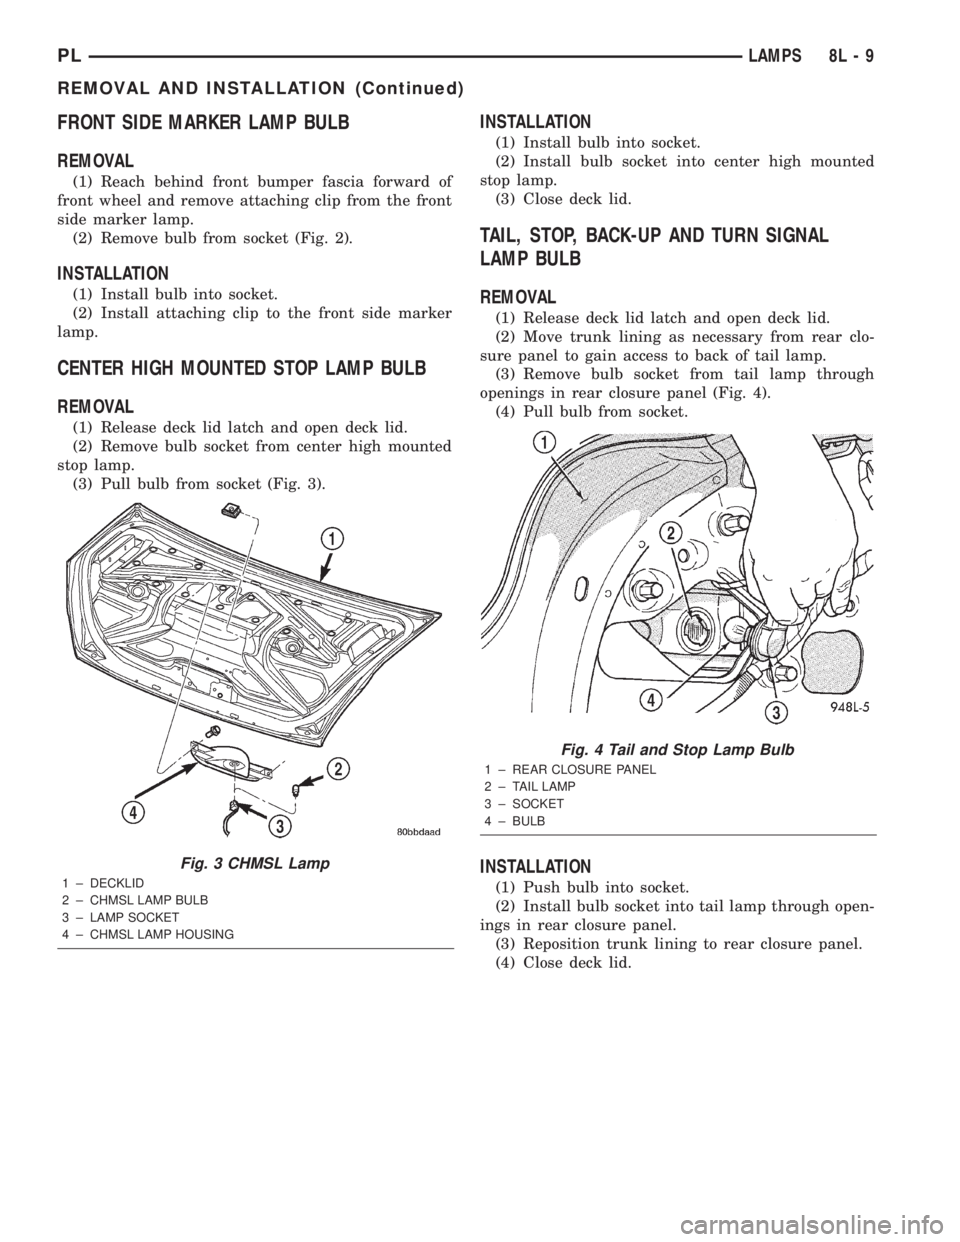
CENTER HIGH MOUNTED STOP LAMP BULB
REMOVAL
(1) Release deck lid latch and open deck lid.
(2) Remove bulb socket from center high mounted
stop lamp.
(3) Pull bulb from socket (Fig. 3).
INSTALLATION
(1) Install bulb into socket.
(2) Install bulb socket into center high mounted
stop lamp.
(3) Close deck lid.
TAIL, STOP, BACK-UP AND TURN SIGNAL
LAMP BULB
REMOVAL
(1) Release deck lid latch and open deck lid.
(2) Move trunk lining as necessary from rear clo-
sure panel to gain access to back of tail lamp.
(3) Remove bulb socket from tail lamp through
openings in rear closure panel (Fig. 4).
(4) Pull bulb from socket.
INSTALLATION
(1) Push bulb into socket.
(2) Install bulb socket into tail lamp through open-
ings in rear closure panel.
(3) Reposition trunk lining to rear closure panel.
(4) Close deck lid.
Fig. 3 CHMSL Lamp
1 ± DECKLID
2 ± CHMSL LAMP BULB
3 ± LAMP SOCKET
4 ± CHMSL LAMP HOUSING
Fig. 4 Tail and Stop Lamp Bulb
1 ± REAR CLOSURE PANEL
2 ± TAIL LAMP
3 ± SOCKET
4 ± BULB
PLLAMPS 8L - 9
REMOVAL AND INSTALLATION (Continued)
Page 319 of 1285
LAMP SERVICE
TABLE OF CONTENTS
page page
DESCRIPTION AND OPERATION
LAMP ASSEMBLIES.......................12
REMOVAL AND INSTALLATION
HEADLAMP MODULE.....................12
FOG LAMP..............................13
PARK AND TURN SIGNAL LAMP BULB........13
FRONT SIDE MARKER LAMP...............13
CENTER HIGH MOUNTED STOP LAMP
(CHMSL)..............................14TAIL, STOP AND TURN SIGNAL LAMP........14
LICENSE PLATE LAMP....................14
UNDERHOOD LAMP......................14
REAR CARGO LAMP......................15
DOME LAMP............................15
GLOVE BOX LAMP BULB..................15
FLOOR CONSOLE LAMP BULB..............15
VISOR VANITY LAMP......................15
DESCRIPTION AND OPERATION
LAMP ASSEMBLIES
The lamp assemblies or modules generally consist
of a housing, reflector(s) and lens that directs a light
source. Vehicles use many different types of lamps:
²Headlamp
²Fog Lamp
²Tail Lamp
²Stop Lamp
²Turn Signal Lamp
²Back up Lamp
²Dome Lamp
²Transaxle Range Indicator Lamp (PRNDL)
²Glove Box Lamp
²Floor Console Lamp
²Rear Cargo Lamp
²Visor Vanity Lamp
²Underhood Lamp
²etc.
REMOVAL AND INSTALLATION
HEADLAMP MODULE
REMOVAL
(1) Release hood latch and open hood.
(2) Remove screws attaching headlamp module to
upper crossmember.
(3) Remove headlamp module from vehicle.
(4) Disconnect wire connectors from back of head-
lamp module.
(5) Remove headlamp module (Fig. 1).
INSTALLATION
CAUTION: Do not touch the glass of halogen bulbs
with fingers or other possibly oily surface, reduced
bulb life will result.
(1) Connect wire connectors to the back of head-
lamp module.
(2) Place headlamp module in position.
(3) Install screws attaching headlamp module to
upper crossmember.
(4) Close hood.
8L - 12 LAMPSPL
Page 320 of 1285
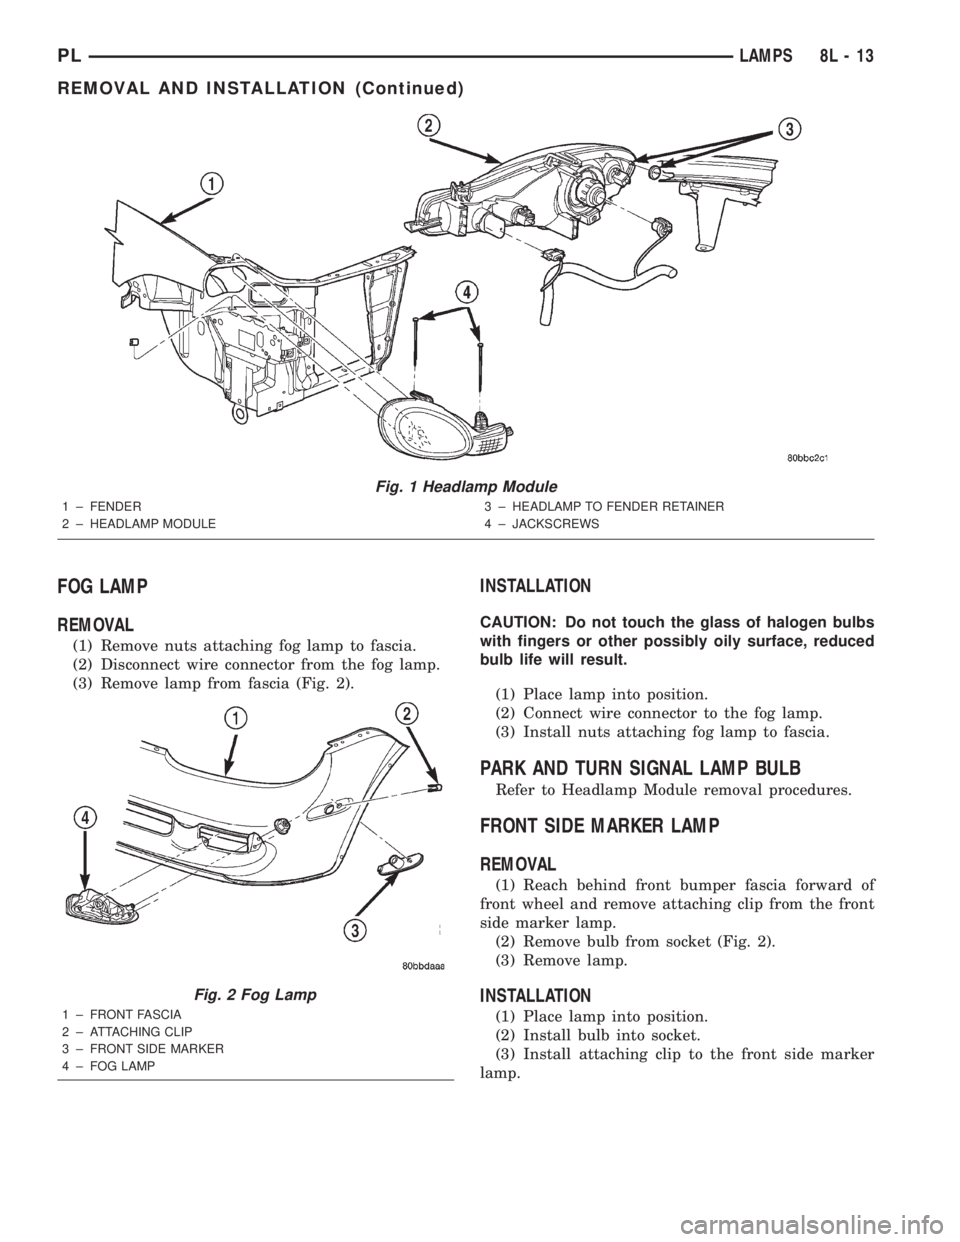
FOG LAMP
REMOVAL
(1) Remove nuts attaching fog lamp to fascia.
(2) Disconnect wire connector from the fog lamp.
(3) Remove lamp from fascia (Fig. 2).
INSTALLATION
CAUTION: Do not touch the glass of halogen bulbs
with fingers or other possibly oily surface, reduced
bulb life will result.
(1) Place lamp into position.
(2) Connect wire connector to the fog lamp.
(3) Install nuts attaching fog lamp to fascia.
PARK AND TURN SIGNAL LAMP BULB
Refer to Headlamp Module removal procedures.
FRONT SIDE MARKER LAMP
REMOVAL
(1) Reach behind front bumper fascia forward of
front wheel and remove attaching clip from the front
side marker lamp.
(2) Remove bulb from socket (Fig. 2).
(3) Remove lamp.
INSTALLATION
(1) Place lamp into position.
(2) Install bulb into socket.
(3) Install attaching clip to the front side marker
lamp.
Fig. 1 Headlamp Module
1 ± FENDER
2 ± HEADLAMP MODULE3 ± HEADLAMP TO FENDER RETAINER
4 ± JACKSCREWS
Fig. 2 Fog Lamp
1 ± FRONT FASCIA
2 ± ATTACHING CLIP
3 ± FRONT SIDE MARKER
4 ± FOG LAMP
PLLAMPS 8L - 13
REMOVAL AND INSTALLATION (Continued)
Page 321 of 1285
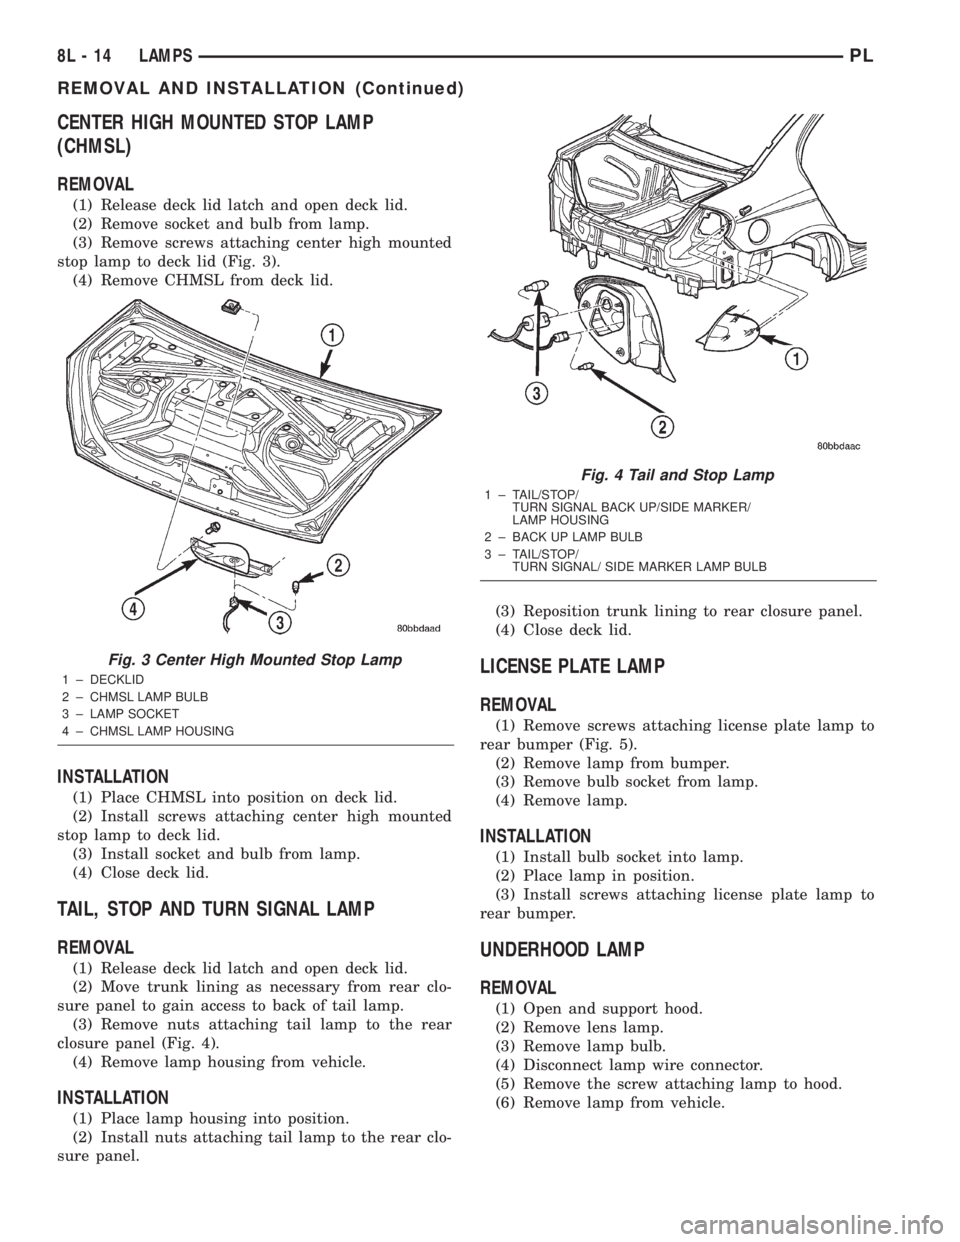
CENTER HIGH MOUNTED STOP LAMP
(CHMSL)
REMOVAL
(1) Release deck lid latch and open deck lid.
(2) Remove socket and bulb from lamp.
(3) Remove screws attaching center high mounted
stop lamp to deck lid (Fig. 3).
(4) Remove CHMSL from deck lid.
INSTALLATION
(1) Place CHMSL into position on deck lid.
(2) Install screws attaching center high mounted
stop lamp to deck lid.
(3) Install socket and bulb from lamp.
(4) Close deck lid.
TAIL, STOP AND TURN SIGNAL LAMP
REMOVAL
(1) Release deck lid latch and open deck lid.
(2) Move trunk lining as necessary from rear clo-
sure panel to gain access to back of tail lamp.
(3) Remove nuts attaching tail lamp to the rear
closure panel (Fig. 4).
(4) Remove lamp housing from vehicle.
INSTALLATION
(1) Place lamp housing into position.
(2) Install nuts attaching tail lamp to the rear clo-
sure panel.(3) Reposition trunk lining to rear closure panel.
(4) Close deck lid.
LICENSE PLATE LAMP
REMOVAL
(1) Remove screws attaching license plate lamp to
rear bumper (Fig. 5).
(2) Remove lamp from bumper.
(3) Remove bulb socket from lamp.
(4) Remove lamp.
INSTALLATION
(1) Install bulb socket into lamp.
(2) Place lamp in position.
(3) Install screws attaching license plate lamp to
rear bumper.
UNDERHOOD LAMP
REMOVAL
(1) Open and support hood.
(2) Remove lens lamp.
(3) Remove lamp bulb.
(4) Disconnect lamp wire connector.
(5) Remove the screw attaching lamp to hood.
(6) Remove lamp from vehicle.
Fig. 3 Center High Mounted Stop Lamp
1 ± DECKLID
2 ± CHMSL LAMP BULB
3 ± LAMP SOCKET
4 ± CHMSL LAMP HOUSING
Fig. 4 Tail and Stop Lamp
1 ± TAIL/STOP/
TURN SIGNAL BACK UP/SIDE MARKER/
LAMP HOUSING
2 ± BACK UP LAMP BULB
3 ± TAIL/STOP/
TURN SIGNAL/ SIDE MARKER LAMP BULB
8L - 14 LAMPSPL
REMOVAL AND INSTALLATION (Continued)