2000 DODGE NEON sensor
[x] Cancel search: sensorPage 928 of 1285
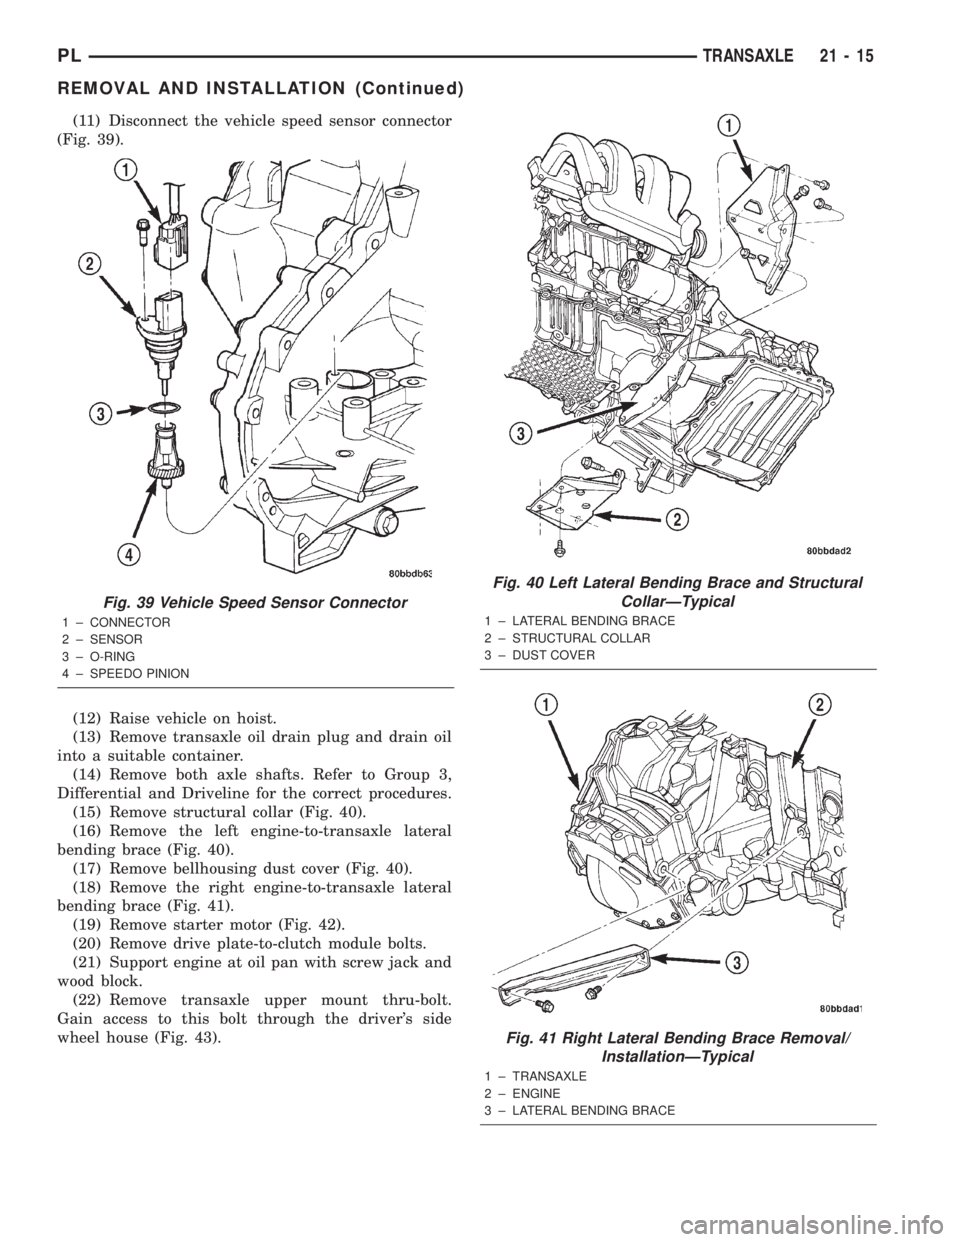
(11) Disconnect the vehicle speed sensor connector
(Fig. 39).
(12) Raise vehicle on hoist.
(13) Remove transaxle oil drain plug and drain oil
into a suitable container.
(14) Remove both axle shafts. Refer to Group 3,
Differential and Driveline for the correct procedures.
(15) Remove structural collar (Fig. 40).
(16) Remove the left engine-to-transaxle lateral
bending brace (Fig. 40).
(17) Remove bellhousing dust cover (Fig. 40).
(18) Remove the right engine-to-transaxle lateral
bending brace (Fig. 41).
(19) Remove starter motor (Fig. 42).
(20) Remove drive plate-to-clutch module bolts.
(21) Support engine at oil pan with screw jack and
wood block.
(22) Remove transaxle upper mount thru-bolt.
Gain access to this bolt through the driver's side
wheel house (Fig. 43).
Fig. 39 Vehicle Speed Sensor Connector
1 ± CONNECTOR
2 ± SENSOR
3 ± O-RING
4 ± SPEEDO PINION
Fig. 40 Left Lateral Bending Brace and Structural
CollarÐTypical
1 ± LATERAL BENDING BRACE
2 ± STRUCTURAL COLLAR
3 ± DUST COVER
Fig. 41 Right Lateral Bending Brace Removal/
InstallationÐTypical
1 ± TRANSAXLE
2 ± ENGINE
3 ± LATERAL BENDING BRACE
PLTRANSAXLE 21 - 15
REMOVAL AND INSTALLATION (Continued)
Page 929 of 1285
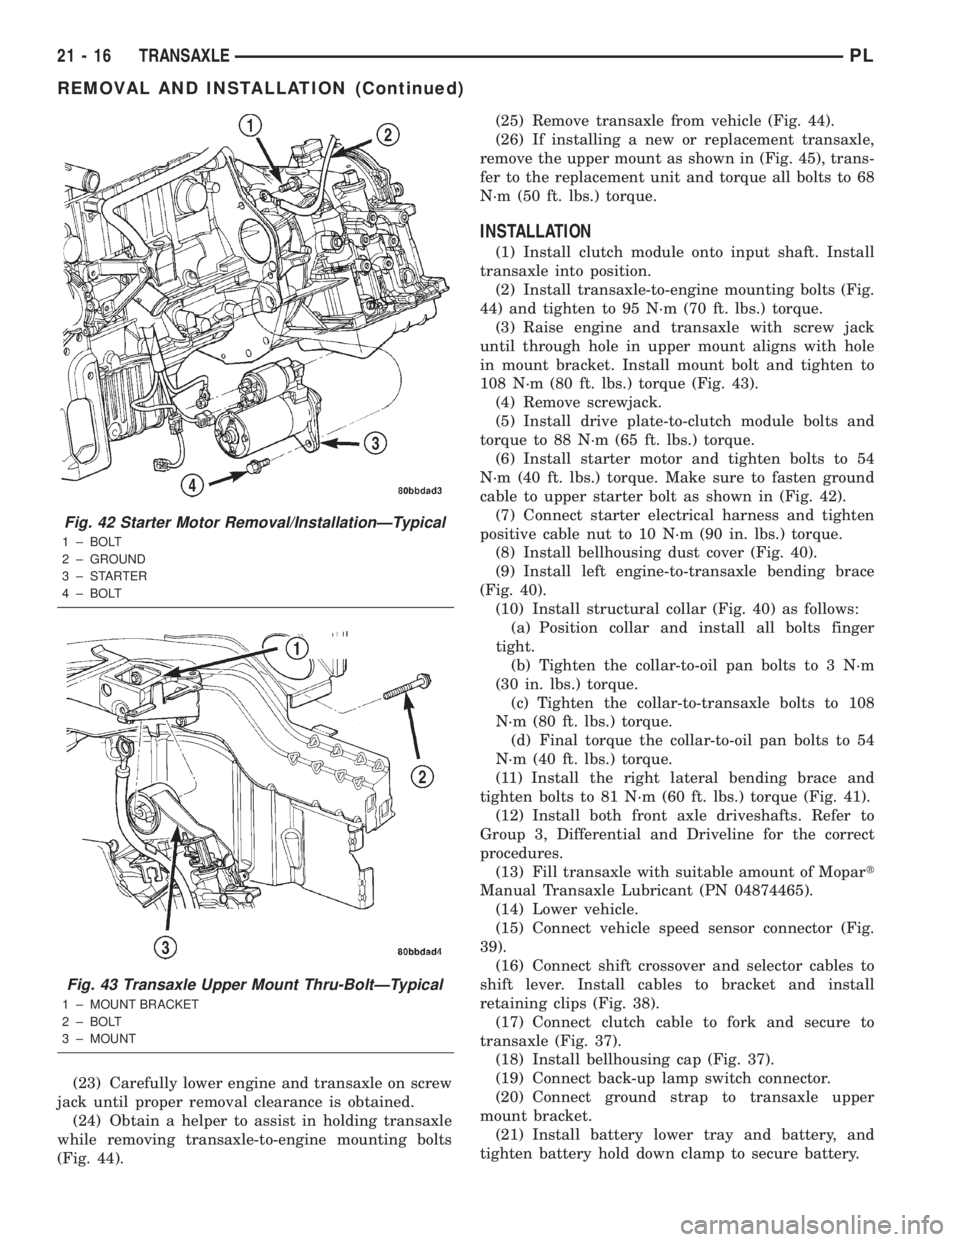
(23) Carefully lower engine and transaxle on screw
jack until proper removal clearance is obtained.
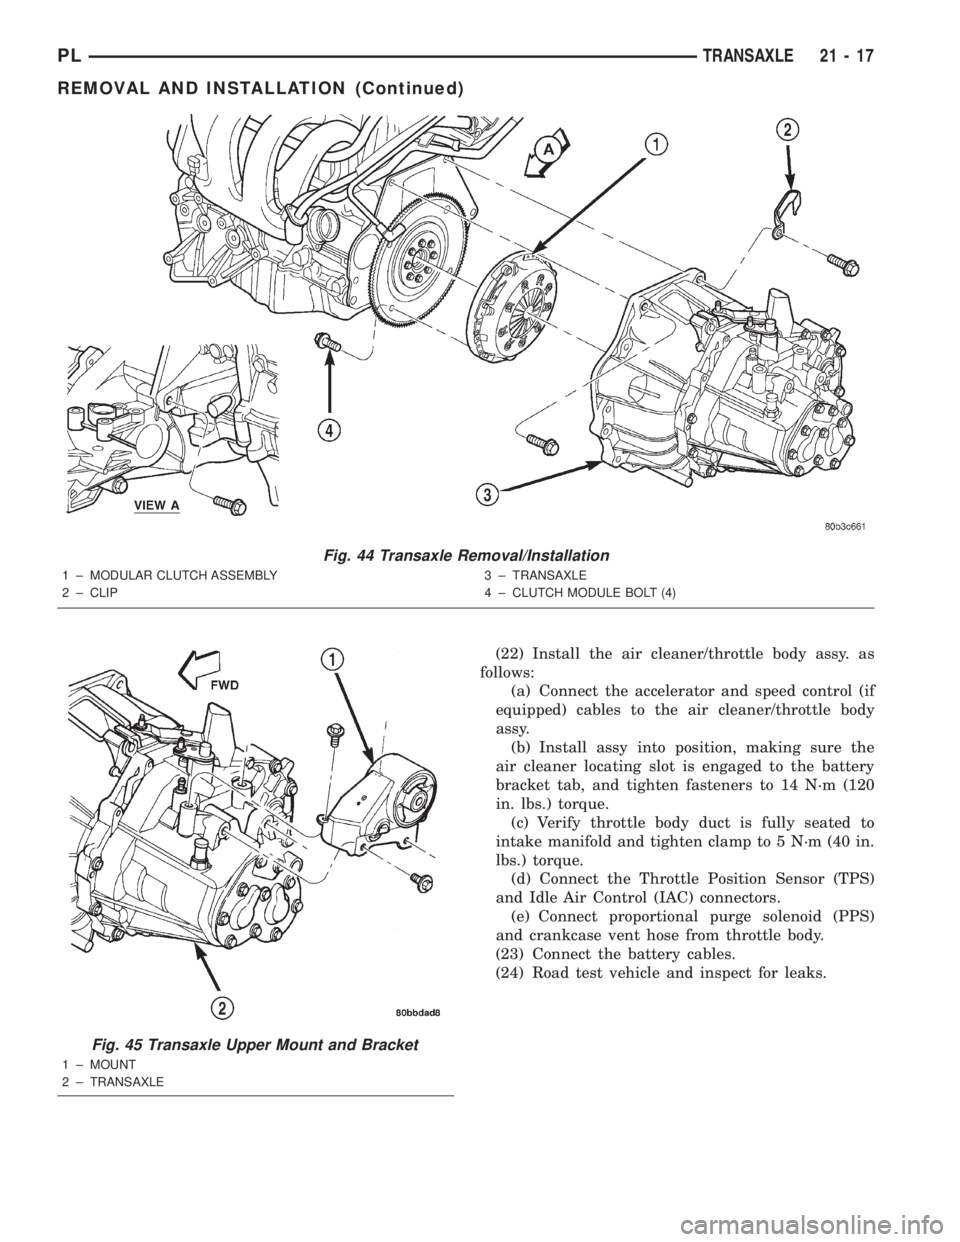
(24) Obtain a helper to assist in holding transaxle
while removing transaxle-to-engine mounting bolts
(Fig. 44).(25) Remove transaxle from vehicle (Fig. 44).
(26) If installing a new or replacement transaxle,
remove the upper mount as shown in (Fig. 45), trans-
fer to the replacement unit and torque all bolts to 68
N´m (50 ft. lbs.) torque.
INSTALLATION
(1) Install clutch module onto input shaft. Install
transaxle into position.
(2) Install transaxle-to-engine mounting bolts (Fig.
44) and tighten to 95 N´m (70 ft. lbs.) torque.
(3) Raise engine and transaxle with screw jack
until through hole in upper mount aligns with hole
in mount bracket. Install mount bolt and tighten to
108 N´m (80 ft. lbs.) torque (Fig. 43).
(4) Remove screwjack.
(5) Install drive plate-to-clutch module bolts and
torque to 88 N´m (65 ft. lbs.) torque.
(6) Install starter motor and tighten bolts to 54
N´m (40 ft. lbs.) torque. Make sure to fasten ground
cable to upper starter bolt as shown in (Fig. 42).
(7) Connect starter electrical harness and tighten
positive cable nut to 10 N´m (90 in. lbs.) torque.
(8) Install bellhousing dust cover (Fig. 40).
(9) Install left engine-to-transaxle bending brace
(Fig. 40).
(10) Install structural collar (Fig. 40) as follows:
(a) Position collar and install all bolts finger
tight.
(b) Tighten the collar-to-oil pan bolts to 3 N´m
(30 in. lbs.) torque.
(c) Tighten the collar-to-transaxle bolts to 108
N´m (80 ft. lbs.) torque.
(d) Final torque the collar-to-oil pan bolts to 54
N´m (40 ft. lbs.) torque.
(11) Install the right lateral bending brace and
tighten bolts to 81 N´m (60 ft. lbs.) torque (Fig. 41).
(12) Install both front axle driveshafts. Refer to
Group 3, Differential and Driveline for the correct
procedures.
(13) Fill transaxle with suitable amount of Mopart
Manual Transaxle Lubricant (PN 04874465).
(14) Lower vehicle.
(15) Connect vehicle speed sensor connector (Fig.
39).
(16) Connect shift crossover and selector cables to
shift lever. Install cables to bracket and install
retaining clips (Fig. 38).
(17) Connect clutch cable to fork and secure to
transaxle (Fig. 37).
(18) Install bellhousing cap (Fig. 37).
(19) Connect back-up lamp switch connector.
(20) Connect ground strap to transaxle upper
mount bracket.
(21) Install battery lower tray and battery, and
tighten battery hold down clamp to secure battery.
Fig. 42 Starter Motor Removal/InstallationÐTypical
1 ± BOLT
2 ± GROUND
3±STARTER
4 ± BOLT
Fig. 43 Transaxle Upper Mount Thru-BoltÐTypical
1 ± MOUNT BRACKET
2 ± BOLT
3 ± MOUNT
21 - 16 TRANSAXLEPL
REMOVAL AND INSTALLATION (Continued)
Page 930 of 1285
(22) Install the air cleaner/throttle body assy. as
follows:
(a) Connect the accelerator and speed control (if
equipped) cables to the air cleaner/throttle body
assy.
(b) Install assy into position, making sure the
air cleaner locating slot is engaged to the battery
bracket tab, and tighten fasteners to 14 N´m (120
in. lbs.) torque.
(c) Verify throttle body duct is fully seated to
intake manifold and tighten clamp to 5 N´m (40 in.
lbs.) torque.
(d) Connect the Throttle Position Sensor (TPS)
and Idle Air Control (IAC) connectors.
(e) Connect proportional purge solenoid (PPS)
and crankcase vent hose from throttle body.
(23) Connect the battery cables.
(24) Road test vehicle and inspect for leaks.
Fig. 44 Transaxle Removal/Installation
1 ± MODULAR CLUTCH ASSEMBLY
2 ± CLIP3 ± TRANSAXLE
4 ± CLUTCH MODULE BOLT (4)
Fig. 45 Transaxle Upper Mount and Bracket
1 ± MOUNT
2 ± TRANSAXLE
PLTRANSAXLE 21 - 17
REMOVAL AND INSTALLATION (Continued)
Page 950 of 1285
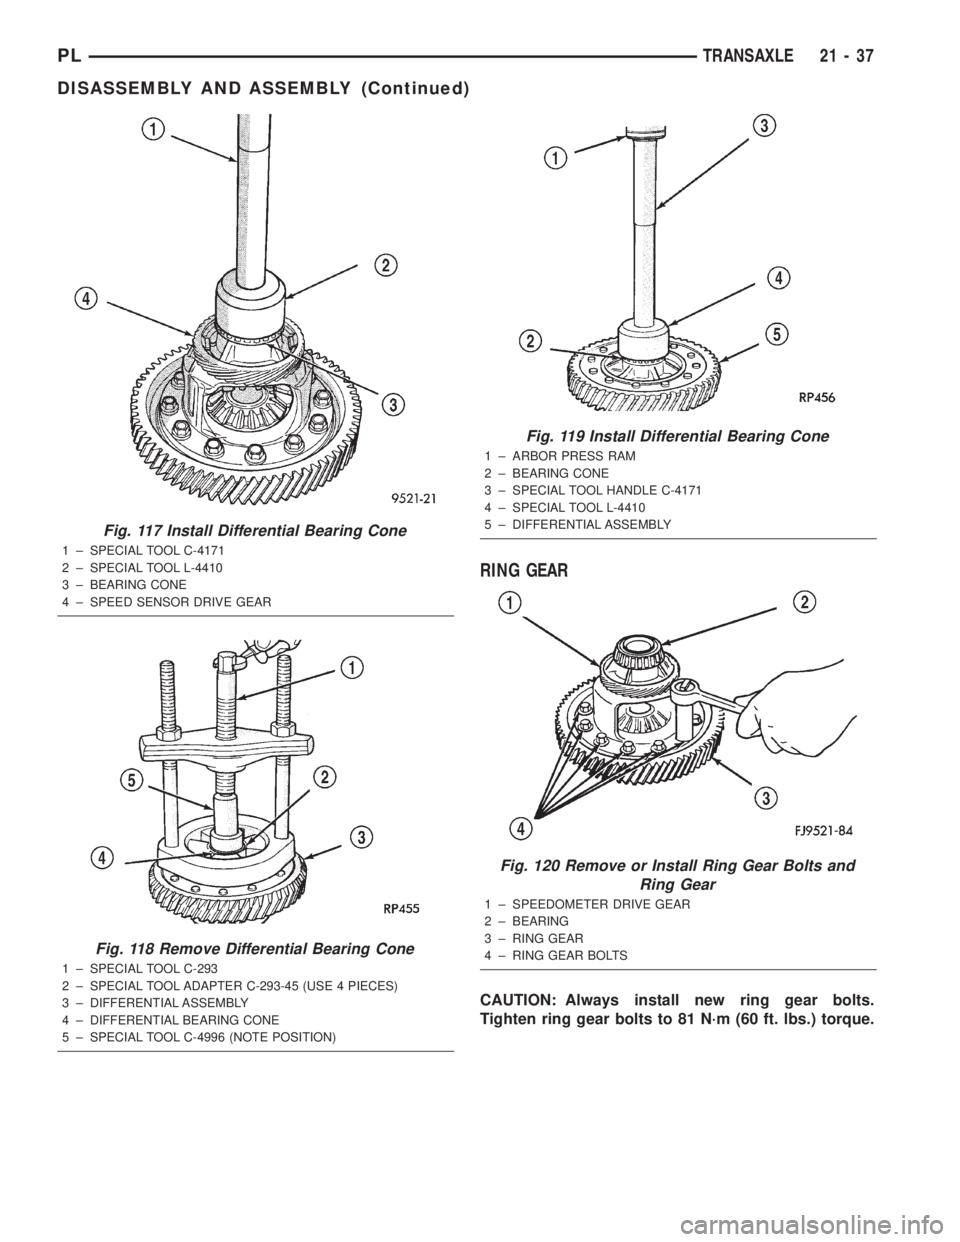
RING GEAR
CAUTION: Always install new ring gear bolts.
Tighten ring gear bolts to 81 N´m (60 ft. lbs.) torque.
Fig. 117 Install Differential Bearing Cone
1 ± SPECIAL TOOL C-4171
2 ± SPECIAL TOOL L-4410
3 ± BEARING CONE
4 ± SPEED SENSOR DRIVE GEAR
Fig. 118 Remove Differential Bearing Cone
1 ± SPECIAL TOOL C-293
2 ± SPECIAL TOOL ADAPTER C-293-45 (USE 4 PIECES)
3 ± DIFFERENTIAL ASSEMBLY
4 ± DIFFERENTIAL BEARING CONE
5 ± SPECIAL TOOL C-4996 (NOTE POSITION)
Fig. 119 Install Differential Bearing Cone
1 ± ARBOR PRESS RAM
2 ± BEARING CONE
3 ± SPECIAL TOOL HANDLE C-4171
4 ± SPECIAL TOOL L-4410
5 ± DIFFERENTIAL ASSEMBLY
Fig. 120 Remove or Install Ring Gear Bolts and
Ring Gear
1 ± SPEEDOMETER DRIVE GEAR
2 ± BEARING
3 ± RING GEAR
4 ± RING GEAR BOLTS
PLTRANSAXLE 21 - 37
DISASSEMBLY AND ASSEMBLY (Continued)
Page 964 of 1285
(8) Remove case bolts. Remove clutch bellhousing
differential bearing cup. Install shim(s) selected in
Step 7. Then press the bearing cup into clutch bell-
housing.
(9) Install clutch bellhousing. Install and torque
case bolts to 26 N´m (19 ft. lbs.).
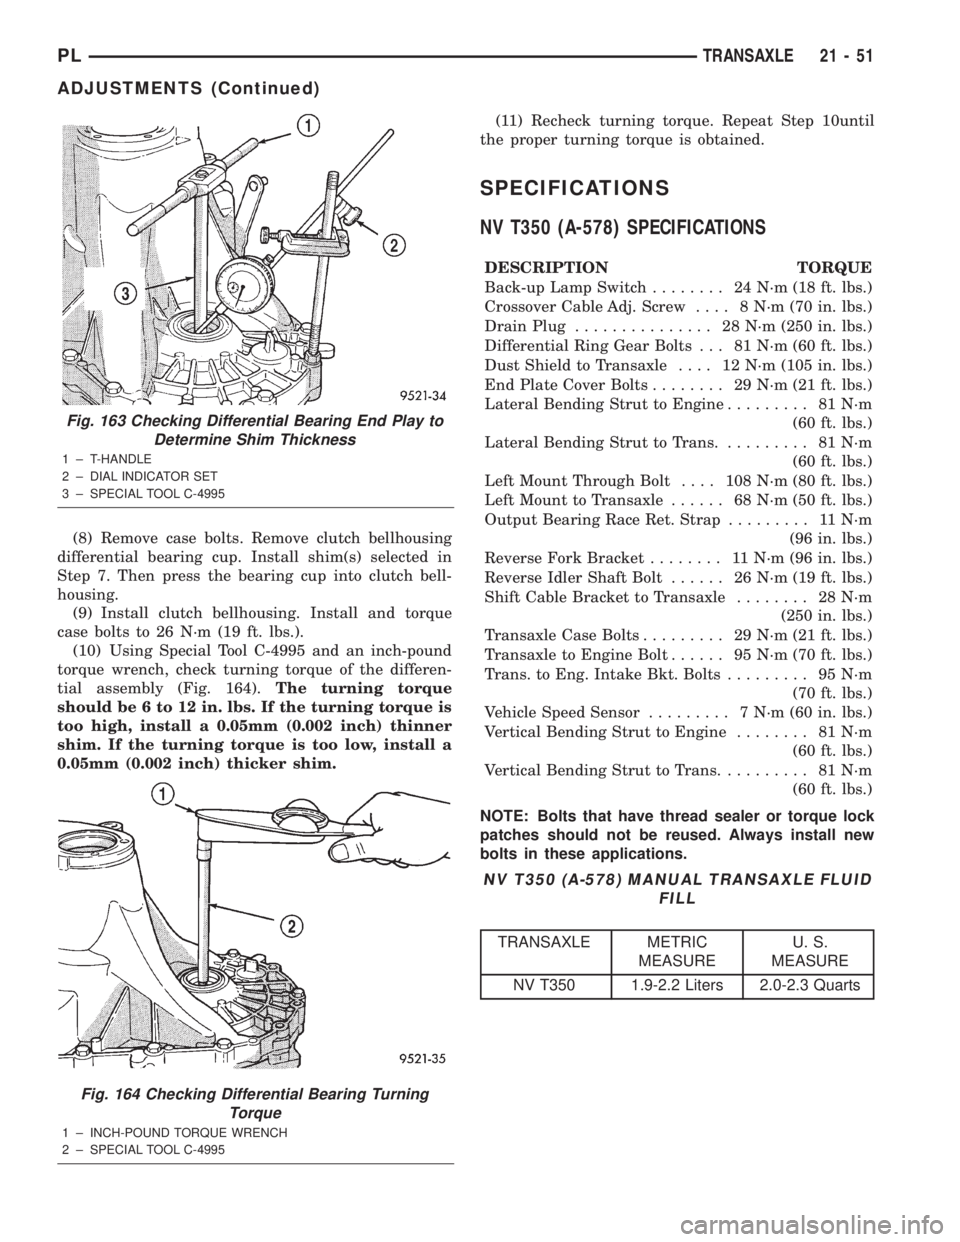
(10) Using Special Tool C-4995 and an inch-pound
torque wrench, check turning torque of the differen-
tial assembly (Fig. 164).The turning torque
should be 6 to 12 in. lbs. If the turning torque is
too high, install a 0.05mm (0.002 inch) thinner
shim. If the turning torque is too low, install a
0.05mm (0.002 inch) thicker shim.(11) Recheck turning torque. Repeat Step 10until
the proper turning torque is obtained.
SPECIFICATIONS
NV T350 (A-578) SPECIFICATIONS
DESCRIPTION TORQUE
Back-up Lamp Switch........ 24N´m(18ft.lbs.)
Crossover Cable Adj. Screw.... 8N´m(70in.lbs.)
Drain Plug............... 28N´m(250 in. lbs.)
Differential Ring Gear Bolts . . . 81 N´m (60 ft. lbs.)
Dust Shield to Transaxle.... 12N´m(105 in. lbs.)
End Plate Cover Bolts........ 29N´m(21ft.lbs.)
Lateral Bending Strut to Engine......... 81N´m
(60 ft. lbs.)
Lateral Bending Strut to Trans.......... 81N´m
(60 ft. lbs.)
Left Mount Through Bolt.... 108N´m(80ft.lbs.)
Left Mount to Transaxle...... 68N´m(50ft.lbs.)
Output Bearing Race Ret. Strap......... 11N´m
(96 in. lbs.)
Reverse Fork Bracket........ 11N´m(96in.lbs.)
Reverse Idler Shaft Bolt...... 26N´m(19ft.lbs.)
Shift Cable Bracket to Transaxle........ 28N´m
(250 in. lbs.)
Transaxle Case Bolts......... 29N´m(21ft.lbs.)
Transaxle to Engine Bolt...... 95N´m(70ft.lbs.)
Trans. to Eng. Intake Bkt. Bolts......... 95N´m
(70 ft. lbs.)
Vehicle Speed Sensor......... 7N´m(60in.lbs.)
Vertical Bending Strut to Engine........ 81N´m
(60 ft. lbs.)
Vertical Bending Strut to Trans.......... 81N´m
(60 ft. lbs.)
NOTE: Bolts that have thread sealer or torque lock
patches should not be reused. Always install new
bolts in these applications.
Fig. 163 Checking Differential Bearing End Play to
Determine Shim Thickness
1 ± T-HANDLE
2 ± DIAL INDICATOR SET
3 ± SPECIAL TOOL C-4995
Fig. 164 Checking Differential Bearing Turning
Torque
1 ± INCH-POUND TORQUE WRENCH
2 ± SPECIAL TOOL C-4995
NV T350 (A-578) MANUAL TRANSAXLE FLUID
FILL
TRANSAXLE METRIC
MEASUREU. S.
MEASURE
NV T350 1.9-2.2 Liters 2.0-2.3 Quarts
PLTRANSAXLE 21 - 51
ADJUSTMENTS (Continued)
Page 967 of 1285
31TH AUTOMATIC TRANSAXLE
TABLE OF CONTENTS
page page
GENERAL INFORMATION
IN VEHICLE SERVICE.....................55
FLUID REQUIREMENTS...................55
DESCRIPTION AND OPERATION
31TH GENERAL INFORMATION..............55
FLUID LEVEL AND CONDITION..............56
TORQUE CONVERTER CLUTCH.............56
HYDRAULIC CONTROL SYSTEM.............56
PRESSURE SUPPLY SYSTEM...............56
PRESSURE REGULATING VALVES...........56
FLOW CONTROL VALVES..................56
CLUTCHES, BAND SERVOS, AND
ACCUMULATOR........................57
BRAKE TRANSMISSION SHIFT INTERLOCK
SYSTEM..............................57
GEARSHIFT AND PARKING LOCK CONTROLS . . 57
COOLER BYPASS VALVE..................57
TORQUE CONVERTER CLUTCH SOLENOID
WIRING CONNECTOR...................58
GOVERNOR.............................58
DIAGNOSIS AND TESTING
TRANSAXLE PRELIMINARY DIAGNOSIS.......58
ROAD TEST.............................65
HYDRAULIC PRESSURE TESTS.............66
CLUTCH AND SERVO AIR PRESSURE TESTS . . 68
FLUID LEAKAGE-TRANSAXLE TORQUE
CONVERTER HOUSING AREA.............70
BRAKE TRANSMISSION SHIFT INTERLOCK....70
SERVICE PROCEDURES
TRANSAXLE FLUID AND FILTER SERVICE.....70
ALUMINUM THREAD REPAIR...............71
FLUSHING COOLERS AND TUBES...........72
OIL PUMP VOLUME CHECK................72
REMOVAL AND INSTALLATION
GEARSHIFT CABLE.......................73
GEARSHIFT MECHANISM..................76
THROTTLE VALVE (KICKDOWN) CABLE.......77
BRAKE TRANSMISSION SHIFT INTERLOCK
CABLE...............................79
INTERLOCK MECHANISM..................82
VEHICLE SPEED SENSOR PINION GEAR......83
PARK/NEUTRAL STARTING AND BACK-UP
LAMP SWITCH.........................84TRANSAXLE AND TORQUE CONVERTER......84
PUMP OIL SEAL.........................88
DISASSEMBLY AND ASSEMBLY
TRANSAXLE............................89
VALVE BODY............................91
OIL PUMP.............................104
FRONT CLUTCH........................105
REAR CLUTCH ASSEMBLY................108
FRONT PLANETARY AND ANNULUS
GEAR-RECONDITION...................110
LOW/REVERSE (REAR) SERVO-
RECONDITION........................112
ACCUMULATOR-RECONDITION............113
KICKDOWN SERVO (CONTROLLED LOAD)-
RECONDITION........................113
TRANSFER SHAFT REPAIR................114
PARKING PAWL.........................121
OUTPUT SHAFT REPAIR..................121
DIFFERENTIAL REPAIR...................129
CLEANING AND INSPECTION
VALVE BODY...........................135
ADJUSTMENTS
GEARSHIFT CABLE......................135
THROTTLE VALVE CABLE ADJUSTMENT
PROCEDURE.........................136
BRAKE TRANSMISSION SHIFT INTERLOCK
SYSTEM.............................137
BAND ADJUSTMENT.....................138
HYDRAULIC CONTROL PRESSURE
ADJUSTMENTS.......................138
BEARING ADJUSTMENT PROCEDURES......138
OUTPUT SHAFT BEARING................139
DIFFERENTIAL BEARING.................139
TRANSFER SHAFT BEARING..............140
SCHEMATICS AND DIAGRAMS
31TH TRANSAXLE HYDRAULIC SCHEMATIC . . 142
SPECIFICATIONS
31TH AUTOMATIC TRANSAXLE.............150
31TH TRANSAXLE TORQUE SPECIFICATIONS . 150
SPECIAL TOOLS
31TH AUTOMATIC TRANSAXLE.............151
21 - 54 TRANSAXLEPL
Page 968 of 1285
GENERAL INFORMATION
IN VEHICLE SERVICE
The following components are serviceable in the
vehicle without transaxle removal:
²Valve Body Assembly
²Converter Clutch Solenoid
²Governor
²Vehicle Speed Sensor & Pinion
²Park/Neutral & Back-up Lamp Switch
²Transfer Gears and Transfer Shaft
²Low/Reverse Servo
²Kickdown Servo
²Accumulator
FLUID REQUIREMENTS
NOTE: The transmission and differential have a
common oil sump with an opening between the
two.
TRANSMISSION/DIFFERENTIAL
MopartATF+4 (Automatic Transmission Fluid
Type 9602) is required in this transaxle. Substitute
fluids must meet fluid specification MS-9602.
FLUID ADDITIVES
Chrysler Corporation strongly recommends against
the addition of any fluids to the transmission, other
than those automatic transmission fluids listed
above. Exceptions to this policy are the use of special
dyes to aid in detecting fluid leaks.
Various ªspecialº additives and supplements exist
that claim to improve shift feel/quality and converter
clutch operation, inhibit overheating, oxidation, var-
nish and sludge. These claims have not been sup-
ported to Chrysler's satisfaction and these additives
must not be used. The use of transmission ªsealersº
should also be avoided, since they may adversely
affect the integrity of tranmission seals.
DESCRIPTION AND OPERATION
31TH GENERAL INFORMATION
NOTE: Safety goggles should be worn at all times
when working on these transaxles.
This transaxle combines torque converter, three
speed transmission, final drive gearing, and differen-
tial into a front wheel drive system.
NOTE: Transaxle operation requirements are differ-
ent for each vehicle and engine combination. Some
internal parts will be different to provide for this.Therefore, when replacing parts, refer to the seven
digit part number stamped on rear of the transaxle
oil pan flange.
Within this transaxle, there are three primary
areas:
(1) Main center line plus valve body.
(2) Transfer shaft center line (includes governor
and parking sprag).
(3) Differential center line.
Center distances between the main rotating parts
in these three areas are held precise to maintain a
low noise level.
The torque converter, transaxle area, and differen-
tial are housed in an integral aluminum die casting.
The differential oil sump is common with the
transaxle sump. Separate filling of the differen-
tial is NOT necessary.
The torque converter is attached to the crankshaft
through a flexible driving plate. Cooling of the con-
verter is accomplished by circulating the transaxle
fluid through a remote cooler. There are two types of
coolers used. An oil-to-water type cooler located in
the radiator side tank and/or an oil-to-air heat
exchanger. The torque converter assembly is a sealed
unit that cannot be disassembled.
The transaxle fluid is filtered by an internal filter
attached to the lower side of the valve body assembly.
Engine torque is transmitted to the torque con-
verter and then through the input shaft to multiple-
disc clutches in the transaxle. The power flow
depends on the application of the clutches and bands.
Refer to Elements in Use Chart in Diagnosis and
Tests section.
The transaxle consists of:
²Two multiple-disc clutches
²An overrunning clutch
²Two servos
²A hydraulic accumulator
²Two bands
²Two planetary gear sets
This provides three forward ratios and a reverse
ratio. The common sun gear of the planetary gear
sets is connected to the front clutch by a driving
shell. The driving shell is splined to the sun gear and
front clutch retainer. The hydraulic system consists
of an oil pump and a single valve body which con-
tains all of the valves except the governor valves.
The transaxle sump and differential sump are both
vented through the dipstick. Output torque from the
main center line is delivered through helical gears to
the transfer shaft. This gear set is a factor in the
transaxle final drive (axle) ratio. The shaft also car-
ries the governor and parking sprag. An integral heli-
cal gear on the transfer shaft drives the differential
ring gear.
PLTRANSAXLE 21 - 55
Page 987 of 1285
(6) Disconnect both battery cables, remove battery
hold down clamp and bolt, and remove battery.
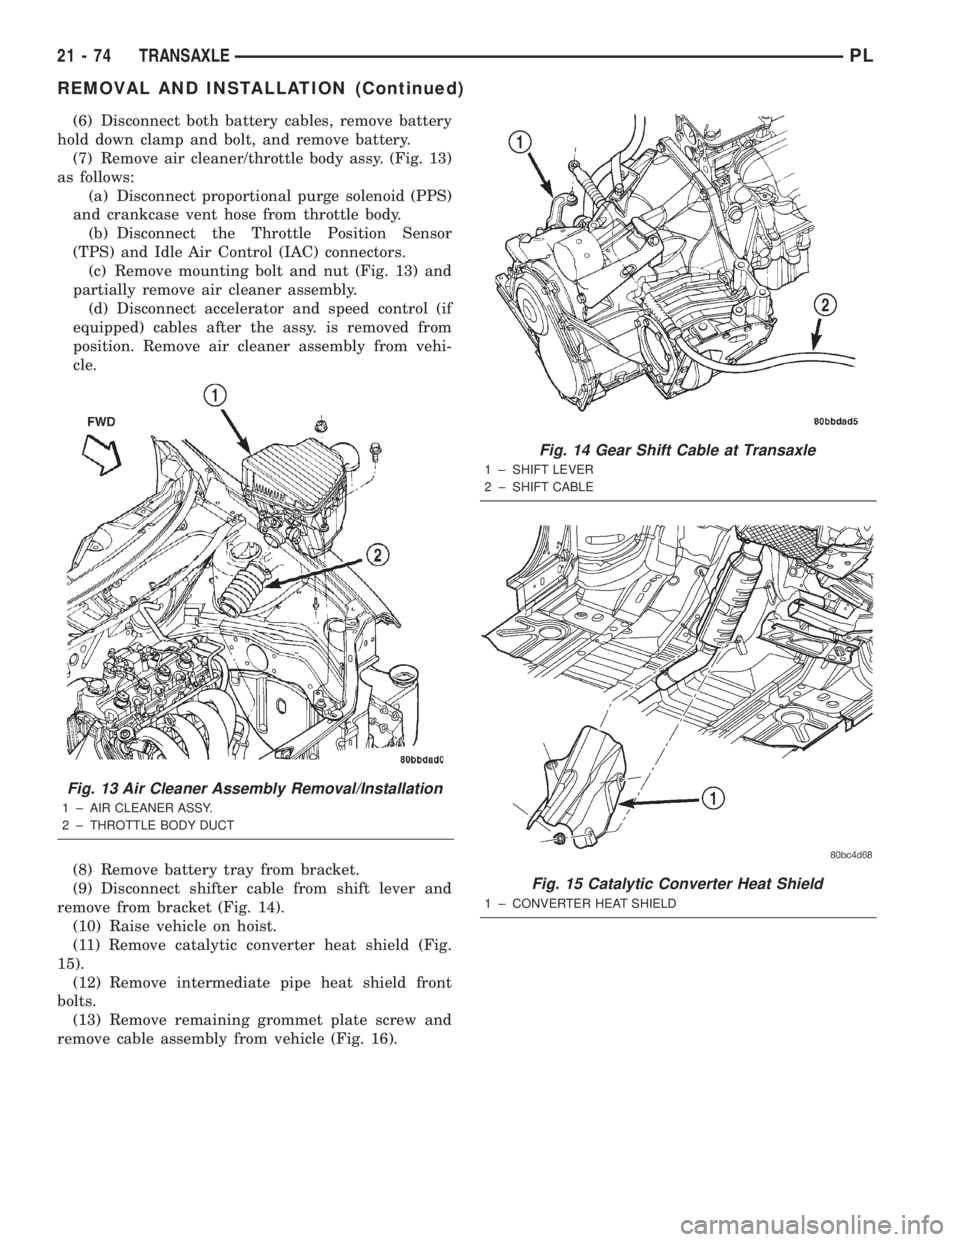
(7) Remove air cleaner/throttle body assy. (Fig. 13)
as follows:
(a) Disconnect proportional purge solenoid (PPS)
and crankcase vent hose from throttle body.
(b) Disconnect the Throttle Position Sensor
(TPS) and Idle Air Control (IAC) connectors.
(c) Remove mounting bolt and nut (Fig. 13) and
partially remove air cleaner assembly.
(d) Disconnect accelerator and speed control (if
equipped) cables after the assy. is removed from
position. Remove air cleaner assembly from vehi-
cle.
(8) Remove battery tray from bracket.
(9) Disconnect shifter cable from shift lever and
remove from bracket (Fig. 14).
(10) Raise vehicle on hoist.
(11) Remove catalytic converter heat shield (Fig.
15).
(12) Remove intermediate pipe heat shield front
bolts.
(13) Remove remaining grommet plate screw and
remove cable assembly from vehicle (Fig. 16).
Fig. 13 Air Cleaner Assembly Removal/Installation
1 ± AIR CLEANER ASSY.
2 ± THROTTLE BODY DUCT
Fig. 14 Gear Shift Cable at Transaxle
1 ± SHIFT LEVER
2 ± SHIFT CABLE
Fig. 15 Catalytic Converter Heat Shield
1 ± CONVERTER HEAT SHIELD
21 - 74 TRANSAXLEPL
REMOVAL AND INSTALLATION (Continued)