1999 TOYOTA CAMRY brake
[x] Cancel search: brakePage 4037 of 4592

G ELECTRICAL WIRING ROUTING
Position of Parts in Engine Compartment
A 1 A/C Condenser Fan Motor
A 2 A/C Magnetic Clutch and Lock Sensor
A 3 A/C Triple Pressure SW
(A/C Dual and Single Pressure SW)
A 4 ABS Actuator
A 5 ABS Actuator
A 6 ABS Speed Sensor Front LH
A 7 ABS Speed Sensor Front RH
A 8 Air Fuel Ratio Sensor
A 9 Airbag Sensor Front LH
A 10 Airbag Sensor Front RH
B 1 Brake Fluid Level Warning SW
C 1 Camshaft Position Sensor
C 2 Crankshaft Position Sensor
C 3 Cruise Control Actuator
D 1 Data Link Connector 1
E 1 Electronically Controlled Transmission Solenoid
E 2 Electronically Controlled Transmission Solenoid
E 3 Engine Coolant Temp. SensorF 1 Front Turn Signal Light and Parking Light LH
F 2 Front Turn Signal Light and Parking Light RH
F 3 Front Wiper Motor
F 4 Fuel Pressure Sensor (Delivery Pipe)
F 5 Fuel Pressure Sensor (Fuel Pipe)
F 6 Fuel Shutoff Valve (Delivery Pipe)
F 7 Fuel Shutoff Valve (Fuel Pressure Regulator)
F 8 Fuel Temp. Sensor (Delivery Pipe)
F 9 Fusible Link Block
F 10 Fusible Link Block
F 11 Fusible Link Block
F 12 Fusible Link Block
F 13 Fusible Link Block
F 14 Fusible Link Block
G 1 Generator
G 2 Generator
H 1 Headlight LH
H 2 Headlight RH
H 3 Horn (High)
H 4 Horn (Low)
Page 4040 of 4592

G
Position of Parts in Instrument Panel
J 1 Junction Connector
J 2 Junction Connector
J 3 Junction Connector
J 4 Junction Connector
J 5 Junction Connector
J 6 Junction Connector
J 7 Junction Connector
J 8 Junction Connector
J 9 Junction Connector
J 10 Junction Connector
J 11 Junction Connector
J 12 Junction Connector
J 13 Junction Connector
J 14 Junction Connector
J 15 Junction Connector
J 16 Junction Connector
J 17 Junction Connector
J 18 Junction Connector
J 19 Junction Connector
J 20 Junction Connector
J 21 Junction Connector
J 22 Junction Connector
J 23 Junction Connector
J 24 Junction Connector
J 25 Junction Connector
J 26 Junction ConnectorJ 27 Junction Connector
J 28 Junction Connector
J 29 Junction Connector
J 30 Junction Connector
J 31 Junction Connector
J 32 Junction Connector
K 1 Key Interlock Solenoid
O 2 O/D Main SW and A/T Shift Lever Illumination
P 3 Parking Brake SW
P 4 Power Outlet
R 2 Radio and Player
R 3 Radio and Player
R 4 Rear Window Defogger SW
R 5 Remote Control Mirror SW
R 6 Rheostat
S 3 Shift Lock ECU
S 4 Stop Light SW
T 2 Turn Signal Flasher
U 1 Unlock Warning SW
Page 4082 of 4592

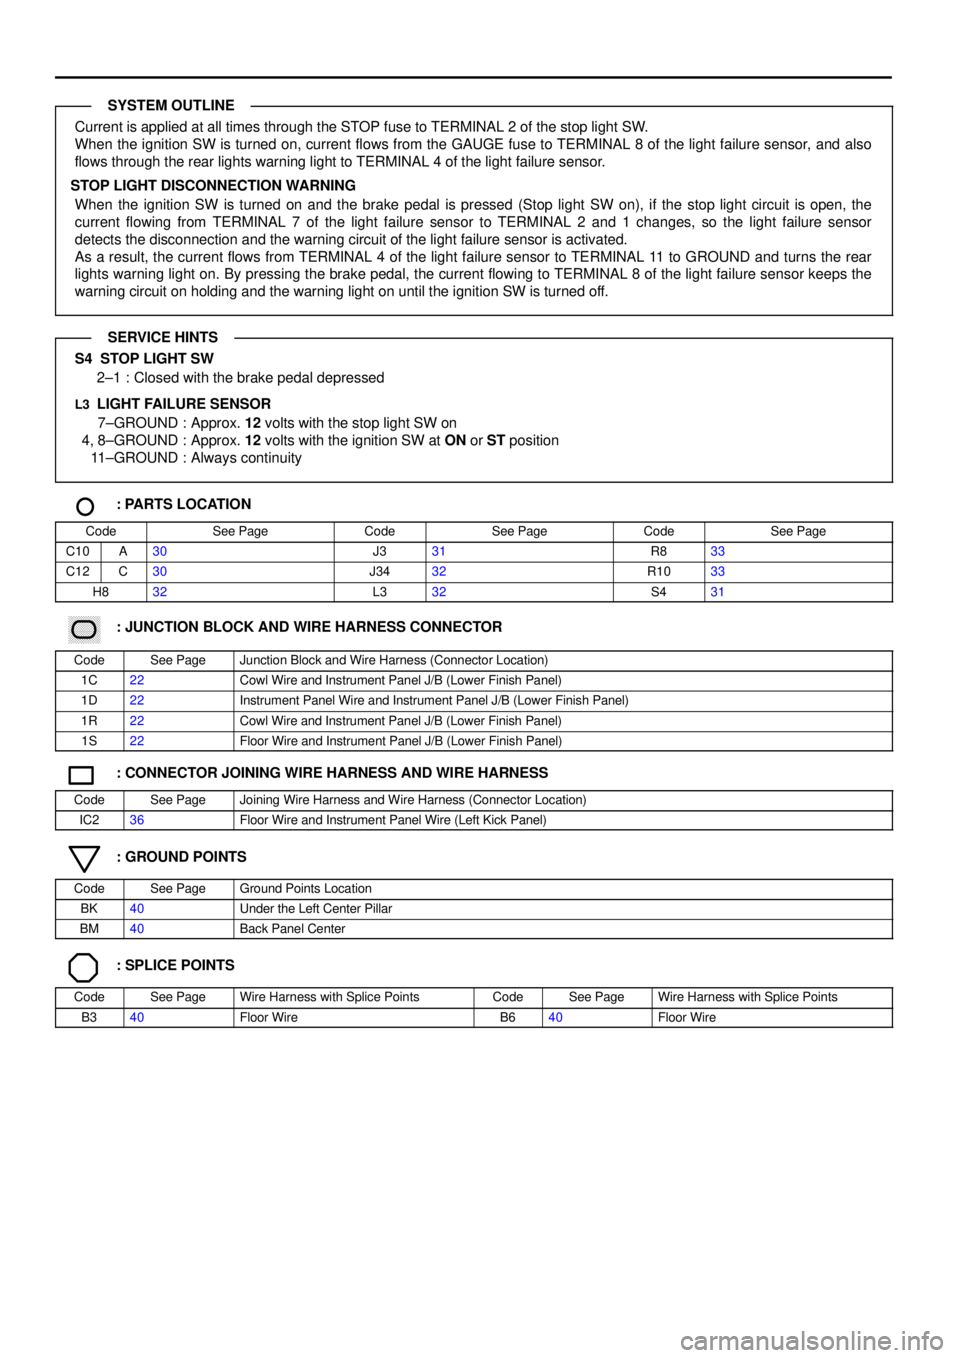
Current is applied at all times through the STOP fuse to TERMINAL 2 of the stop light SW.
When the ignition SW is turned on, current flows from the GAUGE fuse to TERMINAL 8 of the light failure sensor, and also
flows through the rear lights warning light to TERMINAL 4 of the light failure sensor.
STOP LIGHT DISCONNECTION WARNING
When the ignition SW is turned on and the brake pedal is pressed (Stop light SW on), if the stop light circuit is open, the
current flowing from TERMINAL 7 of the light failure sensor to TERMINAL 2 and 1 changes, so the light failure sensor
detects the disconnection and the warning circuit of the light failure sensor is activated.
As a result, the current flows from TERMINAL 4 of the light failure sensor to TERMINAL 11 to GROUND and turns the rear
lights warning light on. By pressing the brake pedal, the current flowing to TERMINAL 8 of the light failure sensor keeps the
warning circuit on holding and the warning light on until the ignition SW is turned off.
S4 STOP LIGHT SW
2±1 : Closed with the brake pedal depressed
L3 LIGHT FAILURE SENSOR
7±GROUND : Approx. 12 volts with the stop light SW on
4, 8±GROUND : Approx. 12 volts with the ignition SW at ON or ST position
11±GROUND : Always continuity
: PARTS LOCATION
CodeSee PageCodeSee PageCodeSee Page
C10A30J331R833
C12C30J3432R1033
H832L332S431
������ ���: JUNCTION BLOCK AND WIRE HARNESS CONNECTOR
CodeSee PageJunction Block and Wire Harness (Connector Location)
1C22Cowl Wire and Instrument Panel J/B (Lower Finish Panel)
1D22Instrument Panel Wire and Instrument Panel J/B (Lower Finish Panel)
1R22Cowl Wire and Instrument Panel J/B (Lower Finish Panel)
1S22Floor Wire and Instrument Panel J/B (Lower Finish Panel)
: CONNECTOR JOINING WIRE HARNESS AND WIRE HARNESS
CodeSee PageJoining Wire Harness and Wire Harness (Connector Location)
IC236Floor Wire and Instrument Panel Wire (Left Kick Panel)
: GROUND POINTS
CodeSee PageGround Points Location
BK40Under the Left Center Pillar
BM40Back Panel Center
: SPLICE POINTS
CodeSee PageWire Harness with Splice PointsCodeSee PageWire Harness with Splice Points
B340Floor WireB640Floor Wire
SYSTEM OUTLINE
SERVICE HINTS
Page 4112 of 4592

The electronically controlled transmission, however, electrically controls the line pressure and lock±up pressure etc., through
the solenoid valve. Engine control module controls of the solenoid valve based on the input signals from each sensor which
makes smooth driving possible by shift selection for each gear which is most appropriate to the driving conditions at that
time.
1. GEAR SHIFT OPERATION
During driving, the engine control module selects the shift for each gear which is most appropriate to the driving conditions,
based on input signals from the engine coolant temp. sensor to TERMINAL THW of the engine control module, and also the
input signals to TERMINAL SPD of the engine control module from the vehicle speed sensor devoted to the electronically
controlled transmission. Current is then output to the electronically controlled transmission solenoid. When shifting to 1st
gear, current flows from TERMINAL S1 of the engine control module to TERMINAL (B) 3 of the solenoid to GROUND, and
continuity to the No.1 solenoid causes the shift.
For 2nd gear, current flows from TERMINAL S1 of the engine control module to TERMINAL (B) 3 of the solenoid to
GROUND, and from TERMINAL S2 of the engine control module to TERMINAL (B) 1 of the solenoid to GROUND, and
continuity to solenoids No.1 and No.2 causes the shift.
For 3rd gear, there is no continuity to No.1 solenoid, only to No.2, causing the shift.
Shifting into 4th gear (Overdrive) takes place when there is no continuity to either No.1 or No.2 solenoid.
2. LOCK±UP OPERATION
When the engine control module judges from each signal that lock±up operation conditions have been met, current flows
from TERMINAL SL of the engine control module to TERMINAL (A) 1 of the electronically controlled transmission solenoid to
GROUND, causing continuity to the lock±up solenoid and causing lock±up operation.
3. STOP LIGHT SW CIRCUIT
If the brake pedal is depressed (Stop light SW on) when driving in lock±up condition, a signal is input to TERMINAL STP of
the engine control module, the engine control module operates and continuity to the lock±up solenoid is cut.
4. OVERDRIVE CIRCUIT
*O/D main SW on
When the O/D main SW is turned on (O/D off indicator light turns off), a signal is input into TERMINAL OD2 of the engine
control module and engine control module operation causes gear shift when the conditions for overdrive are met.
*O/D main SW off
When the O/D main SW is turned to off, the current through the O/D off indicator light flows through the O/D main SW to
GROUND, causing the indicator light to light up. At the same time, a signal is input into TERMINAL OD2 of the engine
control module and engine control module operation prevents shift into overdrive.
E4 (A), E5 (B), E6 (C) ENGINE CONTROL MODULE
S1, S2±E1 :9.0±14.0 volts with the solenoid on
0±1.5 volts with the solenoid off
L±E1 :7.5±14.0 volts with the shift lever at L position
2±E1 :7.5±14.0 volts with the shift lever at 2 position
R±E1 :7.5±14.0 volts with the shift lever at R position
STP±E1 :9.0±14.0 volts with the brake pedal depressed
THW±E2 :0.2±1.0 volts with the ignition SW on and coolant temp. 80°C (176°F)
VTA±E2 :0.3±0.8 volts with the throttle valve fully closed
3.2±4.9 volts with the throttle valve fully opened
VC±E2 :4.5±5.5 volts
OD2±E1 :9.0±14.0 volts with the O/D main SW turned on
0±3.0 volts with the O/D main SW turned off
+B±E1 :9.0±14.0 volts
O2 O/D MAIN SW
2±4 : Closed with the O/D main SW off, open with the O/D main SW on
SYSTEM OUTLINE
SERVICE HINTS
Page 4117 of 4592

CRUISE CONTROL
The cruise control system is a constant vehicle speed controller which controls the opening angle of the engine throttle valve
by the SW, and allows driving at a constant speed without depressing the accelerator pedal.
SET CONTROL
When the SET/COAST SW is operated while traveling with the CRUISE SW on, the speed when the SET/COAST SW is
operated to off is memorized, and the vehicle speed is controlled at that speed.
COAST CONTROL
When the SET/COAST SW is operated to on, the motor in the actuator rotates the throttle valve until it is closed fully to
decrease the vehicle speed, and the speed when the SET/COAST SW is operated to off is memorized, and the vehicle
speed is controlled at that speed.
Furthermore, every time the SET/COAST SW is operated momentarily (Approx. 0.5 sec.) to on, the memorized vehicle
speed is decreased by approx. 1.5 km/h (0.9 mph).
ACCEL CONTROL
When the RESUME/ACCEL SW is operated to on, the motor in the actuator rotates the throttle valve to open direction to
increase the vehicle speed, and the speed when the RESUME/ACCEL SW is operated to off is memorized, and the vehicle
speed is controlled at that speed.
Furthermore, every time the RESUME/ACCEL SW is operated momentarily (Approx. 0.5 sec.) to on, the memorized vehicle
speed is increased by approx. 1.5 km/h (0.9 mph).
MANUAL CANCEL MECHANISM
While traveling with the cruise control, if the following signal is input, the magnetic clutch of the actuator is cut, the motor is
controlled to close the throttle valve, and the cruise control is canceled.
(1) Stop lamp SW is on (Brake pedal is depressed)
(2) The CANCEL SW of the control SW is on
(3) CRUISE SW is off
RESUME CONTROL
After canceling the cruise control by the Manual Cancel operation, (Except when the CRUISE SW is off) if the vehicle speed
is above the minimum speed limit (Approx. 40km/h, 25mph), operating the RESUME/ACCEL SW to on from off will cause the
system to accelerate and resume to the vehicle speed before manual cancellation.
OVERDRIVE FUNCTION
The overdrive may be cut on an uphill grade, while traveling with the cruise control.
After the overdrive is cut, if the vehicle speed reaches the overdrive resume speed (Set speed minus 2 km/h (1.2 mph) ), and
if the system determines that the uphill grade has finished, the overdrive will resume after the overdrive timer operation.
AUTO CANCEL OPERATION
If any of the following conditions are detected, the set speed is erased and the control is canceled.
(1) Overcurrent to the magnetic clutch traction transistor
(2) The motor does not operate
(3) Short in the magnetic clutch
(4) Disconnection in the magnetic clutch (Includes blown stop lamp fuse)
(5) No vehicle speed signal input
(6) Ground short of the control SW input
(7) The actual vehicle speed becomes slower than the minimum speed limit
SYSTEM OUTLINE
Page 4121 of 4592

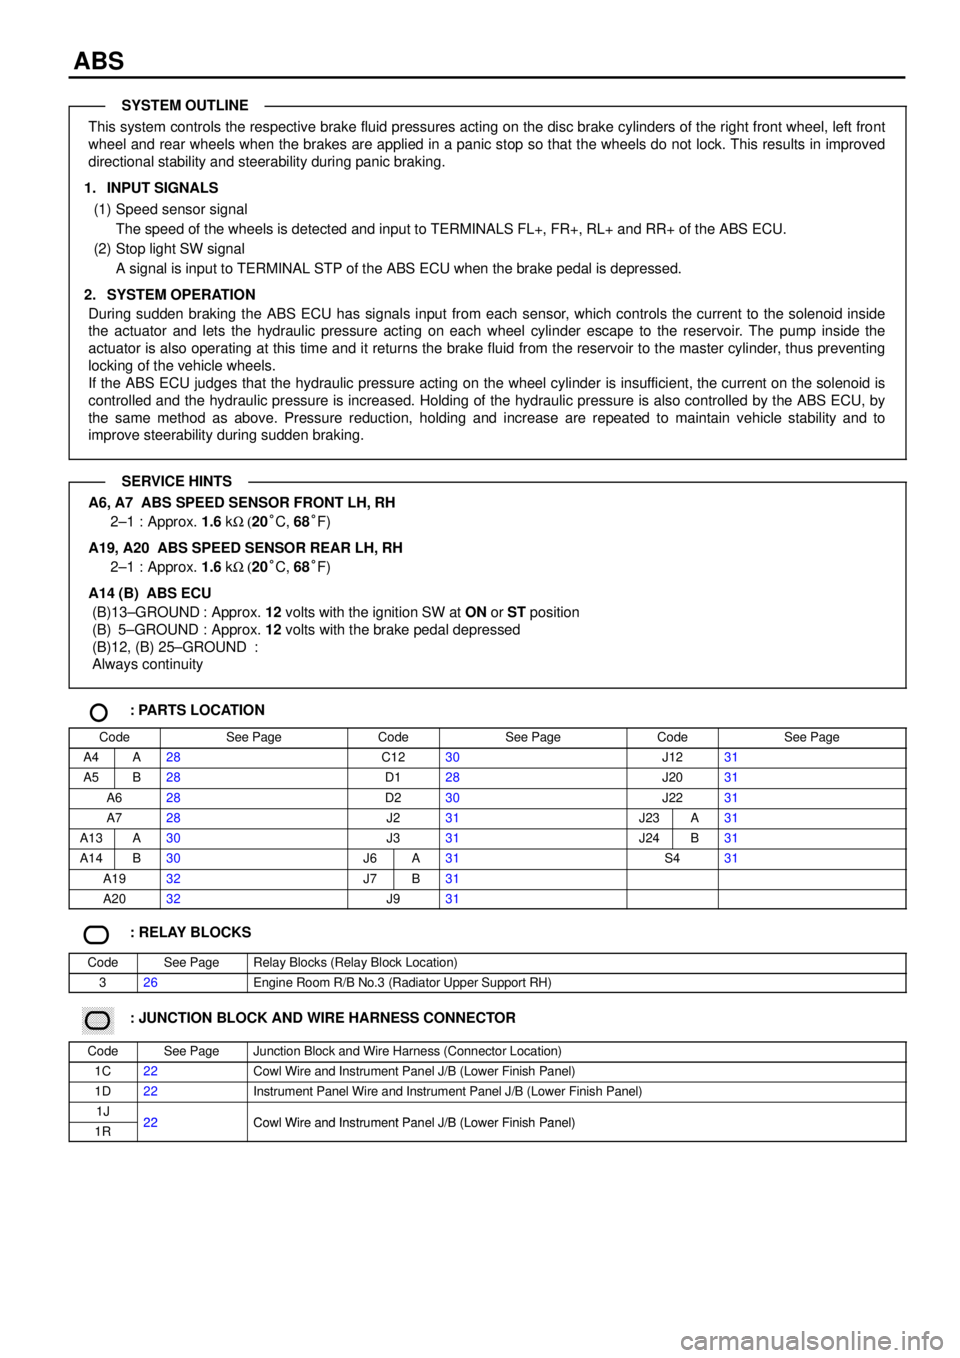
ABS
This system controls the respective brake fluid pressures acting on the disc brake cylinders of the right front wheel, left front
wheel and rear wheels when the brakes are applied in a panic stop so that the wheels do not lock. This results in improved
directional stability and steerability during panic braking.
1. INPUT SIGNALS
(1) Speed sensor signal
The speed of the wheels is detected and input to TERMINALS FL+, FR+, RL+ and RR+ of the ABS ECU.
(2) Stop light SW signal
A signal is input to TERMINAL STP of the ABS ECU when the brake pedal is depressed.
2. SYSTEM OPERATION
During sudden braking the ABS ECU has signals input from each sensor, which controls the current to the solenoid inside
the actuator and lets the hydraulic pressure acting on each wheel cylinder escape to the reservoir. The pump inside the
actuator is also operating at this time and it returns the brake fluid from the reservoir to the master cylinder, thus preventing
locking of the vehicle wheels.
If the ABS ECU judges that the hydraulic pressure acting on the wheel cylinder is insufficient, the current on the solenoid is
controlled and the hydraulic pressure is increased. Holding of the hydraulic pressure is also controlled by the ABS ECU, by
the same method as above. Pressure reduction, holding and increase are repeated to maintain vehicle stability and to
improve steerability during sudden braking.
A6, A7 ABS SPEED SENSOR FRONT LH, RH
2±1 : Approx. 1.6 kW (20°C, 68°F)
A19, A20 ABS SPEED SENSOR REAR LH, RH
2±1 : Approx. 1.6 kW (20°C, 68°F)
A14 (B) ABS ECU
(B)13±GROUND : Approx. 12 volts with the ignition SW at ON or ST position
(B) 5±GROUND : Approx. 12 volts with the brake pedal depressed
(B)12, (B) 25±GROUND :
Always continuity
: PARTS LOCATION
CodeSee PageCodeSee PageCodeSee Page
A4A28C1230J1231
A5B28D128J2031
A628D230J2231
A728J231J23A31
A13A30J331J24B31
A14B30J6A31S431
A1932J7B31
A2032J931
: RELAY BLOCKS
CodeSee PageRelay Blocks (Relay Block Location)
326Engine Room R/B No.3 (Radiator Upper Support RH)
������ ���: JUNCTION BLOCK AND WIRE HARNESS CONNECTOR
CodeSee PageJunction Block and Wire Harness (Connector Location)
1C22Cowl Wire and Instrument Panel J/B (Lower Finish Panel)
1D22Instrument Panel Wire and Instrument Panel J/B (Lower Finish Panel)
1J22Cowl Wire and Instrument Panel J/B (Lower Finish Panel)1R22Cowl Wire and Instrument Panel J/B (Lower Finish Panel)
SYSTEM OUTLINE
SERVICE HINTS
Page 4130 of 4592

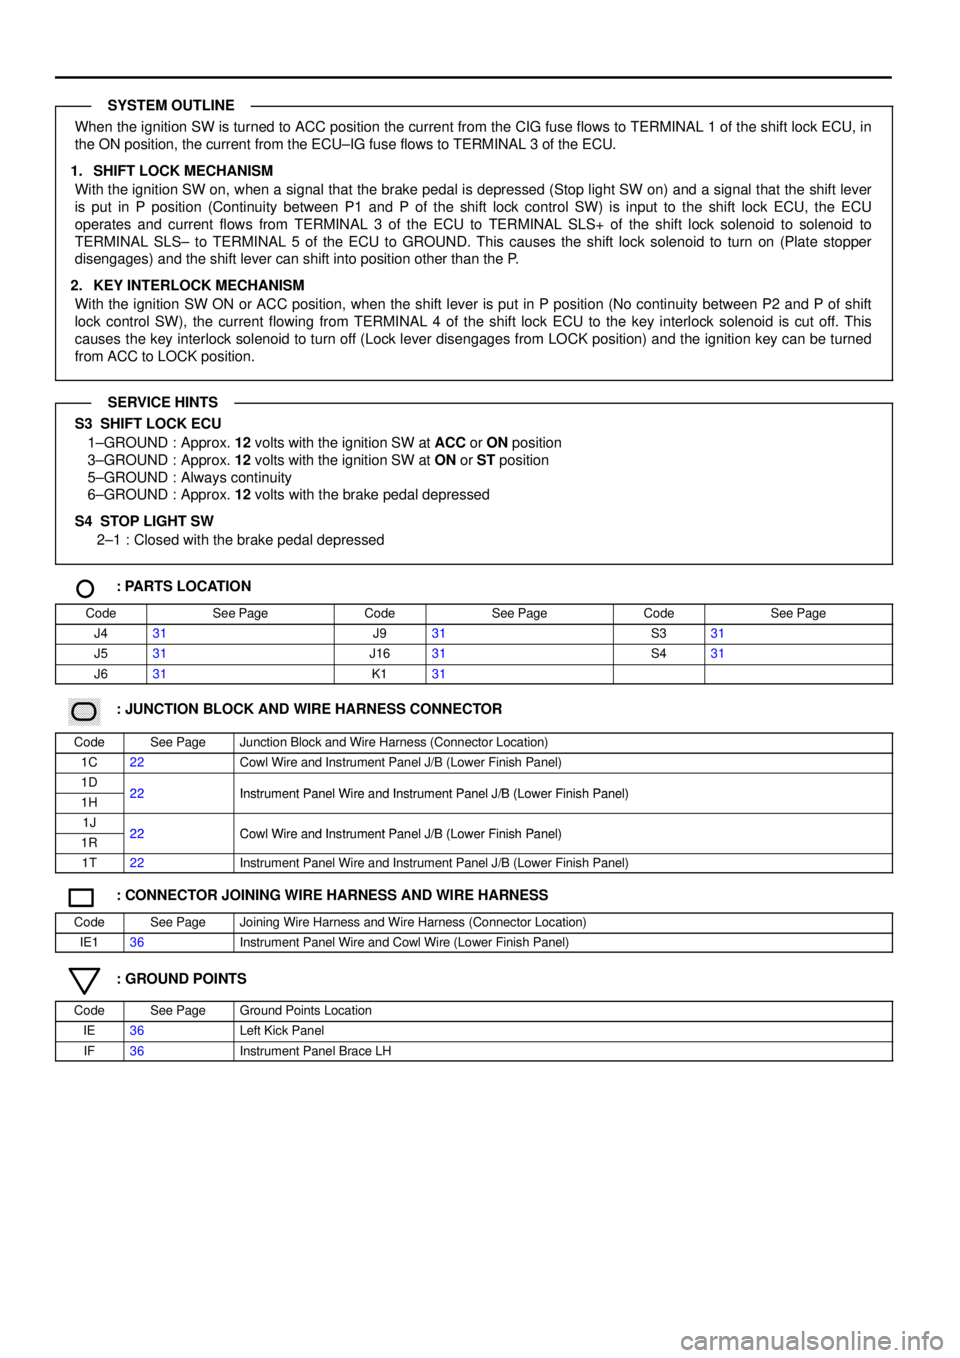
When the ignition SW is turned to ACC position the current from the CIG fuse flows to TERMINAL 1 of the shift lock ECU, in
the ON position, the current from the ECU±IG fuse flows to TERMINAL 3 of the ECU.
1. SHIFT LOCK MECHANISM
With the ignition SW on, when a signal that the brake pedal is depressed (Stop light SW on) and a signal that the shift lever
is put in P position (Continuity between P1 and P of the shift lock control SW) is input to the shift lock ECU, the ECU
operates and current flows from TERMINAL 3 of the ECU to TERMINAL SLS+ of the shift lock solenoid to solenoid to
TERMINAL SLS± to TERMINAL 5 of the ECU to GROUND. This causes the shift lock solenoid to turn on (Plate stopper
disengages) and the shift lever can shift into position other than the P.
2. KEY INTERLOCK MECHANISM
With the ignition SW ON or ACC position, when the shift lever is put in P position (No continuity between P2 and P of shift
lock control SW), the current flowing from TERMINAL 4 of the shift lock ECU to the key interlock solenoid is cut off. This
causes the key interlock solenoid to turn off (Lock lever disengages from LOCK position) and the ignition key can be turned
from ACC to LOCK position.
S3 SHIFT LOCK ECU
1±GROUND : Approx. 12 volts with the ignition SW at ACC or ON position
3±GROUND : Approx. 12 volts with the ignition SW at ON or ST position
5±GROUND : Always continuity
6±GROUND : Approx. 12 volts with the brake pedal depressed
S4 STOP LIGHT SW
2±1 : Closed with the brake pedal depressed
: PARTS LOCATION
CodeSee PageCodeSee PageCodeSee Page
J431J931S331
J531J1631S431
J631K131
������ ���: JUNCTION BLOCK AND WIRE HARNESS CONNECTOR
CodeSee PageJunction Block and Wire Harness (Connector Location)
1C22Cowl Wire and Instrument Panel J/B (Lower Finish Panel)
1D22Instrument Panel Wire and Instrument Panel J/B (Lower Finish Panel)1H22Instrument Panel Wire and Instrument Panel J/B (Lower Finish Panel)
1J22Cowl Wire and Instrument Panel J/B (Lower Finish Panel)1R22Cowl Wire and Instrument Panel J/B (Lower Finish Panel)
1T22Instrument Panel Wire and Instrument Panel J/B (Lower Finish Panel)
: CONNECTOR JOINING WIRE HARNESS AND WIRE HARNESS
CodeSee PageJoining Wire Harness and Wire Harness (Connector Location)
IE136Instrument Panel Wire and Cowl Wire (Lower Finish Panel)
: GROUND POINTS
CodeSee PageGround Points Location
IE36Left Kick Panel
IF36Instrument Panel Brace LH
SYSTEM OUTLINE
SERVICE HINTS
Page 4146 of 4592

5A
STARTER FROM POWER SOURCE SYSTEM (
SEE PAGE 44)
1J 3
IH1 5IC2 5 IE2 5IF117 IE23
IJ2 3B 2
B 5C10 A4C4C11 A3B7A12
EBB C
A B
IE1 6
11
IE1 7
2 1
IF
B±W Y±B Y±B
O O
R±W
R±L
P±L
Y±G P±L P±L W±B
Y±G
R±W R±W R±W
R±W W±B
B±W
PARK/NEUTRAL
POSITION SW P 1
OIL PRESSURE
SW O 1
WASHER LEVEL
WARNING SW W 1
JUNCTION
CONNECTOR J 1
BRAKE FLUID
LEVEL WARNING SW B 1
JUNCTION
CONNECTOR J 9
G±O
B
5
B 6
2B B
B
OI L
CRUISE
SEAT BELT
ABS
WASHER LEVEL
REAR LIGHTS
BRAKE
BULB
CHECK
RELAY
O/ D OFF
JUNCTION
CONNECTOR J22
P
N
A
TO CRUISE
CONTROL ECU
TO I NTEGRATION
RELAY
TO ABS ECU
TO LI GHT
FAI LURE
SENSOR
B±O
TO O/ D
MAIN SW
J 6
JUNCTION
CONNECTORB A, J 7
C10
COMBINATION METERB A, C11 C, C12
GR
IG211
IG210 B±W
GRGR
1
R±W
PARKING
BRAKE SW P 3