Page 3634 of 4592

SA1JR±01
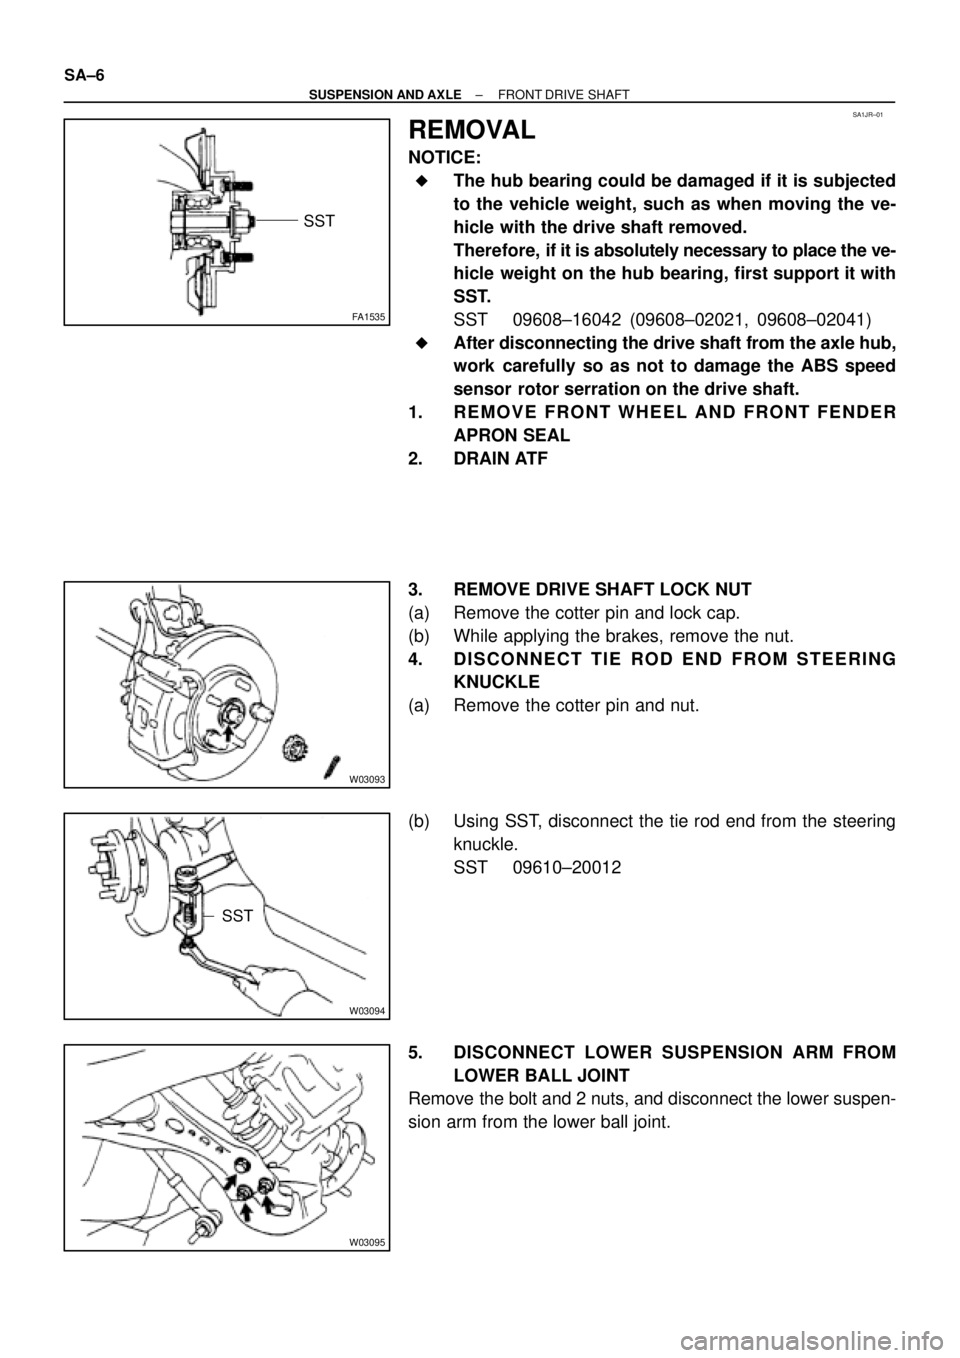
FA1535
SST
W03093
W03094
SST
W03095
SA±6
± SUSPENSION AND AXLEFRONT DRIVE SHAFT
REMOVAL
NOTICE:
�The hub bearing could be damaged if it is subjected
to the vehicle weight, such as when moving the ve-
hicle with the drive shaft removed.
Therefore, if it is absolutely necessary to place the ve-
hicle weight on the hub bearing, first support it with
SST.
SST 09608±16042 (09608±02021, 09608±02041)
�After disconnecting the drive shaft from the axle hub,
work carefully so as not to damage the ABS speed
sensor rotor serration on the drive shaft.
1. REMOVE FRONT WHEEL AND FRONT FENDER
APRON SEAL
2. DRAIN ATF
3. REMOVE DRIVE SHAFT LOCK NUT
(a) Remove the cotter pin and lock cap.
(b) While applying the brakes, remove the nut.
4. DISCONNECT TIE ROD END FROM STEERING
KNUCKLE
(a) Remove the cotter pin and nut.
(b) Using SST, disconnect the tie rod end from the steering
knuckle.
SST 09610±20012
5. DISCONNECT LOWER SUSPENSION ARM FROM
LOWER BALL JOINT
Remove the bolt and 2 nuts, and disconnect the lower suspen-
sion arm from the lower ball joint.
Page 3642 of 4592

SA1EC±02
SA±14
± SUSPENSION AND AXLEFRONT DRIVE SHAFT
INSTALLATION
1. LH drive shaft:
INSTALL DRIVE SHAFT TO TRANSAXLE
(a) Install a new snap ring to the inboard joint shaft.
(b) Coat the gear oil to the inboard joint shaft and differential case sliding surface.
(c) Set the snap ring with opening side facing downward.
(d) Using a brass bar and hammer, install the drive shaft.
NOTICE:
Be careful not to damage the dust cover of the drive shaft and oil seal lip of the transaxle.
HINT:
Whether the inboard joint shaft is in contact with the pinion shaft or not can be known from the sound or feel-
ing when driving it in.
(e) Check that there is 2 ± 3 mm (0.08 ± 0.12 in.) of play in the axial direction.
(f) Check that the drive shaft cannot be removed by hand.
2. RH drive shaft:
INSTALL DRIVE SHAFT TO TRANSAXLE
(a) Install the drive shaft.
NOTICE:
Be careful not to damage the dust cover of the drive shaft and oil seal lip of the transaxle.
(b) Using pliers, install a new snap ring.
(c) Install a new bearing lock bolt.
Torque: 32 N´m (330 kgf´cm, 24 ft´lbf)
3. CONNECT DRIVE SHAFT TO AXLE HUB
NOTICE:
Be careful not to damage the boot and ABS speed sensor rotor.
4. CONNECT LOWER SUSPENSION ARM TO LOWER BALL JOINT
Torque: 127 N´m (1,300 kgf´cm, 94 ft´lbf)
5. CONNECT TIE ROD END TO STEERING KNUCKLE
(a) Connect the tie rod end to the steering knuckle.
(b) Install the nut and a new cotter pin.
If the holes for the cotter pin are not aligned, tighten the nut further up to 60°.
Torque: 49 N´m (500 kgf´cm, 36 ft´lbf)
6. INSTALL DRIVE SHAFT LOCK NUT
(a) While applying brakes, install the nut.
Torque: 294 N´m (3,000 kgf´cm, 217 ft´lbf)
(b) Install the lock cap and a new cotter pin.
If the holes for the cotter pin are not aligned, tighten the nut further up to 60°.
7. FILL AND CHECK ATF (See page DI±133)
8. INSTALL FRONT FENDER APRON SEAL
9. INSTALL FRONT WHEEL
Torque: 103 N´m (1,050 kgf´cm, 76 ft´lbf)
10. CHECK FRONT WHEEL ALIGNMENT (See page SA±1)
11. CHECK ABS SPEED SENSOR SIGNAL (See page DI±177)
Page 3643 of 4592
SA07X±06
F08043
Suspension Support
Spring Bumper
Link Stabilizer Bar
Shock
Absorber
ABS Speed Sensor
Wire Harness ClampFront Drive Shaft with Coil SpringUpper SeatBearing
Lower
Insulator
Lower Suspension Arm Lower Suspension
Bushing StopperBrake CaliperInsulator UpperSpring Support No. 2Suspension
Shock Absorber
Coil Spring
Tie Rod End
� Dust
Deflector
� Cotter Pin
� Cotter Pin� Cotter
Pin
Lower Ball jointDisc
Lock Cap ABS Speed Sensor
N´m (kgf´cm, ft´lbf): Specified torque
� Non±reusable part�
80 (820, 59)49 (500, 36)
39 (400, 29)
211 (2,150, 156)
107 (1,090, 79)
29 (300, 22)
123 (1,250, 90)49 (500, 36)
8.0 (82, 71 in.´lbf)
294 (3,000, 217)
206 (2,100, 152)
206 (2,100, 152)
206 (2,100, 152)
127 (1,300, 94)
127 (1,300, 94)
± SUSPENSION AND AXLEFRONT LOWER BALL JOINT
SA±15
522 Author�: Date�:
FRONT LOWER BALL JOINT
COMPONENTS
Page 3644 of 4592
SA085±04
F08044
Flexible Hose
Rear Axle Hub
� O±Ring
Hub Bolt
Brake Drum No. 2 Lower
Suspension Arm
Rear Axle
Carrier No. 1 Lower
Suspension Arm
ABS
Speed Sensor
Strut Rod
N´m (kgf´cm, ft´lbf)
� Non±reusable part: Specified torque
Reused Nut : 196 (2,000, 145)
New Nut : 255 (2,600, 188)
8.0 (82, 71 in.´lbf)
113 (1,150, 83)
29 (300, 22)
80 (820, 59)
181 (1,850, 134)
SA±16
± SUSPENSION AND AXLEREAR AXLE HUB
523 Author�: Date�:
REAR AXLE HUB
COMPONENTS
Page 3648 of 4592
SA1F6±02
F08049
N´m (kgf´cm, ft´lbf) : Specified torque
Non±reusable part �
56 (570, 41)
181 (1,850, 134)
181 (1,850, 134)
113 (1,150, 83)
5.4 (55, 48 in.´lbf)
113 (1,150, 83)
Suspension Member
Adjusting
Tube
Suspension
Arm Washer
No. 2 Lower Suspension Arm
No. 1 Lower Suspension Arm
Parking Brake Cable
Strut Rod
SA±20
± SUSPENSION AND AXLEREAR LOWER SUSPENSION ARM AND STRUT ROD
527 Author�: Date�:
REAR LOWER SUSPENSION ARM AND STRUT ROD
COMPONENTS
Page 3649 of 4592
SA1JS±01
F08073
F08074
F08075
± SUSPENSION AND AXLEREAR LOWER SUSPENSION ARM AND STRUT ROD
SA±21
REMOVAL
1. REMOVE REAR WHEEL
2. REMOVE STRUT ROD
(a) Remove the bolt and disconnect the parking brake cable.
(b) Remove the 2 bolts, nuts and strut rod.
NOTICE:
Loossen the bolt since the nut cannot be rotated.
3. REMOVE NO. 2 LOWER SUSPENSION ARM
(a) Remove the 3 nuts, suspension arm washer and washer.
(b) Remove the No. 2 lower suspension arm and washer.
4. REMOVE NO. 1 LOWER SUSPENSION ARM
Remove the 2 bolts with the washer and No. 1 lower suspension
arm.
Page 3650 of 4592

SA1JT±01
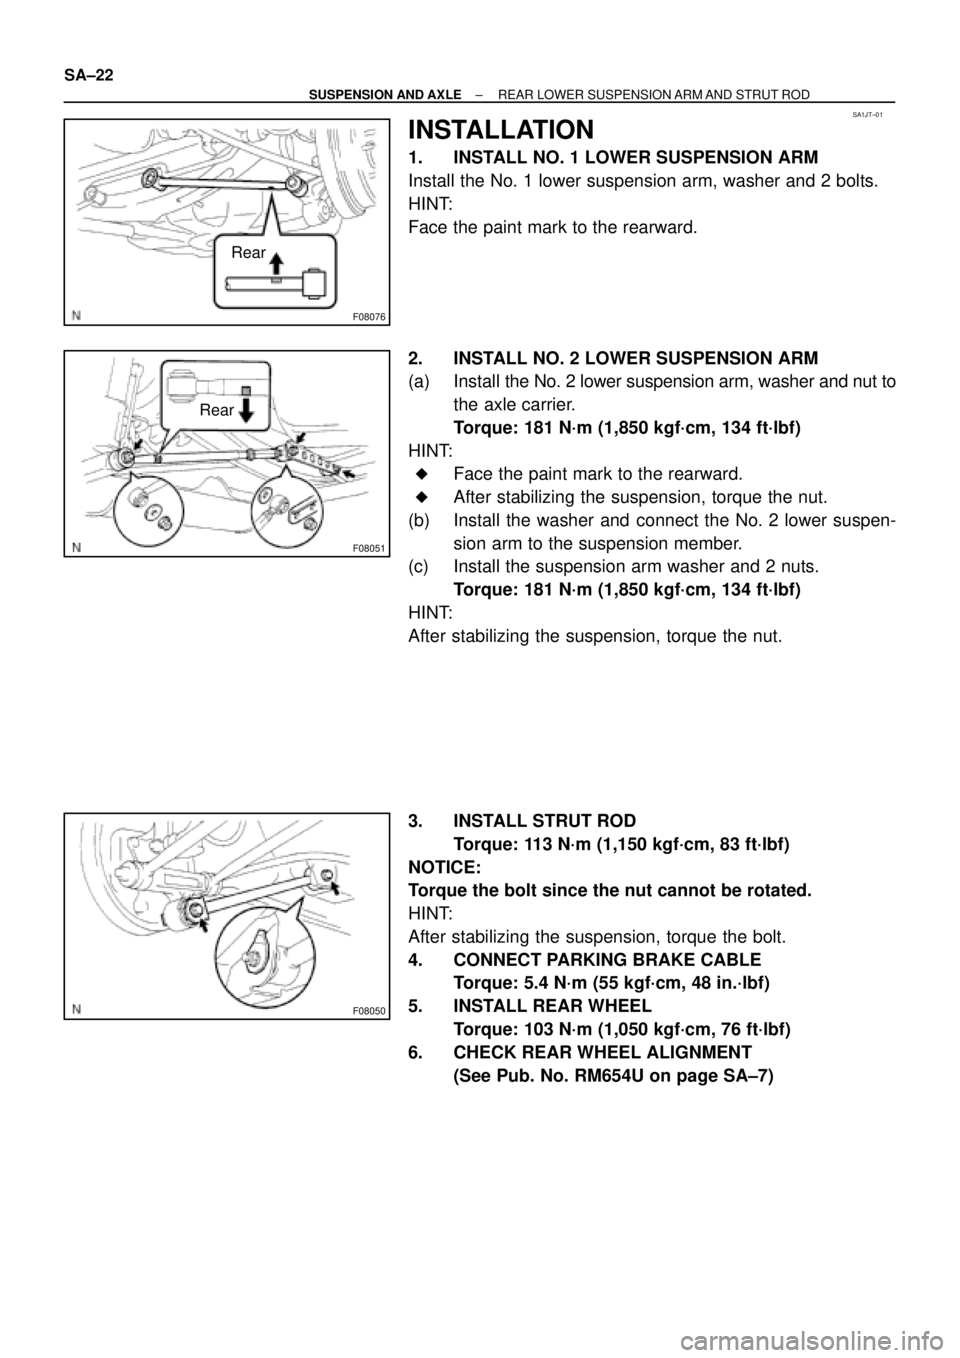
F08076
Rear
F08051
Rear
F08050
SA±22
± SUSPENSION AND AXLEREAR LOWER SUSPENSION ARM AND STRUT ROD
INSTALLATION
1. INSTALL NO. 1 LOWER SUSPENSION ARM
Install the No. 1 lower suspension arm, washer and 2 bolts.
HINT:
Face the paint mark to the rearward.
2. INSTALL NO. 2 LOWER SUSPENSION ARM
(a) Install the No. 2 lower suspension arm, washer and nut to
the axle carrier.
Torque: 181 N´m (1,850 kgf´cm, 134 ft´lbf)
HINT:
�Face the paint mark to the rearward.
�After stabilizing the suspension, torque the nut.
(b) Install the washer and connect the No. 2 lower suspen-
sion arm to the suspension member.
(c) Install the suspension arm washer and 2 nuts.
Torque: 181 N´m (1,850 kgf´cm, 134 ft´lbf)
HINT:
After stabilizing the suspension, torque the nut.
3. INSTALL STRUT ROD
Torque: 113 N´m (1,150 kgf´cm, 83 ft´lbf)
NOTICE:
Torque the bolt since the nut cannot be rotated.
HINT:
After stabilizing the suspension, torque the bolt.
4. CONNECT PARKING BRAKE CABLE
Torque: 5.4 N´m (55 kgf´cm, 48 in.´lbf)
5. INSTALL REAR WHEEL
Torque: 103 N´m (1,050 kgf´cm, 76 ft´lbf)
6. CHECK REAR WHEEL ALIGNMENT
(See Pub. No. RM654U on page SA±7)
Page 3657 of 4592

Vehicles with power antennas may exhibit audible electrical noise on weak AM stations when
various electrical accessories (turn signals, rear defogger, cruise control, brakes, etc.) are operated.
Poor antenna grounding can cause this condition.
To eliminate or reduce the intensity of the noise, use the following repair procedure:
AM STATIC NOISE ON VEHICLES WITH POWER ANTENNASPage 1 of 2
OCTOBER 25, 1996
AUDIO
AU002±96
ALL MODELS
REPAIR PROCEDURE:
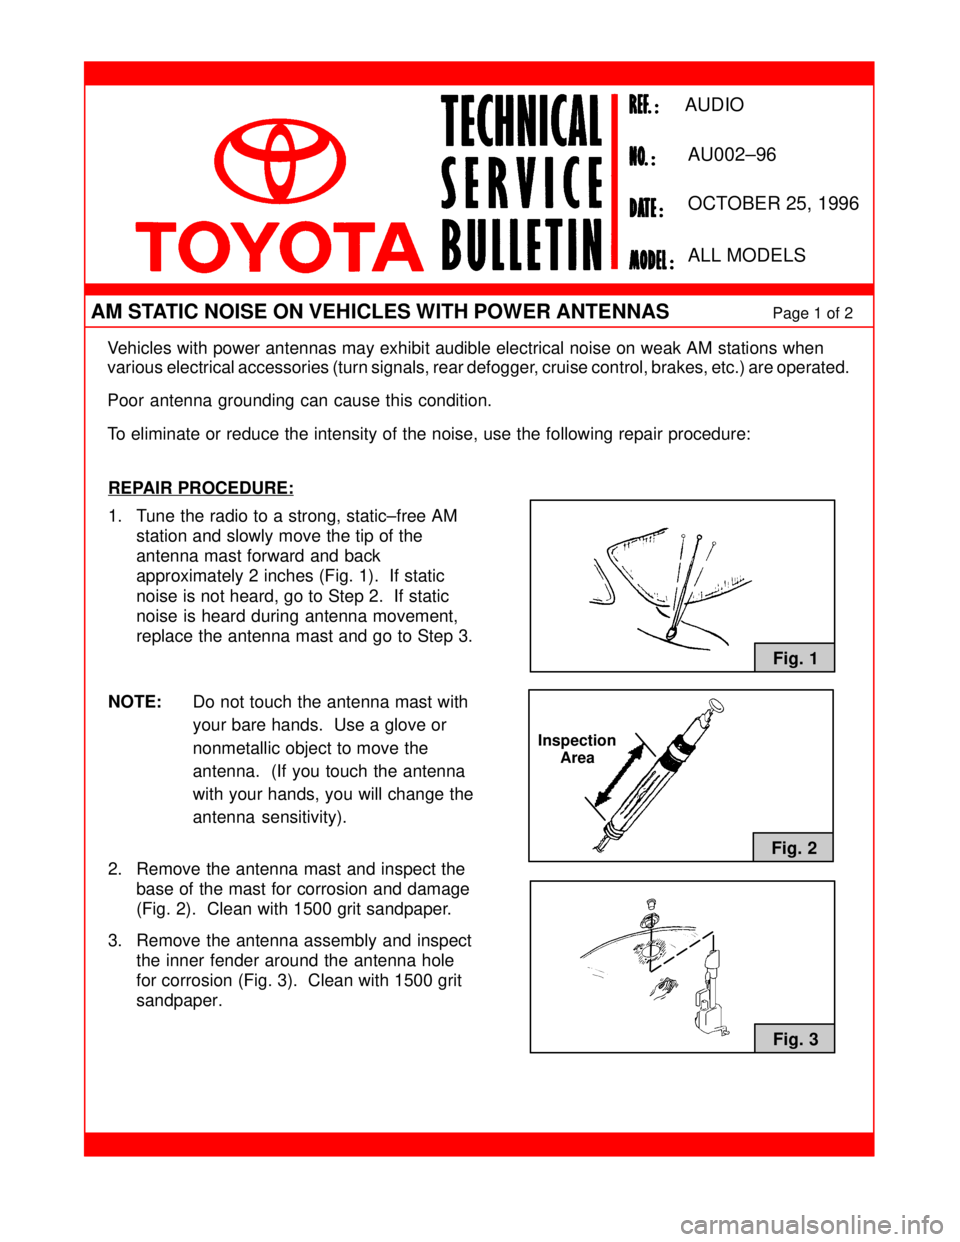
1. Tune the radio to a strong, static±free AM
station and slowly move the tip of the
antenna mast forward and back
approximately 2 inches (Fig. 1). If static
noise is not heard, go to Step 2. If static
noise is heard during antenna movement,
replace the antenna mast and go to Step 3.
NOTE:Do not touch the antenna mast with
your bare hands. Use a glove or
nonmetallic object to move the
antenna. (If you touch the antenna
with your hands, you will change the
antenna sensitivity).
2. Remove the antenna mast and inspect the
base of the mast for corrosion and damage
(Fig. 2). Clean with 1500 grit sandpaper.
3. Remove the antenna assembly and inspect
the inner fender around the antenna hole
for corrosion (Fig. 3). Clean with 1500 grit
sandpaper.
Fig. 1
Fig. 2
Fig. 3
Inspection
Area