Page 863 of 4592
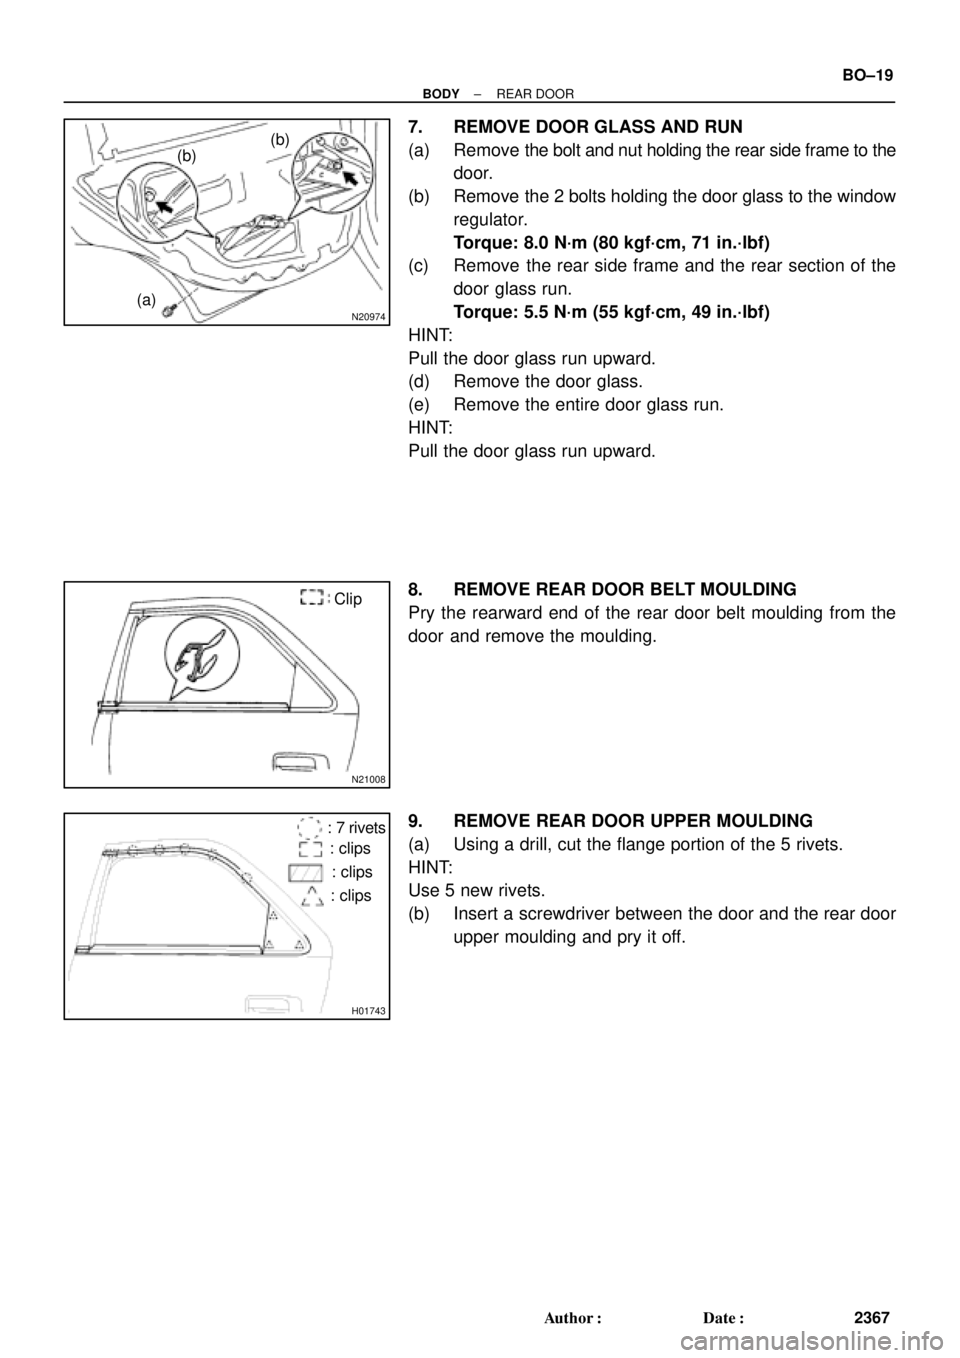
N20974
(b)(b)
(a)
N21008
Clip
H01743
: 7 rivets
: clips
: clips
: clips
± BODYREAR DOOR
BO±19
2367 Author�: Date�:
7. REMOVE DOOR GLASS AND RUN
(a) Remove the bolt and nut holding the rear side frame to the
door.
(b) Remove the 2 bolts holding the door glass to the window
regulator.
Torque: 8.0 N´m (80 kgf´cm, 71 in.´lbf)
(c) Remove the rear side frame and the rear section of the
door glass run.
Torque: 5.5 N´m (55 kgf´cm, 49 in.´lbf)
HINT:
Pull the door glass run upward.
(d) Remove the door glass.
(e) Remove the entire door glass run.
HINT:
Pull the door glass run upward.
8. REMOVE REAR DOOR BELT MOULDING
Pry the rearward end of the rear door belt moulding from the
door and remove the moulding.
9. REMOVE REAR DOOR UPPER MOULDING
(a) Using a drill, cut the flange portion of the 5 rivets.
HINT:
Use 5 new rivets.
(b) Insert a screwdriver between the door and the rear door
upper moulding and pry it off.
Page 893 of 4592
BO0LR±01
N20948
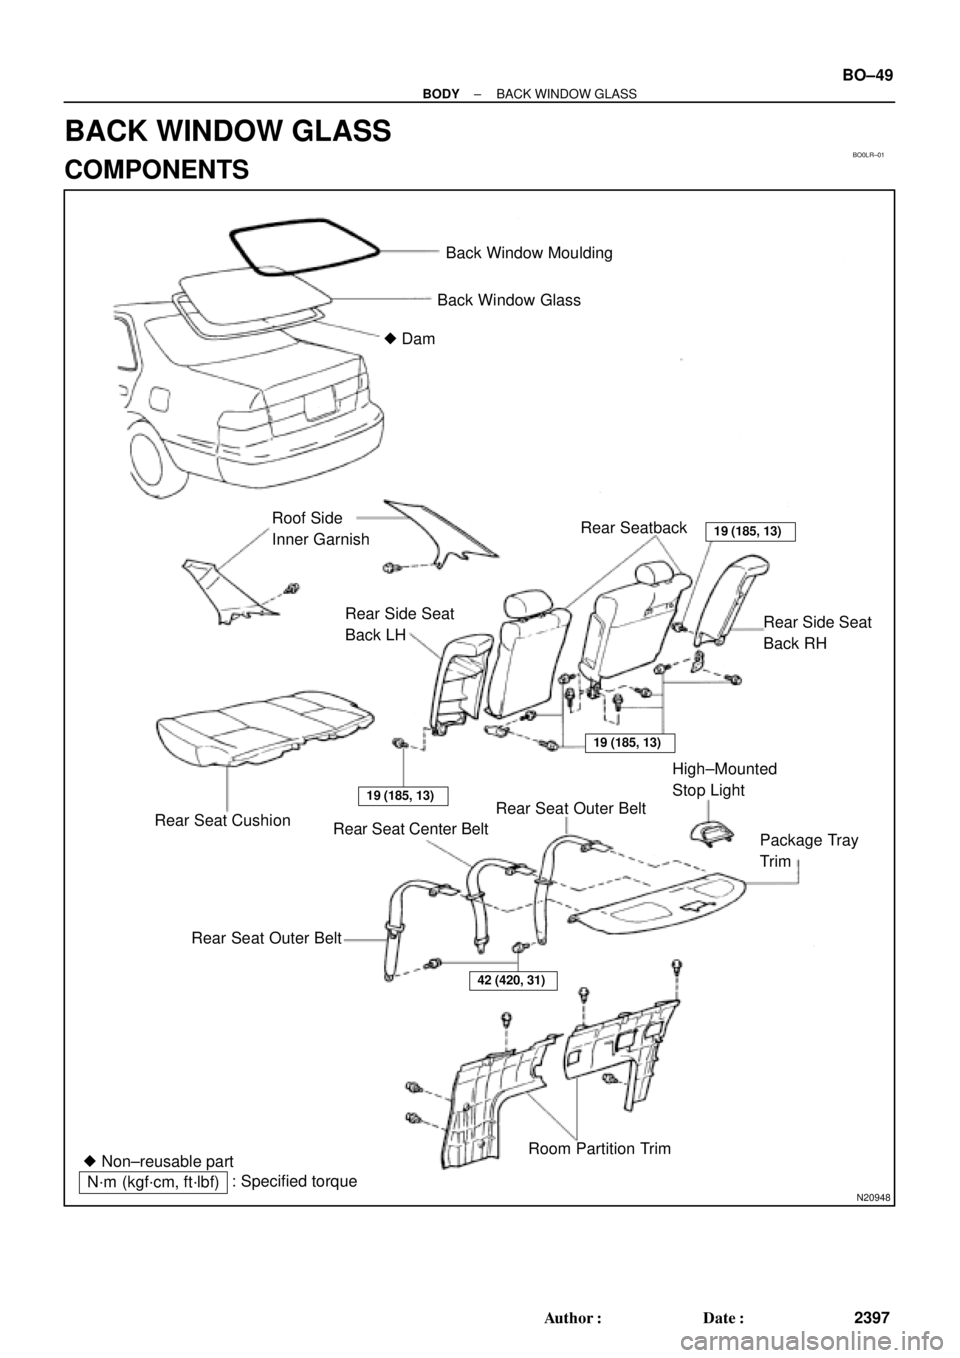
Back Window Moulding
Back Window Glass
� Dam
Roof Side
Inner GarnishRear Seatback
19 (185, 13)
42 (420, 31)
Rear Side Seat
Back RH Rear Side Seat
Back LH
Rear Seat Cushion
19 (185, 13)
19 (185, 13)
Rear Seat Center BeltRear Seat Outer BeltHigh±Mounted
Stop Light
Package Tray
Trim
Rear Seat Outer Belt
Room Partition Trim
� Non±reusable part
N´m (kgf´cm, ft´lbf): Specified torque
± BODYBACK WINDOW GLASS
BO±49
2397 Author�: Date�:
BACK WINDOW GLASS
COMPONENTS
Page 894 of 4592

BO0LS±01
N21020
3 Clips
1 Clip
N22588
N21021
4 Clips
N21121
N20985
BO±50
± BODYBACK WINDOW GLASS
2398 Author�: Date�:
REMOVAL
1. REMOVE REAR SEAT CUSHION AND SEATBACKS
2. REMOVE ROOF SIDE INNER GARNISHES
(a) Remove the clips.
(b) Pull the garnish to remove it.
3. REMOVE HIGH±MOUNTED STOP LIGHT
(a) Push on the both side of the cover to release the claws by
your hand and remove the cover as shown in the illustra-
tion.
(b) Remove the 2 bolts and stop light, then disconnect the
connector.
4. REMOVE PACKAGE TRAY TRIM
(a) Remove the bolts holding the rear seat belt lower side to
the body.
(b) Remove the seat belts with seat belt hole covers from the
package trim.
(c) Remove the trim by pulling forward.
5. REMOVE ROOM PARTITION TRIMS
Remove the 6 clips and room partition trims.
6. REMOVE THESE PARTS
(a) Assist grips.
(b) Rear side of roof headlining.
7. DISCONNECT DEFOGGER WIRE CONNECTORS
8. REMOVE BACK WINDOW MOULDING
Using a knife, cut off the moulding as shown.
NOTICE:
Do not damage the body with the knife.
9. REMOVE BACK WINDOW GLASS
Remove the glass in the same way as windshield.
(See page BO±43)
Page 896 of 4592
BO±52
± BODYBACK WINDOW GLASS
2400 Author�: Date�:
(d) Room partition trims
(e) Seat belt lower side bolts
Torque: 42 N´m (420 kgf´cm, 31 ft´lbf)
(f) High±mounted stop light
(g) Roof side inner garnish
(h) Rear seatbacks and seat cushion
Torque: 18 N´m (185 kgf´cm, 13 ft´lbf)
Page 927 of 4592
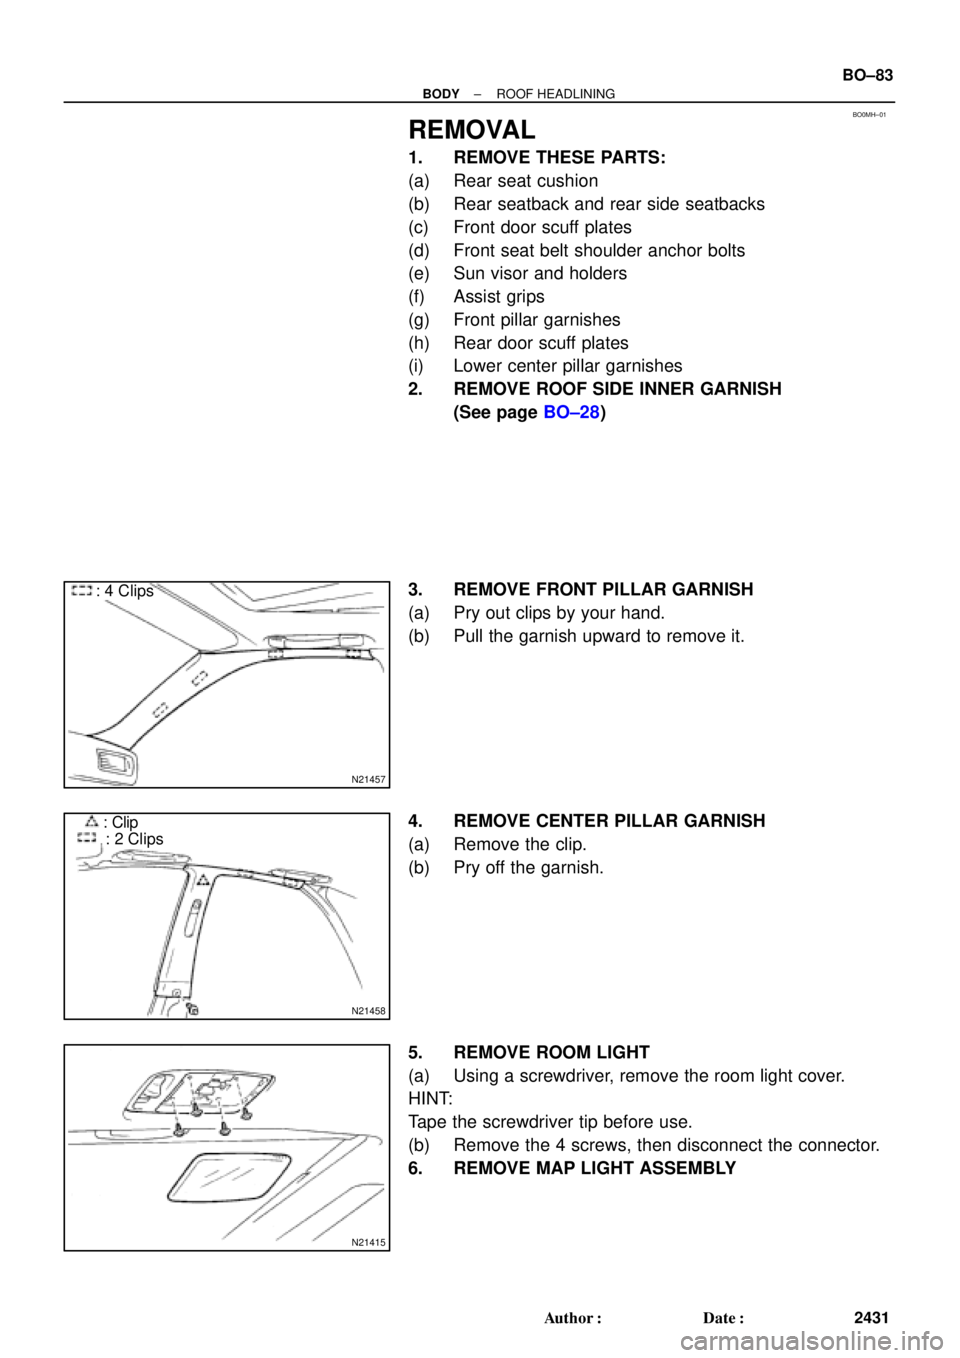
BO0MH±01
N21457
: 4 Clips
N21458
: Clip
: 2 Clips
N21415
± BODYROOF HEADLINING
BO±83
2431 Author�: Date�:
REMOVAL
1. REMOVE THESE PARTS:
(a) Rear seat cushion
(b) Rear seatback and rear side seatbacks
(c) Front door scuff plates
(d) Front seat belt shoulder anchor bolts
(e) Sun visor and holders
(f) Assist grips
(g) Front pillar garnishes
(h) Rear door scuff plates
(i) Lower center pillar garnishes
2. REMOVE ROOF SIDE INNER GARNISH
(See page BO±28)
3. REMOVE FRONT PILLAR GARNISH
(a) Pry out clips by your hand.
(b) Pull the garnish upward to remove it.
4. REMOVE CENTER PILLAR GARNISH
(a) Remove the clip.
(b) Pry off the garnish.
5. REMOVE ROOM LIGHT
(a) Using a screwdriver, remove the room light cover.
HINT:
Tape the screwdriver tip before use.
(b) Remove the 4 screws, then disconnect the connector.
6. REMOVE MAP LIGHT ASSEMBLY
Page 940 of 4592

BO±95
2443 Author�: Date�:
DISASSEMBLY
1. REMOVE THESE PARTS:
(a) Switch knob
(b) Front seat cushion shield
(c) Front power seat switch
(")
BO0MW±01
H01870
± BODYFRONT SEAT (Power Seat for TMMK Made)
BO±95
2443 Author�: Date�:
DISASSEMBLY
1. REMOVE THESE PARTS:
(a) Switch knob
(b) Front seat cushion shield
(c) Front power seat switch
(d) Seat cushion lower shield
(e) w/ Lumber Support:
Lumber support lever
(f) Headrest
(g) Front seat inner belt
2. REMOVE SEATBACK ASSEMBLY
(a) w/ Side Airbag Assembly:
Remove the side airbag wire harness after removing
clips.
(b) Remove the hog rings.
(c) Remove the bolts and front seatback hinge cover.
(d) Remove the seatback assembly.
3. REMOVE SEATBACK COVER
(a) w/ Side Airbag Assembly:
Remove the hook from the seatback frame.
(b) Remove the headrest supports.
(c) Remove the seatback frame from the seatback cover with
pad.
(d) Remove the seatback cover from the seatback pad.
4. w/ Side Airbag Assembly:
REMOVE SIDE AIRBAG ASSEMBLY
Remove the 2 nuts and side airbag assembly from the seatback
frame.
CAUTION:
�Do not store the side airbag assembly with the airbag
deployment direction facing down.
�Never disassemble the side airbag assembly.
5. REMOVE SEAT CUSHION ASSEMBLY
Remove the 4 bolts and seat cushion assembly from the seat
adjuster.
6. REMOVE SEAT CUSHION COVER
(a) Remove the seat cushion frame.
(b) Remove the seat cushion cover from the seat cushion
pad.
7. REMOVE THESE PARTS:
(a) Front seat cushion inner No.1 shield
(b) Front seat cushion bracket
(c) Front seat cushion inner shield
Page 942 of 4592
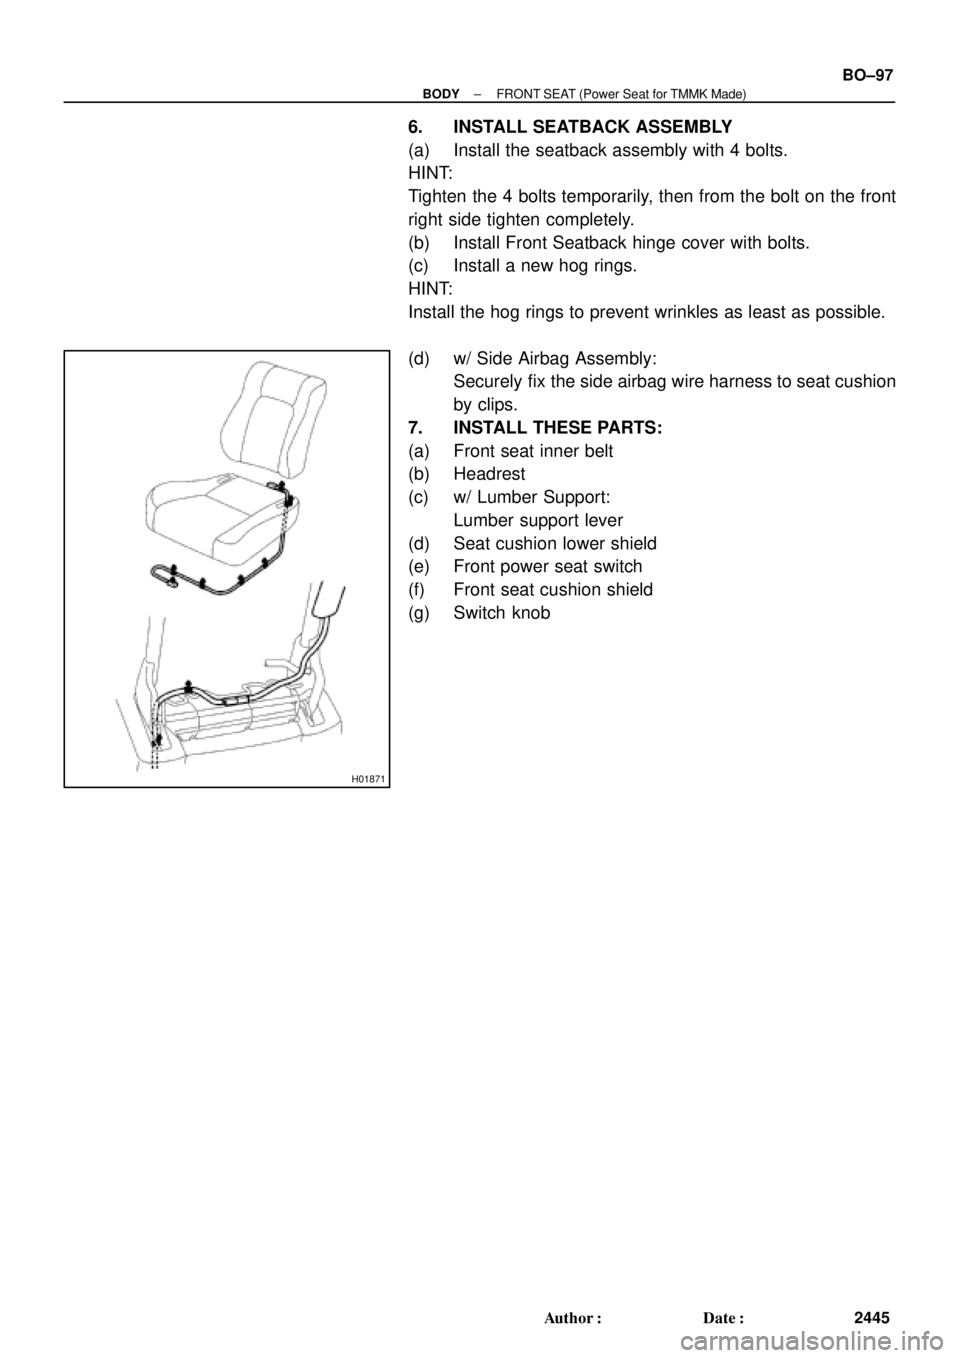
H01871
± BODYFRONT SEAT (Power Seat for TMMK Made)
BO±97
2445 Author�: Date�:
6. INSTALL SEATBACK ASSEMBLY
(a) Install the seatback assembly with 4 bolts.
HINT:
Tighten the 4 bolts temporarily, then from the bolt on the front
right side tighten completely.
(b) Install Front Seatback hinge cover with bolts.
(c) Install a new hog rings.
HINT:
Install the hog rings to prevent wrinkles as least as possible.
(d) w/ Side Airbag Assembly:
Securely fix the side airbag wire harness to seat cushion
by clips.
7. INSTALL THESE PARTS:
(a) Front seat inner belt
(b) Headrest
(c) w/ Lumber Support:
Lumber support lever
(d) Seat cushion lower shield
(e) Front power seat switch
(f) Front seat cushion shield
(g) Switch knob
Page 946 of 4592

BO±101
2449 Author�: Date�:
DISASSEMBLY
1. REMOVE THESE PARTS:
(a) Release handle
(b) Front seat cushion shield
(c) Vertical Seat Adjuste")
BO0N1±01
H01870
± BODYFRONT SEAT (Manual Seat for TMC Made)
BO±101
2449 Author�: Date�:
DISASSEMBLY
1. REMOVE THESE PARTS:
(a) Release handle
(b) Front seat cushion shield
(c) Vertical Seat Adjuster:
Vertical adjuster knob
(d) Front seat cushion lower shield
(e) Seat cushion inner shield
(f) w/ Lumber Support:
Lumber support lever
(g) Headrest
(h) Front seat inner belt
2. REMOVE SEATBACK ASSEMBLY
(a) w/ Side Airbag Assembly:
Remove the side airbag wire harness after removing
clips.
(b) Remove the bolts and seatback assembly.
3. REMOVE SEATBACK COVER
(a) Remove the hog rings.
(b) w/ Side Airbag Assembly:
Remove the hook from the seatback frame.
(c) Remove the headrest supports.
(d) Remove the seatback frame from the seatback cover with
pad.
(e) Remove the seatback cover from the seatback pad.
4. w/ Side Airbag Assembly:
REMOVE SIDE AIRBAG ASSEMBLY
Remove the 1 clip of side airbag wire harness, 2 nuts and side
airbag assembly from the seatback frame.
CAUTION:
�Do not store the side airbag assembly with the airbag
deployment direction facing down.
�Never disassemble the side airbag assembly.
5. REMOVE SEAT CUSHION ASSEMBLY
Remove the 4 bolts and seat cushion assembly from the seat
adjuster.
6. REMOVE SEAT CUSHION COVER
(a) Remove the seat cushion frame.
(b) Remove the seat cushion cover from the seat cushion
pad.
7. REMOVE SEAT TRACK ADJUSTING HANDLE
Remove the seat track handle.
8. REMOVE FRONT SEAT OUTER ADJUSTER
Remove the E ring and front seat outer adjuster from the front
seat inner truck with upper track.