Page 948 of 4592

BO±103
2451 Author�: Date�:
REASSEMBLY
1. Vertical Seat Adjuster:
INSTALL FRONT SEAT OUTER ADJUSTER
Install front seat outer adjuster to front s")
BO0N3±01
± BODYFRONT SEAT (Manual Seat for TMC Made)
BO±103
2451 Author�: Date�:
REASSEMBLY
1. Vertical Seat Adjuster:
INSTALL FRONT SEAT OUTER ADJUSTER
Install front seat outer adjuster to front seat inner adjuster with
E ring, nuts and bolts.
2. w/o Vertical Seat Adjuster:
INSTALL FRONT SEAT OUTER AND INNER AD-
JUSTER
Install the adjusters to the seat cushion frame.
3. INSTALL SEAT TRACK ADJUSTING HANDLE
Install the seat track adjusting handle.
4. Vertical Seat Adjuster:
INSTALL SEAT CUSHION COVER
(a) Install the seat cushion cover to seat cushion pad.
(b) Install the seat cushion cover with pad to the seat cushion
frame.
5. INSTALL SEAT CUSHION ASSEMBLY
Install the seat cushion assembly with 4 bolts to the seat adjust-
er.
HINT:
Tighten the 4 bolts temporarily, then from the bolts on the rear
side tighten completely.
Torque: 18 N´m (185 kgf´cm, 13 ft´lbf)
6. w/ Side Airbag Assembly:
INSTALL SIDE AIRBAG ASSEMBLY
Install the side airbag assembly with new 2 nuts to the seatback
frame.
Torque: 6.0 N´m (61 kgf´cm, 53 in.´lbf)
NOTICE:
�Make sure that the side airbag assembly is installed
to the specified torque.
�If the side airbag assembly has been dropped, or
there are cracks, dents or other defects in the case or
connector, replace the side airbag assembly with a
new one.
�When installing the side airbag assembly, take care
is not pinched between other parts.
7. INSTALL SEATBACK COVER
(a) Install the seatback cover to the seatback pad.
(b) Install the seatback cover with pad to the seatback frame.
(c) Install the headrest supports.
Page 949 of 4592
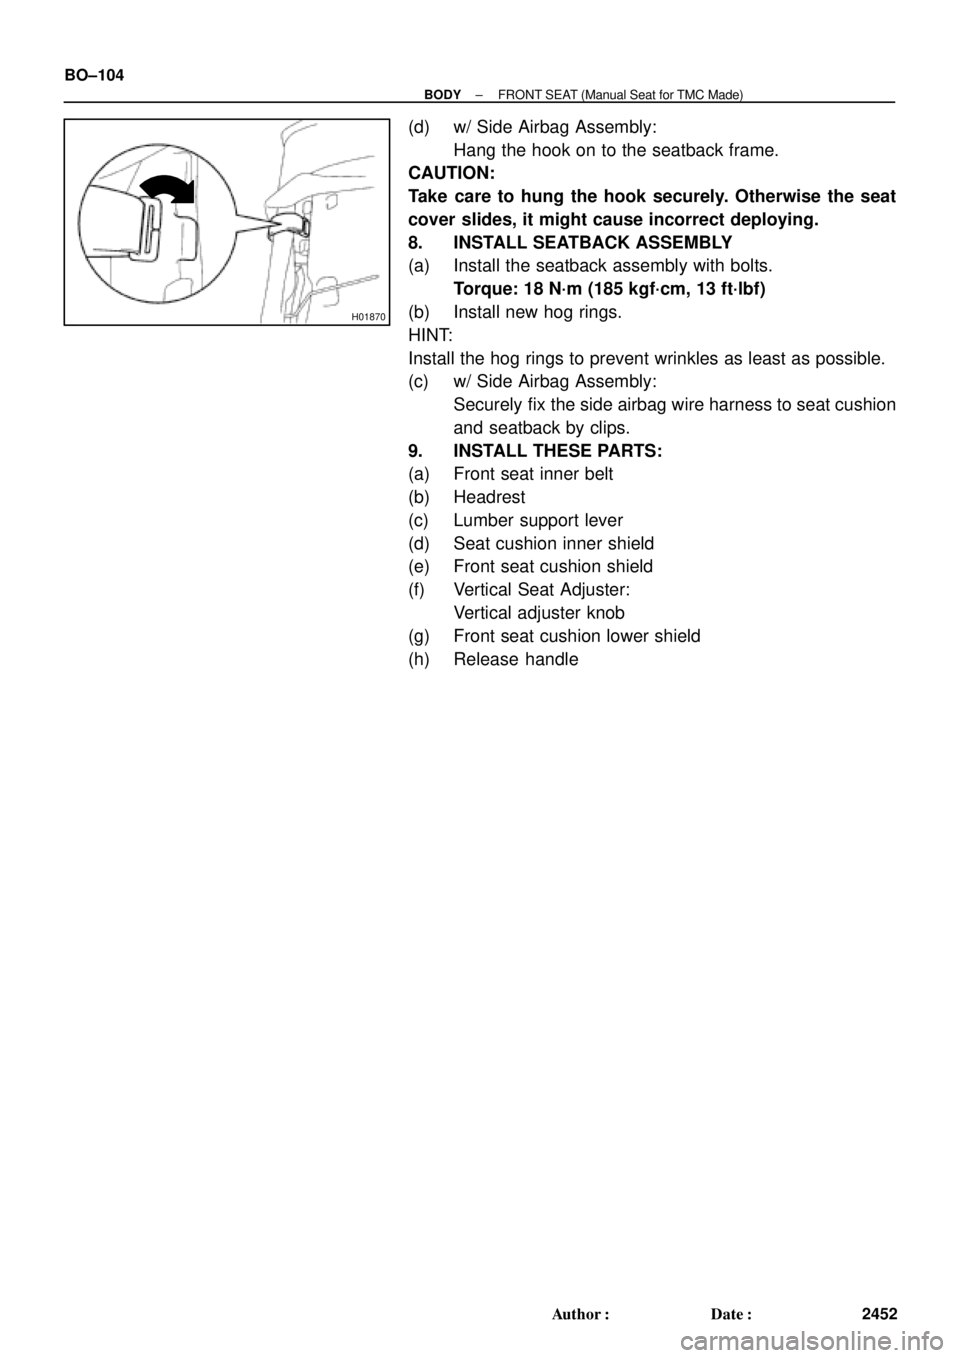
H01870
BO±104
± BODYFRONT SEAT (Manual Seat for TMC Made)
2452 Author�: Date�:
(d) w/ Side Airbag Assembly:
Hang the hook on to the seatback frame.
CAUTION:
Take care to hung the hook securely. Otherwise the seat
cover slides, it might cause incorrect deploying.
8. INSTALL SEATBACK ASSEMBLY
(a) Install the seatback assembly with bolts.
Torque: 18 N´m (185 kgf´cm, 13 ft´lbf)
(b) Install new hog rings.
HINT:
Install the hog rings to prevent wrinkles as least as possible.
(c) w/ Side Airbag Assembly:
Securely fix the side airbag wire harness to seat cushion
and seatback by clips.
9. INSTALL THESE PARTS:
(a) Front seat inner belt
(b) Headrest
(c) Lumber support lever
(d) Seat cushion inner shield
(e) Front seat cushion shield
(f) Vertical Seat Adjuster:
Vertical adjuster knob
(g) Front seat cushion lower shield
(h) Release handle
Page 950 of 4592
BO0N4±01
± BODYFRONT SEAT (Manual Seat for TMC Made)
BO±105
2453 Author�: Date�:
INSTALLATION
INSTALL FRONT SEAT
(a) Slide the front seat to the most front position.
NOTICE:
Make sure that seat adjuster locks.
(b) Without holding the seat track handle, mount the seat to the vehicle.
HINT:
If holding the seat track handle, the adjusted most front positions slip off.
(c) Tighten the bolts on the rear side temporarily, from the bolt on the inner side tighten completely.
Torque: 37 N´m (375 kgf´cm, 27 ft´lbf)
(d) Slide the seat to the most rear position to install the bolts on the front side.
Torque: 37 N´m (375 kgf´cm, 27 ft´lbf)
Page 951 of 4592
BO0MO±01
H01872
� Hog Ring
Front Seatback Cover
Front Seatback Pad
Headrest
Headrest
Support
� Hog Ring
Front Seatback
Hinge Cover
Front Seatback
Frame
w/ Lumber Support:
Lumber Support Lever
Front Seat Cushion Cover
Front Seat
Cushion Pad
Front Seat Cushion Frame
Inner Adjuster
Sub±Assembly
Track Cover
Seat Track
Adjusting HandleOuter Adjuster
Sub±Assembly
Front Seat Cushion
Shield
Release
Handle
Front Seat Cushion
Lower Shield
Vertical Adjuster Knob
w/ Side Airbag Assembly:
Side Airbag
Assembly
6.0 (61, 53 in.´lbf)
w/o Vertical:
Inner Adjuster
Sub±Assembly
Outer Adjuster
Sub±Assembly
Front Seat Cushion
Shield
Front Seat Cushion
Lower Shield
Release Handle
N´m (kgf´cm, ft´lbf) : Specified torque
� Non±reusable part
BO±106
± BODYFRONT SEAT (Manual Seat for TMMK Made)
2454 Author�: Date�:
FRONT SEAT (Manual Seat for TMMK Made)
COMPONENTS
Page 955 of 4592

2458 Author�: Date�:
REASSEMBLY
1. INSTALL OUTER ADJUSTER SUB±ASSEMBLY
Install the outer adjuster sub±assembly to the inner adjuster
s")
BO0MS±01
BO±110
± BODYFRONT SEAT (Manual Seat for TMMK Made)
2458 Author�: Date�:
REASSEMBLY
1. INSTALL OUTER ADJUSTER SUB±ASSEMBLY
Install the outer adjuster sub±assembly to the inner adjuster
sub±assembly.
2. INSTALL SEAT ADJUSTING HANDLE
Install the seat track adjusting handle.
3. INSTALL RECLINING CONNECTING PIPE
(a) Adjust the reclining lock positions of the seat adjusters.
(b) Slide the seat adjusters to the most front position.
(c) Place the adjusters on a spacer to adjust the seat rails in
parallel and install the connecting pipe.
HINT:
When installing the connecting pipe with raising up the adjust-
ers, the lock positions adjusted in 3±(a) step slip off, lock error
will occur.
4. INSTALL SEAT CUSHION COVER
(a) Install the seat cushion cover to seat cushion pad.
(b) Install the seat cushion cover with pad to the seat cushion
frame.
5. INSTALL SEAT CUSHION ASSEMBLY
Install the seat cushion assembly with 4 bolts to the seat adjust-
er.
HINT:
Tighten the 4 bolts temporarily, then from the bolts on the rear
side tighten completely.
6. w/ Side Airbag Assembly:
INSTALL SIDE AIRBAG ASSEMBLY
Install the side airbag assembly with 2 nuts to the seatback
frame.
Torque: 6.0 N´m (61 kgf´cm, 53 in.´lbf)
NOTICE:
�Make sure that the side airbag assembly is installed
to the specified torque.
�If the side airbag assembly has been dropped, or
there are cracks, dents or other defects in the case or
connector, replace the side airbag assembly with a
new one.
�When installing the side airbag assembly, take care
is not pinched between other parts.
7. INSTALL SEATBACK COVER
(a) Install the seatback cover to the seatback pad.
(b) Install the seatback cover with pad to the seatback frame.
(c) Install the headrest supports.
Page 958 of 4592
BO0NA±01
H01874
Headrest SupportHeadrest
Seatback Frame
Seatback Pad
Seatback Cover
RH Seatback
Hinge
Center Seatback Hinge
Rear Seat center
Armrest
Center Armrest
Hinge Cover
LH Seatback Hinge
Seat Cushion Cover
Seat Cushion Pad Seatback Locking Knob
Seatback Lock Knob Gromet
Rear Seatback Lock Control
Rear Seatback lock
Control Bezel Seatback Lock control Cable
: Specified torque
N´m (kgf´cm, ft´lbf)
RH Rear Side
Seatback
LH Rear Side
Seatback
18 (185, 13)
18 (185, 13)
18 (185, 13)
17.5 (178, 12.5)
18 (185, 13)
Seat Belt Guide
± BODYREAR SEAT (TMC Made)
BO±113
2461 Author�: Date�:
REAR SEAT (TMC Made)
COMPONENTS
Page 959 of 4592
BO0NB±01
BO±114
± BODYREAR SEAT (TMC Made)
2462 Author�: Date�:
REMOVAL
1. REMOVE LH SEATBACK ASSEMBLY
(a) Release lock to lean the seat back to front.
(b) Remove the clips.
(c) Remove the 2 bolts and LH seatback assembly.
2. REMOVE RH SEAT BACK ASSEMBLY
(a) Release lock to lean the seatback to front.
(b) Remove the clips.
(c) Remove the 2 bolts and RH seatback assembly.
3. REMOVE SEAT CUSHION ASSEMBLY
(a) Remove the seat cushion assembly.
HINT:
Remove the rear seat inner with center belt from seat cushion slit to remove the seat cushion.
(b) Remove the 2 lock hooks.
4. REMOVE LH AND RH REAR SIDE SEATBACK
(a) Remove the bolt and LH rear side seatback.
(b) Remove the bolt and RH rear side seatback.
5. REMOVE SEATBACK HINGE
(a) Remove the bolts and LH seatback hinge and RH seatback hinge.
(b) Remove the 2 bolts and center seatback hinge.
Torque: 18 N´m (185 kgf´cm, 13 ft´lbf)
Page 960 of 4592
BO0NC±01
± BODYREAR SEAT (TMC Made)
BO±115
2463 Author�: Date�:
DISASSEMBLY
1. REMOVE SEAT CUSHION COVER
Remove the hog rings and seat cushion cover from the seat cushion pad.
2. REMOVE THESE PARTS:
HINT:
Remove the clips to turn over the seatback cover before performing the following steps.
(a) Headrest
(b) Rear seatback lock control Bezel.
(c) Rear seatback Board
(d) Headrest supports
(e) Seatback locking knob
(f) Seatback lock knob Gromet
(g) Rear seat center armrest
3. REMOVE SEATBACK COVER
(a) Remove the hog rings and seatback frame from the seatback cover with pad.
(b) Remove the hog rings and seatback cover from the seatback pad.
4. REMOVE SEATBACK LOCK
(a) Remove the rear seatback lock control cable.
(b) Remove the 2 bolts and rear seatback lock control.
Torque: 17.5 N´m (178 kgf´cm, 12.5 ft´lbf)