Page 98 of 2267
Wiring Diagram Ð AT Ð FPSNCAT0233
YAT209
TCM
(TRANSMISSION
CONTROL MODULE): Detectable line for DTC
: Non-detectable line for DTC CONTROL VALVE
(CVT FLUID
PRESSURE
SENSOR)ECM
DTC P1791 CVT FLUID PRESSURE SENSOR
Wiring Diagram Ð AT Ð FPS
AT-96
Page 103 of 2267
DescriptionNCAT0239The TCM consists of a microcomputer and connectors for signal
input and output and for power supply. The unit controls the CVT.
ON BOARD DIAGNOSIS LOGICNCAT0239S01
Diagnostic trouble code Malfunction is detected when ... Check item (Possible cause)
: CONTROL UNIT (RAM)
: CONTROL UNIT (ROM)TCM memory (RAM) or (ROM) is mal-
functioning.TCM
DIAGNOSTIC TROUBLE CODE (DTC) CONFIRMATION
PROCEDURE
NCAT0239S02NOTE:
If ªDIAGNOSTIC TROUBLE CODE CONFIRMATION PROCE-
DUREº has been previously conducted, always turn ignition
switch ªOFFº and wait at least 5 seconds before conducting
the next test.
With CONSULT-II
1) Turn ignition switch ªONº and select ªDATA MONITORº mode
for CVT with CONSULT-II.
2) Start engine.
3) Run engine for at least 2 seconds at idle speed.
SAT574J
SAT651J
SAT971J
CONTROL UNIT (RAM), CONTROL UNIT (ROM)
Description
AT-101
Page 104 of 2267
Diagnostic Procedure=NCAT0240
1 CHECK DTC
With CONSULT-II
1. Turn ignition switch ªONº and select ªSELF DIAG RESULTSº mode for CVT with CONSULT-II.
2. Touch ªERASEº.
PERFORM DIAGNOSTIC TROUBLE CODE (DTC) CONFIRMATION PROCEDURE.
See previous page.
Is the ªCONTROL UNIT (RAM) or CONTROL UNIT (ROM)º displayed again?
Ye s©Replace TCM.
No©INSPECTION END
CONTROL UNIT (RAM), CONTROL UNIT (ROM)
Diagnostic Procedure
AT-102
Page 105 of 2267
DescriptionNCAT0241The TCM consists of a microcomputer and connectors for signal
input and output and for power supply. The unit controls the CVT.
ON BOARD DIAGNOSIS LOGICNCAT0241S01
Diagnostic trouble code Malfunction is detected when ... Check item (Possible cause)
: CONT UNIT (EEPROM)TCM memory (EEPROM) is malfunction-
ing.TCM
DIAGNOSTIC TROUBLE CODE (DTC) CONFIRMATION
PROCEDURE
NCAT0241S02NOTE:
If ªDIAGNOSTIC TROUBLE CODE CONFIRMATION PROCE-
DUREº has been previously conducted, always turn ignition
switch ªOFFº and wait at least 5 seconds before conducting
the next test.
With CONSULT-II
1) Turn ignition switch ªONº and select ªDATA MONITORº mode
for CVT with CONSULT-II.
2) Start engine.
3) Run engine for at least 2 seconds at idle speed.
SAT574J
SAT651J
SAT971J
CONTROL UNIT (EEPROM)
Description
AT-103
Page 106 of 2267
Diagnostic Procedure=NCAT0242
1 CHECK DTC
With CONSULT-II
1. Turn ignition switch ªONº and select ªSELF DIAG RESULTSº mode for CVT with CONSULT-II.
2. Move selector lever to ªRº position.
3. Depress accelerator pedal (Full throttle position).
4. Touch ªERASEº.
5. Turn ignition switch ªOFFº position for 10 seconds.
PERFORM DIAGNOSTIC TROUBLE CODE (DTC) CONFIRMATION PROCEDURE.
See previous page.
Is the ªCONT UNIT (EEPROM)º displayed again?
Ye s©Replace TCM.
No©INSPECTION END
CONTROL UNIT (EEPROM)
Diagnostic Procedure
AT-104
Page 112 of 2267
Wiring Diagram Ð AT Ð NONDTC
MODELS BEFORE VIN - P11U0548750NCAT0237
YAT155
BATTERYIGNITION SWITCH
ON or START
FUSE
BLOCK
(J/B)Refer to
EL-POWER.TCM
(TRANSMISSION
CONTROL MODULE)
Detectable line for DTC
Non-detectable line for DTC
Hyper CVT models
Hyper CVT M6 models
SPORT indicator lamp
CVT warning lamp
UNIFIED METER CONTROL UNITCOMBINATION
METER
INDICATOR
CONTROL
UNIT
REFER TO THE FOLLOWING
FUSE BLOCK - Junction Box (J/B)
TROUBLE DIAGNOSES FOR NON-DETECTABLE ITEMS
Wiring Diagram Ð AT Ð NONDTC
AT-110
Page 116 of 2267

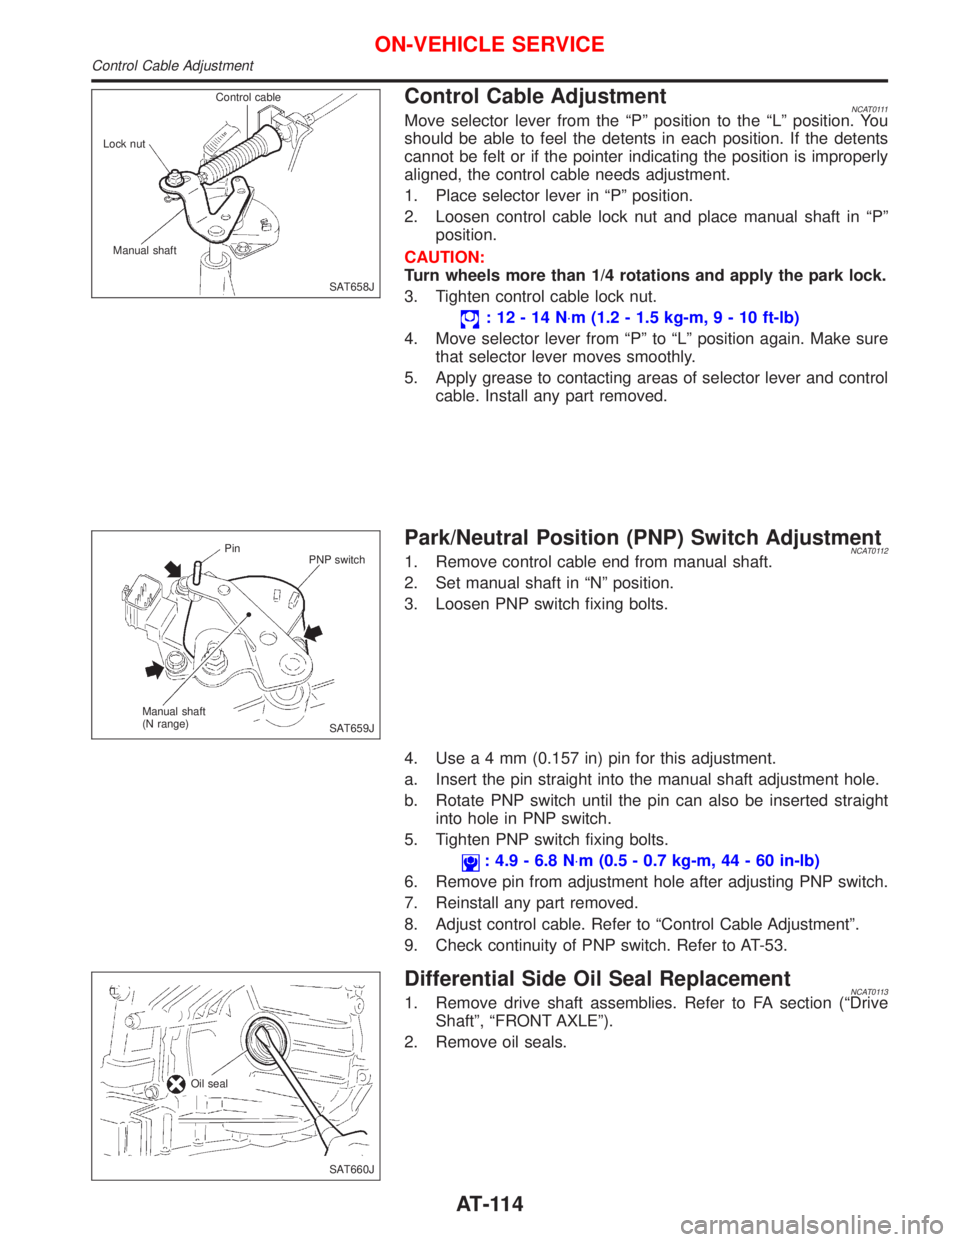
Control Cable AdjustmentNCAT0111Move selector lever from the ªPº position to the ªLº position. You
should be able to feel the detents in each position. If the detents
cannot be felt or if the pointer indicating the position is improperly
aligned, the control cable needs adjustment.
1. Place selector lever in ªPº position.
2. Loosen control cable lock nut and place manual shaft in ªPº
position.
CAUTION:
Turn wheels more than 1/4 rotations and apply the park lock.
3. Tighten control cable lock nut.
:12-14N×m (1.2 - 1.5 kg-m,9-10ft-lb)
4. Move selector lever from ªPº to ªLº position again. Make sure
that selector lever moves smoothly.
5. Apply grease to contacting areas of selector lever and control
cable. Install any part removed.
Park/Neutral Position (PNP) Switch AdjustmentNCAT01121. Remove control cable end from manual shaft.
2. Set manual shaft in ªNº position.
3. Loosen PNP switch fixing bolts.
4. Usea4mm(0.157 in) pin for this adjustment.
a. Insert the pin straight into the manual shaft adjustment hole.
b. Rotate PNP switch until the pin can also be inserted straight
into hole in PNP switch.
5. Tighten PNP switch fixing bolts.
: 4.9 - 6.8 N×m (0.5 - 0.7 kg-m, 44 - 60 in-lb)
6. Remove pin from adjustment hole after adjusting PNP switch.
7. Reinstall any part removed.
8. Adjust control cable. Refer to ªControl Cable Adjustmentº.
9. Check continuity of PNP switch. Refer to AT-53.
Differential Side Oil Seal ReplacementNCAT01131. Remove drive shaft assemblies. Refer to FA section (ªDrive
Shaftº, ªFRONT AXLEº).
2. Remove oil seals.
SAT658J Control cable
Lock nut
Manual shaft
SAT659J Pin
PNP switch
Manual shaft
(N range)
SAT660J Oil seal
ON-VEHICLE SERVICE
Control Cable Adjustment
AT-114
Page 118 of 2267

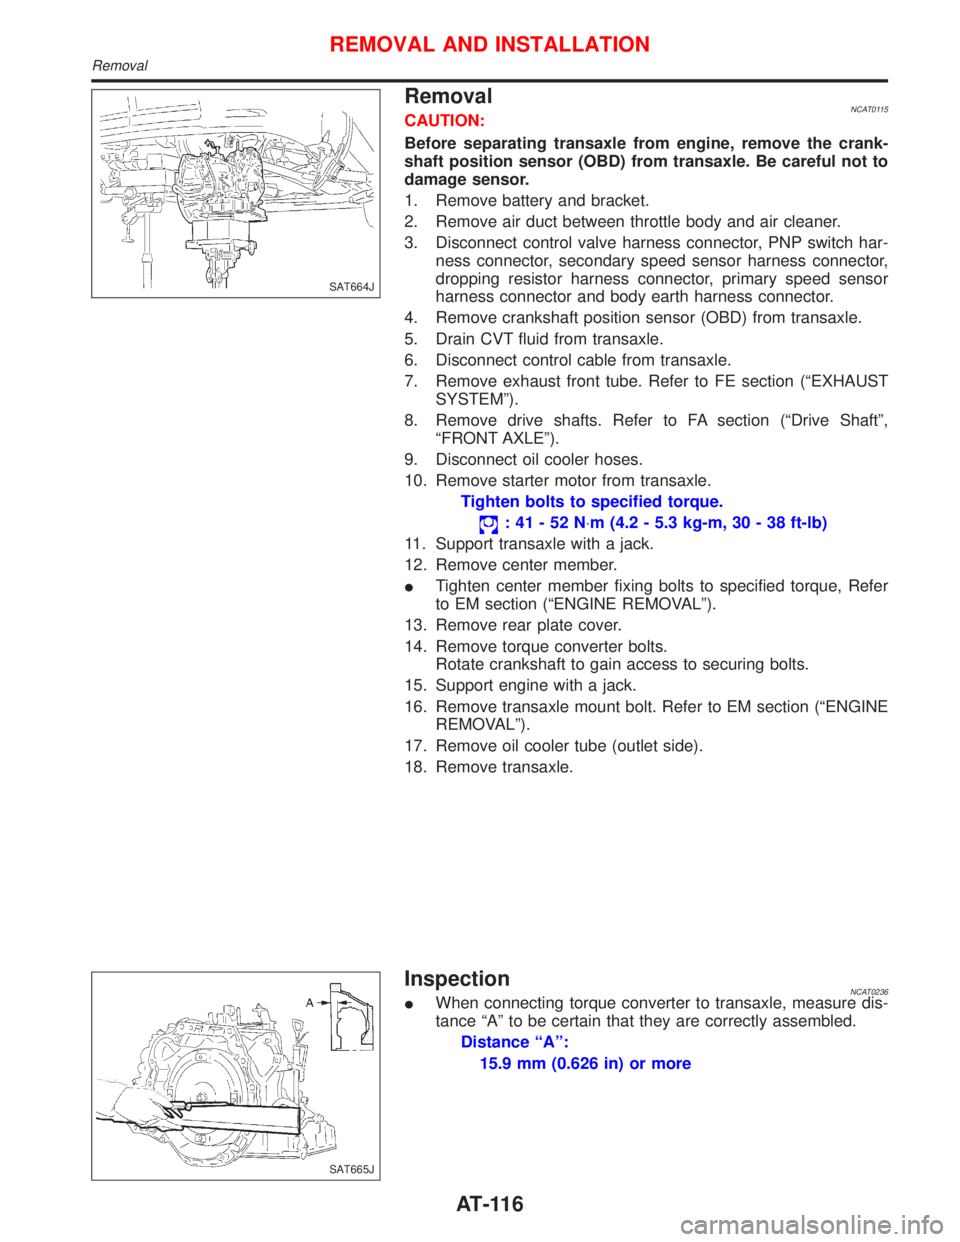
RemovalNCAT0115CAUTION:
Before separating transaxle from engine, remove the crank-
shaft position sensor (OBD) from transaxle. Be careful not to
damage sensor.
1. Remove battery and bracket.
2. Remove air duct between throttle body and air cleaner.
3. Disconnect control valve harness connector, PNP switch har-
ness connector, secondary speed sensor harness connector,
dropping resistor harness connector, primary speed sensor
harness connector and body earth harness connector.
4. Remove crankshaft position sensor (OBD) from transaxle.
5. Drain CVT fluid from transaxle.
6. Disconnect control cable from transaxle.
7. Remove exhaust front tube. Refer to FE section (ªEXHAUST
SYSTEMº).
8. Remove drive shafts. Refer to FA section (ªDrive Shaftº,
ªFRONT AXLEº).
9. Disconnect oil cooler hoses.
10. Remove starter motor from transaxle.
Tighten bolts to specified torque.
:41-52N×m (4.2 - 5.3 kg-m, 30 - 38 ft-lb)
11. Support transaxle with a jack.
12. Remove center member.
ITighten center member fixing bolts to specified torque, Refer
to EM section (ªENGINE REMOVALº).
13. Remove rear plate cover.
14. Remove torque converter bolts.
Rotate crankshaft to gain access to securing bolts.
15. Support engine with a jack.
16. Remove transaxle mount bolt. Refer to EM section (ªENGINE
REMOVALº).
17. Remove oil cooler tube (outlet side).
18. Remove transaxle.
InspectionNCAT0236IWhen connecting torque converter to transaxle, measure dis-
tance ªAº to be certain that they are correctly assembled.
Distance ªAº:
15.9 mm (0.626 in) or more
SAT664J
SAT665J
REMOVAL AND INSTALLATION
Removal
AT-116