1999 NISSAN PRIMERA seats
[x] Cancel search: seatsPage 7 of 2267
Precautions for Supplemental Restraint System
(SRS) ªAIR BAGº and ªSEAT BELT
PRE-TENSIONERº
NCAT0002The Supplemental Restraint System ªAIR BAGº and ªSEAT BELT PRE-TENSIONERº, used along with a seat
belt, help to reduce the risk or severity of injury to the driver and front passenger in a frontal collision. The
Supplemental Restraint System consists of air bag modules (located in the center of the steering wheel and
on the instrument panel on the passenger side), seat belt pre-tensioners, a diagnosis sensor unit, warning
lamp, wiring harness and spiral cable.
In addition to the supplemental air bag modules for a frontal collision, the supplemental side air bag used along
with the seat belt helps to reduce the risk or severity of injury to the driver and front passenger in a side col-
lision. The supplemental side air bag consists of air bag modules (located in the outer side of front seats),
satellite sensor, diagnosis sensor unit (one of components of supplemental air bags for a frontal collision),
wiring harness, warning lamp (one of components of supplemental air bags for a frontal collision). Information
necessary to service the system safely is included in theRS sectionof this Service Manual.
WARNING:
ITo avoid rendering the SRS inoperative, which could increase the risk of personal injury or death
in the event of a collision which would result in air bag inflation, all maintenance must be performed
by an authorized NISSAN dealer.
IImproper maintenance, including incorrect removal and installation of the SRS, can lead to per-
sonal injury caused by unintentional activation of the system.
IDo not use electrical test equipment on any circuit related to the SRS unless instructed to in this
Service Manual. SRS wiring harnesses (except ªSEAT BELT PRE-TENSIONERº connector) can be
identified with yellow harness connector (and with yellow harness protector or yellow insulation
tape before the harness connectors).
Precautions for On Board Diagnostic (OBD)
System of CVT and Engine
NCAT0198The ECM has an on board diagnostic system. It will light up the malfunction indicator (MI) to warn the driver
of a malfunction causing emission deterioration.
CAUTION:
IBe sure to turn the ignition switch ªOFFº and disconnect the negative battery terminal before any
repair or inspection work. The open/short circuit of related switches, sensors, solenoid valves, etc.
will cause the MI to light up.
IBe sure to connect and lock the connectors securely after work. A loose (unlocked) connector will
cause the MI to light up due to an open circuit. (Be sure the connector is free from water, grease,
dirt, bent terminals, etc.)
IBe sure to route and secure the harnesses properly after work. Interference of the harness with a
bracket, etc. may cause the MI to light up due to a short circuit.
IBe sure to connect rubber tubes properly after work. A misconnected or disconnected rubber tube
may cause the MI to light up due to a malfunction of the EGR system or fuel injection system, etc.
IBe sure to erase the unnecessary malfunction information (repairs completed) from the TCM and
ECM before returning the vehicle to the customer.
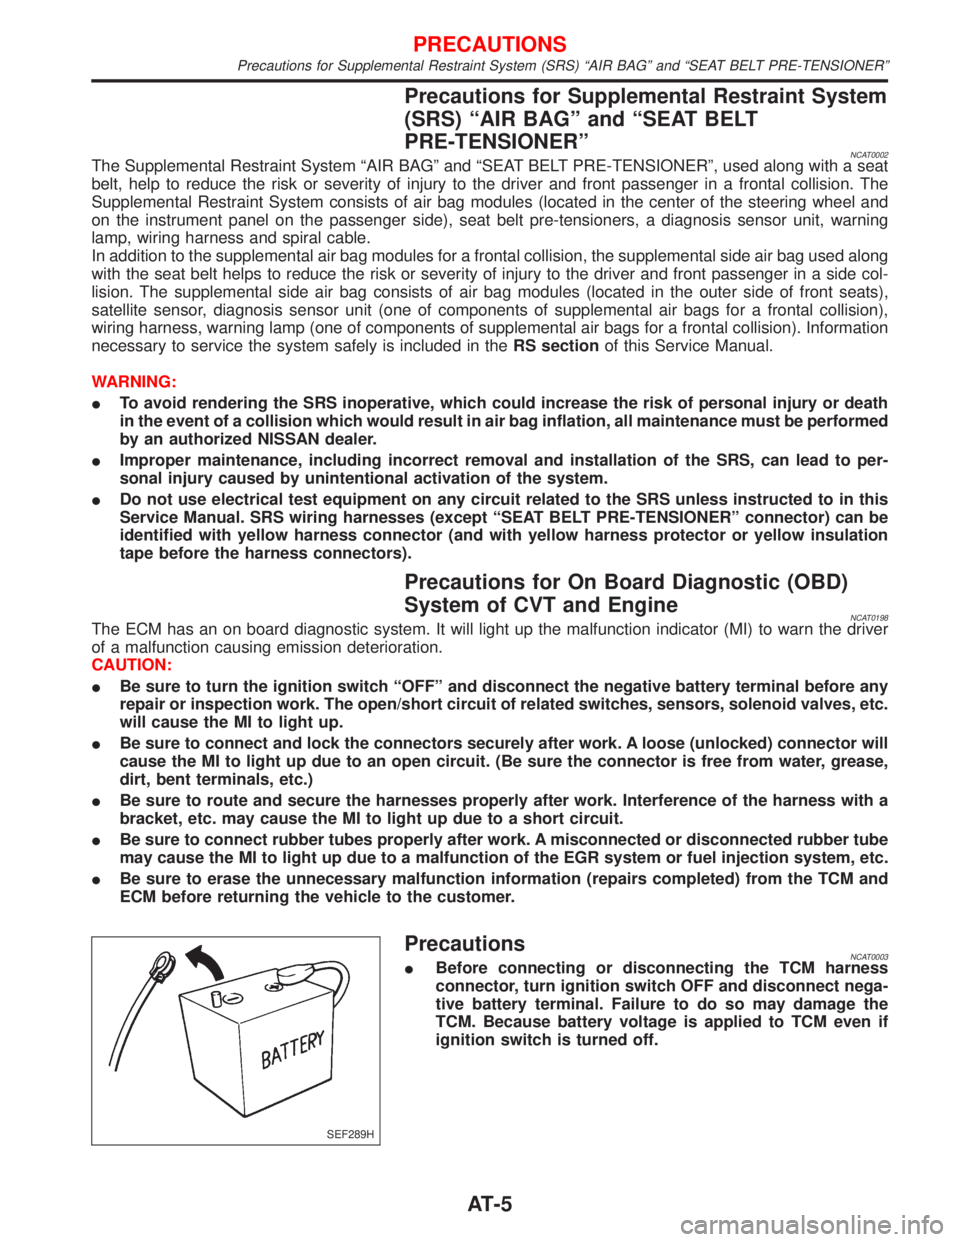
PrecautionsNCAT0003IBefore connecting or disconnecting the TCM harness
connector, turn ignition switch OFF and disconnect nega-
tive battery terminal. Failure to do so may damage the
TCM. Because battery voltage is applied to TCM even if
ignition switch is turned off.
SEF289H
PRECAUTIONS
Precautions for Supplemental Restraint System (SRS) ªAIR BAGº and ªSEAT BELT PRE-TENSIONERº
AT-5
Page 216 of 2267
Service Notice
lWhen removing or installing various parts, place a cloth or padding onto the vehicle body to prevent
scratches.
lHandle trim, molding, instruments, grille, etc. carefully during removing or installing. Be careful not to soil
or damage them.
lApply sealing compound where necessary when installing parts.
lWhen applying sealing compound, be careful that the sealing compound does not protrude from parts.
lWhen replacing any metal parts (for example body outer panel, members, etc.), be sure to take rust
prevention measures.
Supplemental Restraint System (SRS) ªAIR
BAGº and ªSEAT BELT PRE-TENSIONERº
The Supplemental Restraint System ªAir Bagº and ªSeat Belt Pre-tensionerº, used along with a seat belt,
helps to reduce the risk or severity of injury to the driver and front passenger in a frontal collision. The
Supplemental Restraint System consists of air bag modules (located in the center of the steering wheel and
on the instrument panel on the passenger side), seat belt pre-tensioners, a diagnosis sensor unit, warning
lamp, wiring harness and spiral cable. Information necessary to service the system safely is included in the
RS sectionof the Service Manual.
If the vehicle is equipped with side air bag as the Supplemental Restraint System, the side air bag used along
with the seat belt helps to reduce the risk or severity of injury to the driver and front passenger in a side
collision. The side air bag consists of air bag modules (located in the outer side of front seats), satellite
sensor, diagnosis sensor unit (which is one of components of air bags for a frontal collision), wiring harness,
warning lamp (which is one of components of air bags for a frontal collision).
WARNING:
lTo avoid rendering the SRS inoperative (which could increase the risk of personal injury or death
in the event of a collision which would result in air bag inflation) all maintenance must be per-
formed by an authorized NISSAN dealer.
lImproper maintenance, including incorrect removal and installation of the SRS, can lead to per-
sonal injury caused by unintentional activation of the system.
lDo not use electrical test equipment on any circuit related to the SRS unless instructed to do so
in this Service Manual. SRS wiring harnesses are covered with yellow insulation (either just
before the harness connectors or for the complete harness) for easy identification.
PRECAUTIONS
BT-2
Page 232 of 2267
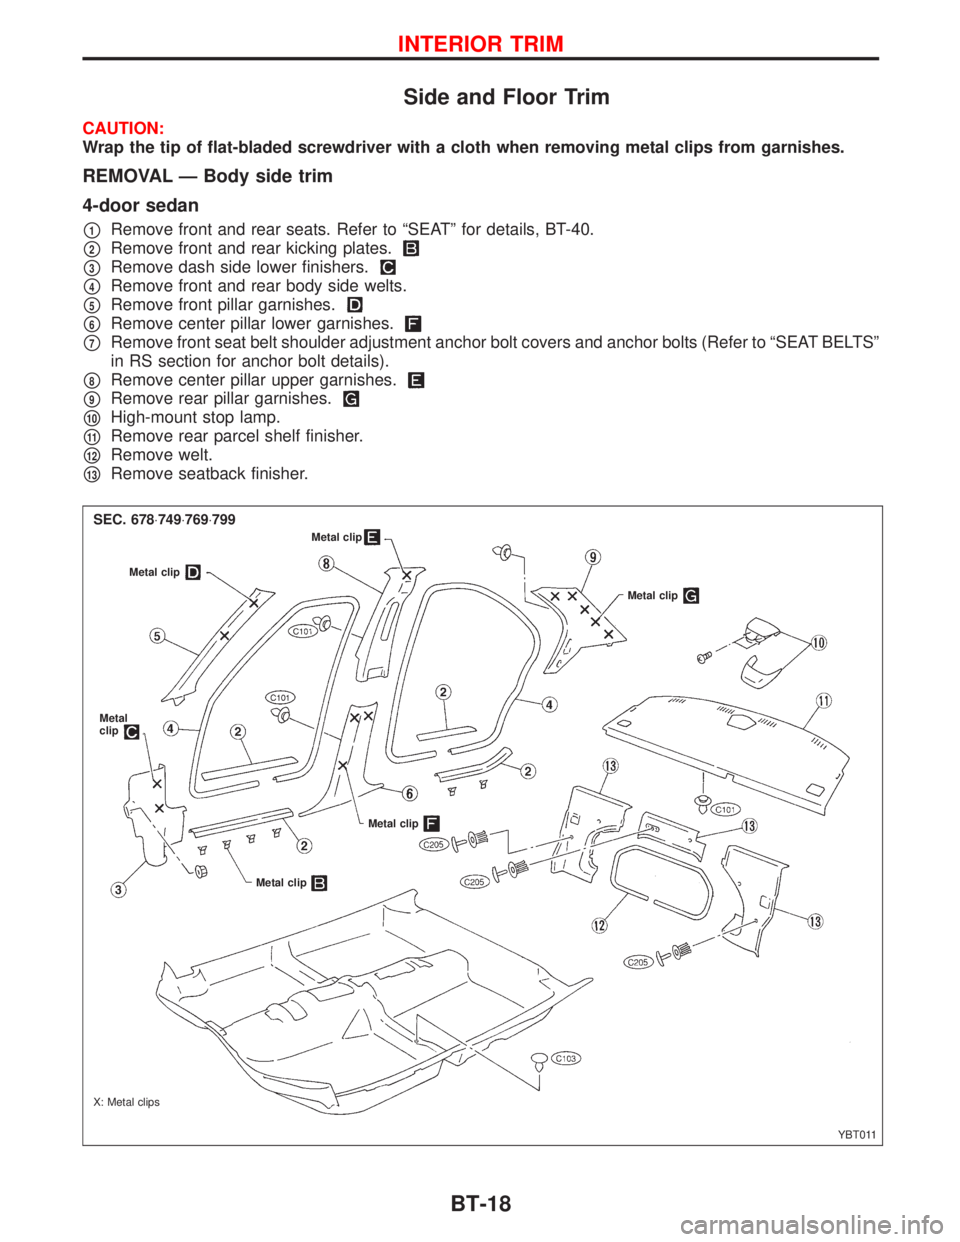
Side and Floor Trim
CAUTION:
Wrap the tip of flat-bladed screwdriver with a cloth when removing metal clips from garnishes.
REMOVAL Ð Body side trim
4-door sedan
p1Remove front and rear seats. Refer to ªSEATº for details, BT-40.
p2Remove front and rear kicking plates.
p3Remove dash side lower finishers.
p4Remove front and rear body side welts.
p5Remove front pillar garnishes.
p6Remove center pillar lower garnishes.
p7Remove front seat belt shoulder adjustment anchor bolt covers and anchor bolts (Refer to ªSEAT BELTSº
in RS section for anchor bolt details).
p8Remove center pillar upper garnishes.
p9Remove rear pillar garnishes.
p10High-mount stop lamp.
p11Remove rear parcel shelf finisher.
p12Remove welt.
p13Remove seatback finisher.
YBT011 X: Metal clipsMetal clip
Metal clip
Metal clip
Metal
clip
Metal clip
Metal clip
SEC. 678×749×769×799
INTERIOR TRIM
BT-18
Page 234 of 2267
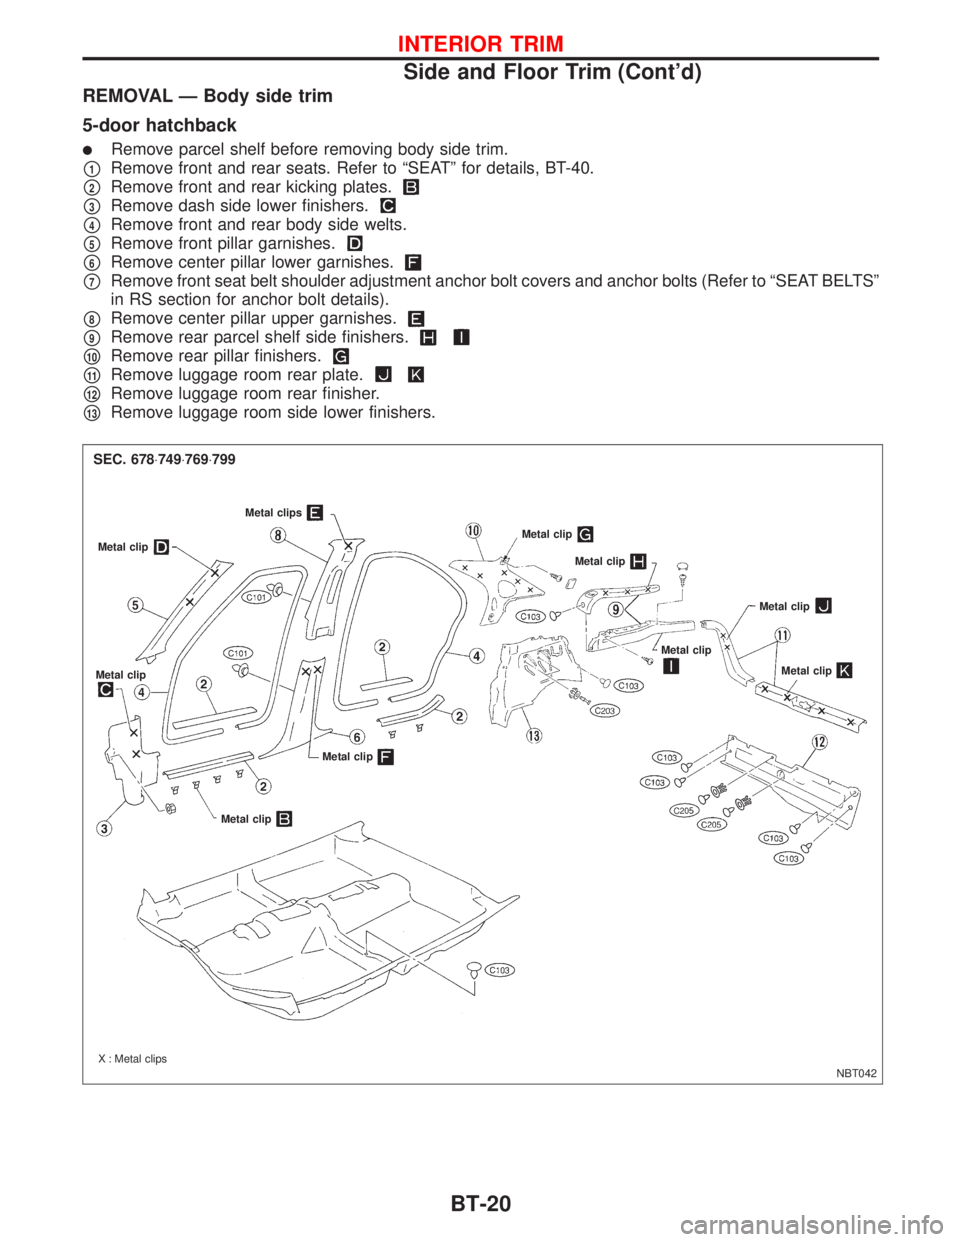
REMOVAL Ð Body side trim
5-door hatchback
lRemove parcel shelf before removing body side trim.
p1Remove front and rear seats. Refer to ªSEATº for details, BT-40.
p2Remove front and rear kicking plates.
p3Remove dash side lower finishers.
p4Remove front and rear body side welts.
p5Remove front pillar garnishes.
p6Remove center pillar lower garnishes.
p7Remove front seat belt shoulder adjustment anchor bolt covers and anchor bolts (Refer to ªSEAT BELTSº
in RS section for anchor bolt details).
p8Remove center pillar upper garnishes.
p9Remove rear parcel shelf side finishers.
p10Remove rear pillar finishers.
p11Remove luggage room rear plate.
p12Remove luggage room rear finisher.
p13Remove luggage room side lower finishers.
NBT042 Metal clip
Metal clips
Metal clip
Metal clip
Metal clip
Metal clip
Metal clip
Metal clip
Metal clip
SEC. 678×749×769×799
Metal clip
X : Metal clips
INTERIOR TRIM
Side and Floor Trim (Cont'd)
BT-20
Page 236 of 2267
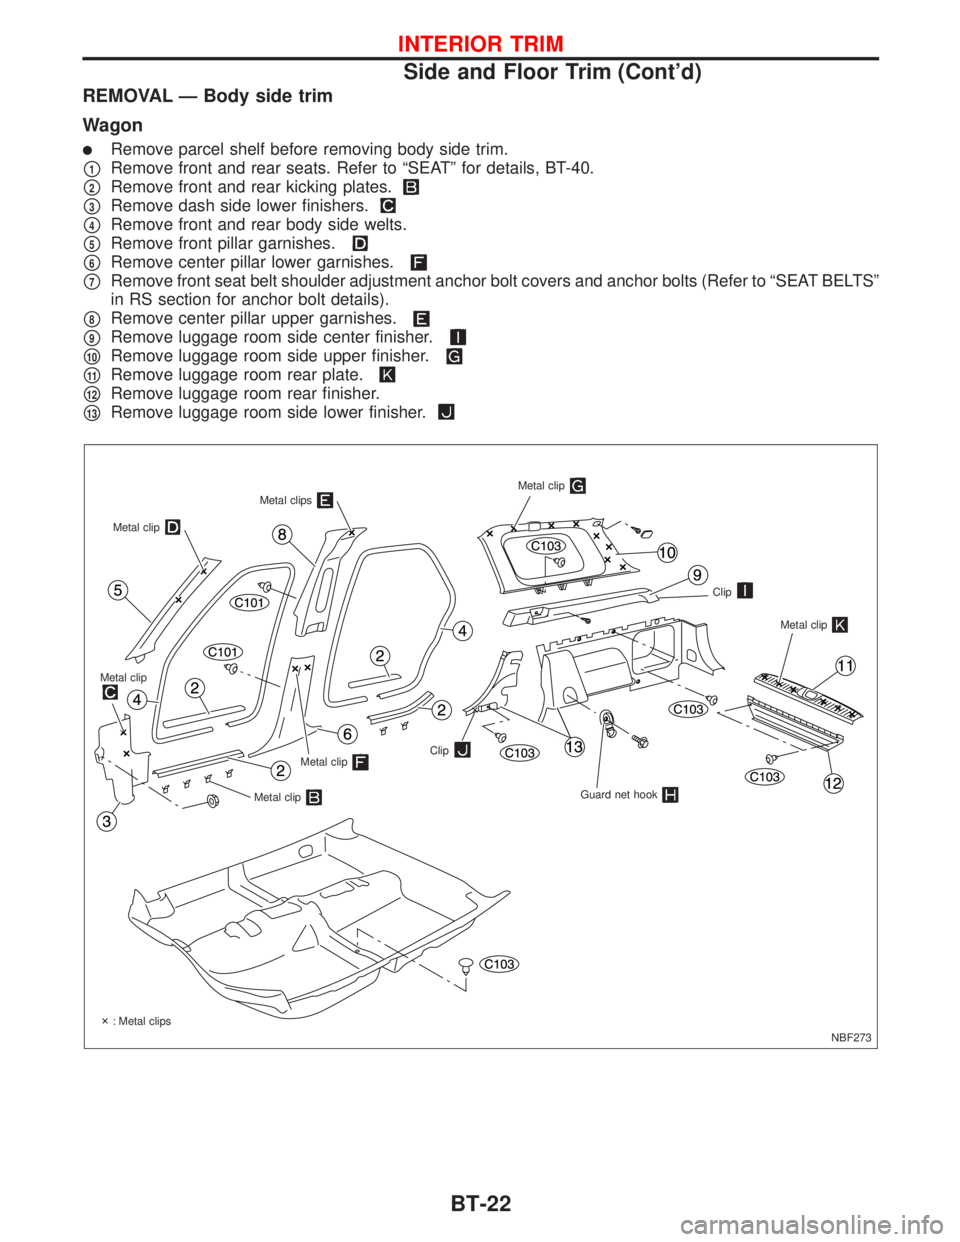
REMOVAL Ð Body side trim
Wagon
lRemove parcel shelf before removing body side trim.
p1Remove front and rear seats. Refer to ªSEATº for details, BT-40.
p2Remove front and rear kicking plates.
p3Remove dash side lower finishers.
p4Remove front and rear body side welts.
p5Remove front pillar garnishes.
p6Remove center pillar lower garnishes.
p7Remove front seat belt shoulder adjustment anchor bolt covers and anchor bolts (Refer to ªSEAT BELTSº
in RS section for anchor bolt details).
p8Remove center pillar upper garnishes.
p9Remove luggage room side center finisher.
p10Remove luggage room side upper finisher.
p11Remove luggage room rear plate.
p12Remove luggage room rear finisher.
p13Remove luggage room side lower finisher.
NBF273 Metal clip
Metal clipsMetal clip
Guard net hook
Metal clip
Metal clip
Metal clip
Metal clip
Clip
.
Clip
: Metal clips
INTERIOR TRIM
Side and Floor Trim (Cont'd)
BT-22
Page 239 of 2267
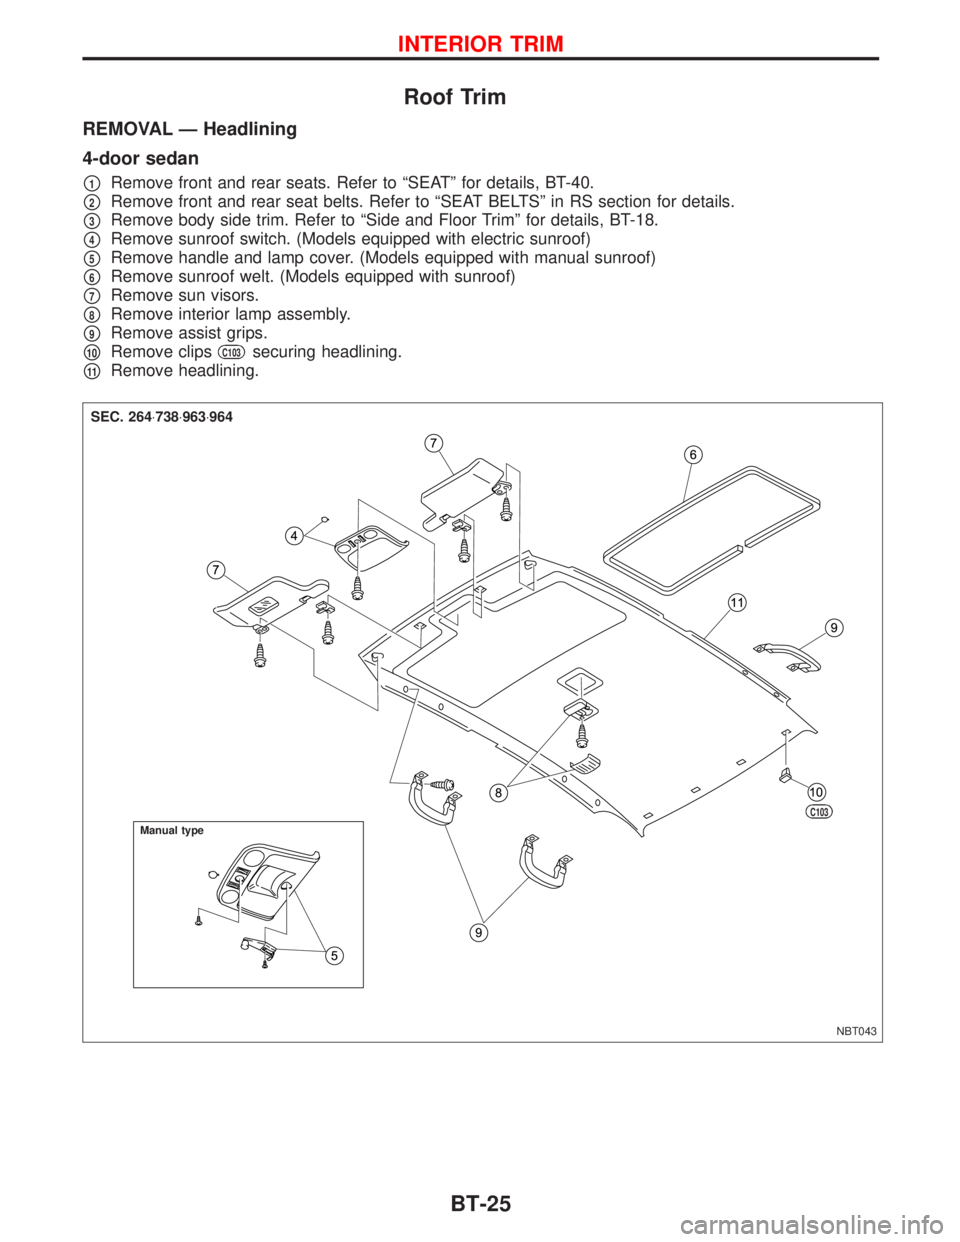
Roof Trim
REMOVAL Ð Headlining
4-door sedan
p1Remove front and rear seats. Refer to ªSEATº for details, BT-40.
p2Remove front and rear seat belts. Refer to ªSEAT BELTSº in RS section for details.
p3Remove body side trim. Refer to ªSide and Floor Trimº for details, BT-18.
p4Remove sunroof switch. (Models equipped with electric sunroof)
p5Remove handle and lamp cover. (Models equipped with manual sunroof)
p6Remove sunroof welt. (Models equipped with sunroof)
p7Remove sun visors.
p8Remove interior lamp assembly.
p9Remove assist grips.
p10Remove clipsC103securing headlining.
p11Remove headlining.
NBT043
SEC. 264×738×963×964
Manual type
C103
INTERIOR TRIM
BT-25
Page 240 of 2267
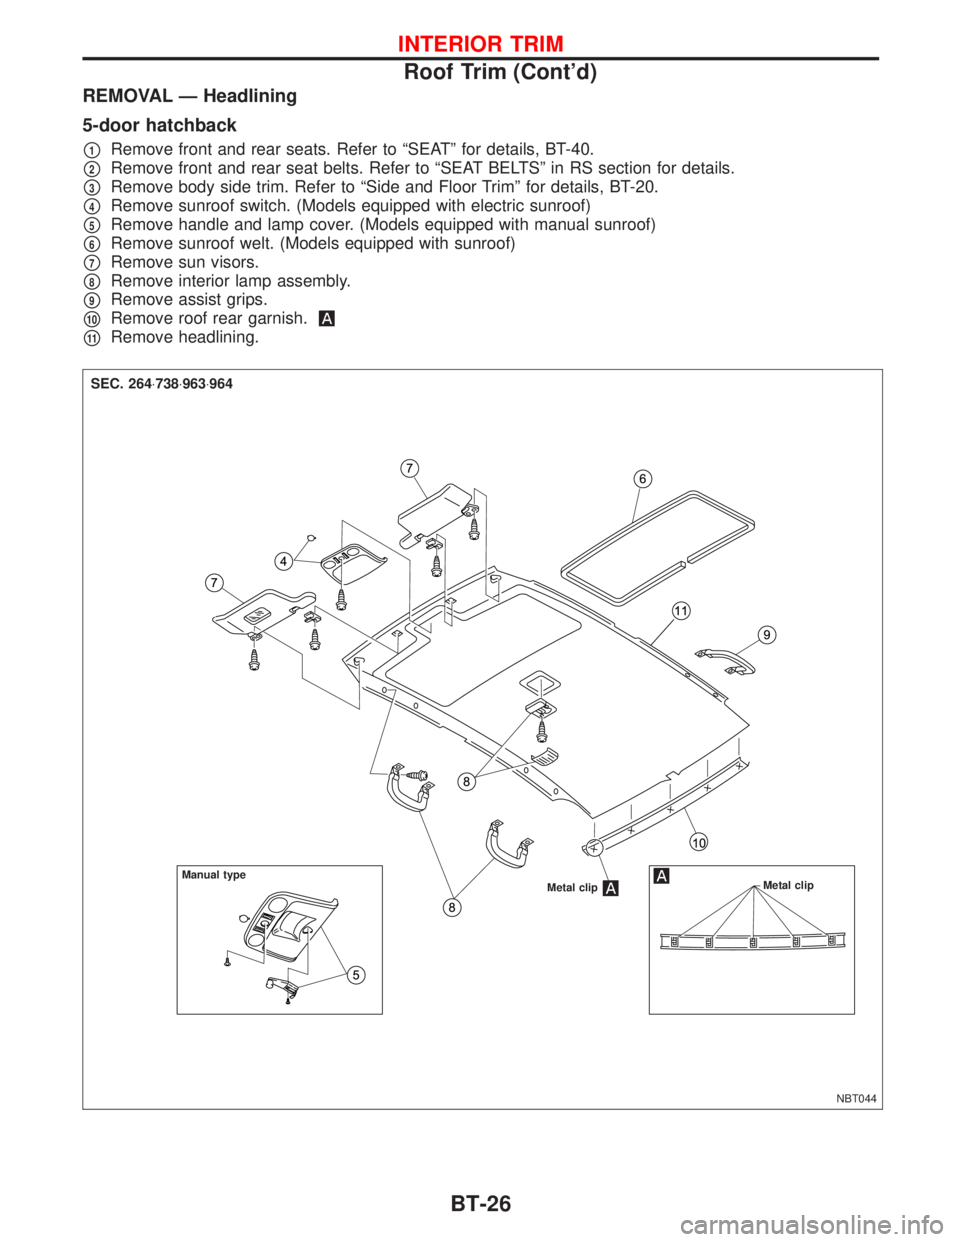
REMOVAL Ð Headlining
5-door hatchback
p1Remove front and rear seats. Refer to ªSEATº for details, BT-40.
p2Remove front and rear seat belts. Refer to ªSEAT BELTSº in RS section for details.
p3Remove body side trim. Refer to ªSide and Floor Trimº for details, BT-20.
p4Remove sunroof switch. (Models equipped with electric sunroof)
p5Remove handle and lamp cover. (Models equipped with manual sunroof)
p6Remove sunroof welt. (Models equipped with sunroof)
p7Remove sun visors.
p8Remove interior lamp assembly.
p9Remove assist grips.
p10Remove roof rear garnish.
p11Remove headlining.
NBT044 Metal clip
Metal clip
SEC. 264×738×963×964
Manual type
INTERIOR TRIM
Roof Trim (Cont'd)
BT-26
Page 241 of 2267
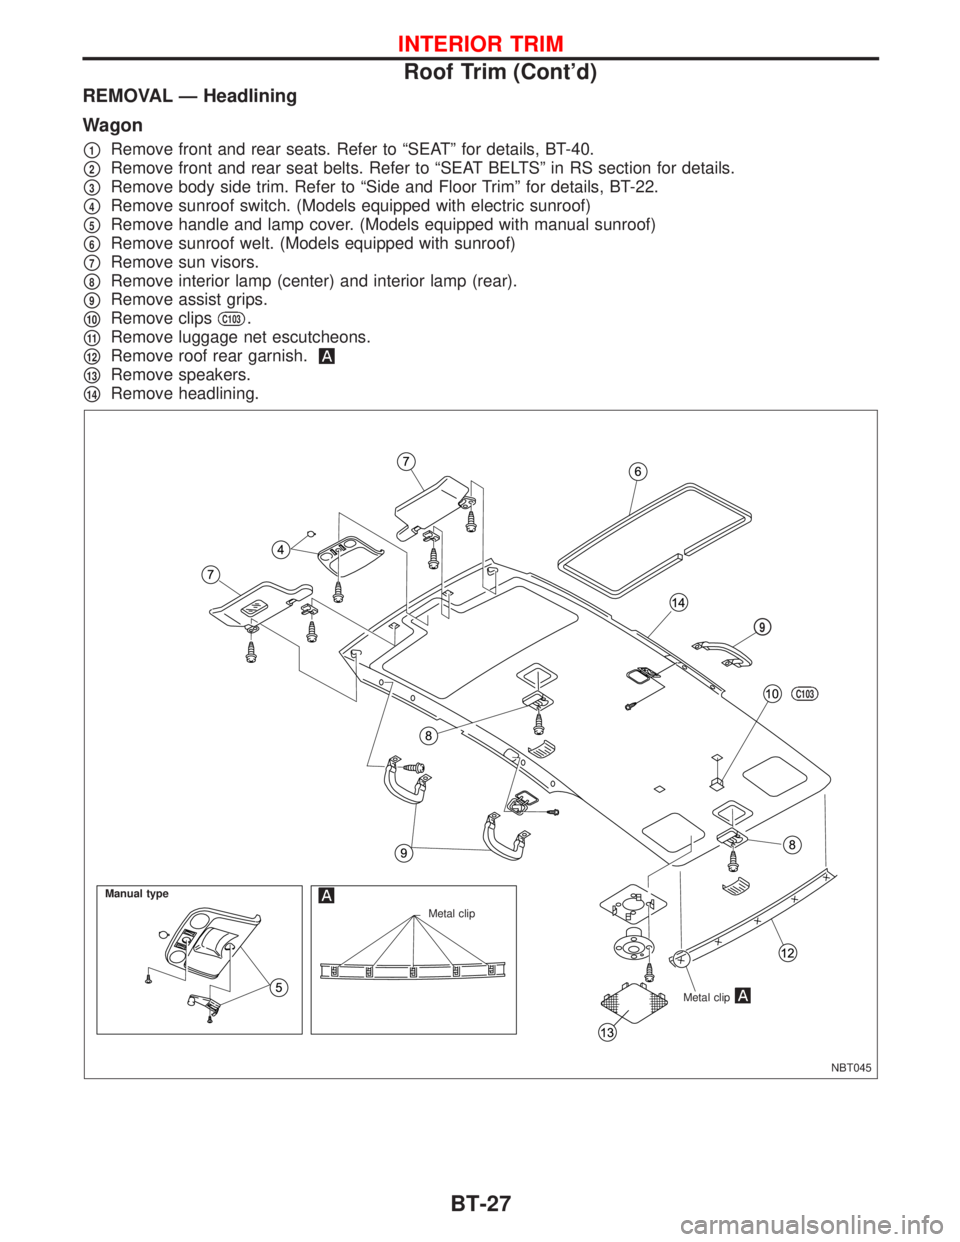
REMOVAL Ð Headlining
Wagon
p1Remove front and rear seats. Refer to ªSEATº for details, BT-40.
p2Remove front and rear seat belts. Refer to ªSEAT BELTSº in RS section for details.
p3Remove body side trim. Refer to ªSide and Floor Trimº for details, BT-22.
p4Remove sunroof switch. (Models equipped with electric sunroof)
p5Remove handle and lamp cover. (Models equipped with manual sunroof)
p6Remove sunroof welt. (Models equipped with sunroof)
p7Remove sun visors.
p8Remove interior lamp (center) and interior lamp (rear).
p9Remove assist grips.
p10Remove clipsC103.
p11Remove luggage net escutcheons.
p12Remove roof rear garnish.
p13Remove speakers.
p14Remove headlining.
NBT045 Metal clip
Manual type
Metal clip
C103
p9
INTERIOR TRIM
Roof Trim (Cont'd)
BT-27