Page 1663 of 2267
Right side
p1Starter motor
p2Injection pump
p3Injection tube
p4Thermostat housing
p5Injection nozzle
p6Spill hose
p7Water outlet
p8Belt cover
p9Timing belt
p10Injection pump sprocket
p11Rear camshaft sprocket
p12Tensioner
p13Vacuum pump
p14Rear back cover
p15Oil cooler
p16Gasket
p17Bracket
p18Power steering oil pump
adjusting bar
p19Gasket
NEM240
17 - 21 (1.7 - 2.1, 12 - 15)2 - 4 (0.2 - 0.4, 18 - 35)
3 - 5 (0.3 0.5, 26 - 43)
49-59
(5.0 - 6.0, 36 - 43)
49 - 59 (5.0 - 6.0,
36 - 43)
31-42
(3.2 - 4.3, 23 - 31)16-21
(1.6 - 2.1,
12 - 15)
16 - 21 (1.6 - 2.1, 12 - 15)
54 - 64 (5.5 - 6.5, 40 - 47)
22 - 25 (2.2 - 2.5, 16 - 18)
16 - 21 (1.6 - 2.1, 12 - 15)
SEC. 130×135×185×186×210×213×233
îî: Apply liquid gasket
: N´m (kg-m, in-lb)
îî
: N´m (kg-m, ft-lb)
: Do not re-use
16 - 21 (1.6 - 2.1, 12 - 15)
OUTER COMPONENT PARTSCD20T
EM-123
Page 1671 of 2267

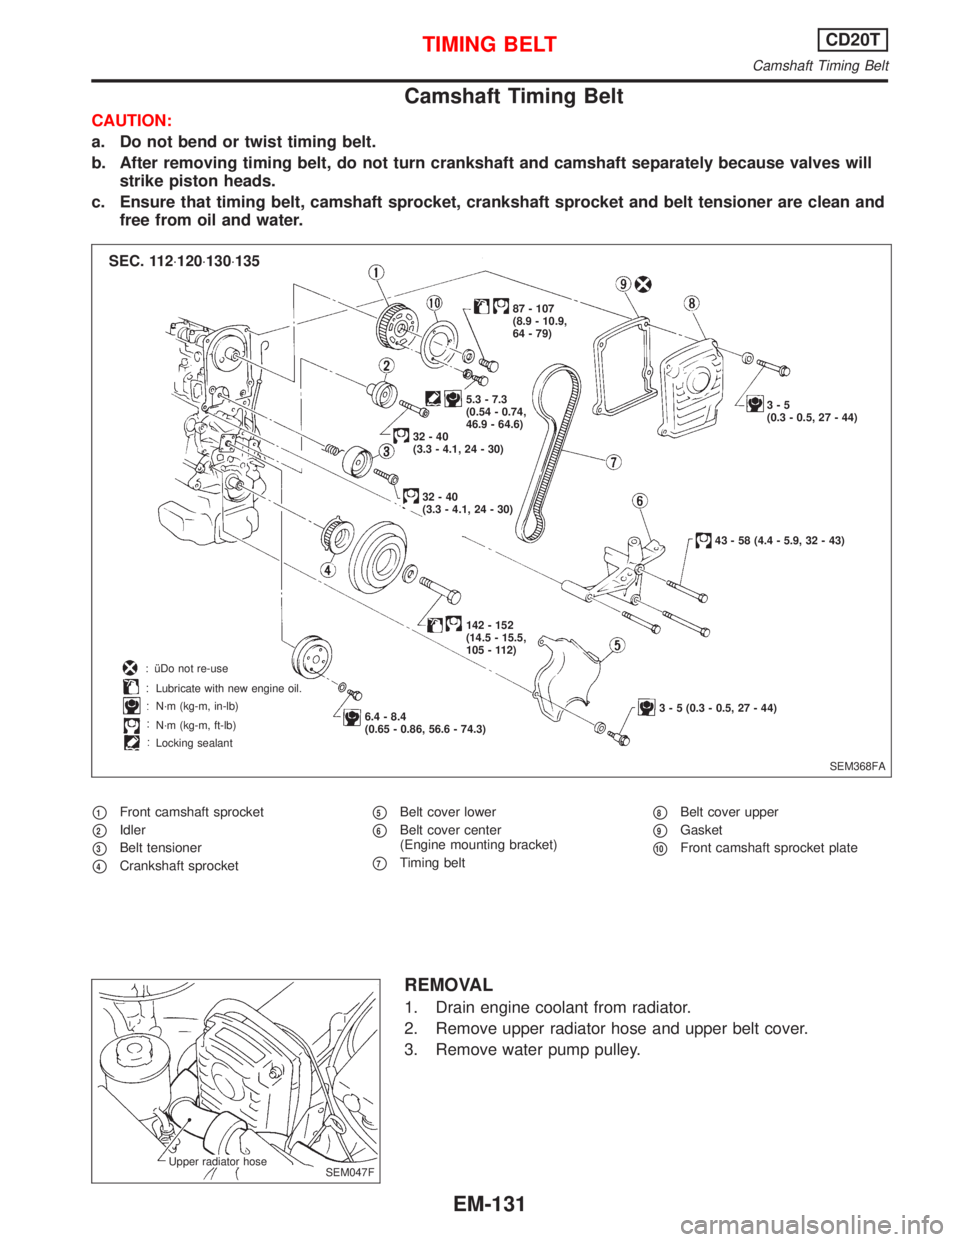
Camshaft Timing Belt
CAUTION:
a. Do not bend or twist timing belt.
b. After removing timing belt, do not turn crankshaft and camshaft separately because valves will
strike piston heads.
c. Ensure that timing belt, camshaft sprocket, crankshaft sprocket and belt tensioner are clean and
free from oil and water.
p1Front camshaft sprocket
p2Idler
p3Belt tensioner
p4Crankshaft sprocket
p5Belt cover lower
p6Belt cover center
(Engine mounting bracket)
p7Timing belt
p8Belt cover upper
p9Gasket
p10Front camshaft sprocket plate
REMOVAL
1. Drain engine coolant from radiator.
2. Remove upper radiator hose and upper belt cover.
3. Remove water pump pulley.
SEM368FA 6.4 - 8.4
(0.65 - 0.86, 56.6 - 74.3) Lubricate with new engine oil.
N´m (kg-m, in-lb)
N´m (kg-m, ft-lb)
Locking sealant5.3 - 7.3
(0.54 - 0.74,
46.9 - 64.6)3-5
(0.3 - 0.5, 27 - 44) 87 - 107
(8.9 - 10.9,
64 - 79)
32-40
(3.3 - 4.1, 24 - 30)
32-40
(3.3 - 4.1, 24 - 30)
142 - 152
(14.5 - 15.5,
105 - 112)
3 - 5 (0.3 - 0.5, 27 - 44)43 - 58 (4.4 - 5.9, 32 - 43)
SEC. 112×120×130×135
: îDo not re-use
SEM047F Upper radiator hose
TIMING BELTCD20T
Camshaft Timing Belt
EM-131
Page 1672 of 2267
4. Set No. 1 cylinder at TDC on its compression stroke. (TDC is
indicated by crankshaft pulley notch without painted mark.)
5. Remove starter motor, and install ring gear stopper using
mounting bolt holes.
6. Remove crank pulley bolt.
7. Remove crank pulley using puller.
Be sure to securely attach puller jaws. Attach jaws only to
the rear side of pulley.
8. Remove lower belt cover.
9. Remove timing belt.
(1) Loosen tensioner pulley bolt, turn tensioner pulley counter-
clockwise then tighten bolt.
(2) Remove camshaft sprocket plate.
(3) Remove idler pulley.
(4) Remove timing belt with crankshaft sprocket.
CAUTION:
Do not allow any magnetic materials to contact crankshaft
sprocket.
(5) Remove tensioner pulley and return spring.
SEM369F
SEM681D
SEM520D LoosenTighten
SEM515D
SMA398A
TIMING BELTCD20T
Camshaft Timing Belt (Cont'd)
EM-132
Page 1673 of 2267

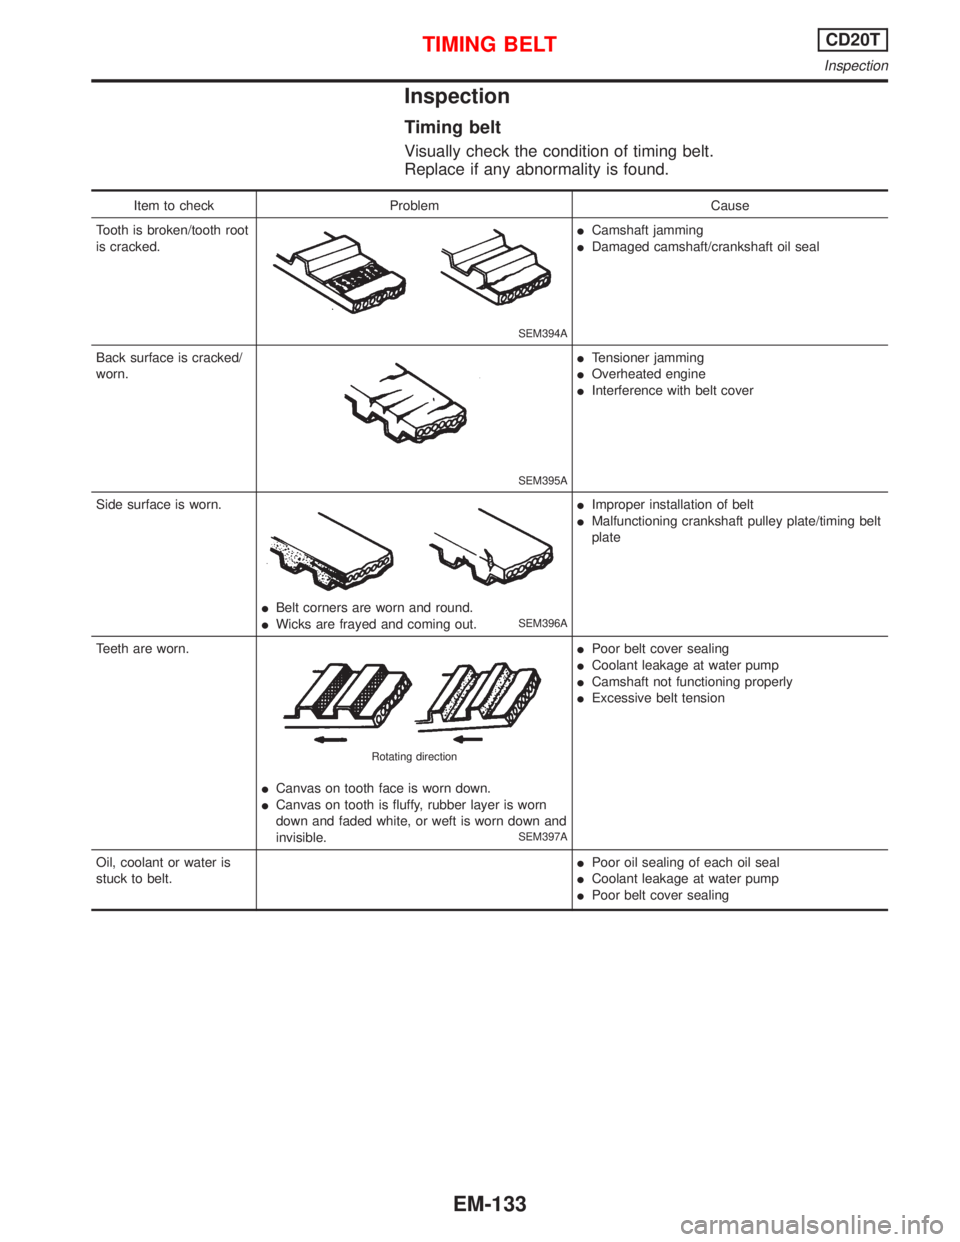
Inspection
Timing belt
Visually check the condition of timing belt.
Replace if any abnormality is found.
Item to check Problem Cause
Tooth is broken/tooth root
is cracked.
SEM394A
ICamshaft jamming
IDamaged camshaft/crankshaft oil seal
Back surface is cracked/
worn.
SEM395A
ITensioner jamming
IOverheated engine
IInterference with belt cover
Side surface is worn.
IBelt corners are worn and round.
IWicks are frayed and coming out.SEM396A
IImproper installation of belt
IMalfunctioning crankshaft pulley plate/timing belt
plate
Teeth are worn.
ICanvas on tooth face is worn down.
ICanvas on tooth is fluffy, rubber layer is worn
down and faded white, or weft is worn down and
invisible.
SEM397A Rotating direction
IPoor belt cover sealing
ICoolant leakage at water pump
ICamshaft not functioning properly
IExcessive belt tension
Oil, coolant or water is
stuck to belt.IPoor oil sealing of each oil seal
ICoolant leakage at water pump
IPoor belt cover sealing
TIMING BELTCD20T
Inspection
EM-133
Page 1674 of 2267
Belt tensioner, tensioner spring and idler
1. Check belt tensioner and idler for smooth turning.
2. Check condition of tensioner spring.
Crankshaft sprocket and front camshaft sprocket
Check teeth for abnormal signs.
Installation
1. Confirm that No. 1 piston is set at TDC on its compression
stroke. (TDC is indicated by crankshaft pulley notch without
painted mark.)
2. Install tensioner and return spring.
Temporarily tighten bolts so that tensioner is set at the fully
outside position.
3. Install idler and tighten bolt to the specified torque.
4. Install timing belt with crankshaft sprocket.
a. Align white lines on timing belt with punchmarks on
camshaft sprocket and crankshaft sprocket.
b. Point arrow on timing belt toward belt cover.
5. Install camshaft sprocket plate and secure screws with Loctite.
SEM558
SEM516D
SEM517D
SEM518D
Mark
43 cogsAlign
Align
SEM519DA
TIMING BELTCD20T
Inspection (Cont'd)
EM-134
Page 1675 of 2267

6. Adjust timing belt tension.
1) Loosen tensioner lock bolt to apply tension to timing belt.
2) Rotate crankshaft clockwise two turns to apply the specified
tension to timing belt.
3) Tighten tensioner lock bolt while holding tensioner pulley
with hexagon wrench.
Belt tension:
147.1 24.5 N (15 2.5 kg, 33.1 5.5 lb)
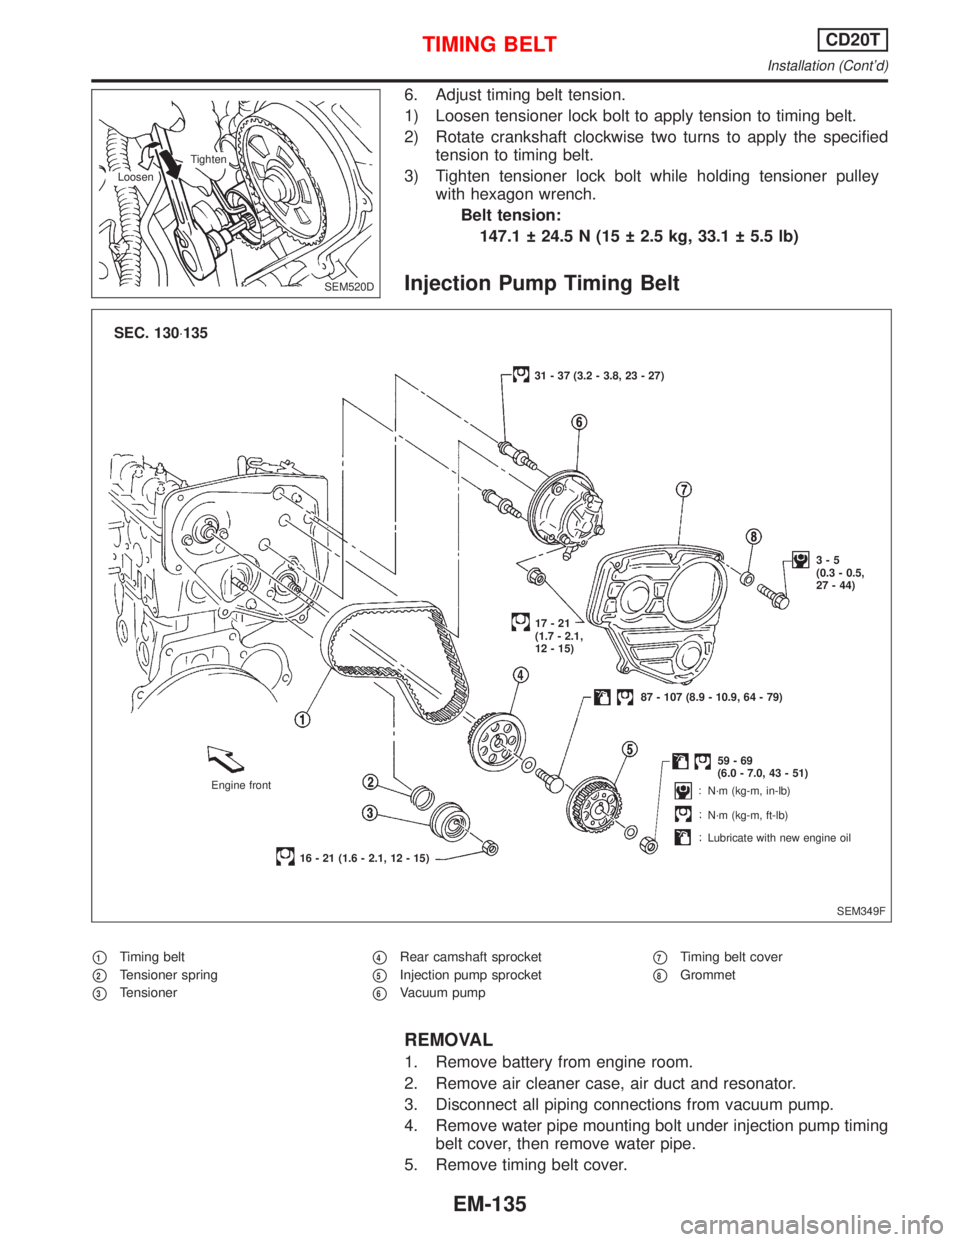
Injection Pump Timing Belt
p1Timing belt
p2Tensioner spring
p3Tensioner
p4Rear camshaft sprocket
p5Injection pump sprocket
p6Vacuum pump
p7Timing belt cover
p8Grommet
REMOVAL
1. Remove battery from engine room.
2. Remove air cleaner case, air duct and resonator.
3. Disconnect all piping connections from vacuum pump.
4. Remove water pipe mounting bolt under injection pump timing
belt cover, then remove water pipe.
5. Remove timing belt cover.
SEM520D Tighten
Loosen
SEM349F 31 - 37 (3.2 - 3.8, 23 - 27)
3-5
(0.3 - 0.5,
27 - 44)
59-69
(6.0 - 7.0, 43 - 51)
17-21
(1.7 - 2.1,
12 - 15)
Engine front
16 - 21 (1.6 - 2.1, 12 - 15)N´m (kg-m, in-lb)
N´m (kg-m, ft-lb)
Lubricate with new engine oil 87 - 107 (8.9 - 10.9, 64 - 79)
SEC. 130×135
TIMING BELTCD20T
Installation (Cont'd)
EM-135
Page 1676 of 2267

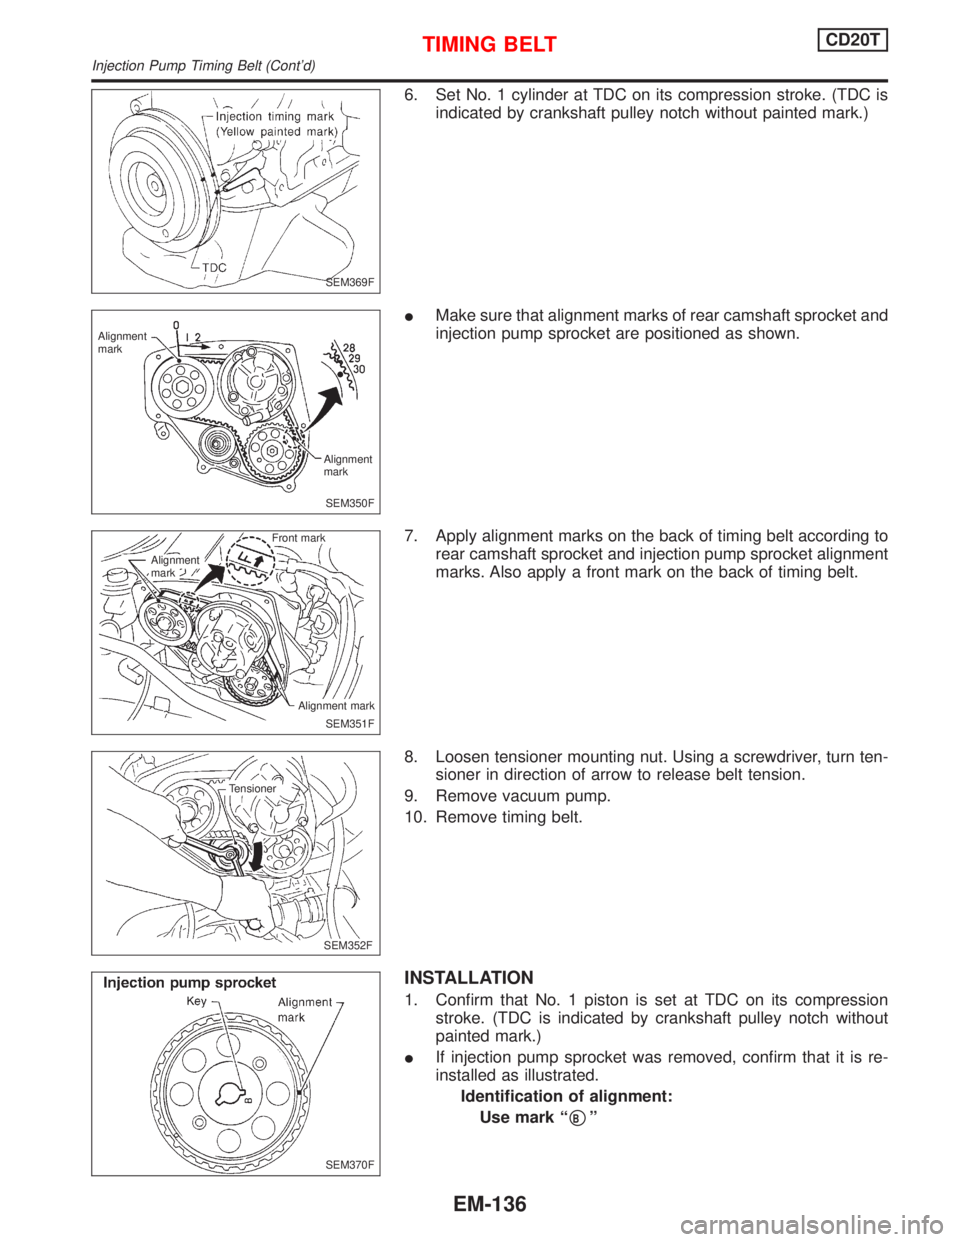
6. Set No. 1 cylinder at TDC on its compression stroke. (TDC is
indicated by crankshaft pulley notch without painted mark.)
IMake sure that alignment marks of rear camshaft sprocket and
injection pump sprocket are positioned as shown.
7. Apply alignment marks on the back of timing belt according to
rear camshaft sprocket and injection pump sprocket alignment
marks. Also apply a front mark on the back of timing belt.
8. Loosen tensioner mounting nut. Using a screwdriver, turn ten-
sioner in direction of arrow to release belt tension.
9. Remove vacuum pump.
10. Remove timing belt.
INSTALLATION
1. Confirm that No. 1 piston is set at TDC on its compression
stroke. (TDC is indicated by crankshaft pulley notch without
painted mark.)
IIf injection pump sprocket was removed, confirm that it is re-
installed as illustrated.
Identification of alignment:
Use mark ª
pBº
SEM369F
SEM350F Alignment
mark
Alignment
mark
SEM351F Alignment
markFront mark
Alignment mark
.SEM352F Tensioner
SEM370F
TIMING BELTCD20T
Injection Pump Timing Belt (Cont'd)
EM-136
Page 1677 of 2267
2. Install timing belt.
1) Set timing belt with the front mark facing front of engine.
2) Install vacuum pump.
3) Position timing belt matching the alignment marks with rear
camshaft sprocket and injection pump sprocket alignment
marks.
3. Adjust belt tension.
1) Loosen tensioner lock nut to apply tension to timing belt.
IMake sure that all sprocket and timing belt alignment marks
are positioned as shown.
2) Rotate crankshaft clockwise by two revolutions.
Do not turn crankshaft by camshaft sprockets
3) Tighten tensioner lock nut while holding tensioner with a
screwdriver.
Belt tension:
98 49 N (10 5 kg, 22 11 lb)
4. Install timing belt cover.
5. Install remaining parts in the reverse order of removal.
SEM351F Alignment
markFront mark
Alignment mark
SEM350F Alignment
mark
Alignment
mark
.SEM353F
TIMING BELTCD20T
Injection Pump Timing Belt (Cont'd)
EM-137