Page 2172 of 2267
NVH Troubleshooting Chart
Use the chart below to help you to find the cause of the symptom. If necessary, repair or replace these parts.
Reference pageRA-9
RA-11
RA-11
Ð
Ð
RA-9
RA-14
RA-5
NVH in FA section
NVH in FA section
NVH in FA section
NVH in FA section
NVH in BR section
NVH in ST section
Possible cause and
SUSPECTED PARTS
Improper installation, looseness
Shock absorber deformation, damage or deflection
Bushing or mounting deterioration
Parts interference
Spring fatigue
Suspension looseness
Incorrect wheel alignment
Wheel bearing damage
DRIVE SHAFT
FRONT AXLE AND FRONT SUSPENSION
TIRES
ROAD WHEEL
BRAKES
STEERING
SymptomREAR AXLE
AND REAR
SUSPENSIONNoiseXXXXXX XXXXXX
ShakeXXXX X XXXXXX
VibrationXXXXX XXX X
ShimmyXXXX X XXXXX
Judder X X XXXXXX
Poor quality ride or
handlingXXXXX XX XXX
X: Applicable
NOISE, VIBRATION AND HARSHNESS (NVH) TROUBLESHOOTING
RA-3
Page 2174 of 2267
Rear Axle and Rear Suspension Parts
Check axle and suspension parts for excessive play, wear or
damage.
lShake each rear wheel to check for excessive play.
lRetighten all nuts and bolts to the specified torque.
Tightening torque:
Refer to REAR SUSPENSION (RA-9).
lCheck shock absorber for oil leakage or other damage.
Rear Wheel Bearing
lCheck axial end play.
Axial end play:
0.00 mm (0.0000 in)
lCheck that wheel hub bearings operate smoothly.
lCheck tightening torque of wheel bearing lock nut.
: 187 - 255 N´m (19 - 26 kg-m, 138 - 188 ft-lb)
lReplace wheel bearing assembly if there is axial end play
or wheel bearing does not turn smoothly.
Refer to REAR AXLE Ð Wheel Hub (RA-7).
SMA525A
NRA005
SMA113
SRA690A
ON-VEHICLE SERVICE
RA-5
Page 2175 of 2267

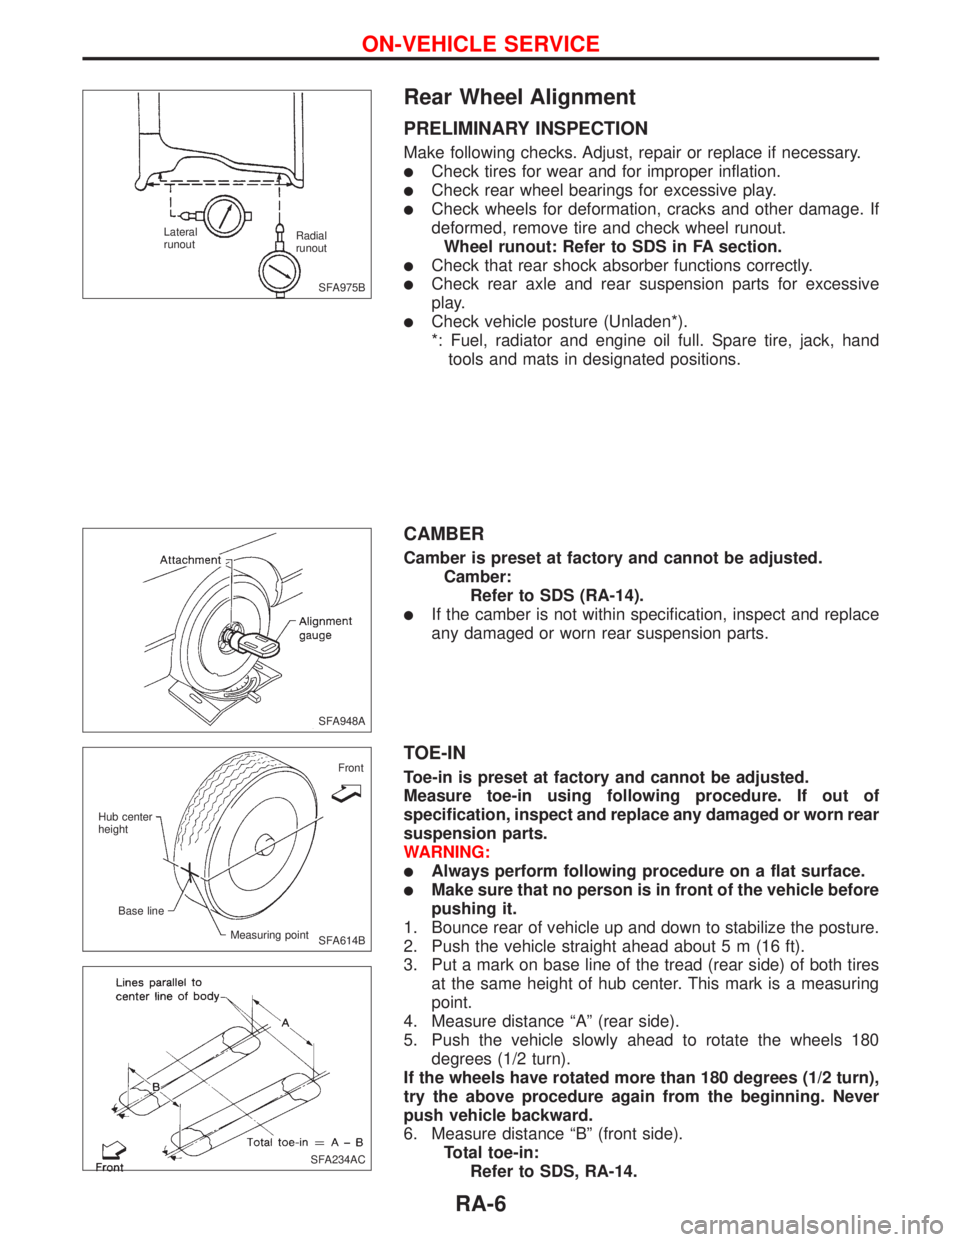
Rear Wheel Alignment
PRELIMINARY INSPECTION
Make following checks. Adjust, repair or replace if necessary.
lCheck tires for wear and for improper inflation.
lCheck rear wheel bearings for excessive play.
lCheck wheels for deformation, cracks and other damage. If
deformed, remove tire and check wheel runout.
Wheel runout: Refer to SDS in FA section.
lCheck that rear shock absorber functions correctly.
lCheck rear axle and rear suspension parts for excessive
play.
lCheck vehicle posture (Unladen*).
*: Fuel, radiator and engine oil full. Spare tire, jack, hand
tools and mats in designated positions.
CAMBER
Camber is preset at factory and cannot be adjusted.
Camber:
Refer to SDS (RA-14).
lIf the camber is not within specification, inspect and replace
any damaged or worn rear suspension parts.
TOE-IN
Toe-in is preset at factory and cannot be adjusted.
Measure toe-in using following procedure. If out of
specification, inspect and replace any damaged or worn rear
suspension parts.
WARNING:
lAlways perform following procedure on a flat surface.
lMake sure that no person is in front of the vehicle before
pushing it.
1. Bounce rear of vehicle up and down to stabilize the posture.
2. Push the vehicle straight ahead about 5 m (16 ft).
3. Put a mark on base line of the tread (rear side) of both tires
at the same height of hub center. This mark is a measuring
point.
4. Measure distance ªAº (rear side).
5. Push the vehicle slowly ahead to rotate the wheels 180
degrees (1/2 turn).
If the wheels have rotated more than 180 degrees (1/2 turn),
try the above procedure again from the beginning. Never
push vehicle backward.
6. Measure distance ªBº (front side).
Total toe-in:
Refer to SDS, RA-14.
SFA975B Radial
runout Lateral
runout
SFA948A
SFA614BFront
Hub center
height
Base line
Measuring point
SFA234AC
ON-VEHICLE SERVICE
RA-6
Page 2176 of 2267
Wheel Hub
p1Spindle
p2Baffle plate
p3Wheel hub bearing
p4Wheel bearing lock nut
p5Cotter pinp6Hub cap
p7ABS sensor
REMOVAL
CAUTION:
lBefore removing the rear wheel hub assembly, discon-
nect the ABS wheel sensor from the assembly. Then
move it away from the hub assembly. Failure to do so
may result in damage to the sensor wires and the sen-
sor becoming inoperative.
lWheel hub bearing does not require maintenance. If any
of the following symptoms are noted, replace wheel hub
bearing assembly.
lGrowling noise is emitted from wheel hub bearing during
operation.
lWheel hub bearing drags or turns roughly. This occurs when
turning hub by hand after bearing lock nut is tightened to
specified torque.
NRA015
SEC. 430
Front
187 - 255
(19 - 26, 138 - 188)
22-29
(2.3 - 2.9, 17 - 21)25 - 33 (2.6 - 3.3, 19 - 24)
: Do not re-use
: N´m (kg-m, ft-lb)
REAR AXLE
RA-7
Page 2177 of 2267
1. Remove brake caliper assembly.
2. Remove brake rotor.
3. Remove wheel bearing lock nut.
4. Remove wheel hub bearing from spindle.
Brake hose does not need to be disconnected from brake
caliper.
Suspend caliper assembly with wire so as not to stretch
brake hose.
Be careful not to depress brake pedal, or piston will pop out.
Make sure brake hose is not twisted.
INSTALLATION
lInstall wheel hub bearing.
lTighten wheel bearing lock nut.
Before tightening, apply oil to threaded portion of rear spindle
and both sides of plain washer.
: 187 - 255 N´m (19 - 26 kg-m, 138 - 188 ft-lb)
lCheck that wheel bearings operate smoothly.
lCheck wheel hub bearing axial end play.
Axial end play:
0.00 mm (0.0000 in)
SRA711A
SRA712A
SRA690A
REAR AXLE
Wheel Hub (Cont'd)
RA-8
Page 2179 of 2267

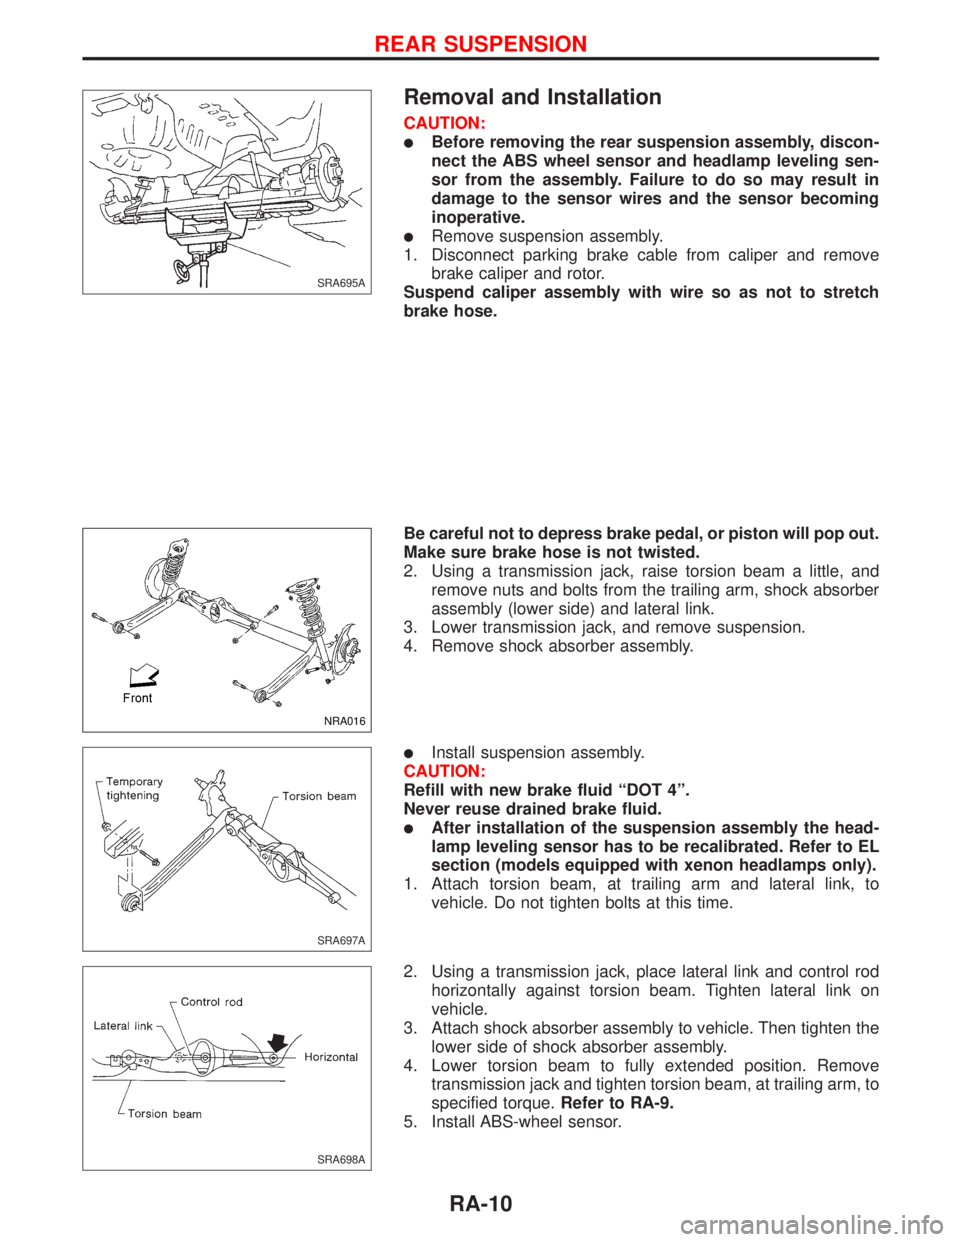
Removal and Installation
CAUTION:
lBefore removing the rear suspension assembly, discon-
nect the ABS wheel sensor and headlamp leveling sen-
sor from the assembly. Failure to do so may result in
damage to the sensor wires and the sensor becoming
inoperative.
lRemove suspension assembly.
1. Disconnect parking brake cable from caliper and remove
brake caliper and rotor.
Suspend caliper assembly with wire so as not to stretch
brake hose.
Be careful not to depress brake pedal, or piston will pop out.
Make sure brake hose is not twisted.
2. Using a transmission jack, raise torsion beam a little, and
remove nuts and bolts from the trailing arm, shock absorber
assembly (lower side) and lateral link.
3. Lower transmission jack, and remove suspension.
4. Remove shock absorber assembly.
lInstall suspension assembly.
CAUTION:
Refill with new brake fluid ªDOT 4º.
Never reuse drained brake fluid.
lAfter installation of the suspension assembly the head-
lamp leveling sensor has to be recalibrated. Refer to EL
section (models equipped with xenon headlamps only).
1. Attach torsion beam, at trailing arm and lateral link, to
vehicle. Do not tighten bolts at this time.
2. Using a transmission jack, place lateral link and control rod
horizontally against torsion beam. Tighten lateral link on
vehicle.
3. Attach shock absorber assembly to vehicle. Then tighten the
lower side of shock absorber assembly.
4. Lower torsion beam to fully extended position. Remove
transmission jack and tighten torsion beam, at trailing arm, to
specified torque.Refer to RA-9.
5. Install ABS-wheel sensor.
SRA695A
NRA016
SRA697A
SRA698A
REAR SUSPENSION
RA-10
Page 2183 of 2267
General Specifications
Suspension type Multi-link beam suspension
Shock absorber type Double-acting hydraulic
Stabilizer Standard equipment
Inspection and Adjustment
WHEEL ALIGNMENT (Unladen*)
Camber Minimum þ2É9¢(þ2.15É)
Degree minute
(Decimal degree)Nominal þ1É24¢(þ1.4É)
Maximum þ0É39¢(þ0.65É)
Total toe-in Minimum þ1.8 (þ0.07)
Distance (AþB)
mm (in)Nominal 2.2 (0.09)
Maximum 6.2 (0.24)
Angle (left plus right) Minimum þ0É11¢24²(þ0.19É)
Degree minute
(Decimal degree)Nominal 0É12¢36²(0.21É)
Maximum 0É36¢36²(0.61É)
*: Fuel, radiator coolant and engine oil full. Spare tire, jack,
hand tools and mats in designated positions.
WHEEL BEARING
Wheel bearing axial end play
mm (in)0.0 (0.00)
Wheel bearing lock nut tighten-
ing torque
N´m (kg-m, ft-lb)187 - 255
(19 - 26, 138 - 188)
SERVICE DATA AND SPECIFICATIONS (SDS)
RA-14
Page 2185 of 2267

Supplemental Restraint System (SRS) ªAIR
BAGº and ªSEAT BELT PRE-TENSIONERº
The Supplemental Restraint System such as ªAIR BAGº and ªSEAT BELT PRE-TENSIONERº used along
with a seat belt, help to reduce the risk or severity of injury to the driver and front passenger in certain types
of collision. The SRS system composition which is available to NISSAN MODEL P11 is as follows (The
composition varies according to the destination and optional equipment):
lFor a frontal collision
The Supplemental Restraint System consists of driver's air bag module (located in the center of the
steering wheel), front passenger's air bag module (located on the instrument panel on passenger's side),
seat belt pre-tensioners, a diagnosis sensor unit, warning lamp, wiring harness and spiral cable.
lFor a side collision
The Supplemental Restraint System consists of air bag modules (located in the outer side of front seats),
satellite sensor, diagnosis sensor unit (one of components of supplemental air bags for a frontal collision),
wiring harness, warning lamp (one of components of supplemental air bags for a frontal collision).
WARNING:
lTo avoid rendering the SRS inoperative, which could increase the risk of personal injury or death
in the event of a collision which would result in air bag inflation, all maintenance must be per-
formed by an authorized NISSAN dealer.
lImproper maintenance, including incorrect removal and installation of the SRS, can lead to per-
sonal injury caused by unintentional activation of the system.
lDo not use electrical test equipment on any circuit related to the SRS unless instructed to in this
Service Manual. Spiral cable and SRS wiring harnesses except ªSEAT BELT PRE-TENSIONERº
connectors can be identified by yellow harness connector (and with yellow harness protector or
yellow insulation tape before the harness connectors).
CAUTION:
lBefore removing the seat belt pre-tensioner assembly, turn the ignition switch OFF, disconnect
both battery cables and wait at least 3 minutes.
lDo not use electrical test equipment for seat belt pre-tensioner connector.
lAfter replacing or installing seat belt pre-tensioner assembly, or reconnecting seat belt pre-ten-
sioner connector, check the system function. Refer to ªSRS Operation Checkº (RS-37) for details.
lDo not disassemble buckle or seat belt assembly.
lReplace anchor bolts if they are deformed or worn out.
lNever oil tongue and buckle.
lIf any component of seat belt assembly is questionable, do not repair. Replace the whole seat
belt assembly.
lIf webbing is cut, frayed, or damaged, replace seat belt assembly.
lWhen replacing seat belt assembly, use a genuine seat belt assembly.
lAfter any collision, inspect all seat belt assemblies, including retractors and other attached
hardwares (i.e., guide rail set).
PRECAUTION
RS-2