1998 JAGUAR X308 fuel
[x] Cancel search: fuelPage 1225 of 2490
R
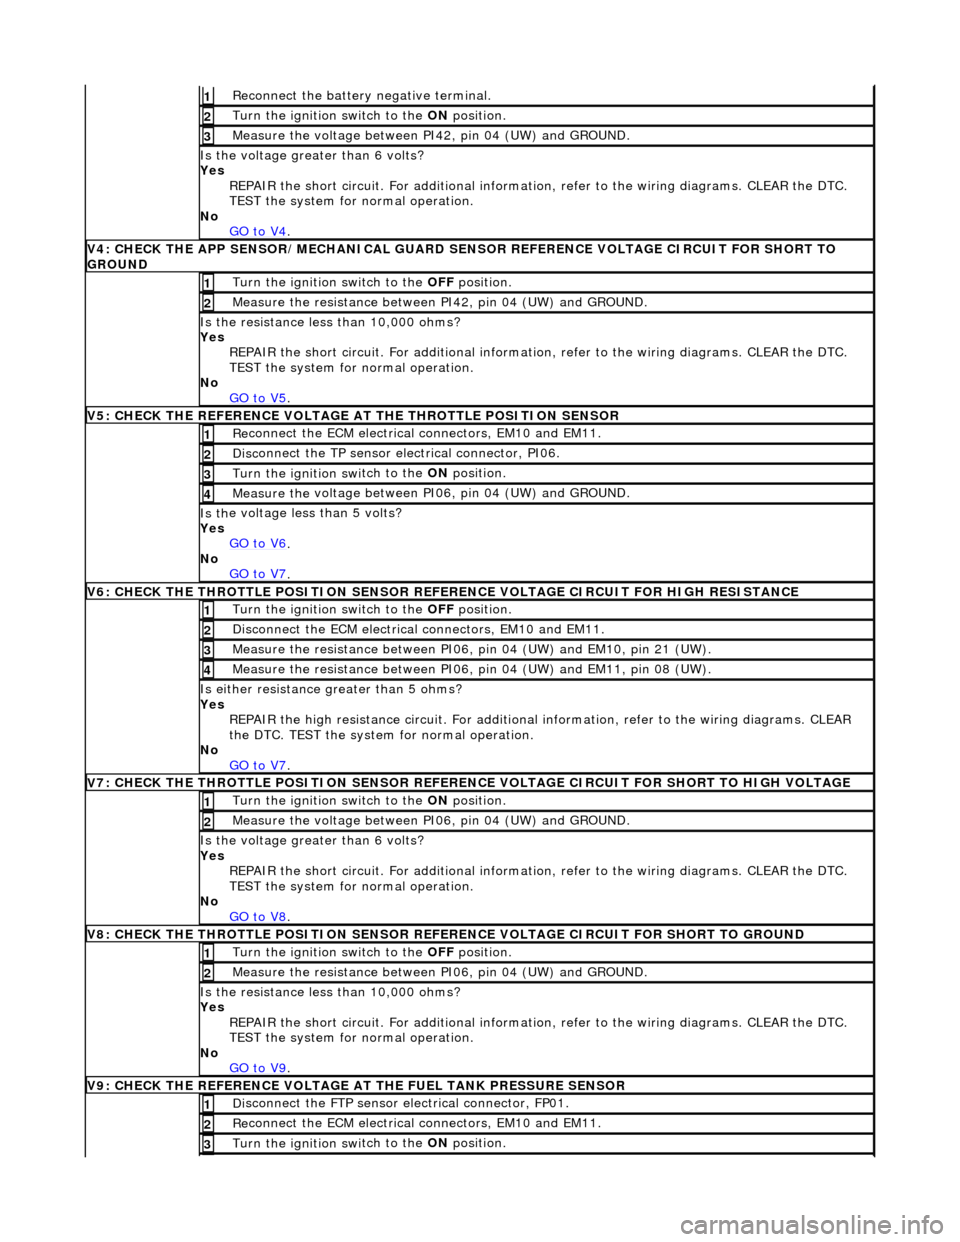
econnect the battery negative terminal.
1
Turn the ignition swi
tch to the ON
position.
2
Measure the
voltage between PI
42, pin 04 (UW) and GROUND.
3
Is th
e voltage greater than 6 volts?
Yes REPAIR the short circuit. For addi tional information, refer to the wiring diagrams. CLEAR the DTC.
TEST the system for normal operation.
No GO to V4
.
V
4: CHECK THE APP SENSOR/MECHA
NICAL GUARD SENSOR REFERENCE VOLTAGE CIRCUIT FOR SHORT TO
GROUND
Turn the ignition swi
tch to the
OFF position.
1
Meas
ure the resistance between PI42, pin 04 (UW) and GROUND.
2
Is
the resistance less than 10,000 ohms?
Yes REPAIR the short circuit. For addi tional information, refer to the wiring diagrams. CLEAR the DTC.
TEST the system for normal operation.
No GO to V5
.
V
5: CHECK THE REFERENCE VOLTAGE AT THE THROTTLE POSITION SENSOR
Re
connect the ECM electrical connectors, EM10 and EM11.
1
Disc
onnect the TP sensor electrical connector, PI06.
2
Turn the ignition swi
tch to the ON
position.
3
Measure the
voltage between PI
06, pin 04 (UW) and GROUND.
4
Is th
e voltage less than 5 volts?
Yes GO to V6
.
No
GO to V7
.
V
6: CHECK THE THROTTLE POSITION SENSOR REFE
RENCE VOLTAGE CIRCUIT FOR HIGH RESISTANCE
Turn the ignition swi
tch to the OFF
position.
1
D
isconnect the ECM electrical connectors, EM10 and EM11.
2
Me
asure the resistance between PI06, pin 04 (UW) and EM10, pin 21 (UW).
3
Me
asure the resistance between PI06, pin 04 (UW) and EM11, pin 08 (UW).
4
Is either resi
stance
greater than 5 ohms?
Yes REPAIR the high resistance circui t. For additional information, refer to the wiring diagrams. CLEAR
the DTC. TEST the system for normal operation.
No GO to V7
.
V
7: CHECK THE THROTTLE POSITION SENSOR REFERENCE VOLTAGE CIRCUIT FOR SHORT TO HIGH VOLTAGE
Turn the ignition swi
tch to the ON
position.
1
Measure the
voltage between PI
06, pin 04 (UW) and GROUND.
2
Is th
e voltage greater than 6 volts?
Yes REPAIR the short circuit. For addi tional information, refer to the wiring diagrams. CLEAR the DTC.
TEST the system for normal operation.
No
GO to V8
.
V
8: CHECK THE THROTTLE POSITION SENSOR REFE
RENCE VOLTAGE CIRCUIT FOR SHORT TO GROUND
Turn the ignition swi
tch to the OFF
position.
1
Meas
ure the resistance between PI06, pin 04 (UW) and GROUND.
2
Is
the resistance less than 10,000 ohms?
Yes REPAIR the short circuit. For addi tional information, refer to the wiring diagrams. CLEAR the DTC.
TEST the system for normal operation.
No GO to V9
.
V
9: CHECK THE REFERENCE VOLTAGE AT THE FUEL TANK PRESSURE SENSOR
Di
sconnect the FTP sensor electrical connector, FP01.
1
Re
connect the ECM electrical connectors, EM10 and EM11.
2
Turn the ignition swi
tch to the ON
position.
3
Page 1226 of 2490
Measure the voltage between FP 01
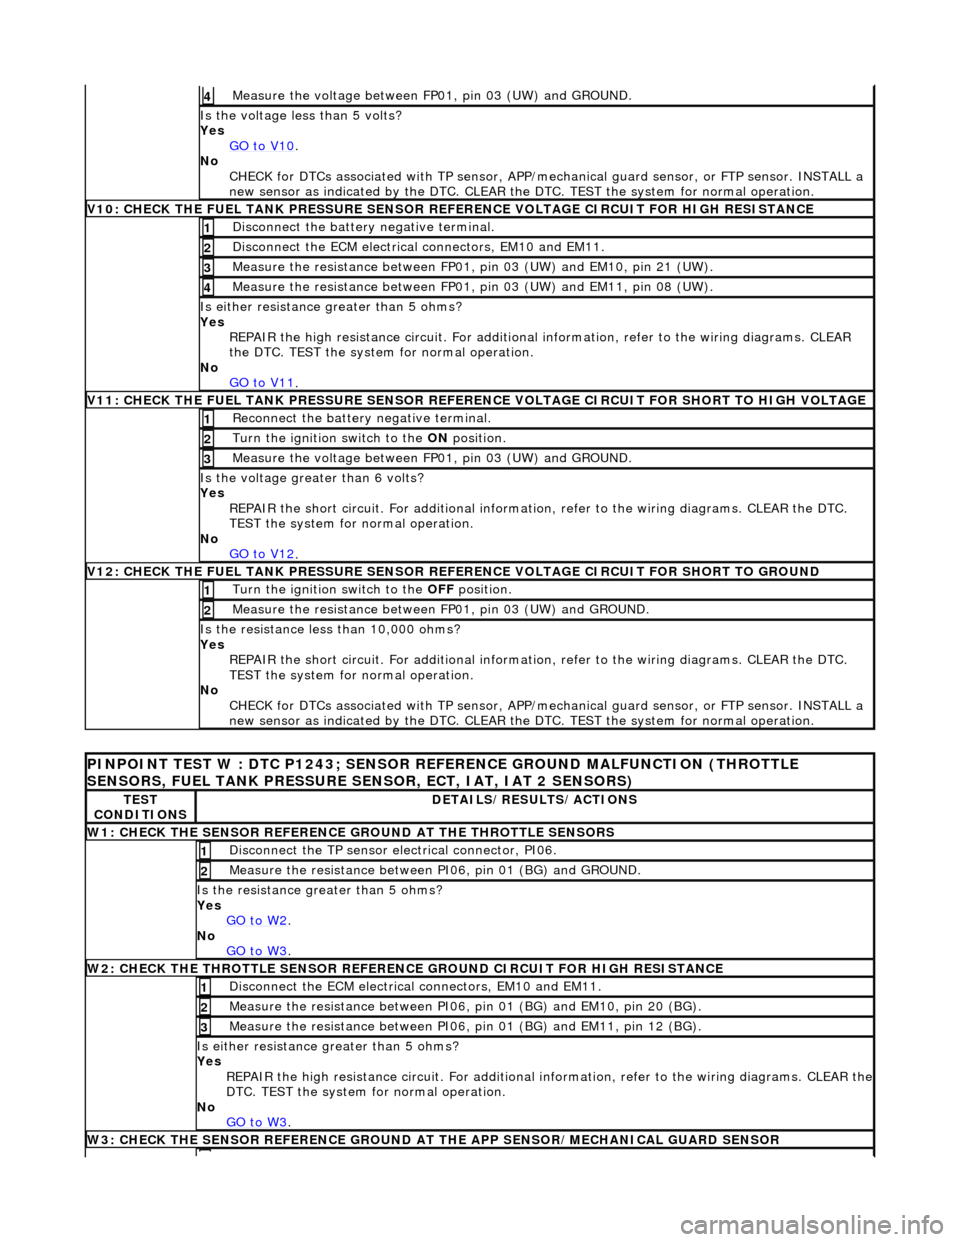
, pin 03 (UW) and GROUND.
4
Is th
e volt
age less than 5 volts?
Yes GO to V10
.
No
CHECK
for DTCs associated with
TP sensor, APP/mechanical guard sensor, or FTP sensor. INSTALL a
new sensor as indicated by the DTC. CLEAR the DTC. TEST the system for normal operation.
V
10: CHECK
THE FUEL TANK PRESSURE SENSOR
REFERENCE VOLTAGE CIRCUIT FOR HIGH RESISTANCE
Disc
onnect the battery negative terminal.
1
D
i
sconnect the ECM electrical connectors, EM10 and EM11.
2
Measure t
he resistance between FP01,
pin 03 (UW) and EM10, pin 21 (UW).
3
Measure t
he resistance between FP01,
pin 03 (UW) and EM11, pin 08 (UW).
4
Is either resistance greater
than 5 ohms?
Yes REPAIR the high resistance circui t. For additional information, refer to the wiring diagrams. CLEAR
the DTC. TEST the system for normal operation.
No GO to V11
.
V11: CHECK
THE FUEL TANK PRESSURE SENSOR REFE
RENCE VOLTAGE CIRCUIT FOR SHORT TO HIGH VOLTAGE
Re
connect the battery negative terminal.
1
Turn the ignition swi
t
ch to the ON
position.
2
Measure the voltage between FP 01
, pin 03 (UW) and GROUND.
3
Is th
e volt
age greater than 6 volts?
Yes REPAIR the short circuit. For addi tional information, refer to the wiring diagrams. CLEAR the DTC.
TEST the system for normal operation.
No GO to V12
.
V12: CHECK
THE FUEL TANK PRESSURE SENSOR
REFERENCE VOLTAGE CIRCUIT FOR SHORT TO GROUND
Turn the ignition swit
ch to the OFF
position.
1
Measure t
he resistance between
FP01, pin 03 (UW) and GROUND.
2
Is t
he resistance less than 10,000 ohms?
Yes REPAIR the short circuit. For addi tional information, refer to the wiring diagrams. CLEAR the DTC.
TEST the system for normal operation.
No CHECK for DTCs associated with TP sensor, APP/mechanical guard sensor, or FTP sensor. INSTALL a
new sensor as indicated by the DTC. CLEAR the DTC. TEST the system for normal operation.
PI
NPOINT TEST W : DTC P1243; SENSOR RE
FERENCE GROUND MALFUNCTION (THROTTLE
SENSORS, FUEL TANK PRESSURE SENSOR, ECT, IAT, IAT 2 SENSORS)
TE S
T
CONDITIONS
D E
TAILS/RESULTS/ACTIONS
W1: CHECK THE SENSO
R
REFERENCE
GROUND AT THE THROTTLE SENSORS
Disc
onne
ct the TP sensor electrical connector, PI06.
1
Meas
ure t
he resistance between PI06, pin 01 (BG) and GROUND.
2
Is th
e res
istance greater than 5 ohms?
Yes GO to W2
.
No
GO to W3
.
W2: CHECK TH
E THROTTLE SENSOR REFERENCE GROUND CIRCUIT FOR HIGH RESISTANCE
D
i
sconnect the ECM electrical connectors, EM10 and EM11.
1
Meas
ure t
he resistance between PI06,
pin 01 (BG) and EM10, pin 20 (BG).
2
Measure t
he resistance between PI06,
pin 01 (BG) and EM11, pin 12 (BG).
3
Is either resistance greater
than 5 ohms?
Yes REPAIR the high resistance circuit. For additional information, refer to the wiring diagrams. CLEAR the
DTC. TEST the system for normal operation.
No GO to W3
.
W3: CHECK THE SENSO R
REFERENCE GROUND AT
THE APP SENSOR/MECHANICAL GUARD SENSOR
Page 1227 of 2490
Di
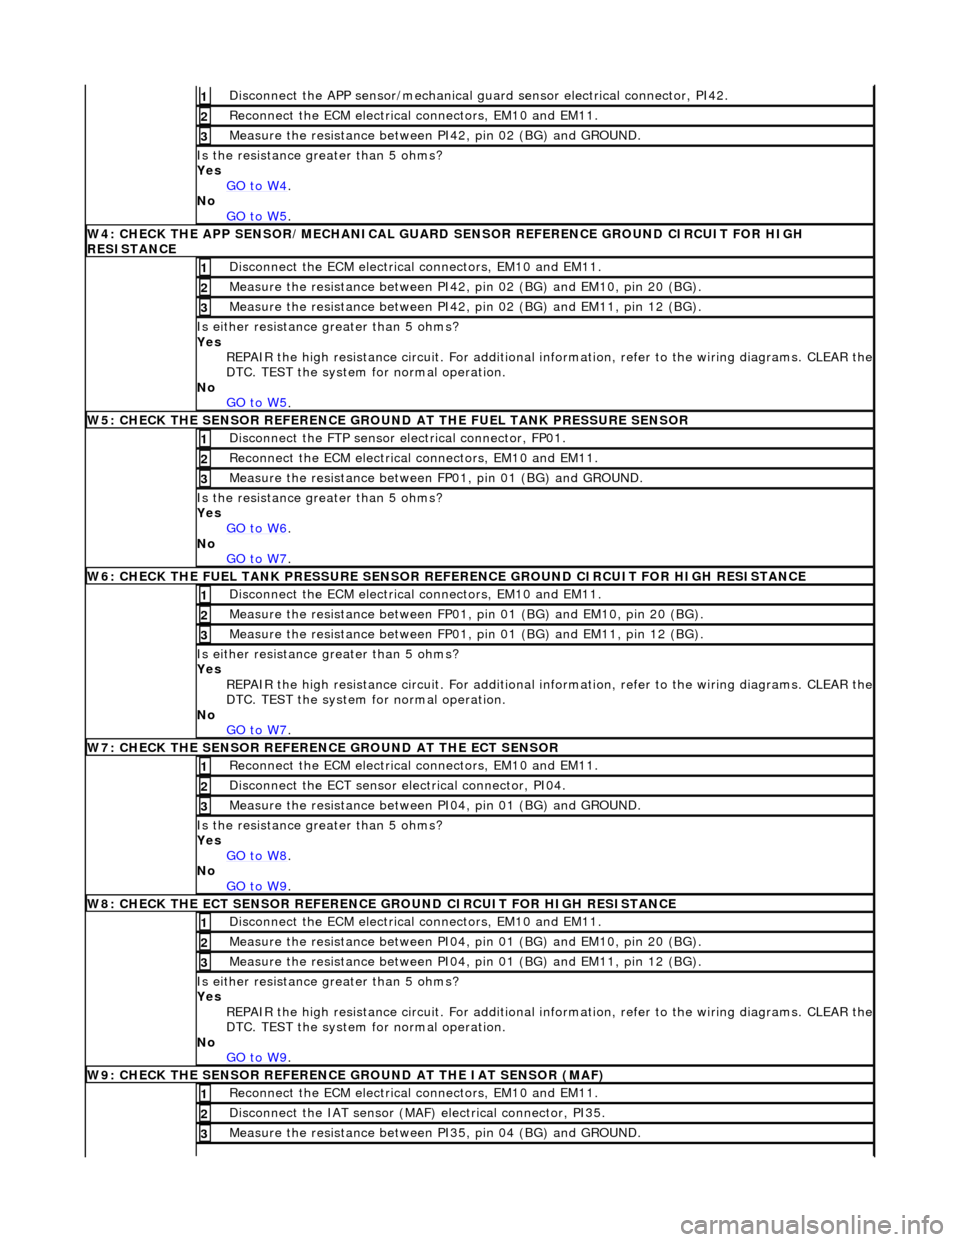
sconnect the APP sensor/mechanical guard sensor electrical connector, PI42.
1
Re
connect the ECM electrical connectors, EM10 and EM11.
2
Meas
ure the resistance between PI42, pin 02 (BG) and GROUND.
3
Is th
e resistance greater than 5 ohms?
Yes GO to W4
.
No
GO to W5
.
W4: CHECK THE APP
SENSOR/MECHANICAL GUARD SE
NSOR REFERENCE GROUND CIRCUIT FOR HIGH
RESISTANCE
D
isconnect the ECM electrical connectors, EM10 and EM11.
1
Meas
ure the resistance between PI42,
pin 02 (BG) and EM10, pin 20 (BG).
2
Meas
ure the resistance between PI42,
pin 02 (BG) and EM11, pin 12 (BG).
3
Is either resi
stance
greater than 5 ohms?
Yes REPAIR the high resistance circuit. For additional information, refer to the wiring diagrams. CLEAR the
DTC. TEST the system for normal operation.
No GO to W5
.
W5: CHECK THE SENSO
R REFERENCE GROUND AT THE FUEL TANK PRESSURE SENSOR
Di
sconnect the FTP sensor electrical connector, FP01.
1
Re
connect the ECM electrical connectors, EM10 and EM11.
2
Meas
ure the resistance between
FP01, pin 01 (BG) and GROUND.
3
Is th
e resistance greater than 5 ohms?
Yes GO to W6
.
No
GO to W7
.
W6: CHECK THE FUEL
TANK PRESSURE SENSOR RE
FERENCE GROUND CIRCUIT FOR HIGH RESISTANCE
D
isconnect the ECM electrical connectors, EM10 and EM11.
1
Meas
ure the resistance between FP01,
pin 01 (BG) and EM10, pin 20 (BG).
2
Meas
ure the resistance between FP01,
pin 01 (BG) and EM11, pin 12 (BG).
3
Is either resi
stance
greater than 5 ohms?
Yes REPAIR the high resistance circuit. For additional information, refer to the wiring diagrams. CLEAR the
DTC. TEST the system for normal operation.
No GO to W7
.
W7: CHECK THE SENSO
R REFERENCE GROUND AT THE ECT SENSOR
Re
connect the ECM electrical connectors, EM10 and EM11.
1
D
isconnect the ECT sensor electrical connector, PI04.
2
Meas
ure the resistance between PI04, pin 01 (BG) and GROUND.
3
Is th
e resistance greater than 5 ohms?
Yes GO to W8
.
No
GO to W9
.
W8: CHECK THE ECT SEN
SOR REFERENCE
GROUND CIRCUIT FOR HIGH RESISTANCE
D
isconnect the ECM electrical connectors, EM10 and EM11.
1
Meas
ure the resistance between PI04,
pin 01 (BG) and EM10, pin 20 (BG).
2
Meas
ure the resistance between PI04,
pin 01 (BG) and EM11, pin 12 (BG).
3
Is either resi
stance
greater than 5 ohms?
Yes REPAIR the high resistance circuit. For additional information, refer to the wiring diagrams. CLEAR the
DTC. TEST the system for normal operation.
No GO to W9
.
W9: CHECK THE SENSO
R REFERENCE GR
OUND AT THE IAT SENSOR (MAF)
Re
connect the ECM electrical connectors, EM10 and EM11.
1
Di
sconnect the IAT sensor (MAF) electrical connector, PI35.
2
Meas
ure the resistance between PI35, pin 04 (BG) and GROUND.
3
Page 1233 of 2490
E
lectronic Engine Controls - Ca
mshaft Position (CMP) Sensor
Re
moval and Installation
Remov
al
1.
Disc
onnect battery ground cable (IMPORTANT, see SRO
86.15.19 for further information).
2. Remove engine covers ; refer to 12.30.06.
3. WARNING: BEFORE PROCEEDING, IT IS ESSENTIAL THAT
THE WARNING NOTES GIVEN IN SECTION 100-00 (UNDER THE
HEADING 'SAFETY PRECAUTIONS') ARE READ AND
UNDERSTOOD.
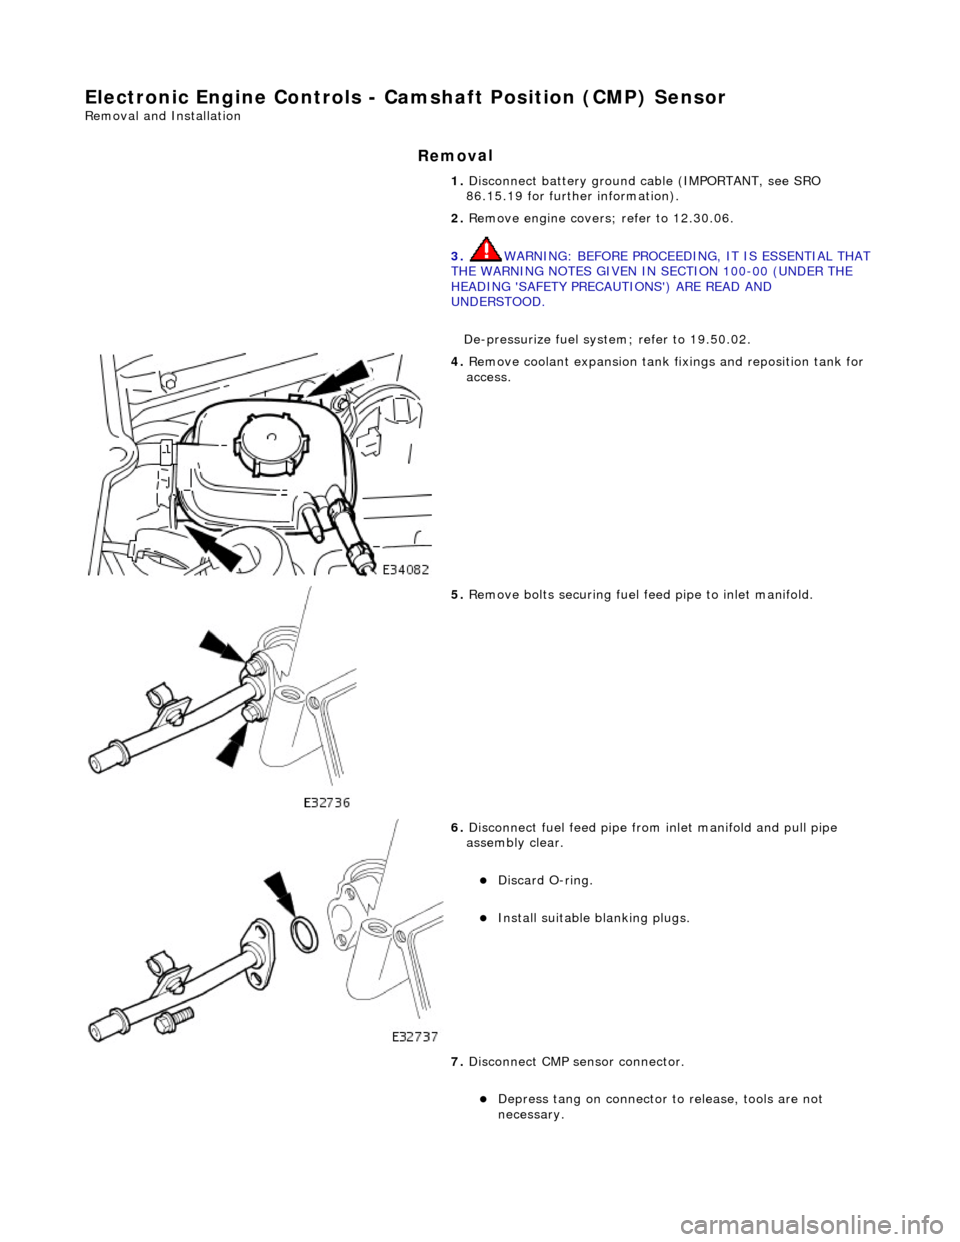
De-pressurize fuel system; refer to 19.50.02.
4. R
emove coolant expansion tank fixings and reposition tank for
access.
5. R
emove bolts securing fuel fe
ed pipe to inlet manifold.
6. Di
sconnect fuel feed pipe from inlet manifold and pull pipe
assembly clear.
Di
scard O-ring.
Inst
all suitable blanking plugs.
7. Disconnect CMP sensor connector.
De
press tang on connector to release, tools are not
necessary.
Page 1235 of 2490
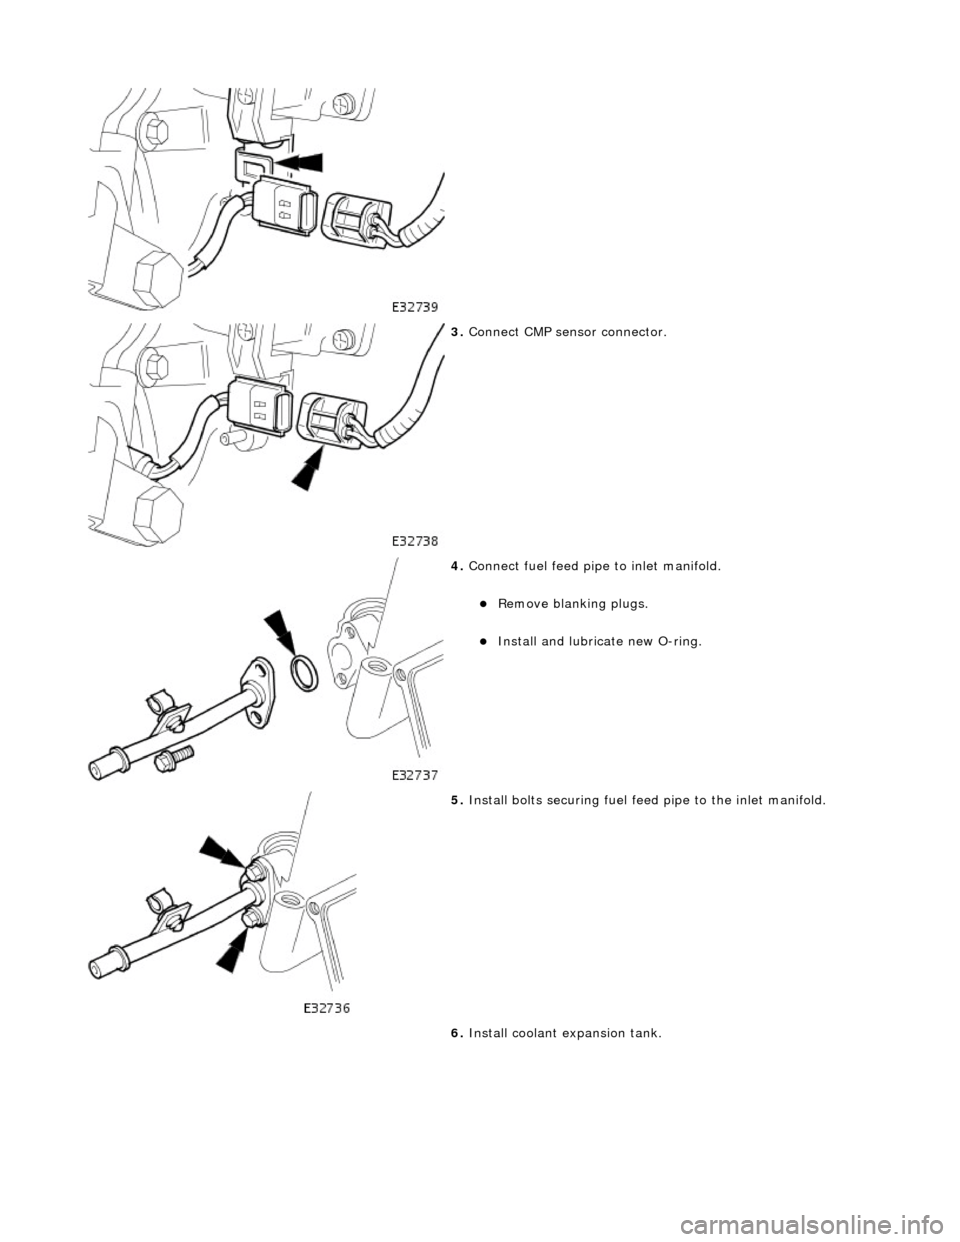
3. Conne
ct CMP sensor connector.
4. Connect
fuel feed pipe to inlet manifold.
R
emove blanking plugs.
Install and lubricate new O-r
ing.
5. Install
bolts securing fuel feed
pipe to the inlet manifold.
6. Install coolant expansion tank.
Page 1241 of 2490
E
lectronic Engine Controls - Engine
Control Module (ECM) Adaptation
Gen
eral Procedures
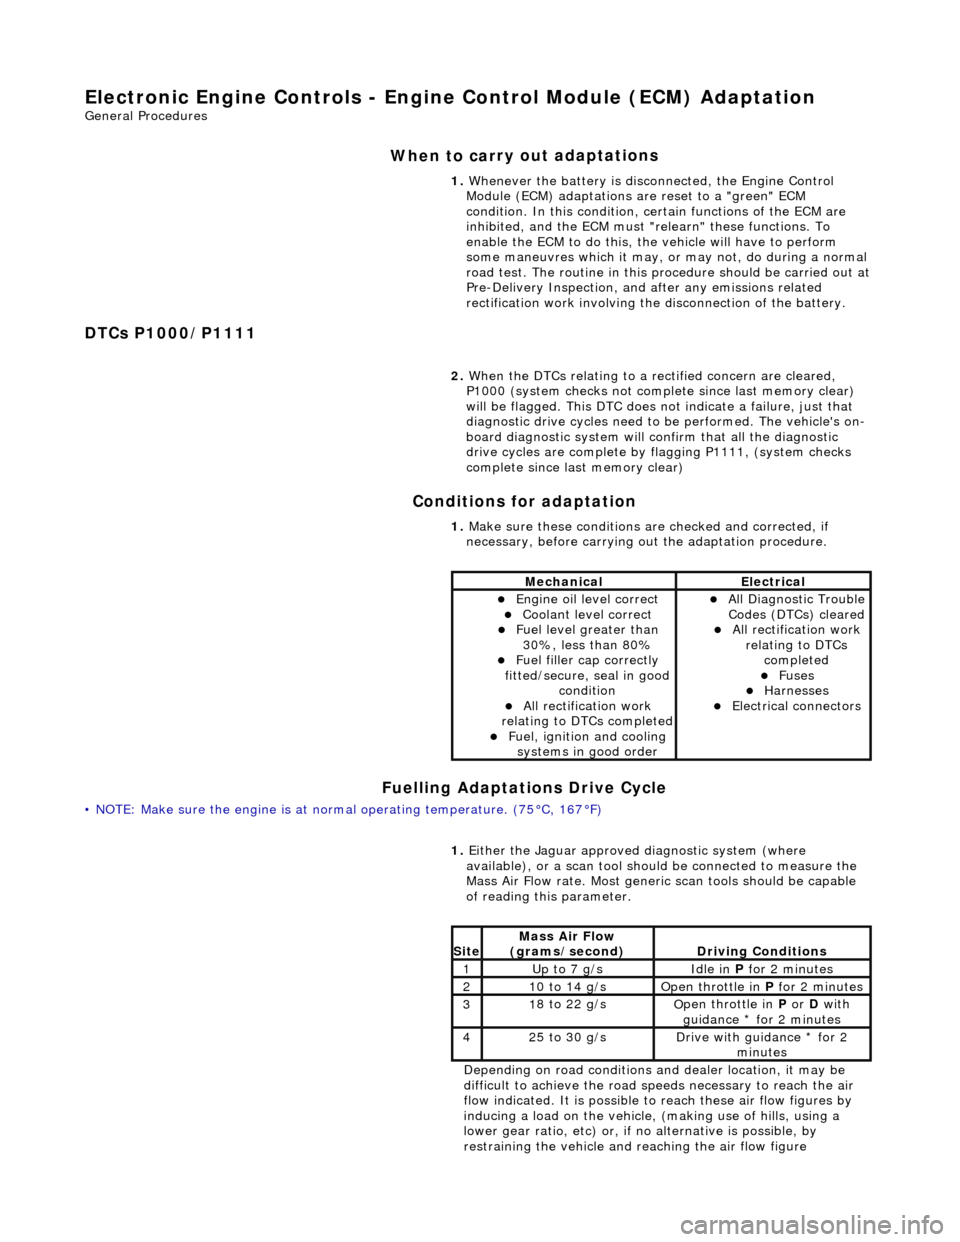
When to car
ry out adaptations
DTCs P1000/P1111 Conditions for adaptation
Fuelling Adaptations Drive Cycle
•
NOTE: Make sure the engine is at normal operating
temperature. (75°C, 167°F) 1.
Whenever the battery is disconnected, the Engine Control
Module (ECM) adaptations are reset to a "green" ECM
condition. In this condition, certain functions of the ECM are
inhibited, and the ECM must "r elearn" these functions. To
enable the ECM to do this, the vehicle will have to perform
some maneuvres which it may, or may not, do during a normal
road test. The routine in this pr ocedure should be carried out at
Pre-Delivery Inspection, and after any emissions related
rectification work involving the disconnection of the battery.
2. When the DTCs relating to a rectified concern are cleared,
P1000 (system checks not complete since last memory clear)
will be flagged. This DTC does no t indicate a failure, just that
diagnostic drive cycles need to be performed. The vehicle's on-
board diagnostic system will confirm that all the diagnostic
drive cycles are complete by flagging P1111, (system checks
complete since last memory clear)
1. Make sure these conditions are checked and corrected, if
necessary, before carrying ou t the adaptation procedure.
MechanicalElectrical
Engi
ne oil level correct
Coo
lant level correct
F
uel level greater than
30%, less than 80%
F
uel filler cap correctly
fitted/secure, seal in good condition
Al
l rectification work
relating to DTCs completed
F
uel, ignition and cooling
systems in good order
Al
l Diagnostic Trouble
Codes (DTCs) cleared
Al
l rectification work
relating to DTCs completed
F
uses
Harnes
ses
E
lectrical connectors
1.
Either
the Jaguar approved diagnostic system (where
available), or a scan tool should be connected to measure the
Mass Air Flow rate. Most generi c scan tools should be capable
of reading this parameter.
Depending on road conditions and dealer location, it may be
difficult to achieve the road sp eeds necessary to reach the air
flow indicated. It is possible to reach these air flow figures by
inducing a load on the vehicle, (making use of hills, using a
lower gear ratio, etc) or, if no alternative is possible, by
restraining the vehicle and re aching the air flow figure
Si
te
Mass Air Flow
(gra
ms/second)
D
riving Conditions
1Up t
o 7 g/s
Idle
in
P for 2 minutes
21
0 to 14 g/s
O
pen throttle in
P for 2 minutes
31
8 to 22 g/s
O
pen throttle in
P or D with
guidance * for 2 minutes
42
5 to 30 g/s
D
rive with guidance * for 2
minutes
Page 1242 of 2490
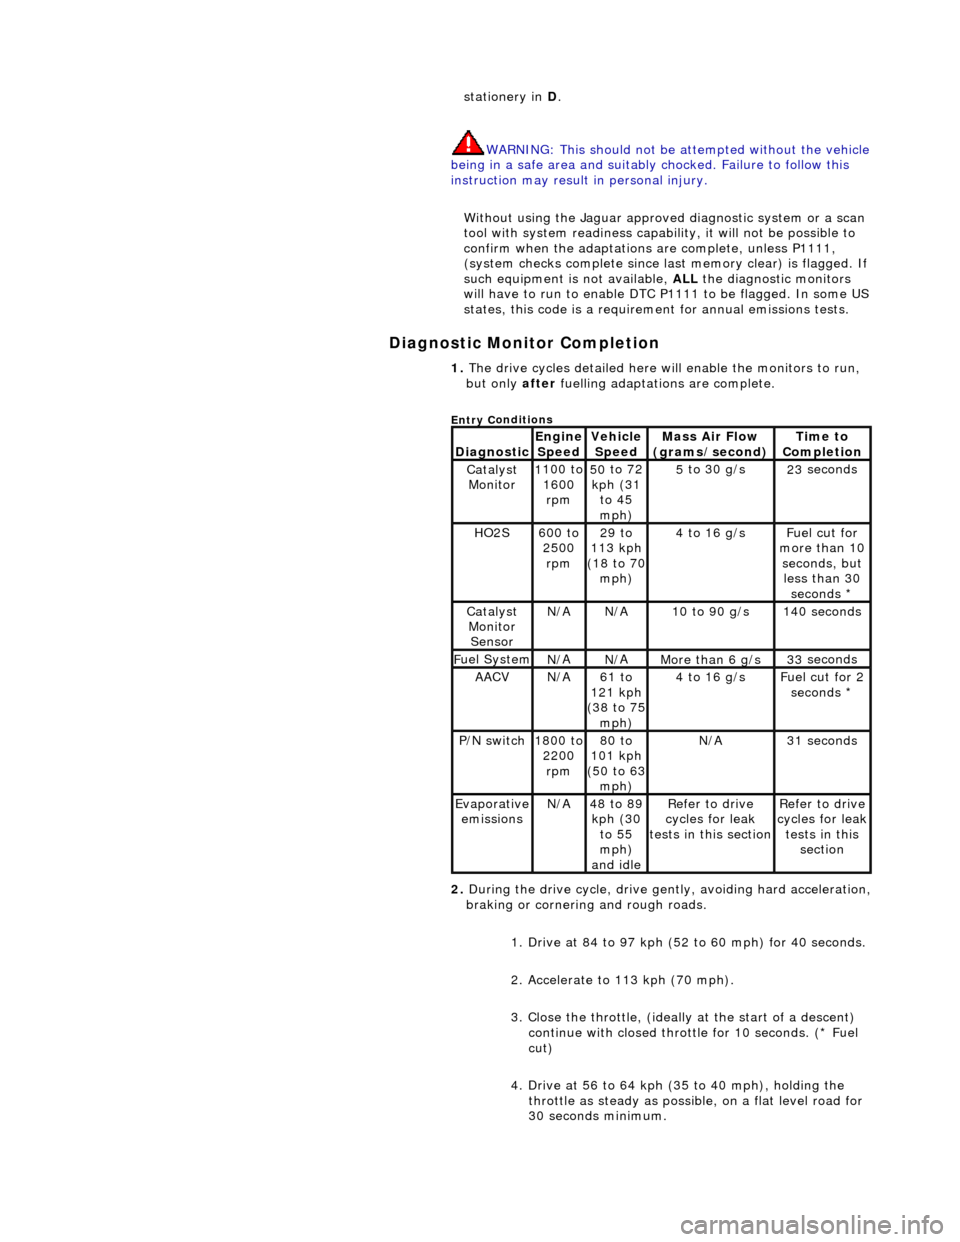
Diagnostic Monitor Comp
letion
stat
ionery in
D.
WARNING: This should not be attempted without the vehicle
being in a safe area and suitably chocked. Failure to follow this
instruction may result in personal injury.
Without using the Jaguar approved diagnostic system or a scan
tool with system readiness capability, it will not be possible to
confirm when the adaptations are complete, unless P1111,
(system checks complete since last memory clear) is flagged. If
such equipment is not available, ALL the diagnostic monitors
will have to run to enable DTC P1111 to be flagged. In some US
states, this code is a requirem ent for annual emissions tests.
1. The dri v
e cycles detailed here w
ill enable the monitors to run,
but only after fuelling adaptations are complete.
Entry C
onditions
Di
agno
stic
Engine
S p
eed
Ve
h
icle
Speed
Mass Air Flow
(gra ms/sec
ond)
Ti
m
e to
Completion
Catalyst Monitor1 100
to
1600 rpm
50 to
72
kph (31 to 45
mph)
5 to
30 g/s
23
se
conds
HO2S6
00 t
o
2500 rpm
29 to
113 kph
(18 to 70
mph)
4 to
16 g/s
F
u
el cut for
more than 10 seconds, but less than 30 seconds *
Catalyst Monitor SensorN/ AN/A10
to 90 g/s
14
0
seconds
F
u
el System
N/
AN/AMore than 6 g/s33 se
conds
AACVN/
A61 to
121 kph
(38 to 75
mph)
4 to
16 g/s
F
u
el cut for 2
seconds *
P /
N switch
1
800
to
2200 rpm
80 to
101 kph
(50 to 63
mph)
N/ A31 se
conds
Evaporative
em is
sions
N/
A48 to
89
kph (30 to 55
mph)
and idle
R e
fer to drive
cycles for leak
tests in this section
Re
fer to drive
cycles for leak
tests in this section
2. During the drive cycle, drive gent ly, avoiding hard acceleration,
braking or cornering and rough roads.
1. Drive at 84 to 97 kph (52 to 60 mph) for 40 seconds.
2. Accelerate to 113 kph (70 mph).
3. Close the throttle, (ideally at the start of a descent)
continue with closed throttle for 10 seconds. (* Fuel
cut)
4. Drive at 56 to 64 kph (35 to 40 mph), holding the throttle as steady as possib le, on a flat level road for
30 seconds minimum.
Page 1243 of 2490
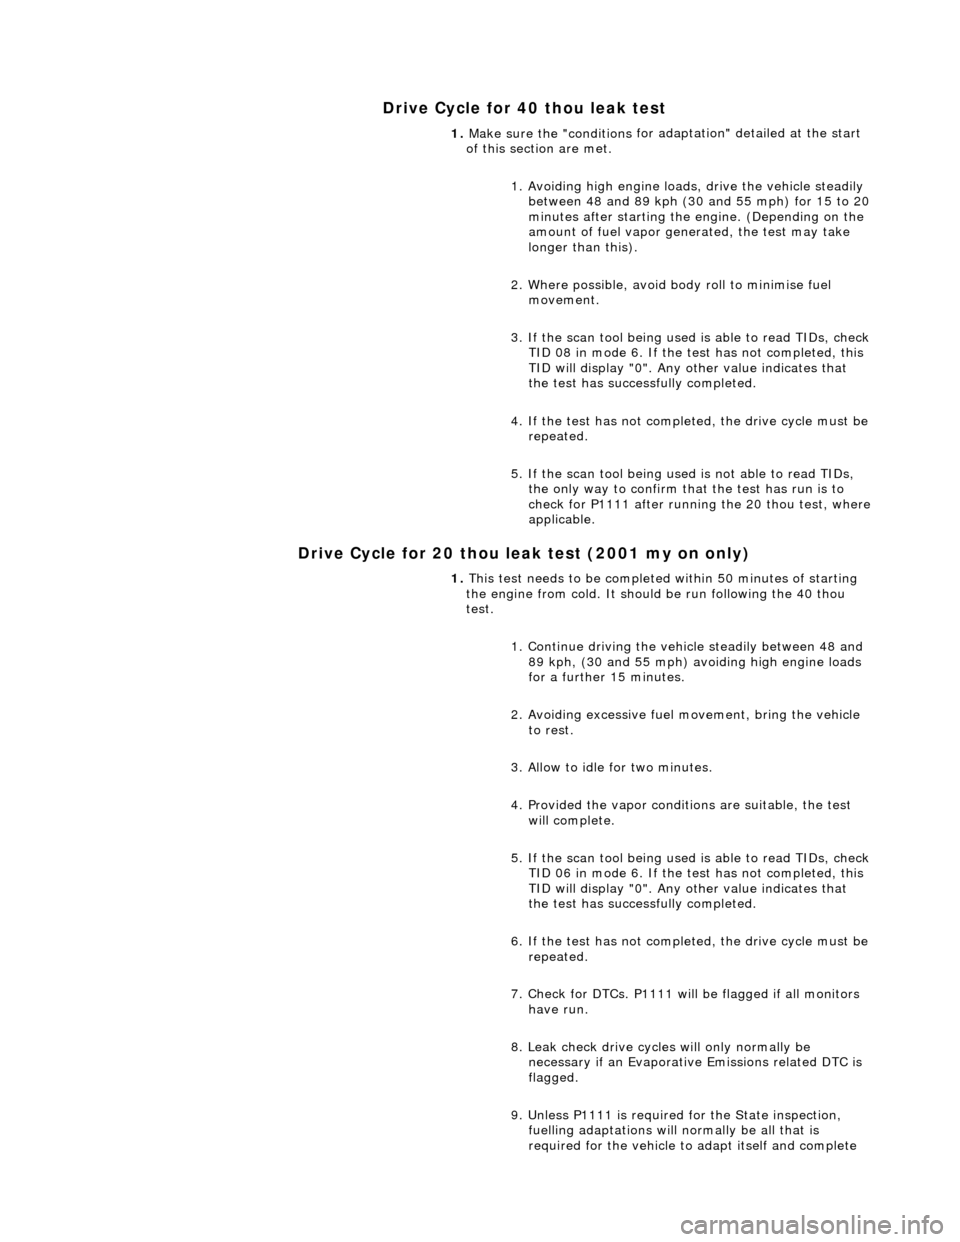
Drive Cycle for 40 thou leak test
Drive Cycle for 20 thou leak test (2001 my on only)
1. Make sure the "conditions
for ad
aptation" detailed at the start
of this section are met.
1. Avoiding high engine load s, drive the vehicle steadily
between 48 and 89 kph (30 and 55 mph) for 15 to 20
minutes after starting the engine. (Depending on the
amount of fuel vapor gene rated, the test may take
longer than this).
2. Where possible, avoid body roll to minimise fuel movement.
3. If the scan tool being used is able to read TIDs, check
TID 08 in mode 6. If the test has not completed, this
TID will display "0". Any other value indicates that
the test has successfully completed.
4. If the test has not completed, the drive cycle must be repeated.
5. If the scan tool being used is not able to read TIDs, the only way to confirm that the test has run is to
check for P1111 after running the 20 thou test, where
applicable.
1. This test needs to be completed within 50 minutes of starting
the engine from cold. It should be run following the 40 thou
test.
1. Continue driving the vehi cle steadily between 48 and
89 kph, (30 and 55 mph) avoiding high engine loads
for a further 15 minutes.
2. Avoiding excessive fuel movement, bring the vehicle to rest.
3. Allow to idle for two minutes.
4. Provided the vapor conditions are suitable, the test will complete.
5. If the scan tool being used is able to read TIDs, check
TID 06 in mode 6. If the test has not completed, this
TID will display "0". Any other value indicates that
the test has successfully completed.
6. If the test has not completed, the drive cycle must be repeated.
7. Check for DTCs. P1111 will be flagged if all monitors have run.
8. Leak check drive cycles will only normally be necessary if an Evaporative Emissions related DTC is
flagged.
9. Unless P1111 is required for the State inspection, fuelling adaptations will normally be all that is
required for the vehicle to adapt itself and complete