1997 SSANGYONG KORANDO key
[x] Cancel search: keyPage 1722 of 2053
INSTRUMENTATION, DRIVER INFORMATION 9E-5
SSANGYONG MY2002
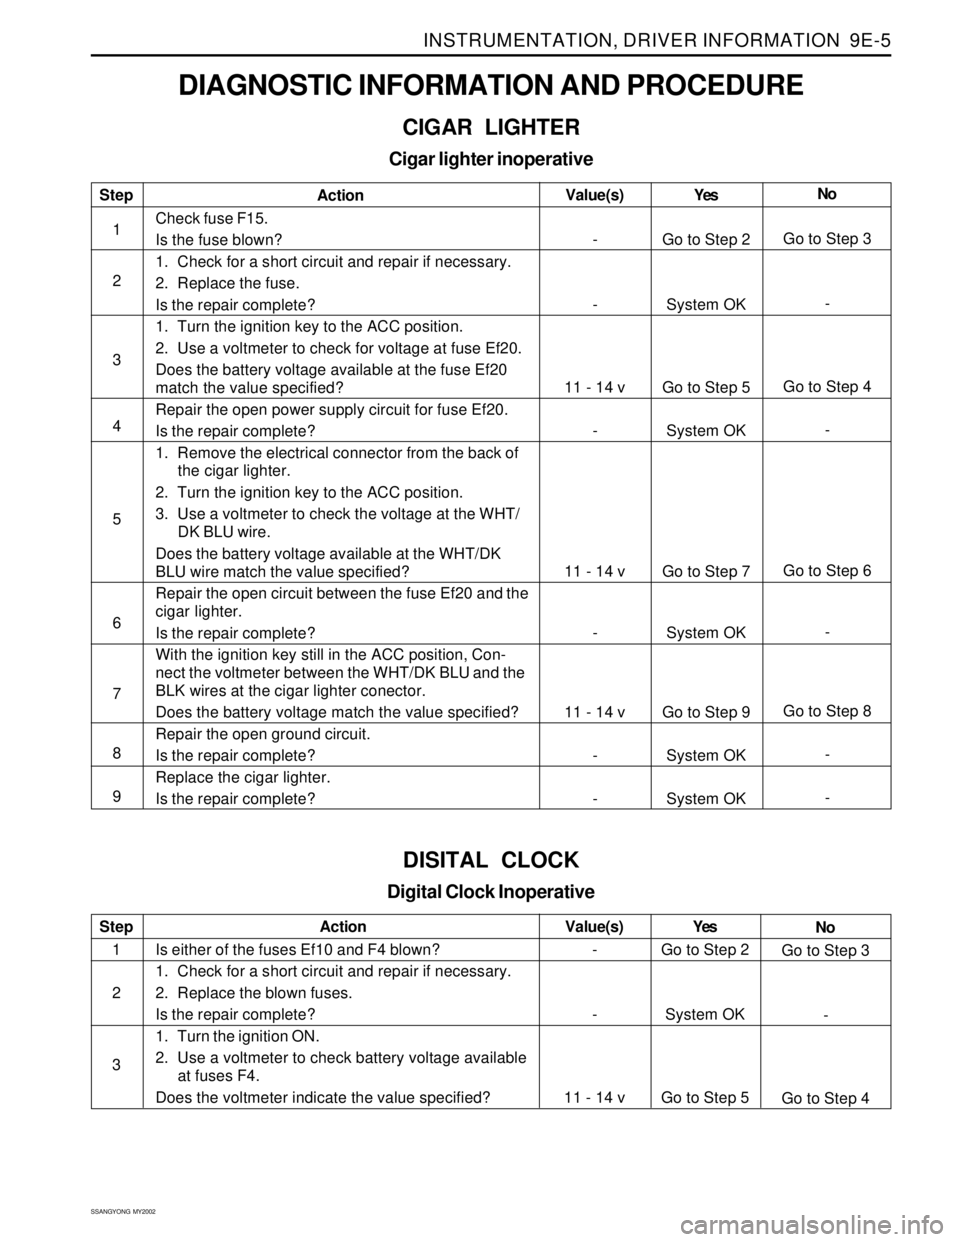
DIAGNOSTIC INFORMATION AND PROCEDURE
CIGAR LIGHTER
Cigar lighter inoperative
Step
1
2
3
4
5
6
7
8
9Action
Check fuse F15.
Is the fuse blown?
1. Check for a short circuit and repair if necessary.
2. Replace the fuse.
Is the repair complete?
1. Turn the ignition key to the ACC position.
2. Use a voltmeter to check for voltage at fuse Ef20.
Does the battery voltage available at the fuse Ef20
match the value specified?
Repair the open power supply circuit for fuse Ef20.
Is the repair complete?
1. Remove the electrical connector from the back of
the cigar lighter.
2. Turn the ignition key to the ACC position.
3. Use a voltmeter to check the voltage at the WHT/
DK BLU wire.
Does the battery voltage available at the WHT/DK
BLU wire match the value specified?
Repair the open circuit between the fuse Ef20 and the
cigar lighter.
Is the repair complete?
With the ignition key still in the ACC position, Con-
nect the voltmeter between the WHT/DK BLU and the
BLK wires at the cigar lighter conector.
Does the battery voltage match the value specified?
Repair the open ground circuit.
Is the repair complete?
Replace the cigar lighter.
Is the repair complete?Yes
Go to Step 2
System OK
Go to Step 5
System OK
Go to Step 7
System OK
Go to Step 9
System OK
System OKNo
Go to Step 3
-
Go to Step 4
-
Go to Step 6
-
Go to Step 8
-
- Value(s)
-
-
11 - 14 v
-
11 - 14 v
-
11 - 14 v
-
-
DISITAL CLOCK
Digital Clock Inoperative
Step
1
2
3Action
Is either of the fuses Ef10 and F4 blown?
1. Check for a short circuit and repair if necessary.
2. Replace the blown fuses.
Is the repair complete?
1. Turn the ignition ON.
2. Use a voltmeter to check battery voltage available
at fuses F4.
Does the voltmeter indicate the value specified?Yes
Go to Step 2
System OK
Go to Step 5No
Go to Step 3
-
Go to Step 4 Value(s)
-
-
11 - 14 v
Page 1734 of 2053
INSTRUMENTATION, DRIVER INFORMATION 9E-17
SSANGYONG MY2002
KAA9E270
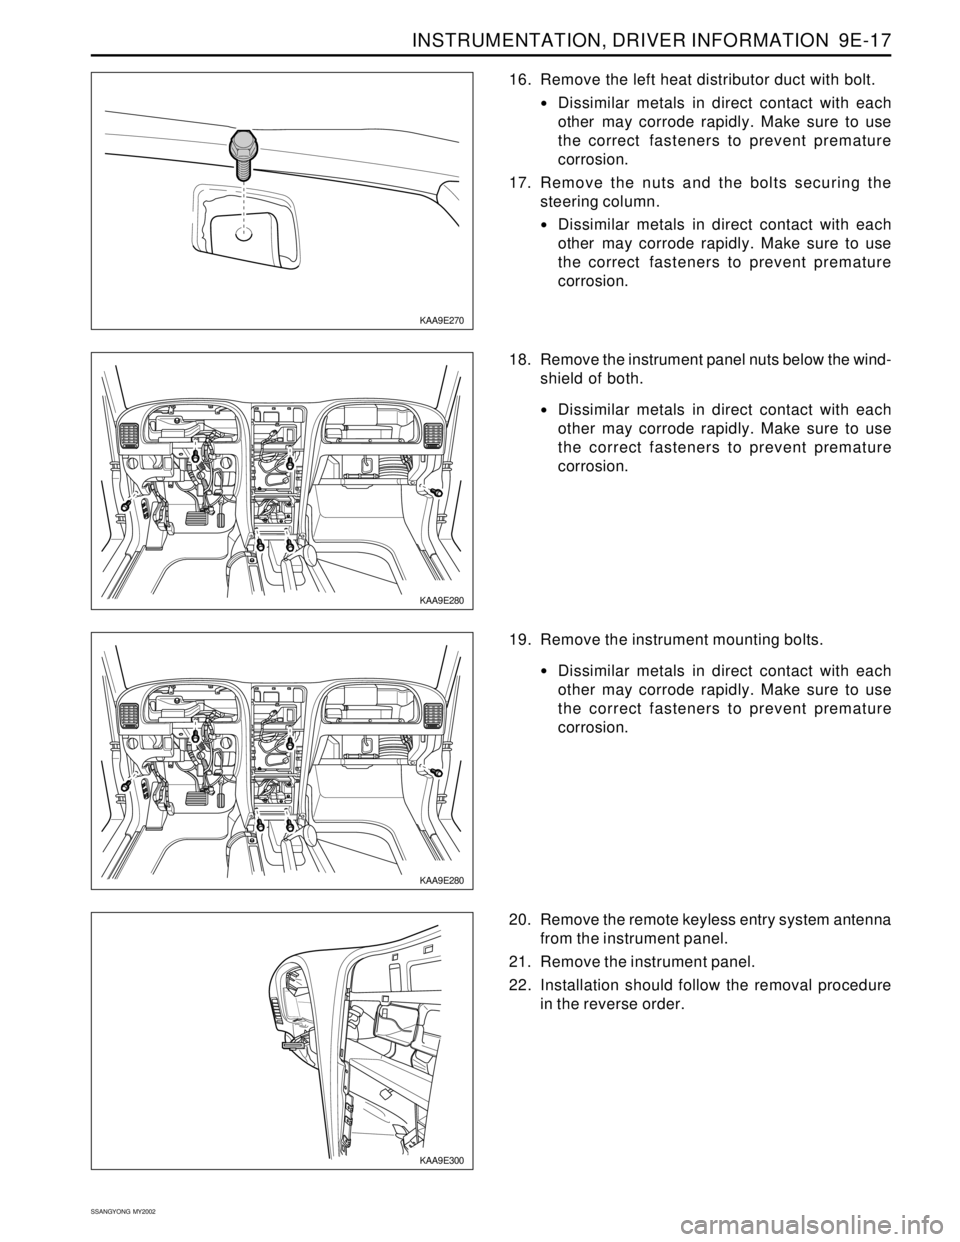
16. Remove the left heat distributor duct with bolt.
Dissimilar metals in direct contact with each
other may corrode rapidly. Make sure to use
the correct fasteners to prevent premature
corrosion.
17. Remove the nuts and the bolts securing the
steering column.
Dissimilar metals in direct contact with each
other may corrode rapidly. Make sure to use
the correct fasteners to prevent premature
corrosion.
KAA9E280
18. Remove the instrument panel nuts below the wind-
shield of both.
Dissimilar metals in direct contact with each
other may corrode rapidly. Make sure to use
the correct fasteners to prevent premature
corrosion.
KAA9E300
20. Remove the remote keyless entry system antenna
from the instrument panel.
21. Remove the instrument panel.
22. Installation should follow the removal procedure
in the reverse order.
KAA9E280
19. Remove the instrument mounting bolts.
Dissimilar metals in direct contact with each
other may corrode rapidly. Make sure to use
the correct fasteners to prevent premature
corrosion.
Page 1848 of 2053
SECTION 9T1
REMOTE KEYLESS ENTRY AND ANTI-THEFT
SYSTEM
CAUTION: Disconnect the negative battery cable before removing or installing any electrical unit or when a
tool or equipment could easily come in contact with exposed electrical terminals. Disconnecting this cable
will help prevent personal injury and damage to the vehicle. The ignition must also be in LOCK unless
otherwise noted.
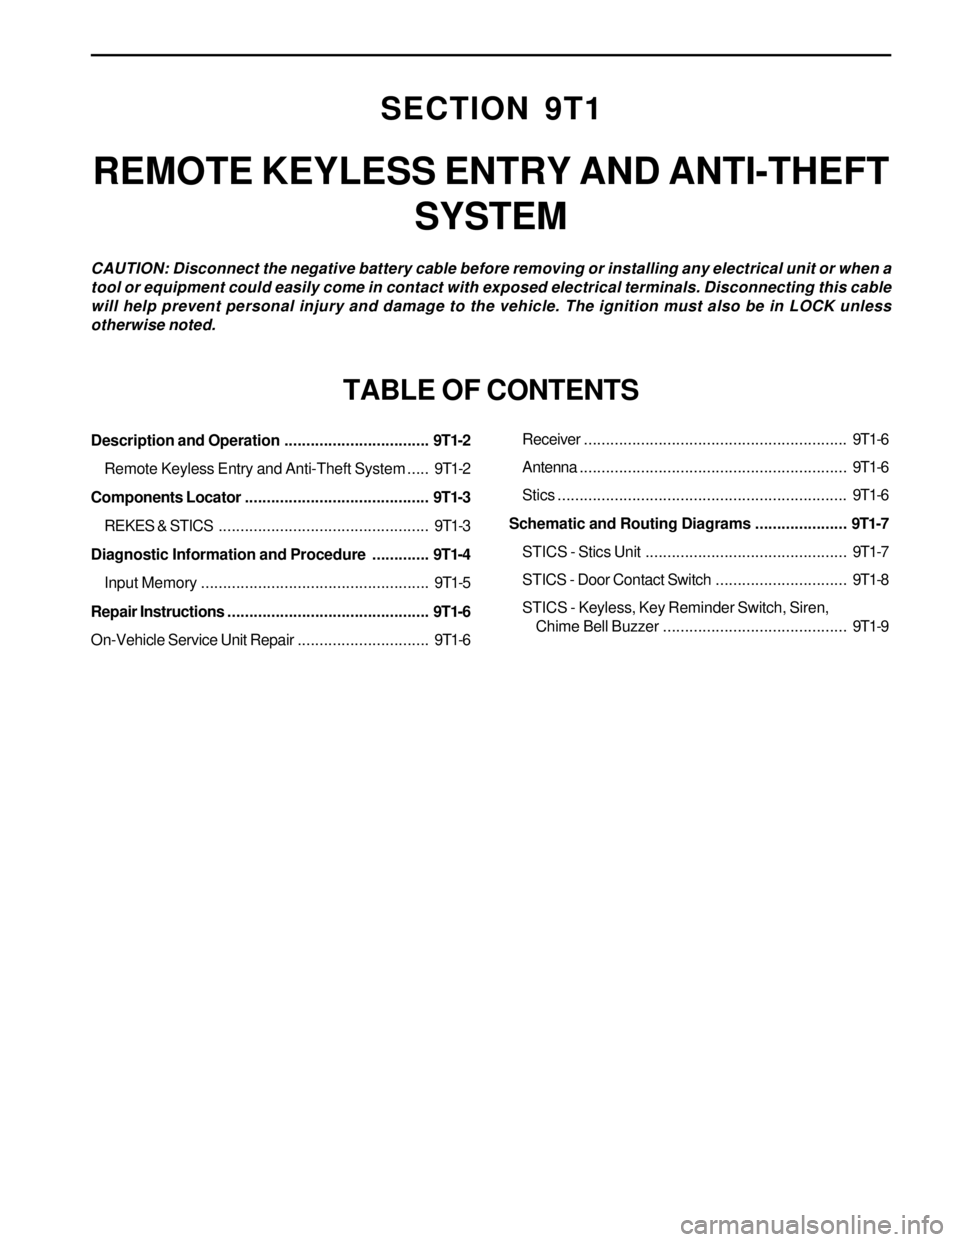
TABLE OF CONTENTS
Description and Operation.................................9T1-2
Remote Keyless Entry and Anti-Theft System.....9T1-2
Components Locator..........................................9T1-3
REKES & STICS................................................9T1-3
Diagnostic Information and Procedure.............9T1-4
Input Memory....................................................9T1-5
Repair Instructions..............................................9T1-6
On-Vehicle Service Unit Repair..............................9T1-6Receiver............................................................9T1-6
Antenna.............................................................9T1-6
Stics..................................................................9T1-6
Schematic and Routing Diagrams.....................9T1-7
STICS - Stics Unit..............................................9T1-7
STICS - Door Contact Switch..............................9T1-8
STICS - Keyless, Key Reminder Switch, Siren,
Chime Bell Buzzer ..........................................9T1-9
Page 1849 of 2053
SSANGYONG MY2002
9T1-2 REMOTE KEYLESS ENTRY AND ANTI-THEFT SYSTEM
DESCRIPTION AND OPERATION
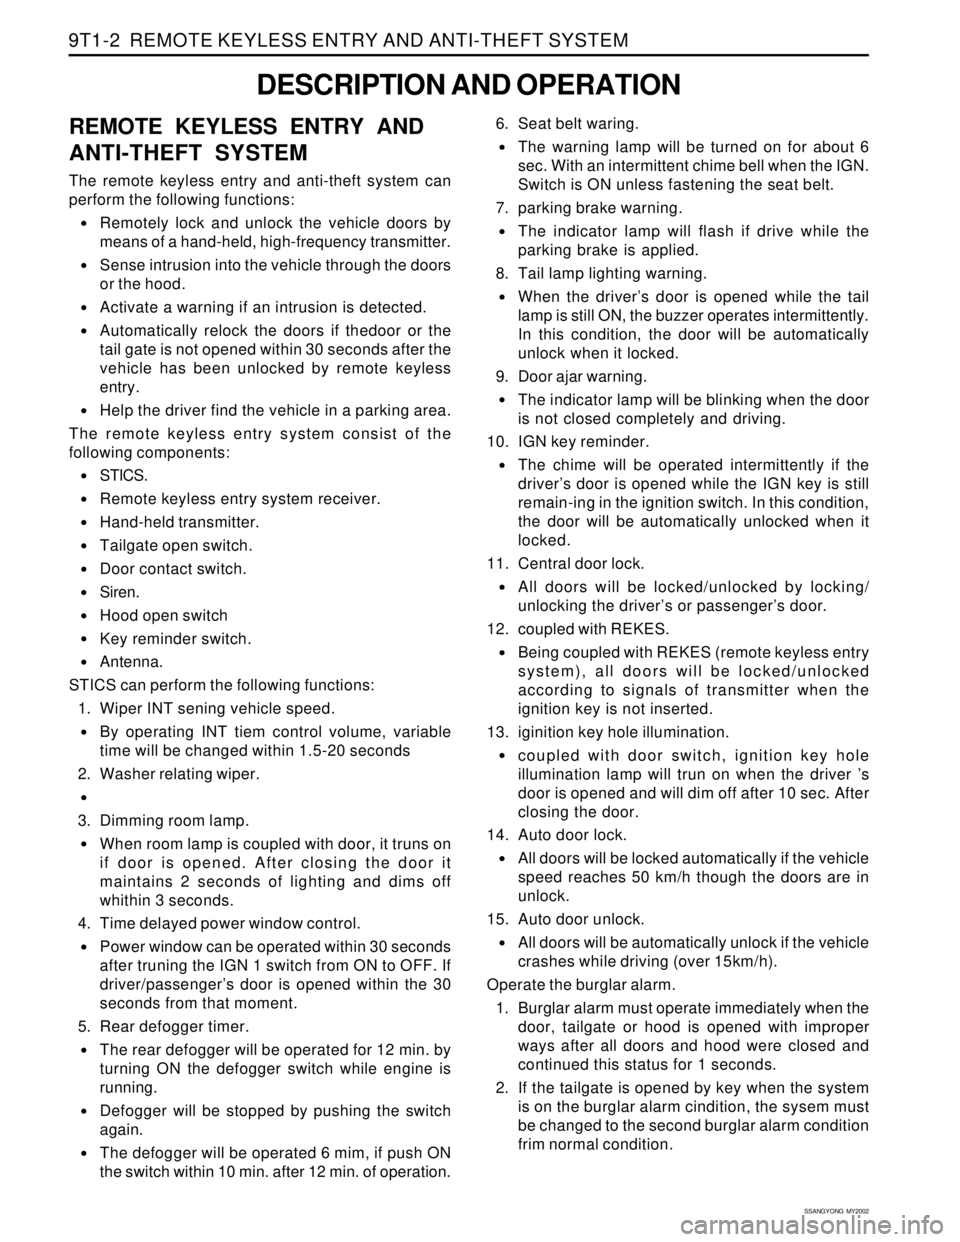
REMOTE KEYLESS ENTRY AND
ANTI-THEFT SYSTEM
The remote keyless entry and anti-theft system can
perform the following functions:
•Remotely lock and unlock the vehicle doors by
means of a hand-held, high-frequency transmitter.
Sense intrusion into the vehicle through the doors
or the hood.
Activate a warning if an intrusion is detected.
Automatically relock the doors if thedoor or the
tail gate is not opened within 30 seconds after the
vehicle has been unlocked by remote keyless
entry.
Help the driver find the vehicle in a parking area.
The remote keyless entry system consist of the
following components:
STICS.
Remote keyless entry system receiver.
Hand-held transmitter.
Tailgate open switch.
Door contact switch.
Siren.
Hood open switch
Key reminder switch.
Antenna.
STICS can perform the following functions:
1. Wiper INT sening vehicle speed.
By operating INT tiem control volume, variable
time will be changed within 1.5-20 seconds
2. Washer relating wiper.
3. Dimming room lamp.
When room lamp is coupled with door, it truns on
if door is opened. After closing the door it
maintains 2 seconds of lighting and dims off
whithin 3 seconds.
4. Time delayed power window control.
Power window can be operated within 30 seconds
after truning the IGN 1 switch from ON to OFF. If
driver/passenger’s door is opened within the 30
seconds from that moment.
5. Rear defogger timer.
The rear defogger will be operated for 12 min. by
turning ON the defogger switch while engine is
running.
Defogger will be stopped by pushing the switch
again.
The defogger will be operated 6 mim, if push ON
the switch within 10 min. after 12 min. of operation.6. Seat belt waring.
The warning lamp will be turned on for about 6
sec. With an intermittent chime bell when the IGN.
Switch is ON unless fastening the seat belt.
7. parking brake warning.
The indicator lamp will flash if drive while the
parking brake is applied.
8. Tail lamp lighting warning.
When the driver’s door is opened while the tail
lamp is still ON, the buzzer operates intermittently.
In this condition, the door will be automatically
unlock when it locked.
9. Door ajar warning.
The indicator lamp will be blinking when the door
is not closed completely and driving.
10. IGN key reminder.
The chime will be operated intermittently if the
driver’s door is opened while the IGN key is still
remain-ing in the ignition switch. In this condition,
the door will be automatically unlocked when it
locked.
11. Central door lock.
All doors will be locked/unlocked by locking/
unlocking the driver’s or passenger’s door.
12. coupled with REKES.
Being coupled with REKES (remote keyless entry
system), all doors will be locked/unlocked
according to signals of transmitter when the
ignition key is not inserted.
13. iginition key hole illumination.
coupled with door switch, ignition key hole
illumination lamp will trun on when the driver ’s
door is opened and will dim off after 10 sec. After
closing the door.
14. Auto door lock.
All doors will be locked automatically if the vehicle
speed reaches 50 km/h though the doors are in
unlock.
15. Auto door unlock.
All doors will be automatically unlock if the vehicle
crashes while driving (over 15km/h).
Operate the burglar alarm.
1. Burglar alarm must operate immediately when the
door, tailgate or hood is opened with improper
ways after all doors and hood were closed and
continued this status for 1 seconds.
2. If the tailgate is opened by key when the system
is on the burglar alarm cindition, the sysem must
be changed to the second burglar alarm condition
frim normal condition.
Page 1850 of 2053
REMOTE KEYLESS ENTRY AND ANTI-THEFT SYSTEM 9T1-3
SSANGYONG MY2002
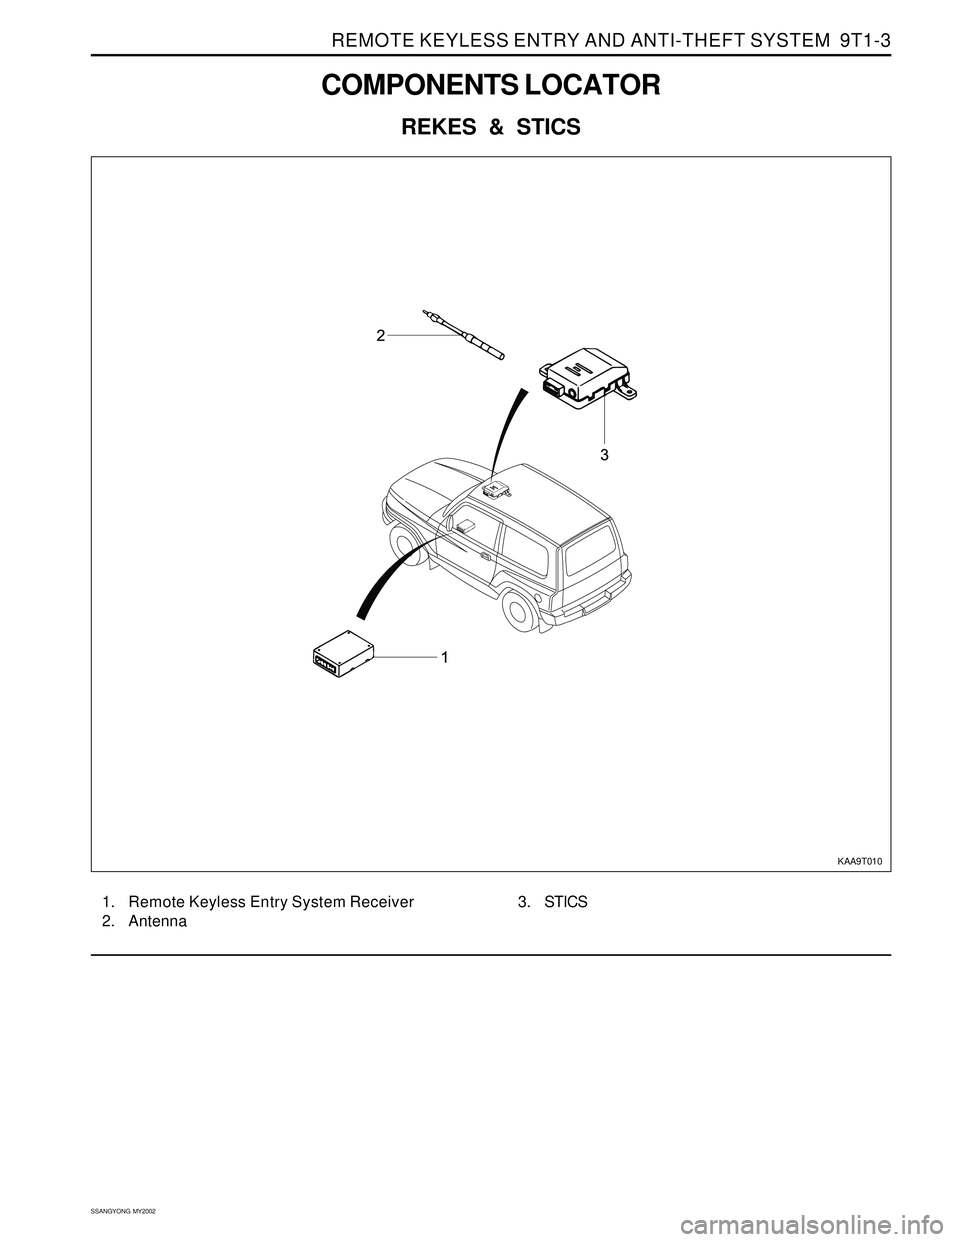
COMPONENTS LOCATOR
REKES & STICS
KAA9T010
1. Remote Keyless Entry System Receiver
2. Antenna3. STICS
Page 1851 of 2053
SSANGYONG MY2002
9T1-4 REMOTE KEYLESS ENTRY AND ANTI-THEFT SYSTEM
DIAGNOSTIC INFORMATION AND PROCEDURE
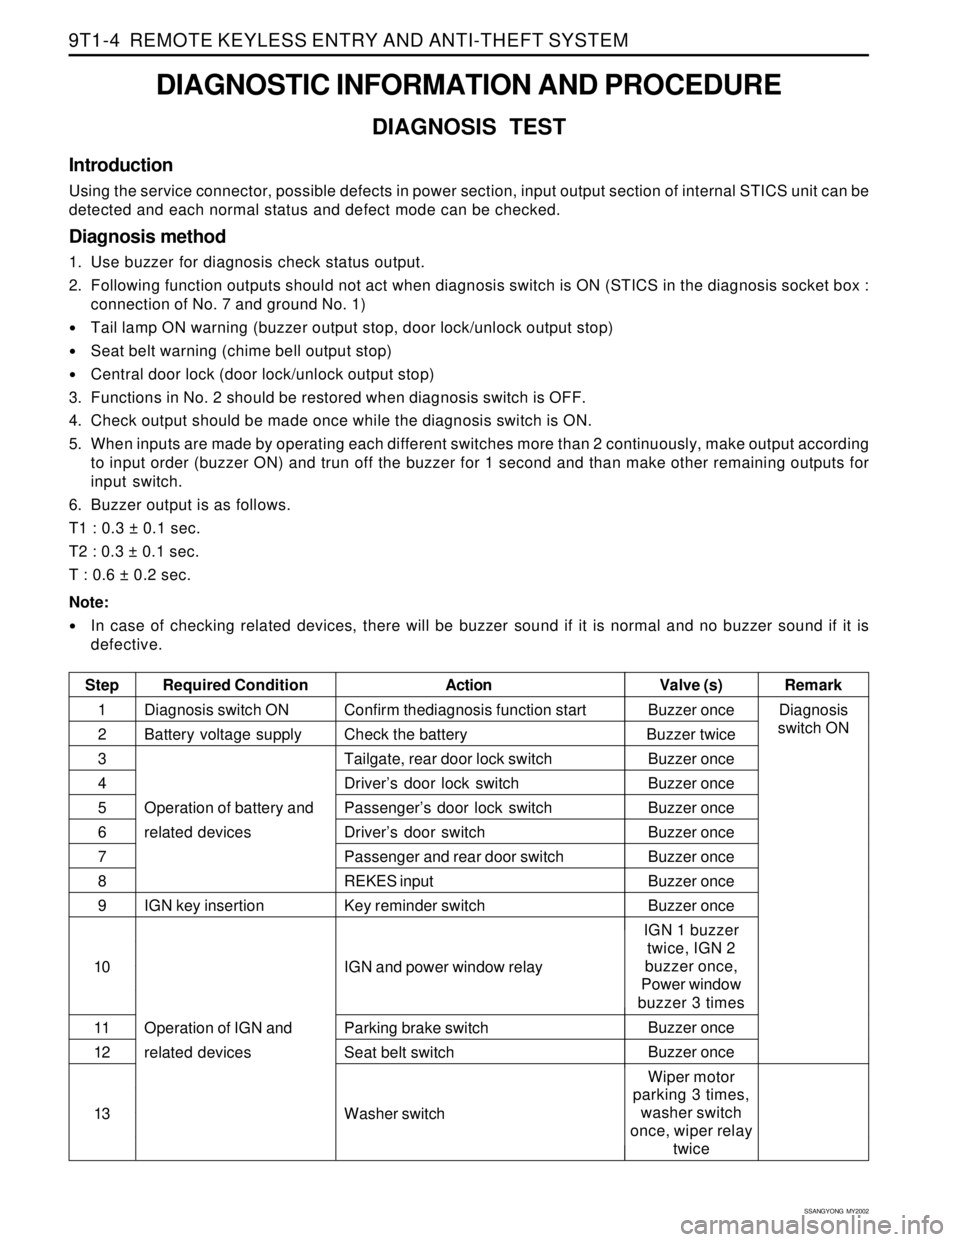
DIAGNOSIS TEST
Introduction
Using the service connector, possible defects in power section, input output section of internal STICS unit can be
detected and each normal status and defect mode can be checked.
Diagnosis method
1. Use buzzer for diagnosis check status output.
2. Following function outputs should not act when diagnosis switch is ON (STICS in the diagnosis socket box :
connection of No. 7 and ground No. 1)
Tail lamp ON warning (buzzer output stop, door lock/unlock output stop)
Seat belt warning (chime bell output stop)
Central door lock (door lock/unlock output stop)
3. Functions in No. 2 should be restored when diagnosis switch is OFF.
4. Check output should be made once while the diagnosis switch is ON.
5. When inputs are made by operating each different switches more than 2 continuously, make output according
to input order (buzzer ON) and trun off the buzzer for 1 second and than make other remaining outputs for
input switch.
6. Buzzer output is as follows.
T1 : 0.3 ± 0.1 sec.
T2 : 0.3 ± 0.1 sec.
T : 0.6 ± 0.2 sec.
Note:
In case of checking related devices, there will be buzzer sound if it is normal and no buzzer sound if it is
defective.
Step Required ConditionActionRemark Valve (s)
Diagnosis switch ON
Battery voltage supply
Operation of battery and
related devices
IGN key insertion
Operation of IGN and
related devicesBuzzer once
Buzzer twice
Buzzer once
Buzzer once
Buzzer once
Buzzer once
Buzzer once
Buzzer once
Buzzer once
IGN 1 buzzer
twice, IGN 2
buzzer once,
Power window
buzzer 3 times
Buzzer once
Buzzer once
Wiper motor
parking 3 times,
washer switch
once, wiper relay
twice Confirm thediagnosis function start
Check the battery
Tailgate, rear door lock switch
Driver’s door lock switch
Passenger’s door lock switch
Driver’s door switch
Passenger and rear door switch
REKES input
Key reminder switch
IGN and power window relay
Parking brake switch
Seat belt switch
Washer switch1
2
3
4
5
6
7
8
9
10
11
12
13Diagnosis
switch ON
Page 1852 of 2053

REMOTE KEYLESS ENTRY AND ANTI-THEFT SYSTEM 9T1-5
SSANGYONG MY2002
KAA9T020
KAA9T030
INPUT MEMORY
When the REKES transmitter is lost
1. Connect the battery terminal No. 3 and REKES
terminal No. 4 which are on the diagnosis socket
under the dash board with service lead wire.
2. push the lock or unlock button on the REKES
transmitter.
3. Input memory and close all doors.
4. Check the operation of door locking system by
pushing the lock or unlock button on the REKES
transmitter.
When the transmitter is faulty
1. Connect the battery terminal No. 3 and REKES
terminal No. 4 which are on the diagnosis socket
under the dash board with service lead wire.
2. Set the input switch of the REKES receiver onto
the No. 1 or No. 2 position and push the lock or
unlock button on the REKES transmitter.
3. Set the input switch of the REKES receiver onto
the central position and close all doors.
4. Check the operation of door locking system by
pushing the lock or unlock button on the REKES
transmitter.
Step Required ConditionActionRemark Valve (s)
Wiper motor
parking 3 times,
washer switch
once, wiper relay
twice
Buzzer once
Buzzer once
Buzzer once
Buzzer once Wiper auto switch
ALT ‘L’
Volume variable switch
Defogger switch
Speed sensor signal
Operation of IGN and
related devices
Operation of IGN and
starting and related
devices14
15
16
17
18
KAA9T100
Page 1853 of 2053
SSANGYONG MY2002
9T1-6 REMOTE KEYLESS ENTRY AND ANTI-THEFT SYSTEM
KAA9T040
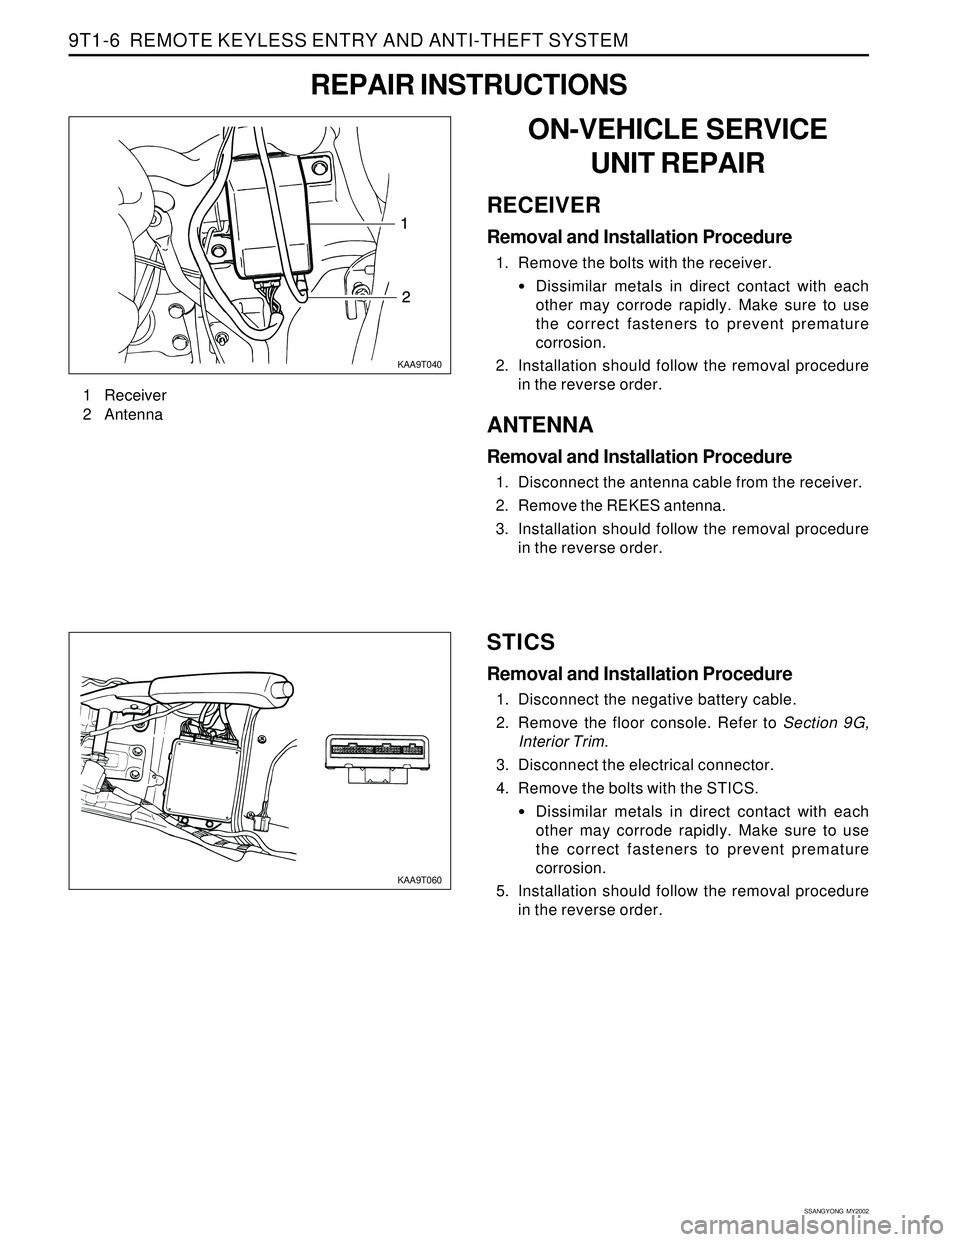
ON-VEHICLE SERVICE
UNIT REPAIR
RECEIVER
Removal and Installation Procedure
1. Remove the bolts with the receiver.
Dissimilar metals in direct contact with each
other may corrode rapidly. Make sure to use
the correct fasteners to prevent premature
corrosion.
2. Installation should follow the removal procedure
in the reverse order.
ANTENNA
Removal and Installation Procedure
1. Disconnect the antenna cable from the receiver.
2. Remove the REKES antenna.
3. Installation should follow the removal procedure
in the reverse order.
REPAIR INSTRUCTIONS
1 Receiver
2 Antenna
STICS
Removal and Installation Procedure
1. Disconnect the negative battery cable.
2. Remove the floor console. Refer to Section 9G,
Interior Trim.
3. Disconnect the electrical connector.
4. Remove the bolts with the STICS.
Dissimilar metals in direct contact with each
other may corrode rapidly. Make sure to use
the correct fasteners to prevent premature
corrosion.
5. Installation should follow the removal procedure
in the reverse order.
KAA9T060