Page 1705 of 2062
Downloaded from www.Manualslib.com manuals search engine BR0A6−01
R12233
BR−68
− BRAKEREAR SPEED SENSOR
1996 TOYOTA T100 (RM449U)
REMOVAL
1. DISCONNECT SPEED SENSOR CONNECTOR
2. REMOVE SPEED SENSOR
(a) Remove the clamp bolt, the clamp nut and the 5 clips
holding the sensor wire harness from the axle and the fuel
tank.
HINT:
�When installing the rear sensor wire harness, never use
the removed resin clips, which are service parts.
�When replacing clips, set up new resin clips at the same
angle of the removed resin clips.
�When removing a resin clip, take care so that the remov-
ing tool is not caught on the grommet or wire.
Torque: 13 N·m (130 kgf·cm, 9 ft·lbf)
(b) Remove the speed sensor from the axle carrier.
Torque: 8.0 N·m (82 kgf·cm, 71 in.·lbf)
Page 1706 of 2062
Downloaded from www.Manualslib.com manuals search engine BR0A7−03
− BRAKEREAR SPEED SENSOR
BR−69
1996 TOYOTA T100 (RM449U)
INSTALLATION
Installation is in the reverse order of removal (See page BR−68).
AFTER INSTALLATION, CHECK SPEED SENSOR SIGNAL (See page DI−341)
Page 1707 of 2062
Downloaded from www.Manualslib.com manuals search engine SR – STEERING
STEERING SYSTEM SR-1
TROUBLESHOOTING SR-2
DRIVE BELT SR-3
POWER STEERING FLUID SR-4
AIR CONTROL VALVE SR-8
STEERING WHEEL SR-9
NON-TILT STEERING COLUMN SR-10
TILT STEERING COLUMN SR-23
POWER STEERING VANE PUMP (3RZ-FE) SR-34
POWER STEERING VANE PUMP (5VZ-FE) SR-44
POWER STEERING GEAR (2WD) SR-54
POWER STEERING GEAR (2WD) SR-72
STEERING LINKAGE SR-84
IDLER ARM SR-89
Page 1708 of 2062
Downloaded from www.Manualslib.com manuals search engine SR06Z−01
− STEERINGSTEERING SYSTEM
SR−1
1675 Author�: Date�:
1996 TOYOTA T100 (RM449U)
STEERING SYSTEM
PRECAUTION
�Care must be taken to replace parts properly because they could affect the performance of the
steering system and result in a driving hazard.
�The TOYOTA T100 is equipped with SRS (Supplemental Restraint System) such as the driver
airbag. Failure to carry out service operation in the correct sequence could cause the SRS to
unexpectedly deploy during servicing, possibly leading to a serious accident. Before servicing
(including removal or installation of parts, inspection or replacement), be sure to read the pre-
cautionary notices in the RS section.
Page 1709 of 2062

TROUBLESHOOTING
PROBLEM SYMPTOMS TABLE
Use the t")
Downloaded from www.Manualslib.com manuals search engine SR070−01
SR−2
− STEERINGTROUBLESHOOTING
1676 Author�: Date�:
1996 TOYOTA T100 (RM449U)
TROUBLESHOOTING
PROBLEM SYMPTOMS TABLE
Use the table below to help you find the cause of the problem. The numbers indicate the priority of the likely
cause of the problem. Check each part in order. If necessary, repair or replace these parts.
SymptomSuspect AreaSee page
Hard steering
1. Tires (Improperly inflated)
2. Power steering fluid level (Low)
3. Drive belt (Loose)
4. Front wheel alignment (Incorrect)
5. Steering system joints (Worn)
6. Suspension arm ball joints
7. Steering column (Binding)
8.Power steering gearSA−3
SA−5
SR−5
SR−3
SA−7
SA−10
−
SA−109
SA−11 3
SA−11 7
SA−121
−
SR−54
SR−72
Poor return
1. Tires (Improperly inflated)
2. Front wheel alignment (Incorrect)
3. Steering column (Binding)
4. Power steering gearSA−3
SA−5
SA−7
SA−10
−
SR−54
SR−72
Excessive play
1. Steering system joints (Worn)
2. Suspension arm ball joints (Worn)
3. Universal joint, Intermediate shaft, Sliding yoke (Worn)
4. Front wheel bearing (Worn)
5. Power steering gear−
SA−109
SA−11 3
SA−11 7
SA−121
−
SA−16
SR−54
SR−72
Abnormal noise
1. Power steering fluid level (Low)
2. Steering system joints (Worn)
3. Power steering gearSR−5
−
SR−54
SR−72
Page 1710 of 2062

Downloaded from www.Manualslib.com manuals search engine P06717
SR071−02
Z00038
DENSO
Borroughs
CH0087
CORRECT WRONG WRONG
− STEERINGDRIVE BELT
SR−3
1677 Author�: Date�:
1996 TOYOTA T100 (RM449U)
DRIVE BELT
INSPECTION
1. INSPECT DRIVE BELT
(a) Visually check the belt for excessive wear, frayed cords
etc.
If any defect has been found, replace the drive belt.
HINT:
Cracks on the rib side of a belt are considered acceptable. If the
belt has chunks missing from the ribs, it should be replaced.
(b) Using a belt tension gauge, measure the belt tension.
Belt tension gauge:
DENSO BTG−20 (95506−00020)
Borroughs No. BT−33−73F
3RZ−FE Engine:
Drive belt tension:
New belt: 135 − 185 lbf
Used belt: 80 − 120 lbf
5VZ−FE Engine:
Drive belt tension:
New belt: 135−180 lbf
Used belt: 85−120 lbf
If the best tension is not as specified, adjust it.
HINT:
�”New belt” refers to a belt which has been used less than
5 minutes on a running engine.
�”Used belt” refers to a belt which has been used on a run-
ning engine for 5 minutes or more.
�After installing a belt, check that it fits properly in the
ribbed grooves.
�Check with your hand to confirm that the belt has not
slipped out of the groove on the bottom of the pulley.
�After installing a new belt, run the engine for about 5 min-
utes and recheck the belt tension.
Page 1711 of 2062
Downloaded from www.Manualslib.com manuals search engine SR072−01
R07281
Normal Abnormal SR−4
− STEERINGPOWER STEERING FLUID
1678 Author�: Date�:
1996 TOYOTA T100 (RM449U)
POWER STEERING FLUID
BLEEDING
1. CHECK FLUID LEVEL (See page SR−5)
2. JACK UP FRONT OF VEHICLE AND SUPPORT IT
WITH STANDS
3. TURN STEERING WHEEL
With the engine stopped, turn the wheel slowly from lock to lock
several times.
4. LOWER VEHICLE
5. START ENGINE
Run the engine at idle for a few minutes.
6. TURN STEERING WHEEL
(a) With the engine idling, turn the wheel to left or right full
lock and keep it there for 2 − 3 seconds, then turn the
wheel to the opposite full lock and keep it there for 2 − 3
seconds.
(b) Repeat (a) several times.
7. STOP ENGINE
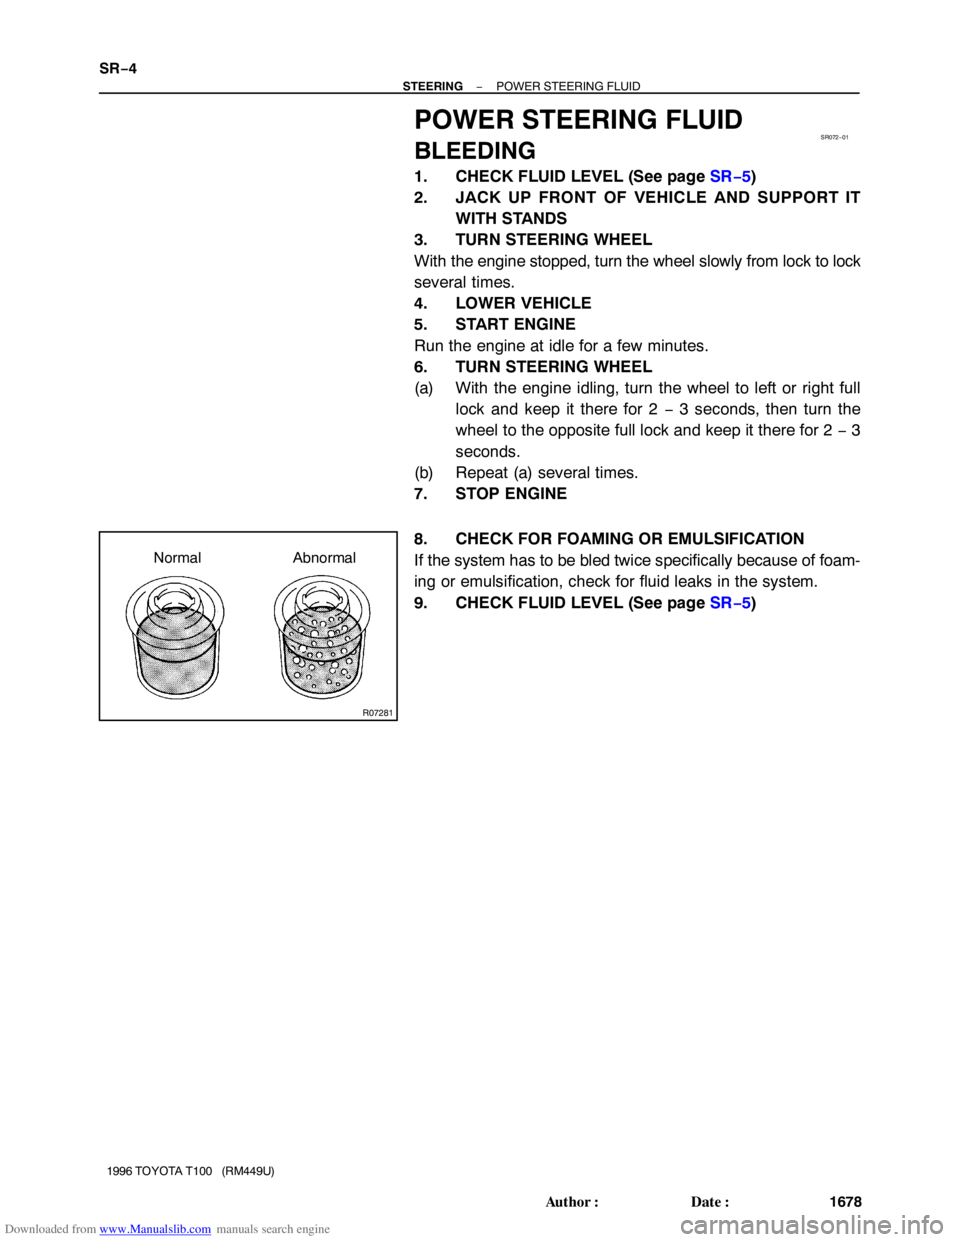
8. CHECK FOR FOAMING OR EMULSIFICATION
If the system has to be bled twice specifically because of foam-
ing or emulsification, check for fluid leaks in the system.
9. CHECK FLUID LEVEL (See page SR−5)
Page 1712 of 2062

or less
Engine Idling Engine Stopped
− STEERINGPOWER STEERING FLUID
SR−5
199")
Downloaded from www.Manualslib.com manuals search engine SR2267
SR073−04
R07281
Normal Abnormal
R11361
5 mm (0.2 in.)
or less
Engine Idling Engine Stopped
− STEERINGPOWER STEERING FLUID
SR−5
1996 TOYOTA T100 (RM449U)
INSPECTION
1. CHECK FLUID LEVEL
(a) Keep the vehicle level.
(b) With the engine stopped, check the fluid level in the oil
reservoir.
If necessary, add fluid.
Fluid: ATF DEXRON®II or III
HINT:
Check that the fluid level is within the HOT LEVEL range on the
reservoir cap dipstick. If the fluid is cold, check that it is within
the COLD LEVEL range.
(c) Start the engine and run it at idle.
(d) Turn the steering wheel from lock to lock several times to
boost fluid temperature.
Fluid temperature: 80°C (176°F)
(e) Check for foaming or emulsification.
If there is foaming or emulsification, bleed power steering sys-
tem.
(f) With the engine idling, measure the fluid level in the oil
reservoir.
(g) Stop the engine.
(h) Wait a few minutes and remeasure the fluid level in the
reservoir.
Maximum fluid level rise: 5 mm (0.20 in.)
If a problem is found, bleed power steering system.
(i) Check the fluid level.

REMOVAL
1. DISCONNECT SPEED SENSOR CONNECTOR
2. REMOVE SPEED S")

INSTALLATION
Installation is in the reverse order of removal (See pag")