Page 1046 of 2890
11. Rear Crossmember (AWD Model)
A: REMOVAL
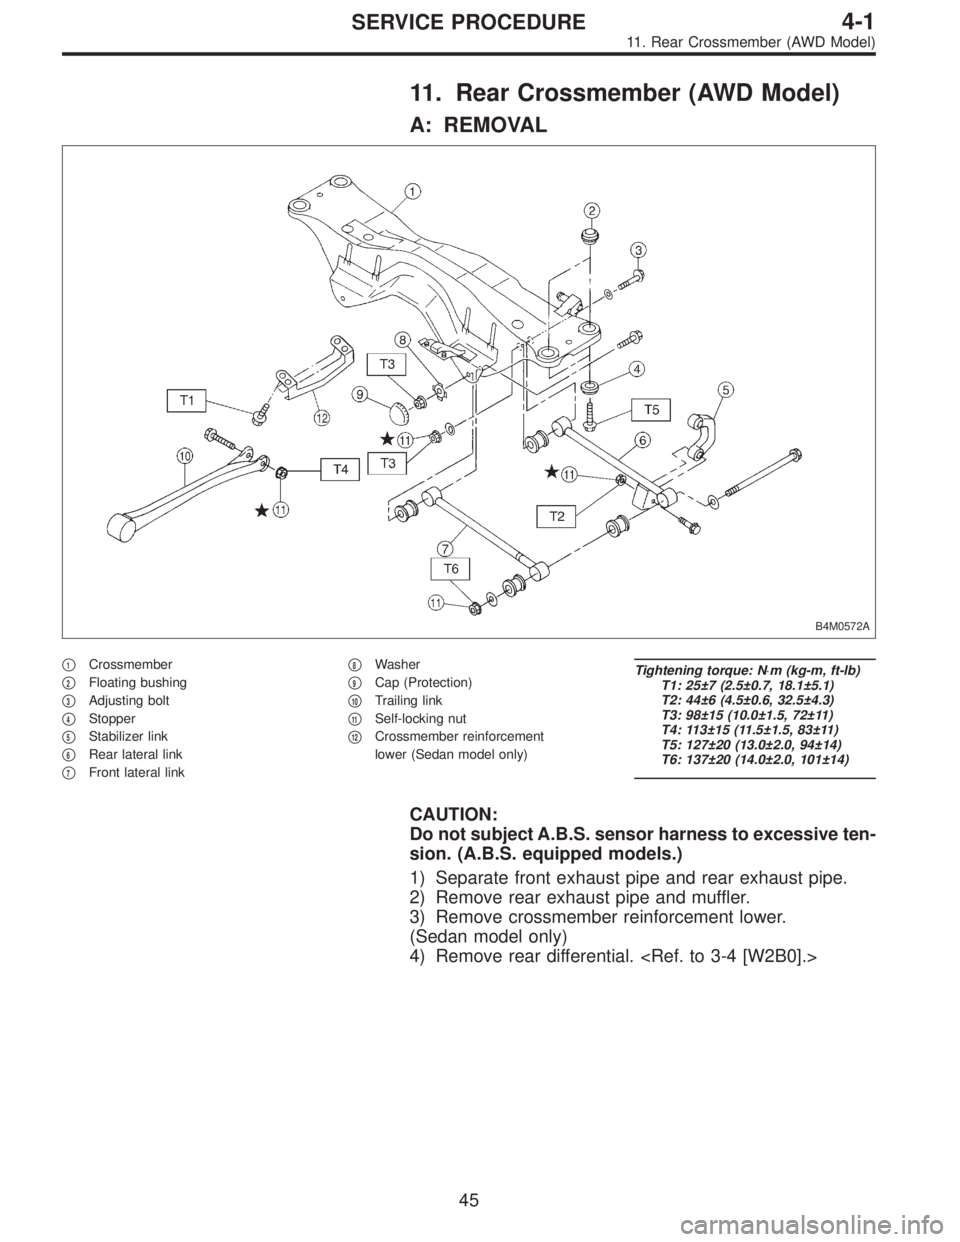
B4M0572A
�1Crossmember
�
2Floating bushing
�
3Adjusting bolt
�
4Stopper
�
5Stabilizer link
�
6Rear lateral link
�
7Front lateral link�
8Washer
�
9Cap (Protection)
�
10Trailing link
�
11Self-locking nut
�
12Crossmember reinforcement
lower (Sedan model only)
Tightening torque: N⋅m (kg-m, ft-lb)
T1: 25±7 (2.5±0.7, 18.1±5.1)
T2: 44±6 (4.5±0.6, 32.5±4.3)
T3: 98±15 (10.0±1.5, 72±11)
T4: 113±15 (11.5±1.5, 83±11)
T5: 127±20 (13.0±2.0, 94±14)
T6: 137±20 (14.0±2.0, 101±14)
CAUTION:
Do not subject A.B.S. sensor harness to excessive ten-
sion. (A.B.S. equipped models.)
1) Separate front exhaust pipe and rear exhaust pipe.
2) Remove rear exhaust pipe and muffler.
3) Remove crossmember reinforcement lower.
(Sedan model only)
4) Remove rear differential.
45
4-1SERVICE PROCEDURE
11. Rear Crossmember (AWD Model)
Page 1047 of 2890
G4M0544
5) Place transmission jack under rear crossmember.
G4M0545
6) Remove bolts securing crossmember to vehicle body,
and remove crossmember.
7) Scribe an alignment mark on rear lateral link cam bolt
and crossmember.
8) Remove four bolts securing front and rear lateral links
to crossmember by loosening nuts.
B: INSPECTION
Check removed parts for damage and cracks, and correct
or replace if defective.
C: INSTALLATION
1) Install in reverse order of removal.
2) For installation and tightening torque of rear differential,
refer to 3-4 [W2F0].
CAUTION:
Always tighten rubber bushing when wheels are in full
contact with the ground and vehicle is at curb weight
condition.
NOTE:
Check wheel alignment and adjust if necessary.
46
4-1SERVICE PROCEDURE
11. Rear Crossmember (AWD Model)
Page 1079 of 2890
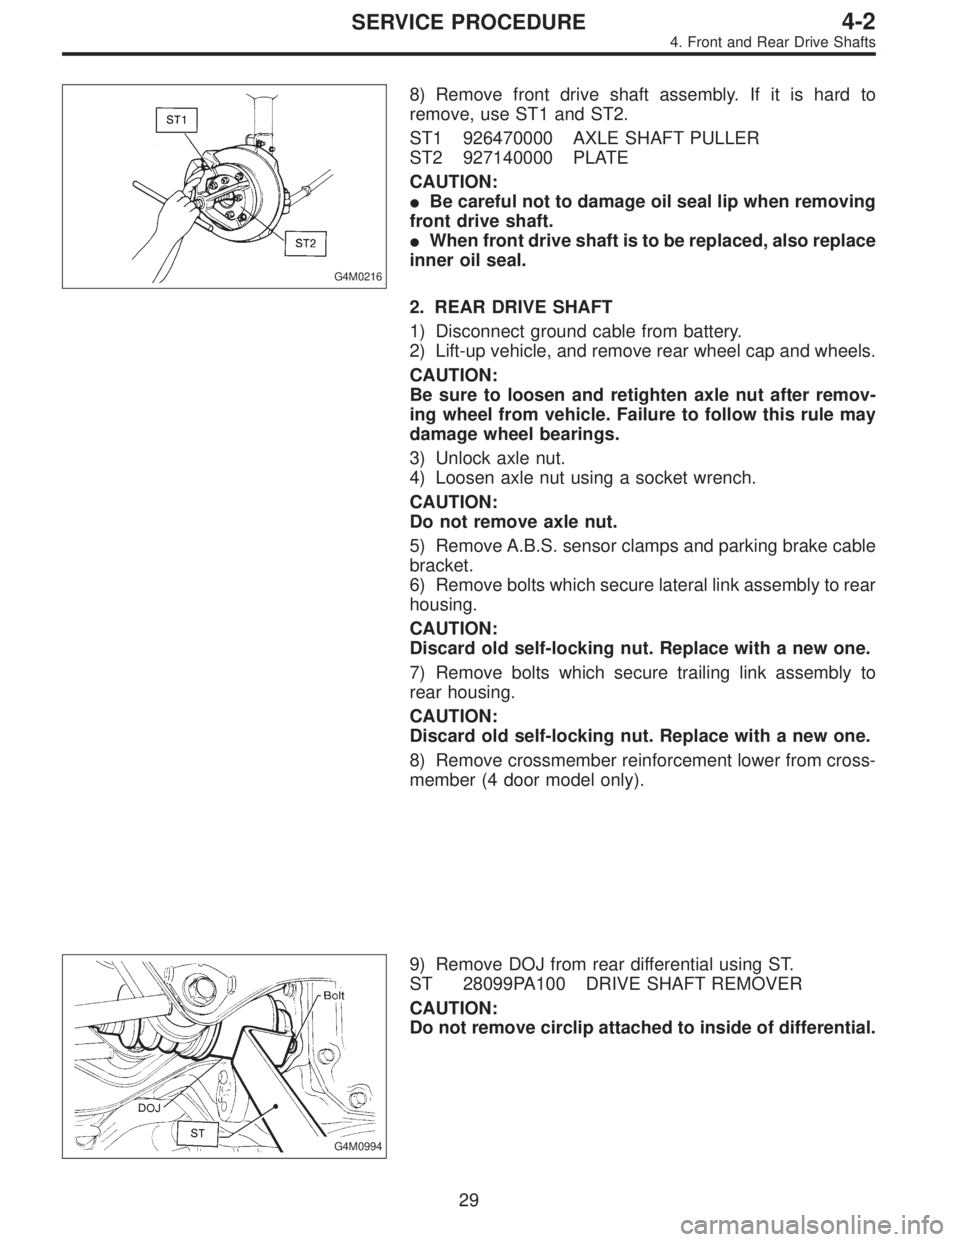
G4M0216
8) Remove front drive shaft assembly. If it is hard to
remove, use ST1 and ST2.
ST1 926470000 AXLE SHAFT PULLER
ST2 927140000 PLATE
CAUTION:
�Be careful not to damage oil seal lip when removing
front drive shaft.
�When front drive shaft is to be replaced, also replace
inner oil seal.
2. REAR DRIVE SHAFT
1) Disconnect ground cable from battery.
2) Lift-up vehicle, and remove rear wheel cap and wheels.
CAUTION:
Be sure to loosen and retighten axle nut after remov-
ing wheel from vehicle. Failure to follow this rule may
damage wheel bearings.
3) Unlock axle nut.
4) Loosen axle nut using a socket wrench.
CAUTION:
Do not remove axle nut.
5) Remove A.B.S. sensor clamps and parking brake cable
bracket.
6) Remove bolts which secure lateral link assembly to rear
housing.
CAUTION:
Discard old self-locking nut. Replace with a new one.
7) Remove bolts which secure trailing link assembly to
rear housing.
CAUTION:
Discard old self-locking nut. Replace with a new one.
8) Remove crossmember reinforcement lower from cross-
member (4 door model only).
G4M0994
9) Remove DOJ from rear differential using ST.
ST 28099PA100 DRIVE SHAFT REMOVER
CAUTION:
Do not remove circlip attached to inside of differential.
29
4-2SERVICE PROCEDURE
4. Front and Rear Drive Shafts
Page 1094 of 2890
G4M0279
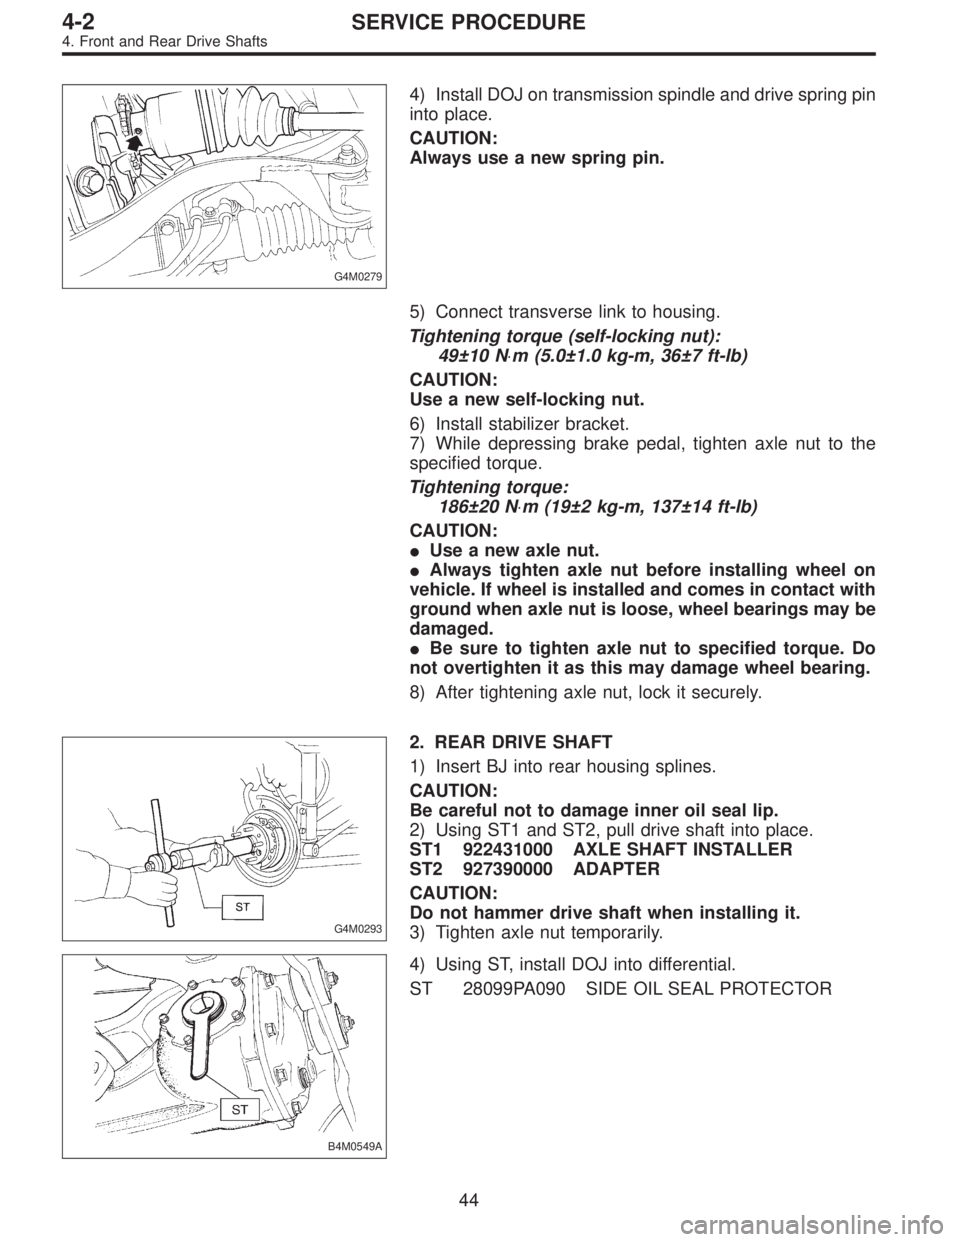
4) Install DOJ on transmission spindle and drive spring pin
into place.
CAUTION:
Always use a new spring pin.
5) Connect transverse link to housing.
Tightening torque (self-locking nut):
49±10 N⋅m (5.0±1.0 kg-m, 36±7 ft-lb)
CAUTION:
Use a new self-locking nut.
6) Install stabilizer bracket.
7) While depressing brake pedal, tighten axle nut to the
specified torque.
Tightening torque:
186±20 N⋅m (19±2 kg-m, 137±14 ft-lb)
CAUTION:
�Use a new axle nut.
�Always tighten axle nut before installing wheel on
vehicle. If wheel is installed and comes in contact with
ground when axle nut is loose, wheel bearings may be
damaged.
�Be sure to tighten axle nut to specified torque. Do
not overtighten it as this may damage wheel bearing.
8) After tightening axle nut, lock it securely.
G4M0293
2. REAR DRIVE SHAFT
1) Insert BJ into rear housing splines.
CAUTION:
Be careful not to damage inner oil seal lip.
2) Using ST1 and ST2, pull drive shaft into place.
ST1 922431000 AXLE SHAFT INSTALLER
ST2 927390000 ADAPTER
CAUTION:
Do not hammer drive shaft when installing it.
3) Tighten axle nut temporarily.
B4M0549A
4) Using ST, install DOJ into differential.
ST 28099PA090 SIDE OIL SEAL PROTECTOR
44
4-2SERVICE PROCEDURE
4. Front and Rear Drive Shafts
Page 1095 of 2890
B4M0550A
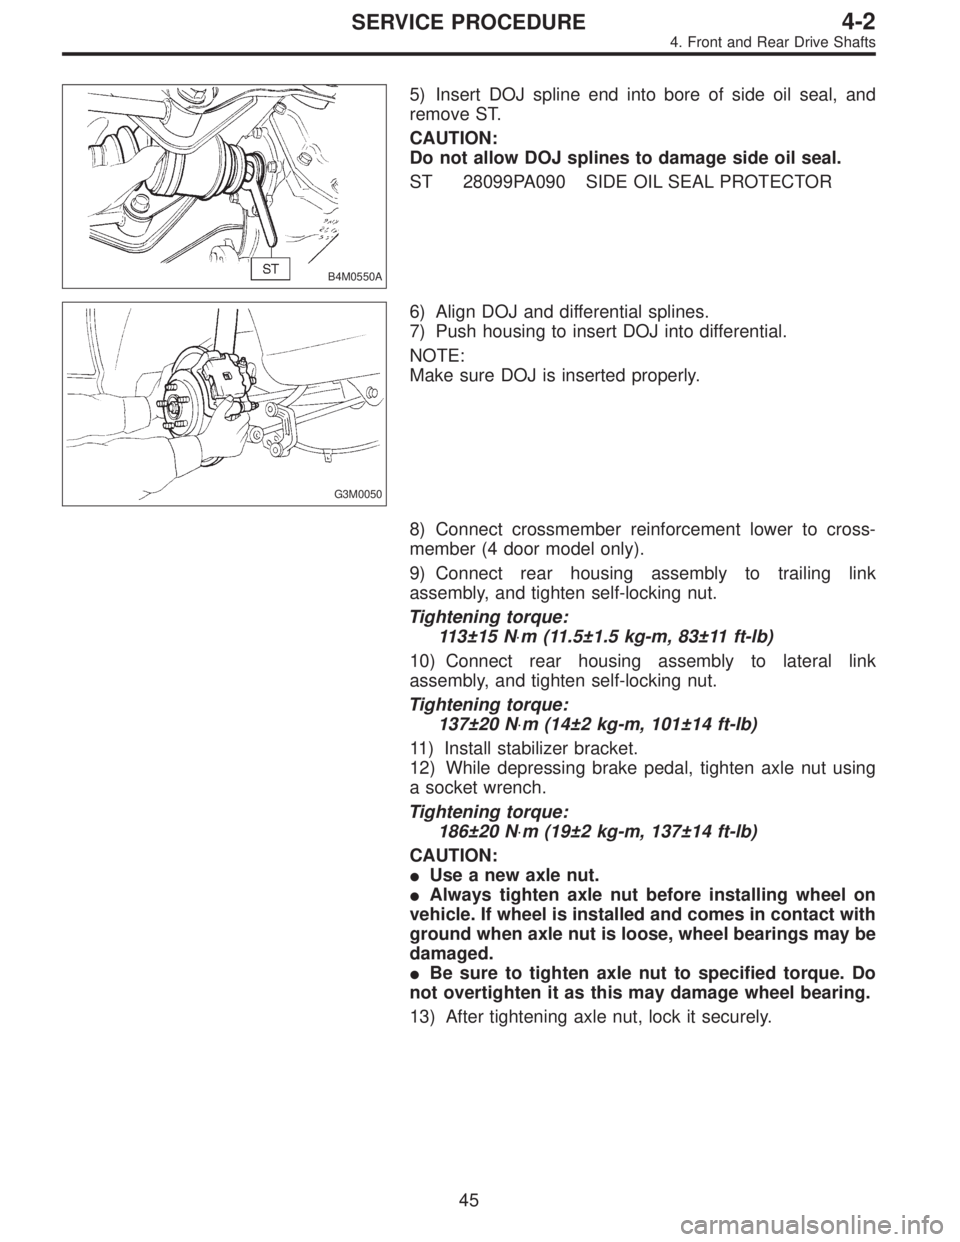
5) Insert DOJ spline end into bore of side oil seal, and
remove ST.
CAUTION:
Do not allow DOJ splines to damage side oil seal.
ST 28099PA090 SIDE OIL SEAL PROTECTOR
G3M0050
6) Align DOJ and differential splines.
7) Push housing to insert DOJ into differential.
NOTE:
Make sure DOJ is inserted properly.
8) Connect crossmember reinforcement lower to cross-
member (4 door model only).
9) Connect rear housing assembly to trailing link
assembly, and tighten self-locking nut.
Tightening torque:
113±15 N⋅m (11.5±1.5 kg-m, 83±11 ft-lb)
10) Connect rear housing assembly to lateral link
assembly, and tighten self-locking nut.
Tightening torque:
137±20 N⋅m (14±2 kg-m, 101±14 ft-lb)
11) Install stabilizer bracket.
12) While depressing brake pedal, tighten axle nut using
a socket wrench.
Tightening torque:
186±20 N⋅m (19±2 kg-m, 137±14 ft-lb)
CAUTION:
�Use a new axle nut.
�Always tighten axle nut before installing wheel on
vehicle. If wheel is installed and comes in contact with
ground when axle nut is loose, wheel bearings may be
damaged.
�Be sure to tighten axle nut to specified torque. Do
not overtighten it as this may damage wheel bearing.
13) After tightening axle nut, lock it securely.
45
4-2SERVICE PROCEDURE
4. Front and Rear Drive Shafts
Page 1097 of 2890
6. Replacement of Rear DOJ and BJ
Boots
A: REMOVAL
1) Disconnect ground cable from battery.
2) Lift-up vehicle, and remove rear wheel cap and wheels.
NOTE:
Axle nut need not be removed.
3) Remove A.B.S. sensor clamps and parking brake cable
bracket.
4) Disconnect stabilizer link from lateral link.
5) Remove bolts which secure lateral link assembly to rear
housing.
6) Remove bolts which secure trailing link assembly to
rear housing.
7) Remove crossmember reinforcement lower from cross-
member (4 door model only).
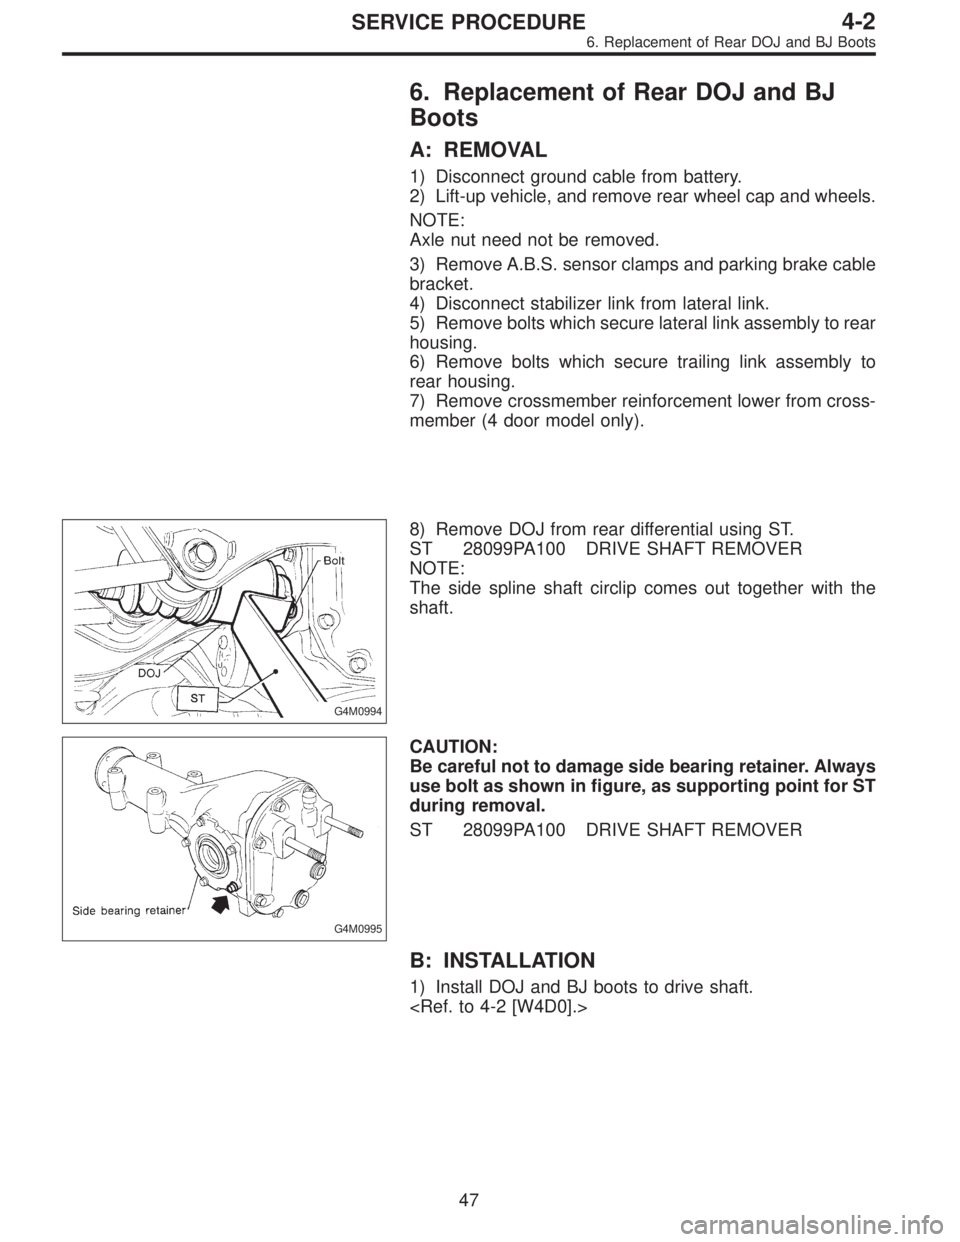
G4M0994
8) Remove DOJ from rear differential using ST.
ST 28099PA100 DRIVE SHAFT REMOVER
NOTE:
The side spline shaft circlip comes out together with the
shaft.
G4M0995
CAUTION:
Be careful not to damage side bearing retainer. Always
use bolt as shown in figure, as supporting point for ST
during removal.
ST 28099PA100 DRIVE SHAFT REMOVER
B: INSTALLATION
1) Install DOJ and BJ boots to drive shaft.
47
4-2SERVICE PROCEDURE
6. Replacement of Rear DOJ and BJ Boots
Page 1098 of 2890
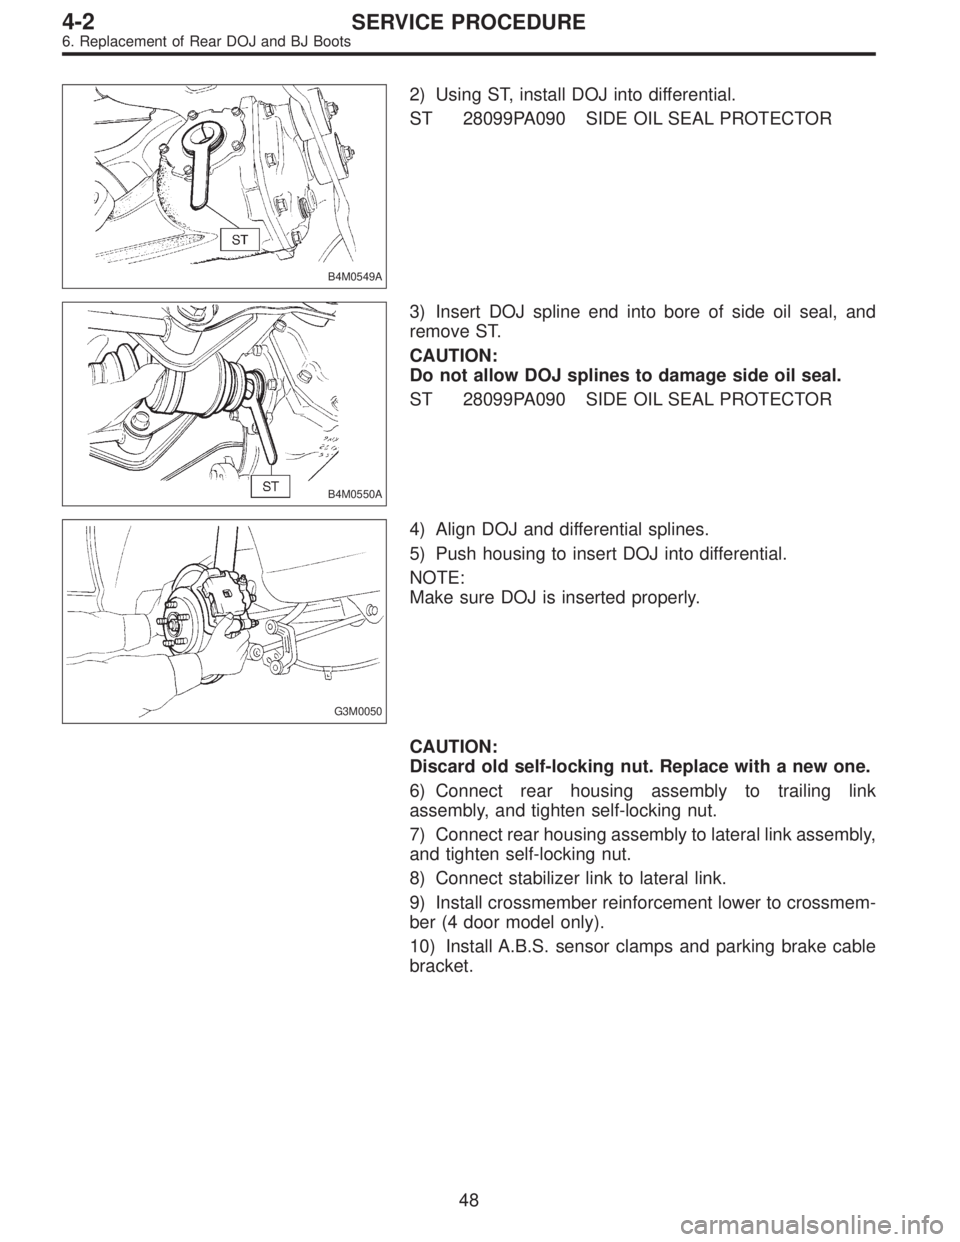
B4M0549A
2) Using ST, install DOJ into differential.
ST 28099PA090 SIDE OIL SEAL PROTECTOR
B4M0550A
3) Insert DOJ spline end into bore of side oil seal, and
remove ST.
CAUTION:
Do not allow DOJ splines to damage side oil seal.
ST 28099PA090 SIDE OIL SEAL PROTECTOR
G3M0050
4) Align DOJ and differential splines.
5) Push housing to insert DOJ into differential.
NOTE:
Make sure DOJ is inserted properly.
CAUTION:
Discard old self-locking nut. Replace with a new one.
6) Connect rear housing assembly to trailing link
assembly, and tighten self-locking nut.
7) Connect rear housing assembly to lateral link assembly,
and tighten self-locking nut.
8) Connect stabilizer link to lateral link.
9) Install crossmember reinforcement lower to crossmem-
ber (4 door model only).
10) Install A.B.S. sensor clamps and parking brake cable
bracket.
48
4-2SERVICE PROCEDURE
6. Replacement of Rear DOJ and BJ Boots
Page 2161 of 2890
OBD0607A
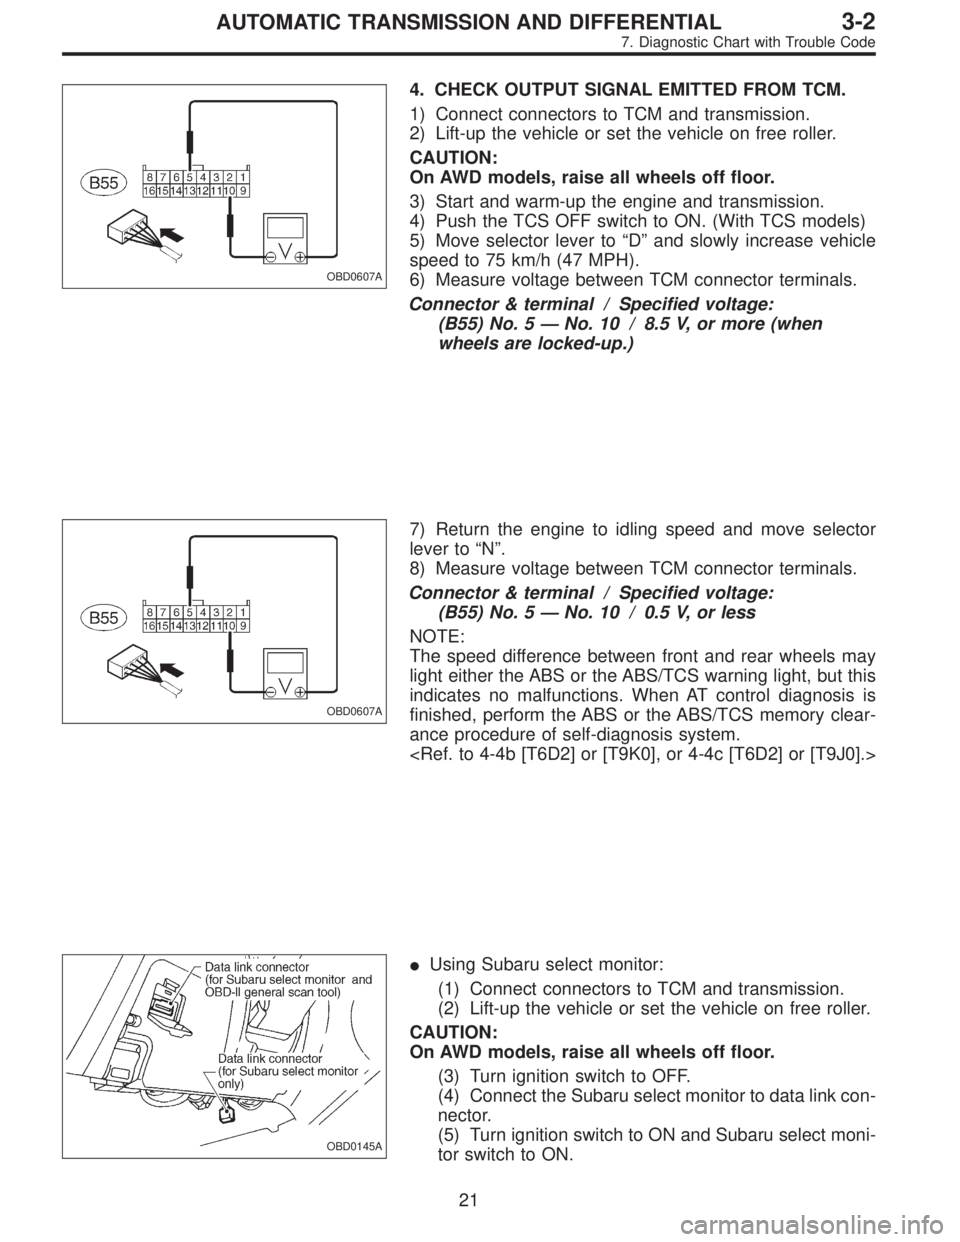
4. CHECK OUTPUT SIGNAL EMITTED FROM TCM.
1) Connect connectors to TCM and transmission.
2) Lift-up the vehicle or set the vehicle on free roller.
CAUTION:
On AWD models, raise all wheels off floor.
3) Start and warm-up the engine and transmission.
4) Push the TCS OFF switch to ON. (With TCS models)
5) Move selector lever to“D”and slowly increase vehicle
speed to 75 km/h (47 MPH).
6) Measure voltage between TCM connector terminals.
Connector & terminal / Specified voltage:
(B55) No. 5—No. 10 / 8.5 V, or more (when
wheels are locked-up.)
OBD0607A
7) Return the engine to idling speed and move selector
lever to“N”.
8) Measure voltage between TCM connector terminals.
Connector & terminal / Specified voltage:
(B55) No. 5—No. 10 / 0.5 V, or less
NOTE:
The speed difference between front and rear wheels may
light either the ABS or the ABS/TCS warning light, but this
indicates no malfunctions. When AT control diagnosis is
finished, perform the ABS or the ABS/TCS memory clear-
ance procedure of self-diagnosis system.
OBD0145A
�Using Subaru select monitor:
(1) Connect connectors to TCM and transmission.
(2) Lift-up the vehicle or set the vehicle on free roller.
CAUTION:
On AWD models, raise all wheels off floor.
(3) Turn ignition switch to OFF.
(4) Connect the Subaru select monitor to data link con-
nector.
(5) Turn ignition switch to ON and Subaru select moni-
tor switch to ON.
21
3-2AUTOMATIC TRANSMISSION AND DIFFERENTIAL
7. Diagnostic Chart with Trouble Code