Page 965 of 2890
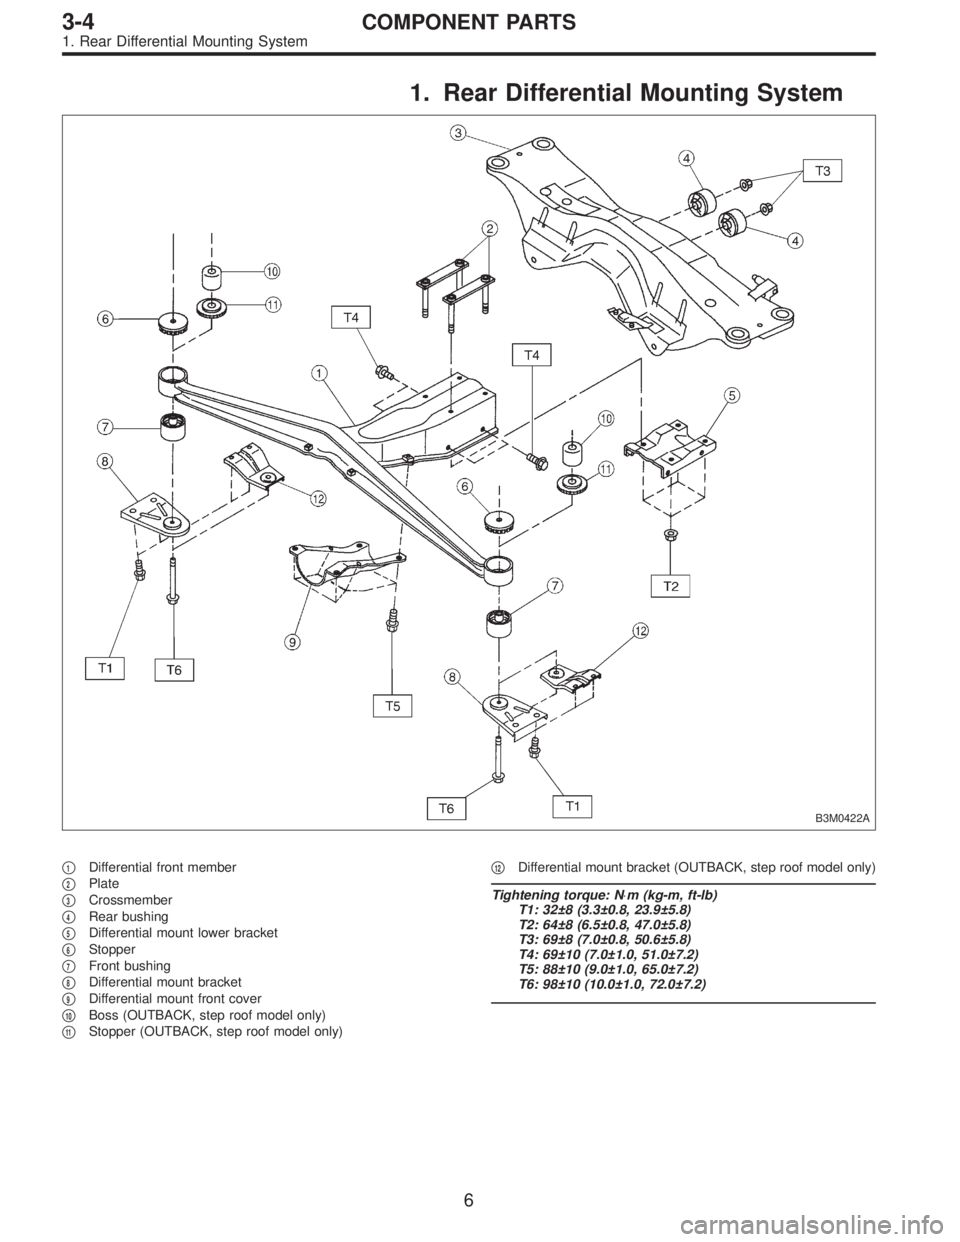
1. Rear Differential Mounting System
B3M0422A
�1Differential front member
�
2Plate
�
3Crossmember
�
4Rear bushing
�
5Differential mount lower bracket
�
6Stopper
�
7Front bushing
�
8Differential mount bracket
�
9Differential mount front cover
�
10Boss (OUTBACK, step roof model only)
�
11Stopper (OUTBACK, step roof model only)�
12Differential mount bracket (OUTBACK, step roof model only)
Tightening torque: N⋅m (kg-m, ft-lb)
T1: 32±8 (3.3±0.8, 23.9±5.8)
T2: 64±8 (6.5±0.8, 47.0±5.8)
T3: 69±8 (7.0±0.8, 50.6±5.8)
T4: 69±10 (7.0±1.0, 51.0±7.2)
T5: 88±10 (9.0±1.0, 65.0±7.2)
T6: 98±10 (10.0±1.0, 72.0±7.2)
6
3-4COMPONENT PARTS
1. Rear Differential Mounting System
Page 1454 of 2890
3. Front Bumper (Except outback with
step roof)
B5M0367A
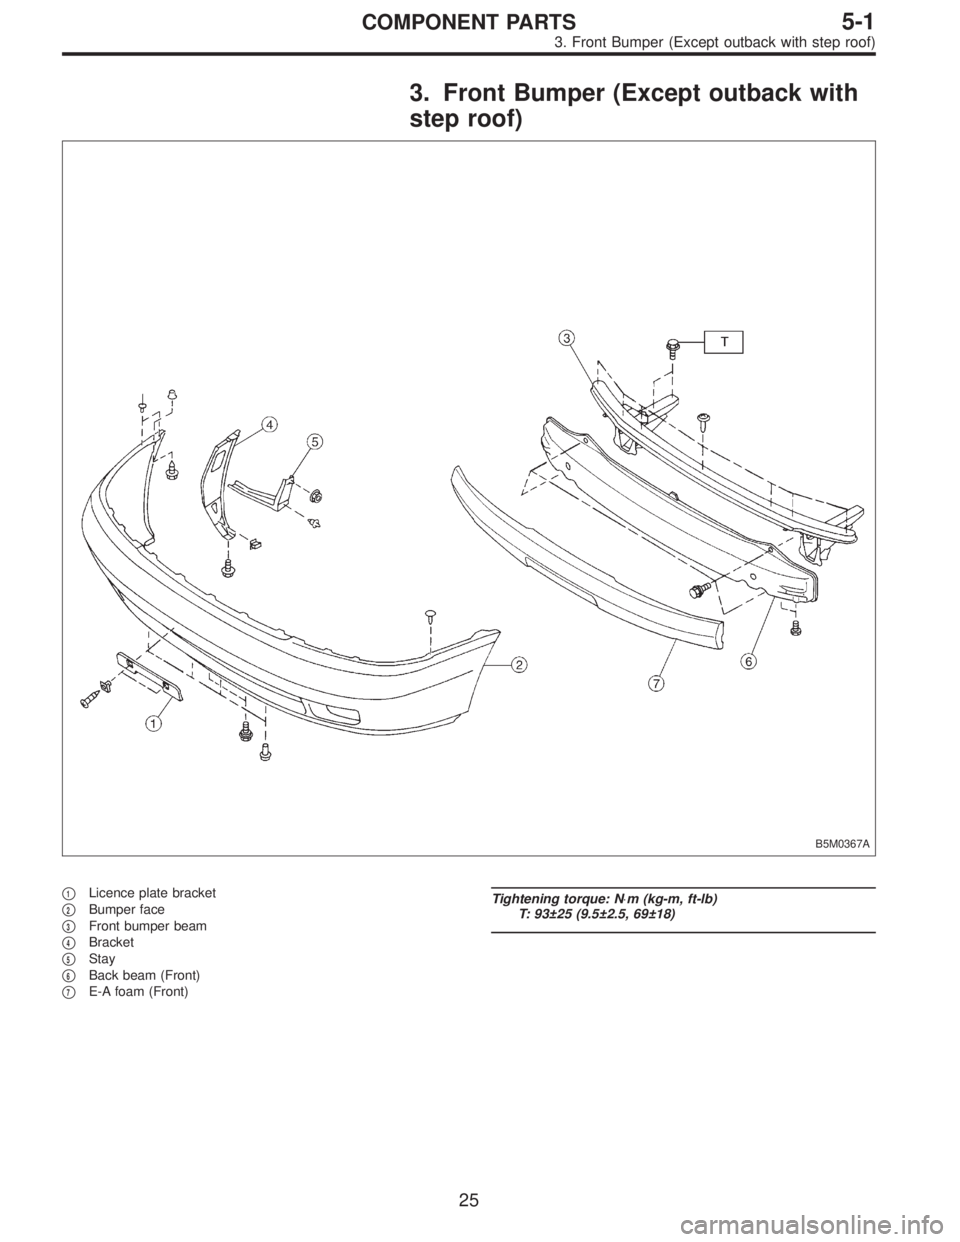
�1Licence plate bracket
�
2Bumper face
�
3Front bumper beam
�
4Bracket
�
5Stay
�
6Back beam (Front)
�
7E-A foam (Front)
Tightening torque: N⋅m (kg-m, ft-lb)
T: 93±25 (9.5±2.5, 69±18)
25
5-1COMPONENT PARTS
3. Front Bumper (Except outback with step roof)
Page 1457 of 2890
6. Sunroof
B5M0370A
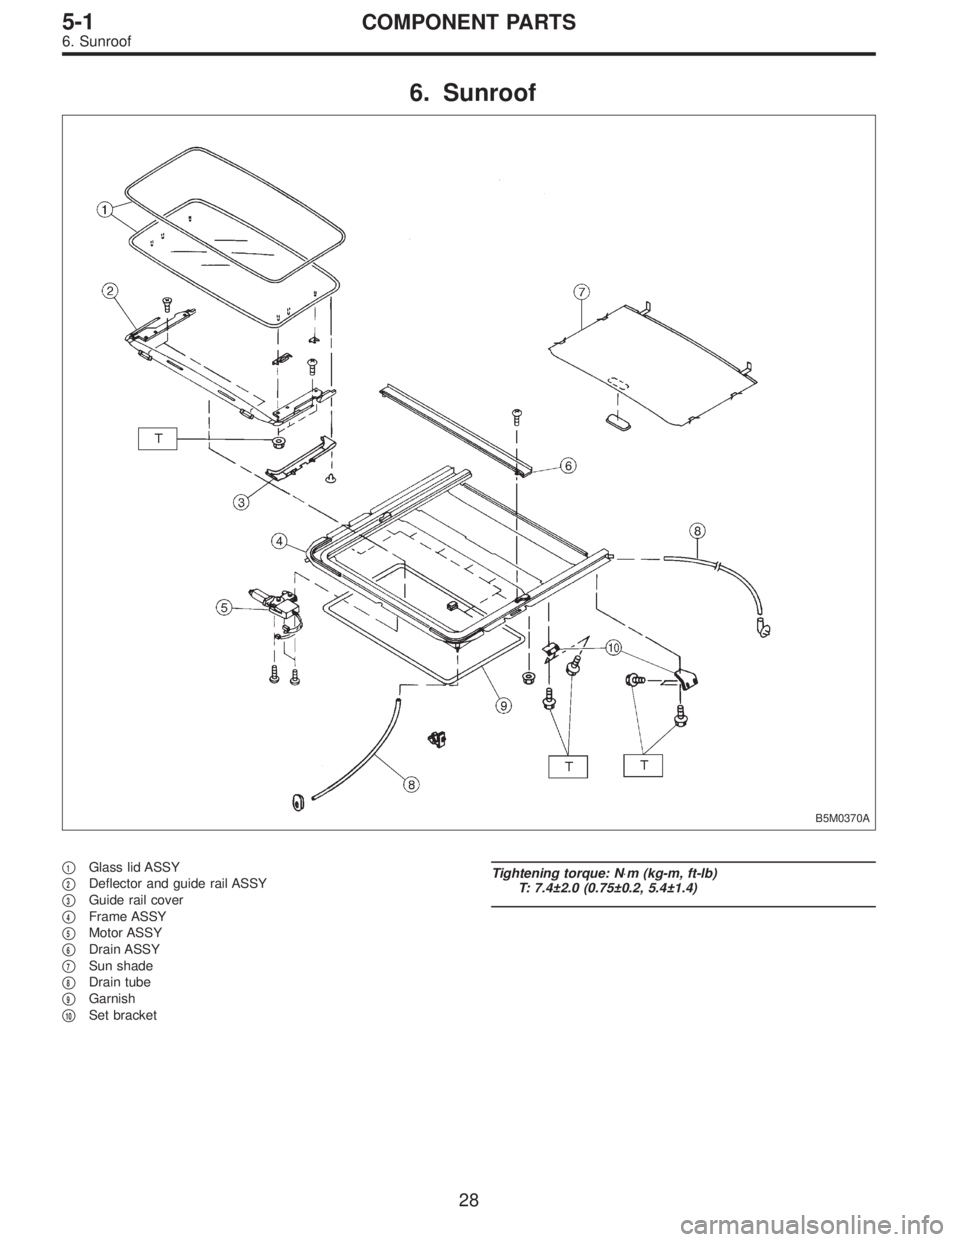
�1Glass lid ASSY
�
2Deflector and guide rail ASSY
�
3Guide rail cover
�
4Frame ASSY
�
5Motor ASSY
�
6Drain ASSY
�
7Sun shade
�
8Drain tube
�
9Garnish
�
10Set bracket
Tightening torque: N⋅m (kg-m, ft-lb)
T: 7.4±2.0 (0.75±0.2, 5.4±1.4)
28
5-1COMPONENT PARTS
6. Sunroof
Page 1460 of 2890
9. Front Bumper (Outback with step
roof)
B5M0404A
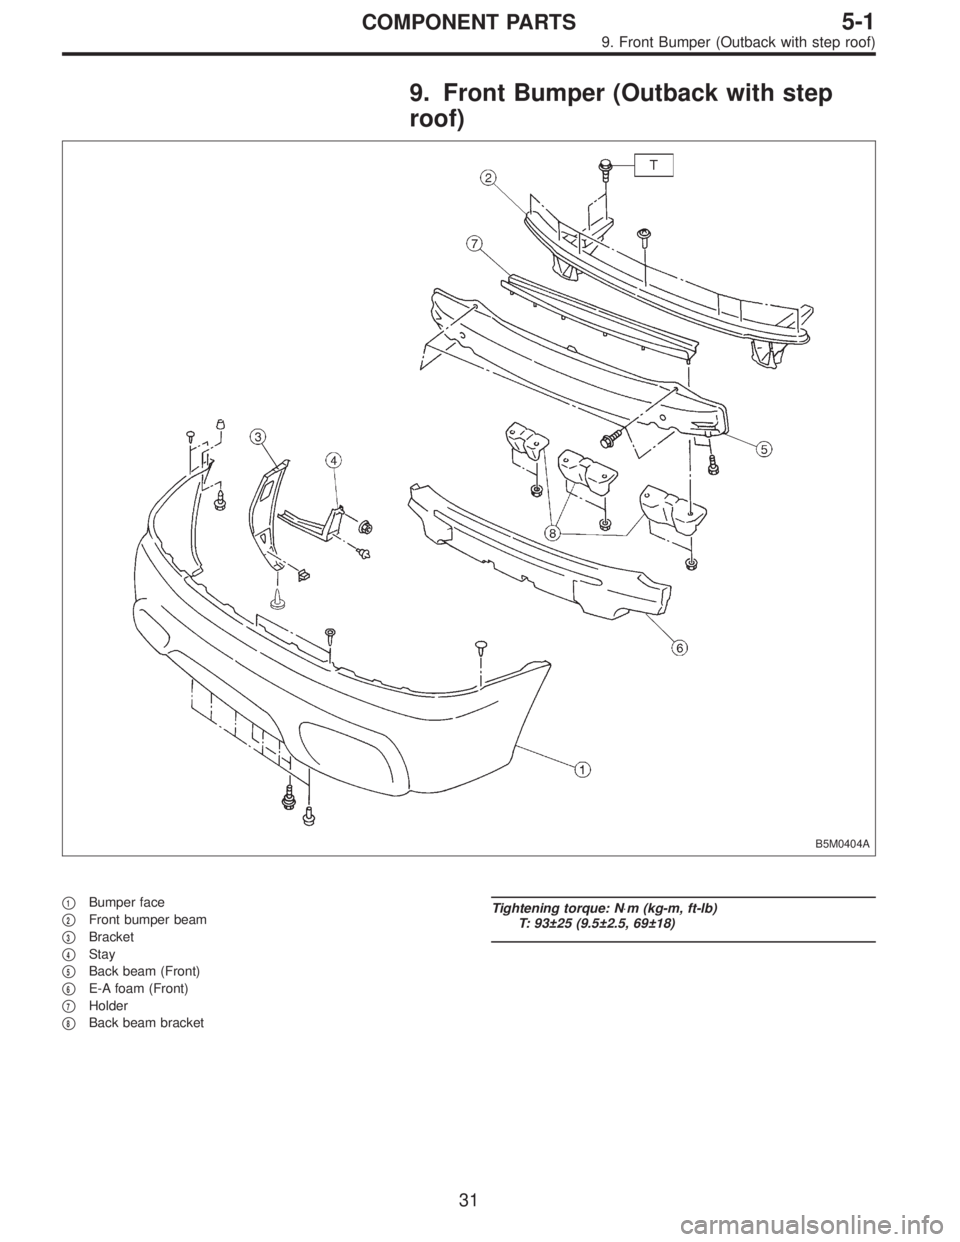
�1Bumper face
�
2Front bumper beam
�
3Bracket
�
4Stay
�
5Back beam (Front)
�
6E-A foam (Front)
�
7Holder
�
8Back beam bracket
Tightening torque: N⋅m (kg-m, ft-lb)
T: 93±25 (9.5±2.5, 69±18)
31
5-1COMPONENT PARTS
9. Front Bumper (Outback with step roof)
Page 1461 of 2890
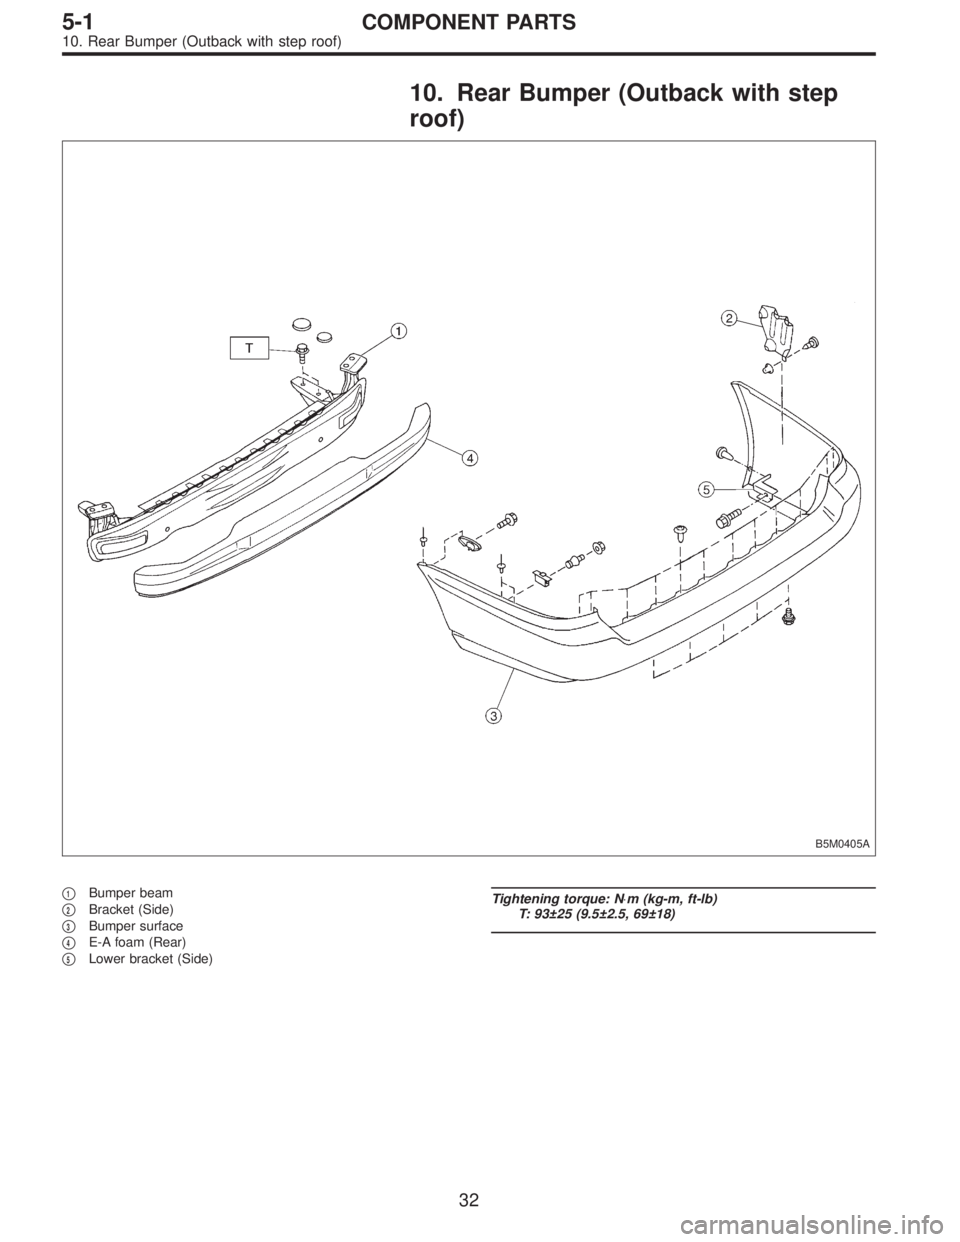
10. Rear Bumper (Outback with step
roof)
B5M0405A
�1Bumper beam
�
2Bracket (Side)
�
3Bumper surface
�
4E-A foam (Rear)
�
5Lower bracket (Side)
Tightening torque: N⋅m (kg-m, ft-lb)
T: 93±25 (9.5±2.5, 69±18)
32
5-1COMPONENT PARTS
10. Rear Bumper (Outback with step roof)
Page 1490 of 2890
![SUBARU LEGACY 1996 Service Repair Manual B5M0304
15. Roof Rack (Wagon only, if
equipped)
A: REMOVAL
1) Remove roof trim, rear quarter trim, pillar trim, etc.
<Ref. to 5-3 [W5A0].>
2) Remove flange bolts.
3) Remove flange nuts.
4) Remove roof](/manual-img/17/57433/w960_57433-1489.png "SUBARU LEGACY 1996 Service Repair Manual B5M0304
15. Roof Rack (Wagon only, if
equipped)
A: REMOVAL
1) Remove roof trim, rear quarter trim, pillar trim, etc.
<Ref. to 5-3 [W5A0].>
2) Remove flange bolts.
3) Remove flange nuts.
4) Remove roof")
B5M0304
15. Roof Rack (Wagon only, if
equipped)
A: REMOVAL
1) Remove roof trim, rear quarter trim, pillar trim, etc.
2) Remove flange bolts.
3) Remove flange nuts.
4) Remove roof rail.
B: INSTALLATION
Installation is in the reverse order of removal.
CAUTION:
To prevent deformation, be sure to install roof rail in
steps 4), 3), 2) and 1), in that order.
B5M0307A
16. Sunroof
A: REMOVAL
1. GLASS LID ASSEMBLY
1) Completely open sun shade. (Push it back far.)
2) Remove a clip and detach guide rail cover.
3) Remove six nuts from the left and right lid bracket.
4) Working inside, slightly raise glass lid assembly until it
is disengaged from lid bracket.
5) Hold both ends of glass lid assembly and remove it at
an angle.
B5M0308B
2. SUNROOF MOTOR AND RELAY
1) Remove center pillar trim upper.
2) Remove front pillar trim upper.
3) Remove assist grip on left side.
4) Remove sunvisor with hook.
5) Remove sunroof switch.
6) Remove rearview mirror.
7) While rolling up roof trim, disconnect harness clips and
connector.
8) While rolling up roof trim, remove spot lamp bracket and
sunroof motor.
58
5-1SERVICE PROCEDURE
15. Roof Rack (Wagon only, if equipped) - 16. Sunroof
Page 1491 of 2890
![SUBARU LEGACY 1996 Service Repair Manual B5M0304
15. Roof Rack (Wagon only, if
equipped)
A: REMOVAL
1) Remove roof trim, rear quarter trim, pillar trim, etc.
<Ref. to 5-3 [W5A0].>
2) Remove flange bolts.
3) Remove flange nuts.
4) Remove roof](/manual-img/17/57433/w960_57433-1490.png "SUBARU LEGACY 1996 Service Repair Manual B5M0304
15. Roof Rack (Wagon only, if
equipped)
A: REMOVAL
1) Remove roof trim, rear quarter trim, pillar trim, etc.
<Ref. to 5-3 [W5A0].>
2) Remove flange bolts.
3) Remove flange nuts.
4) Remove roof")
B5M0304
15. Roof Rack (Wagon only, if
equipped)
A: REMOVAL
1) Remove roof trim, rear quarter trim, pillar trim, etc.
2) Remove flange bolts.
3) Remove flange nuts.
4) Remove roof rail.
B: INSTALLATION
Installation is in the reverse order of removal.
CAUTION:
To prevent deformation, be sure to install roof rail in
steps 4), 3), 2) and 1), in that order.
B5M0307A
16. Sunroof
A: REMOVAL
1. GLASS LID ASSEMBLY
1) Completely open sun shade. (Push it back far.)
2) Remove a clip and detach guide rail cover.
3) Remove six nuts from the left and right lid bracket.
4) Working inside, slightly raise glass lid assembly until it
is disengaged from lid bracket.
5) Hold both ends of glass lid assembly and remove it at
an angle.
B5M0308B
2. SUNROOF MOTOR AND RELAY
1) Remove center pillar trim upper.
2) Remove front pillar trim upper.
3) Remove assist grip on left side.
4) Remove sunvisor with hook.
5) Remove sunroof switch.
6) Remove rearview mirror.
7) While rolling up roof trim, disconnect harness clips and
connector.
8) While rolling up roof trim, remove spot lamp bracket and
sunroof motor.
58
5-1SERVICE PROCEDURE
15. Roof Rack (Wagon only, if equipped) - 16. Sunroof
Page 1492 of 2890
B5M0310A
3. SUNROOF FRAME
1) Remove sunroof switch, center and rear room lamps.
2) Remove roof trim, rear quarter trim, pillar trim, etc.
3) Remove glass lid assembly.
4) Remove two harness support clips.
G5M0205
5) Disconnect harness clips and connector of sunroof
motor.
6) Disconnect front and rear drain tubes.
CAUTION:
When installing drain tube, insert it securely into drain
pipe.
Length A:
15 mm (0.59 in) or more
B5M0312
7) Remove eight nuts.
B5M0382A
8) Remove set bracket mounting bolts.
9) Remove sunroof frame.
B: INSTALLATION
Installation is in the reverse order of removal.
59
5-1SERVICE PROCEDURE
16. Sunroof
![SUBARU LEGACY 1996 Service Repair Manual B5M0310A
3. SUNROOF FRAME
1) Remove sunroof switch, center and rear room lamps.
2) Remove roof trim, rear quarter trim, pillar trim, etc.
<Ref. to 5-3 [W5A0].>
3) Remove glass lid assembly.
4) Remove](/manual-img/17/57433/w960_57433-1491.png "SUBARU LEGACY 1996 Service Repair Manual B5M0310A
3. SUNROOF FRAME
1) Remove sunroof switch, center and rear room lamps.
2) Remove roof trim, rear quarter trim, pillar trim, etc.
<Ref. to 5-3 [W5A0].>
3) Remove glass lid assembly.
4) Remove")