1996 ACURA RL KA9 sensor
[x] Cancel search: sensorPage 1640 of 1954
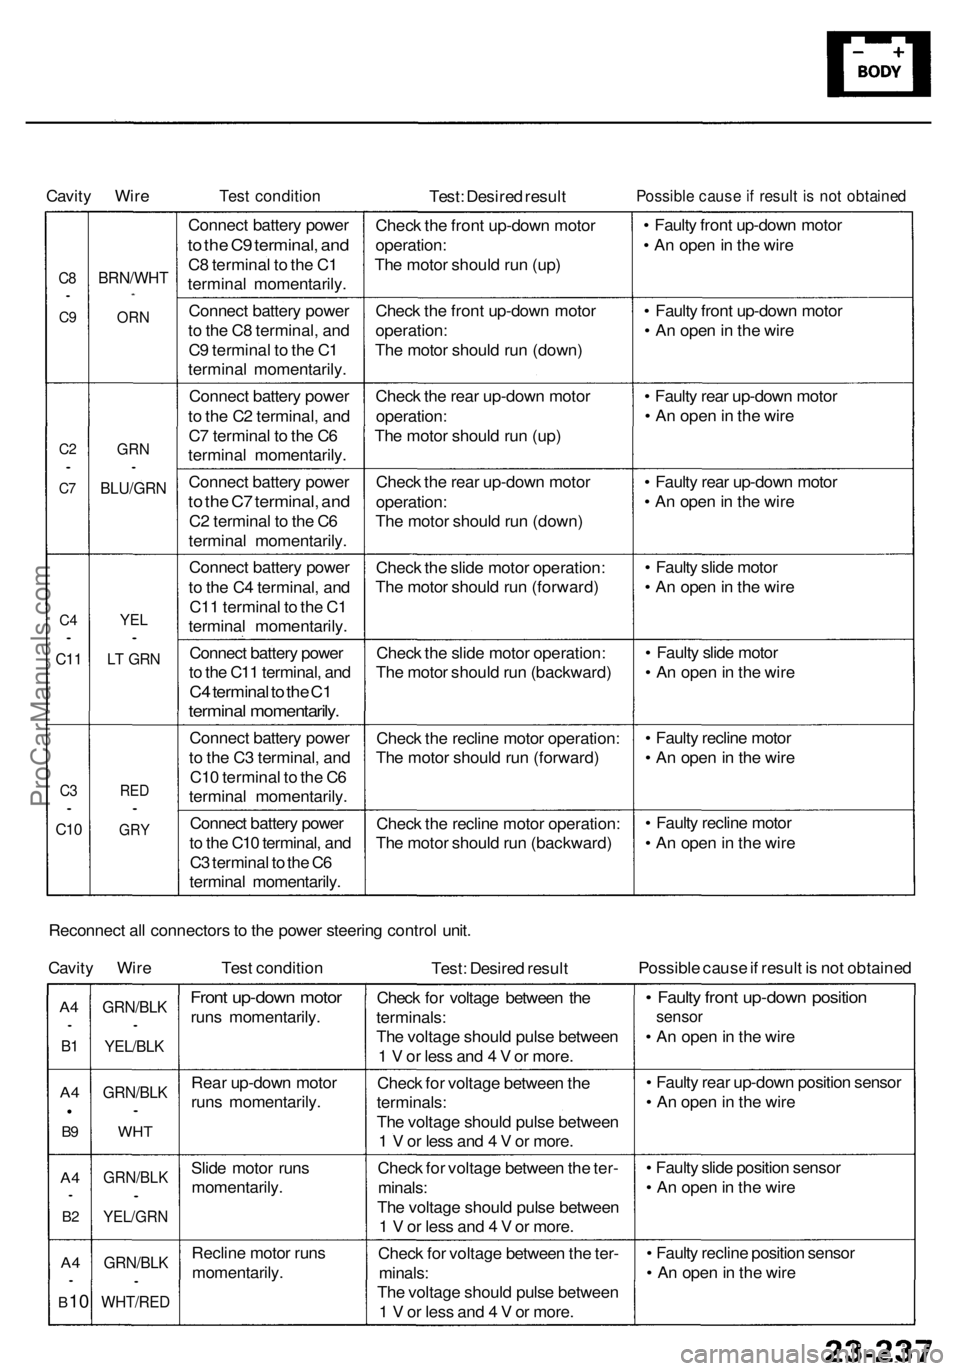
Cavity Wir eTest conditio nTest: Desire d resul tPossibl e caus e if resul t i s no t obtaine d
C8•
C9
C 2•
C7
C 4•
C1 1
C3•
C1 0
BRN/WH T*
ORN
GR N•
BLU/GR N
YEL•
LT GR N
RED•
GR Y
Connec t batter y powe r
to th e C 9 terminal , an d
C8 termina l t o th e C 1
termina l momentarily .
Connec t batter y powe r
t o th e C 8 terminal , an d
C 9 termina l t o th e C 1
termina l momentarily .
Connec t batter y powe r
t o th e C 2 terminal , an d
C 7 termina l t o th e C 6
termina l momentarily .
Connec t batter y powe r
to th e C 7 terminal , an d
C2 termina l t o th e C 6
termina l momentarily .
Connec t batter y powe r
t o th e C 4 terminal , an d
C1 1 termina l t o th e C 1
termina l momentarily .
Connec t batter y powe r
t o th e C1 1 terminal , an d
C4 termina l t o th e C 1
termina l momentarily .
Connect batter y powe r
t o th e C 3 terminal , an d
C1 0 termina l t o th e C 6
termina l momentarily .
Connec t batter y powe r
t o th e C1 0 terminal , an d
C 3 termina l t o th e C 6
termina l momentarily .Chec
k th e fron t up-dow n moto r
operation :
Th e moto r shoul d ru n (up )
Chec k th e fron t up-dow n moto r
operation :
Th e moto r shoul d ru n (down )
Chec k th e rea r up-dow n moto r
operation :
Th e moto r shoul d ru n (up )
Chec k th e rea r up-dow n moto r
operation :
Th e moto r shoul d ru n (down )
Chec k th e slid e moto r operation :
Th e moto r shoul d ru n (forward )
Chec k th e slid e moto r operation :
Th e moto r shoul d ru n (backward )
Chec k th e reclin e moto r operation :
Th e moto r shoul d ru n (forward )
Chec k th e reclin e moto r operation :
Th e moto r shoul d ru n (backward )•
Fault y fron t up-dow n moto r
• A n ope n in th e wir e
• Fault y fron t up-dow n moto r
• A n ope n in th e wir e
• Fault y rea r up-dow n moto r
• A n ope n in th e wir e
• Fault y rea r up-dow n moto r
• A n ope n in th e wir e
• Fault y slid e moto r
• A n ope n in th e wir e
• Fault y slid e moto r
• A n ope n in th e wir e
• Fault y reclin e moto r
• A n ope n in th e wir e
• Fault y reclin e moto r
• A n ope n in th e wir e
Reconnec t al l connector s to th e powe r steerin g contro l unit .
Cavit y Wir e Test conditio n
Test: Desire d resul t Possibl
e caus e if resul t i s no t obtaine d
A4•
B1
A 4
B9
A 4•
B2
A 4•
B 10
GRN/BL K•
YEL/BLK
GRN/BL K•
WHT
GRN/BL K•
YEL/GRN
GRN/BLK•
WHT/RE D
Front up-dow n moto r
runs momentarily .
Rea r up-dow n moto r
run s momentarily .
Slid e moto r run s
momentarily .
Reclin e moto r run s
momentarily . Chec
k fo r voltag e betwee n th e
terminals :
Th e voltag e shoul d puls e betwee n
1 V or les s an d 4 V or more .
Chec k fo r voltag e betwee n th e
terminals :
Th e voltag e shoul d puls e betwee n
1 V or les s an d 4 V or more .
Chec k fo r voltag e betwee n th e ter -
minals :
Th e voltag e shoul d puls e betwee n
1 V or les s an d 4 V or more .
Chec k fo r voltag e betwee n th e ter -
minals :
Th e voltag e shoul d puls e betwee n
1 V or les s an d 4 V or more .
• Fault y fron t up-dow n positio n
sensor
• A n ope n in th e wir e
• Fault y rea r up-dow n positio n senso r
• A n ope n in th e wir e
• Fault y slid e positio n senso r
• A n ope n in th e wir e
• Fault y reclin e positio n senso r
• A n ope n in th e wir e
ProCarManuals.com
Page 1643 of 1954
Driving Positio n Memor y Syste m (DPMS )
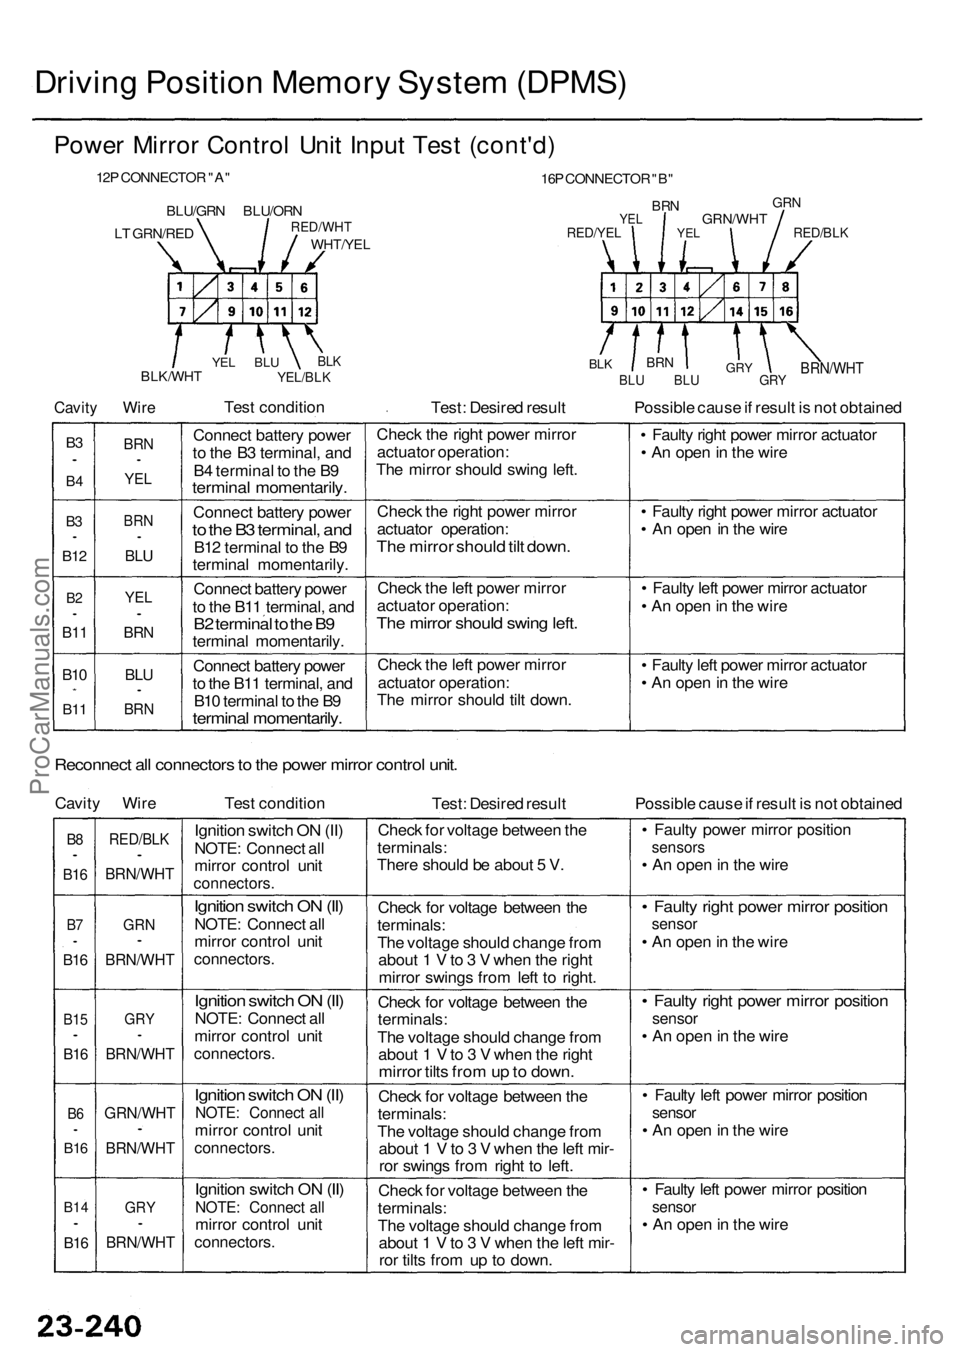
Power Mirro r Contro l Uni t Inpu t Tes t (cont'd )
12P CONNECTO R "A "
BLU/GR N BLU/OR NRED/WHT
WHT/YEL
16P CONNECTO R "B "
BR NYELGR N
RED/YE LGRN/WH TRED/BLK
Cavity
BLK/WH T
Wire
BLKYEL/BL K
Test conditio n
Test: Desire d resul t
BRN/WH TBLU BL U GR Y
Possible caus e if resul t i s no t obtaine d
B3•
B 4
B3•
B1 2
B2•
B1 1
B10*
B1 1
BR N•
YEL
BRN•
BLU
YE L•
BRN
BLU•
BR N
Connec t batter y powe r
t o th e B 3 terminal , an d
B 4 termina l t o th e B 9
termina l momentarily .
Connect batter y powe r
to th e B 3 terminal , an d
B12 termina l t o th e B 9
termina l momentarily .
Connec t batter y powe r
t o th e B1 1 terminal , an d
B2 termina l t o th e B 9termina l momentarily .
Connec t batter y powe r
t o th e B1 1 terminal , an d
B1 0 termina l t o th e B 9
termina l momentarily .
Check th e righ t powe r mirro r
actuato r operation :
Th e mirro r shoul d swin g left .
Chec k th e righ t powe r mirro r
actuato r operation :
The mirro r shoul d til t down .
Check th e lef t powe r mirro r
actuato r operation :
The mirro r shoul d swin g left .
Chec k th e lef t powe r mirro r
actuato r operation :
Th e mirro r shoul d til t down . •
Fault y righ t powe r mirro r actuato r
• A n ope n in th e wir e
• Fault y righ t powe r mirro r actuato r
• A n ope n in th e wir e
• Fault y lef t powe r mirro r actuato r
• A n ope n in th e wir e
• Fault y lef t powe r mirro r actuato r
• A n ope n in th e wir e
Reconnec t al l connector s to th e powe r mirro r contro l unit .
Cavit y Wir e Test conditio n
Test: Desire d resul t Possible caus e if resul t i s no t obtaine d
B8•
B1 6
B7•
B1 6
B1 5•
B16
B6•
B1 6
B1 4•
B16
RED/BL K•
BRN/WH T
GRN•
BRN/WH T
GRY•
BRN/WH T
GRN/WH T•
BRN/WHT
GRY•
BRN/WH T
Ignition switc h O N (II )
NOTE : Connec t al l
mirro r contro l uni t
connectors .
Ignition switc h O N (II )
NOTE : Connec t al l
mirro r contro l uni t
connectors .
Ignition switc h O N (II )
NOTE : Connec t al l
mirro r contro l uni t
connectors .
Ignition switc h O N (II )
NOTE : Connec t al l
mirro r contro l uni t
connectors .
Ignition switc h O N (II )
NOTE : Connec t al lmirro r contro l uni t
connectors .
Check fo r voltag e betwee n th e
terminals :
Ther e shoul d b e abou t 5 V .
Chec k fo r voltag e betwee n th e
terminals :
Th e voltag e shoul d chang e fro m
abou t 1 V to 3 V whe n th e righ t
mirro r swing s fro m lef t t o right .
Chec k fo r voltag e betwee n th e
terminals :
Th e voltag e shoul d chang e fro m
abou t 1 V to 3 V whe n th e righ t
mirro r tilt s fro m up to down .
Check fo r voltag e betwee n th e
terminals :
Th e voltag e shoul d chang e fro m
abou t 1 V to 3 V whe n th e lef t mir -
ro r swing s fro m righ t t o left .
Chec k fo r voltag e betwee n th e
terminals :
Th e voltag e shoul d chang e fro m
abou t 1 V to 3 V whe n th e lef t mir -
ro r tilt s fro m u p t o down . •
Fault y powe r mirro r positio n
sensors
• A n ope n in th e wir e
• Fault y righ t powe r mirro r positio nsensor
• A n ope n in th e wir e
• Fault y righ t powe r mirro r positio n
sensor
• A n ope n in th e wir e
• Fault y lef t powe r mirro r positio n
sensor
• A n ope n in th e wir e
• Fault y lef t powe r mirro r positio n
sensor
• A n ope n in th e wir e
YEL
GR YBRNBLKYE L BL U
LT GRN/RE D
ProCarManuals.com
Page 1730 of 1954
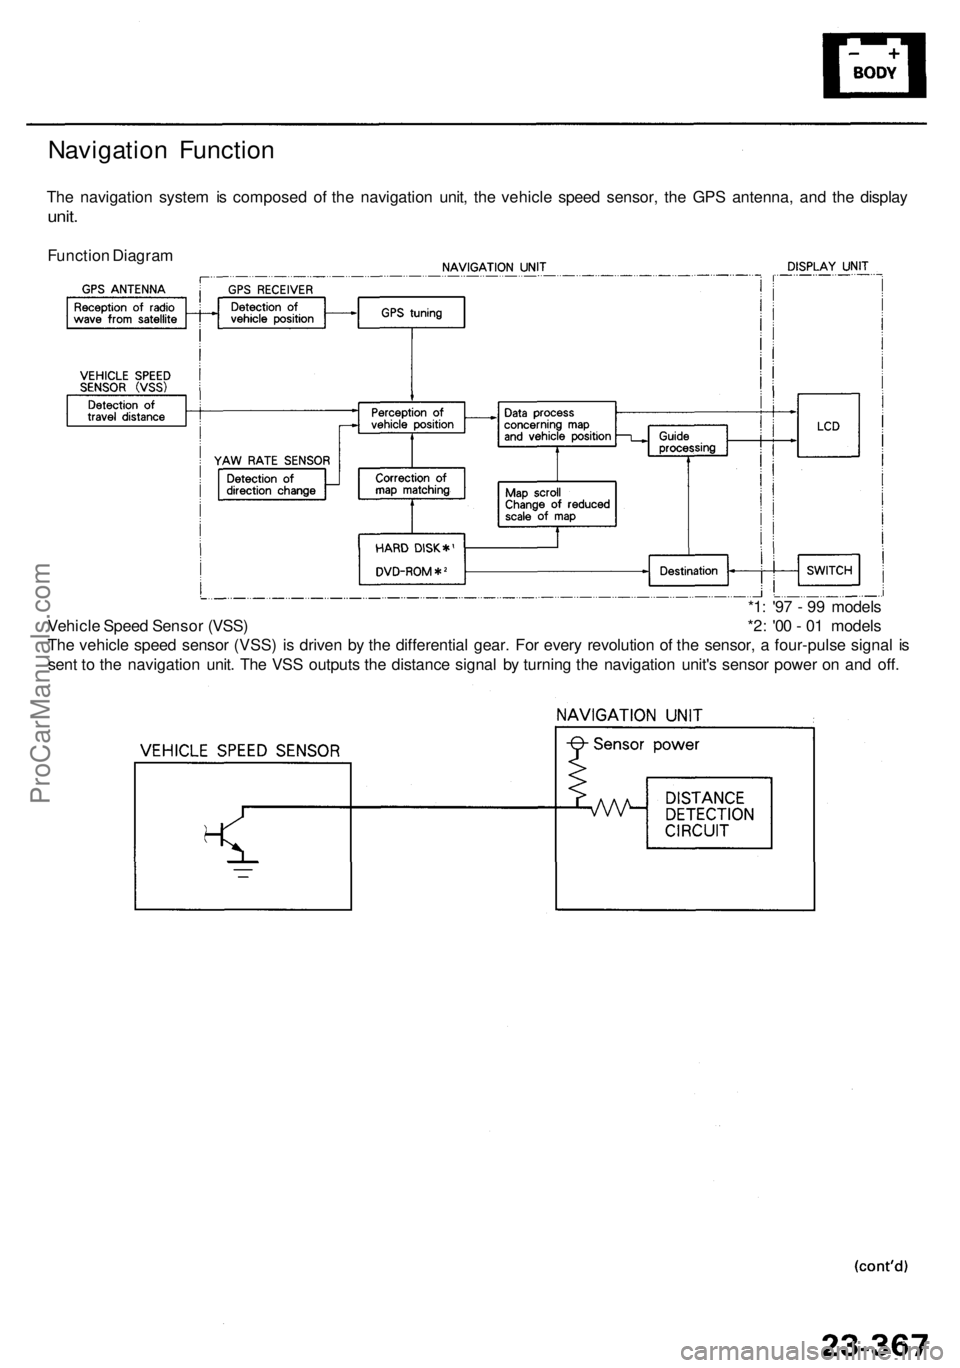
Navigation Functio n
The navigatio n syste m is compose d o f th e navigatio n unit , th e vehicl e spee d sensor , th e GP S antenna , an d th e displa y
unit.
Functio n Diagra m
*1: '9 7 - 9 9 model s
Vehicl e Spee d Senso r (VSS ) *2 : '0 0 - 0 1 model s
Th e vehicl e spee d senso r (VSS ) i s drive n b y th e differentia l gear . Fo r ever y revolutio n o f th e sensor , a four-puls e signa l i s
sen t t o th e navigatio n unit . Th e VS S output s th e distanc e signa l b y turnin g th e navigatio n unit' s senso r powe r o n an d off .
ProCarManuals.com
Page 1742 of 1954
Troubleshooting Precaution s
General Operatio n
Refer t o th e Acur a Navigatio n Syste m Owner' s Manua l fo r th e navigatio n syste m operatin g procedures .
Anti-thef t Featur e
Th e navigatio n syste m ha s a code d thef t protectio n circuit . B e sur e t o ge t th e customer' s four-digi t securit y cod e numbe r
before ;
• disconnectin g th e batter y
• disconnectin g th e navigatio n uni t connecto r
• removin g th e BACK-UP/RADI O (7. 5 A ) fus e fro m th e under-hoo d fuse/rela y bo x
Afte r service , reconnec t powe r t o th e navigatio n unit , an d tur n th e ignitio n switc h O N (II) . Ente r th e 4-digi t securit y code ,
then selec t "Done" . Whe n replacin g th e navigatio n unit , b e sur e to giv e th e custome r th e ne w anti-thef t securit y code .
Sympto m Diagnosi s
Certain circumstance s an d syste m limitation s wil l produc e occasiona l vehicl e positionin g errors . Som e customer s ma y
thin k thi s indicate s a proble m wit h th e navigatio n syste m when , i n fact , th e syste m is normal . Kee p th e followin g item s i n
min d whe n interviewin g customer s abou t navigatio n syste m symptoms .
Self-lnertia l Navigatio n Limitation s
Th e limitation s o f th e self-inertia l portio n o f th e navigatio n syste m (th e ya w rat e senso r an d th e vehicl e spee d sensor ) can
caus e som e discrepancie s betwee n th e actua l vehicl e positio n an d th e indicate d vehicl e position . I f ther e i s a larg e dis -
crepancy , an d th e syste m is receivin g GP S signals , th e syste m wil l adjus t th e indicate d vehicl e positio n to th e GP S vehicl e
position . However , i f GP S signal s canno t b e received , yo u mus t tun e th e vehicl e positio n manually .
Th e followin g circumstance s ma y caus e vehicl e positionin g error s unti l th e syste m ca n adjus t t o th e GPS .
• Movin g th e vehicl e wit h th e engin e stopped , suc h a s b y ferr y o r to w truck , o r i f th e vehicl e is spu n o n a tur n table .
• Tir e slippage , change s i n tir e rollin g diameters , an d som e drivin g situation s ma y caus e discrepancie s i n trave l dis -
tances . Example s o f thi s include :
— Continuou s tir e slippag e o n a slipper y surface .
— Drivin g wit h sno w chain s mounted .
— Abnorma l tir e pressures .
— Differen t diamete r tires .
— Frequen t lane s change s acros s a wid e highway .
— Continuou s drivin g o n a straigh t o r gentl y curvin g highway .
• Tolerance s i n th e syste m an d ma p accurac y sometime s limi t ho w precisel y th e vehicl e positio n is indicated .
Example s o f thi s include :
— Drivin g o n road s no t show n o n th e ma p (ma p matchin g is no t possible) .
— Drivin g o n a roa d tha t wind s in on e direction , suc h a s a loo p bridge , a n interchange , o r a spira l parkin g garage .
— Drivin g o n a roa d wit h a serie s o f shar p hair-pi n turns .
— Drivin g o n on e o f tw o clos e paralle l roads .
— Afte r makin g man y 9 0 degre e turns .
ProCarManuals.com
Page 1751 of 1954
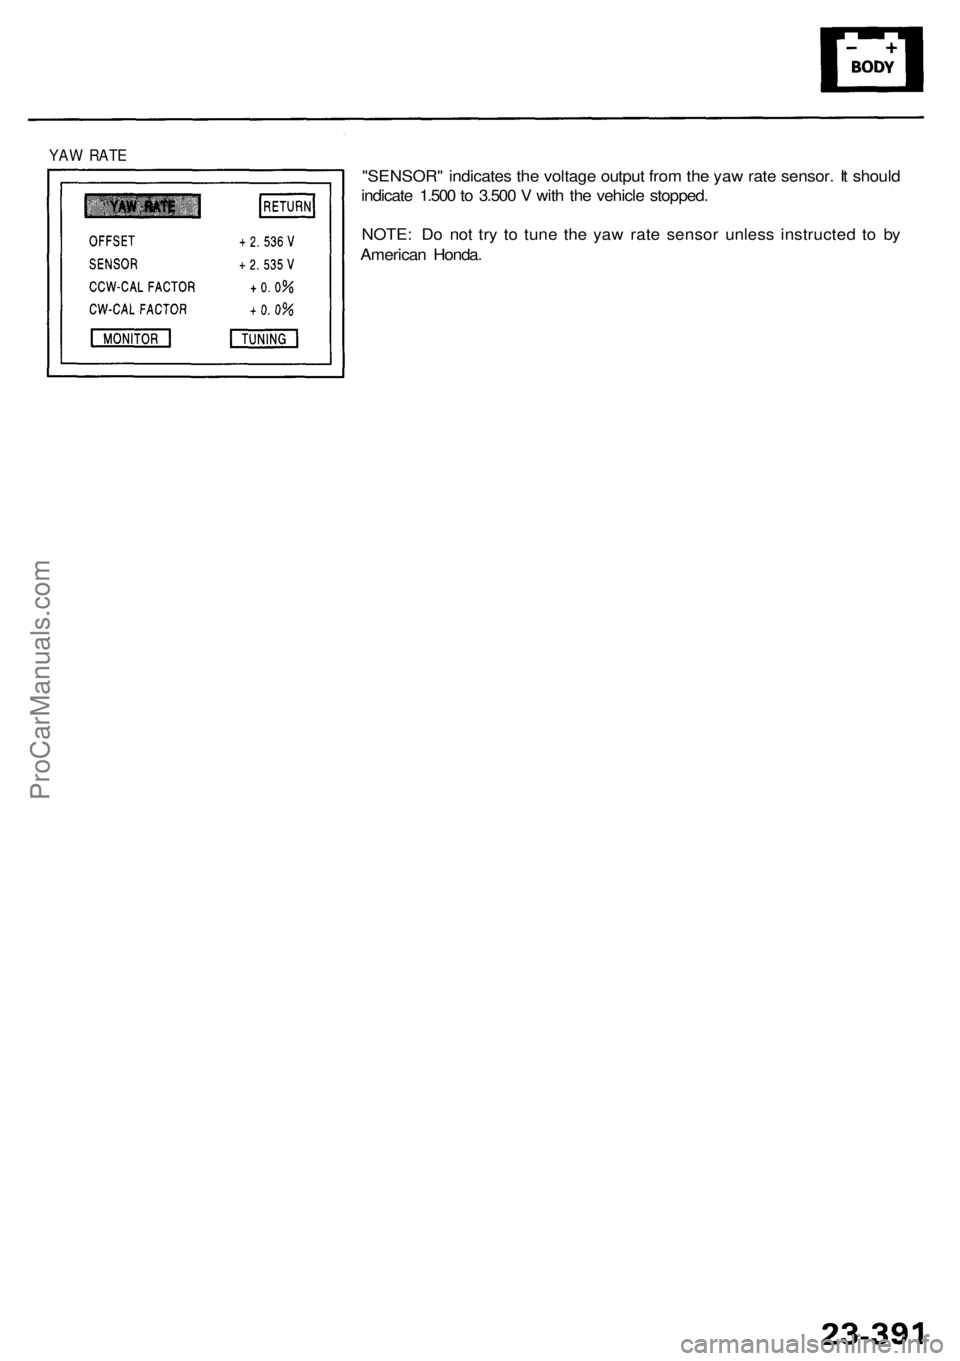
YAW RAT E
"SENSOR " indicate s th e voltag e outpu t fro m th e ya w rat e sensor . I t shoul d
indicat e 1.50 0 to 3.50 0 V wit h th e vehicl e stopped .
NOTE : D o no t tr y t o tun e th e ya w rat e senso r unles s instructe d t o b y
America n Honda .
ProCarManuals.com
Page 1757 of 1954
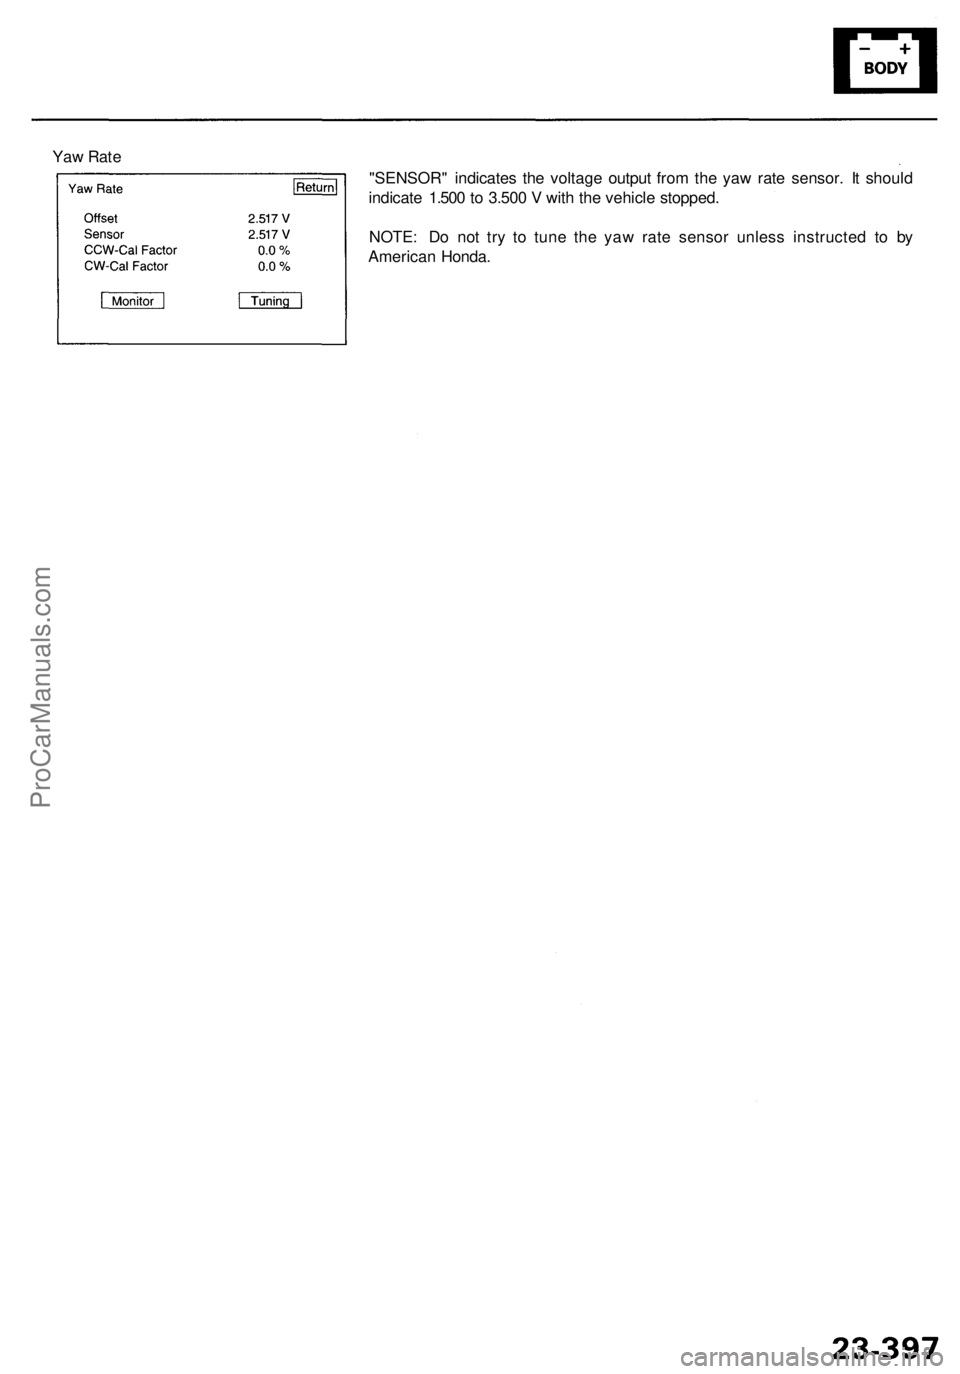
Yaw Rate
"SENSOR" indicates the voltage output from the yaw rate sensor. It should
indicate 1.500 to 3.500 V with the vehicle stopped.
NOTE: Do not try to tune the yaw rate sensor unless instructed to by
American Honda.ProCarManuals.com
Page 1790 of 1954
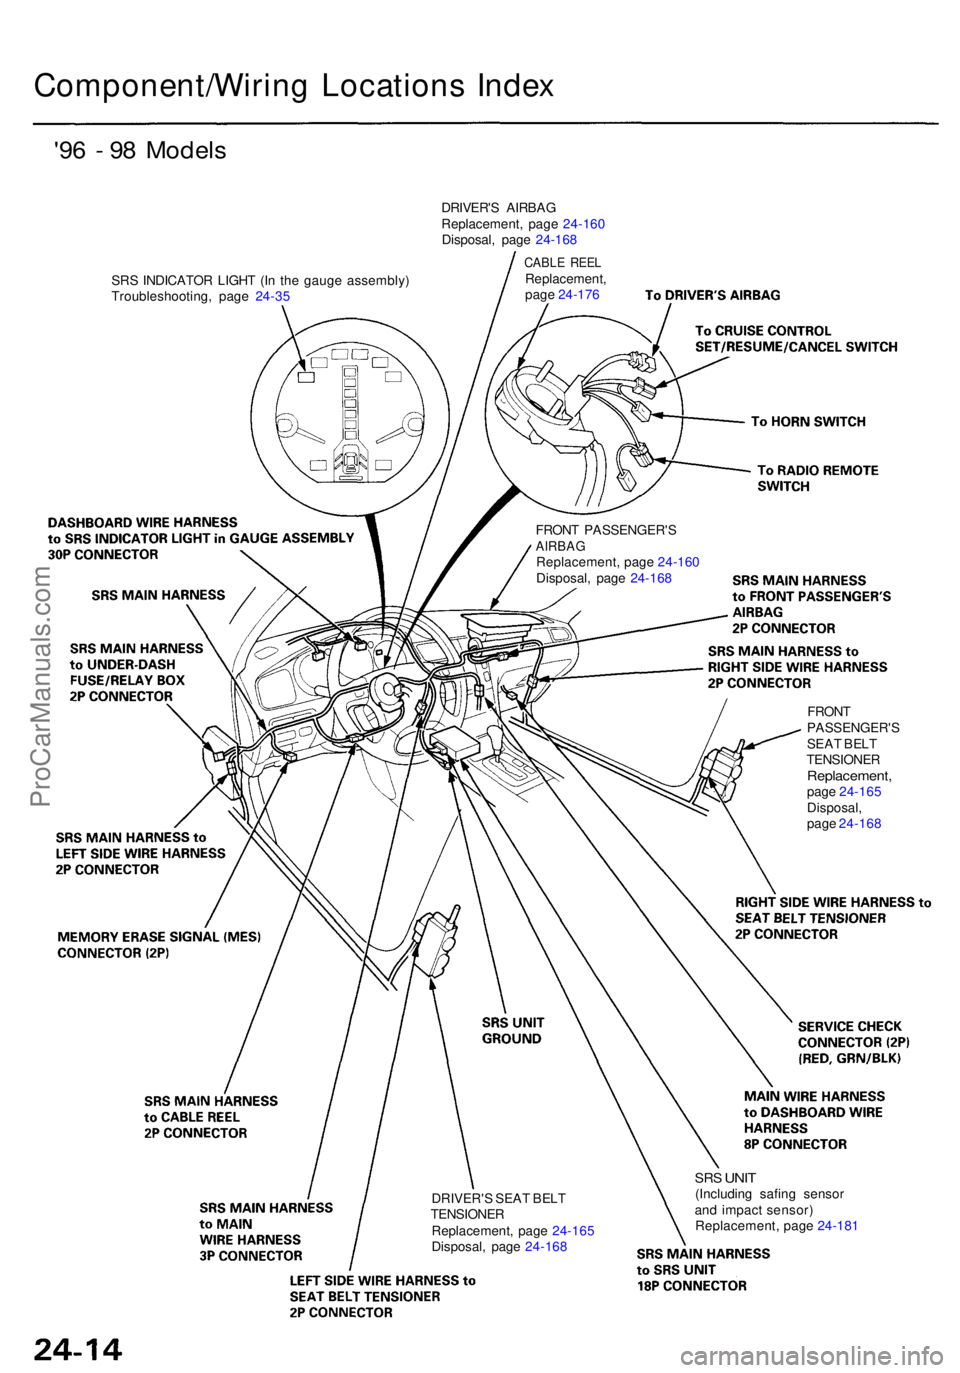
Component/Wiring Location s Inde x
'96 - 9 8 Model s
SRS INDICATO R LIGH T (I n th e gaug e assembly )
Troubleshooting , pag e 24-3 5 DRIVER'
S AIRBA G
Replacement , pag e 24-16 0
Disposal , pag e 24-16 8
CABL E REE LReplacement ,
pag e 24-17 6
FRON T PASSENGER' S
AIRBAGReplacement , pag e 24-16 0
Disposal , pag e 24-16 8
DRIVER' S SEA T BEL T
TENSIONE R
Replacement , pag e 24-16 5
Disposal , pag e 24-16 8
SRS UNI T(Includin g safin g senso r
an d impac t sensor )
Replacement , pag e 24-18 1
FRON
T
PASSENGER' SSEAT BEL T
TENSIONE R
Replacement ,page 24-16 5
Disposal ,
pag e 24-16 8
ProCarManuals.com
Page 1792 of 1954
Description
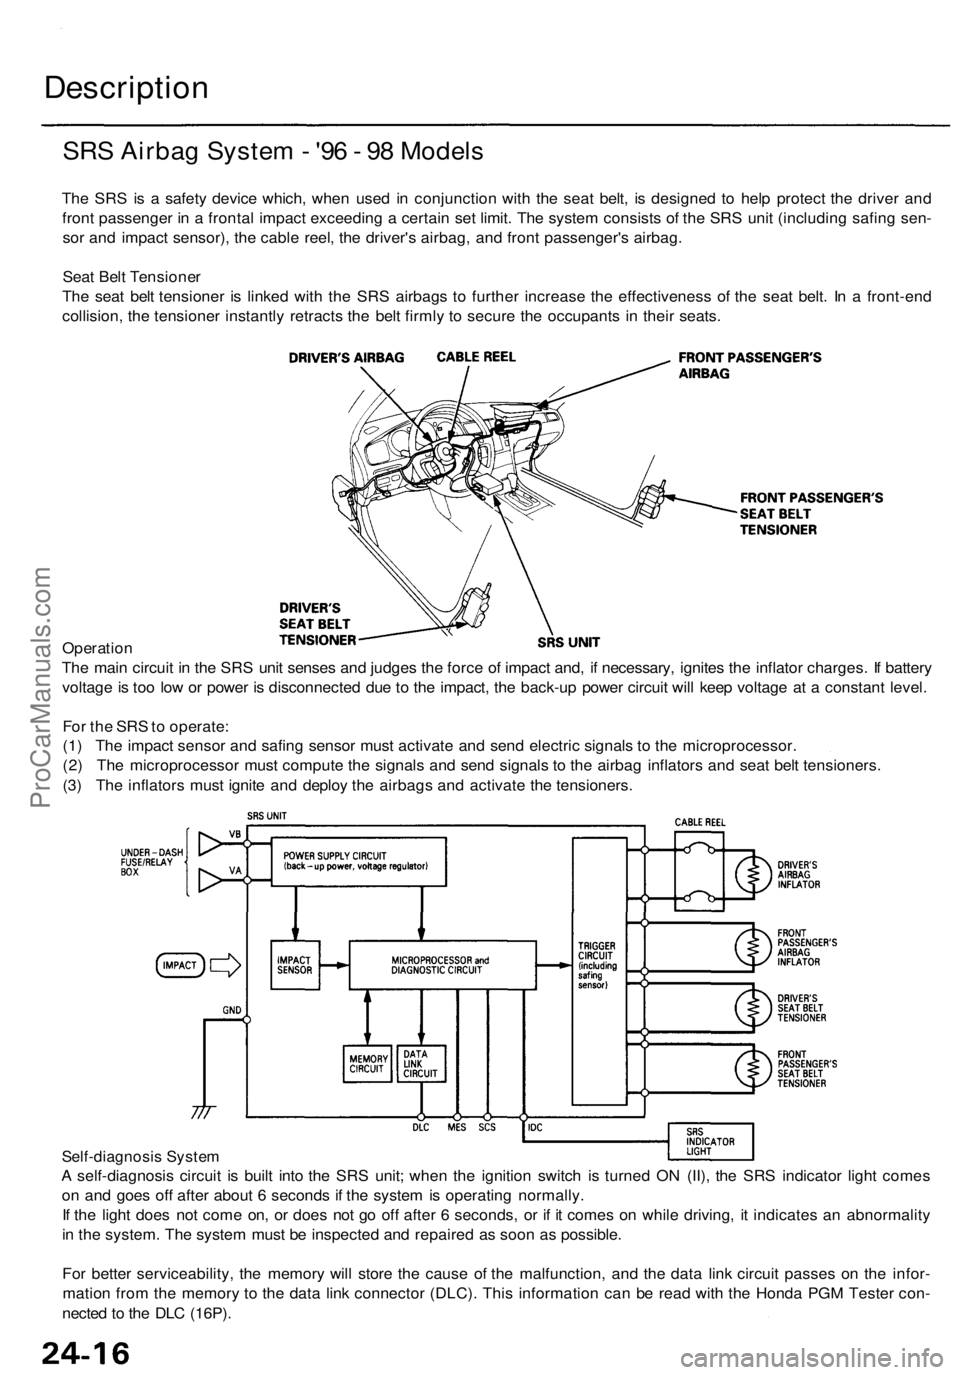
SRS Airbag System - '96 - 98 Models
The SRS is a safety device which, when used in conjunction with the seat belt, is designed to help protect the driver and
front passenger in a frontal impact exceeding a certain set limit. The system consists of the SRS unit (including safing sen-
sor and impact sensor), the cable reel, the driver's airbag, and front passenger's airbag.
Seat Belt Tensioner
The seat belt tensioner is linked with the SRS airbags to further increase the effectiveness of the seat belt. In a front-end
collision, the tensioner instantly retracts the belt firmly to secure the occupants in their seats.
Operation
The main circuit in the SRS unit senses and judges the force of impact and, if necessary, ignites the inflator charges. If battery
voltage is too low or power is disconnected due to the impact, the back-up power circuit will keep voltage at a constant level.
For the SRS to operate:
(1) The impact sensor and safing sensor must activate and send electric signals to the microprocessor.
(2) The microprocessor must compute the signals and send signals to the airbag inflators and seat belt tensioners.
(3) The inflators must ignite and deploy the airbags and activate the tensioners.
Self-diagnosis System
A self-diagnosis circuit is built into the SRS unit; when the ignition switch is turned ON (II), the SRS indicator light comes
on and goes off after about 6 seconds if the system is operating normally.
If the light does not come on, or does not go off after 6 seconds, or if it comes on while driving, it indicates an abnormality
in the system. The system must be inspected and repaired as soon as possible.
For better serviceability, the memory will store the cause of the malfunction, and the data link circuit passes on the infor-
mation from the memory to the data link connector (DLC). This information can be read with the Honda PGM Tester con-
nected to the DLC (16P).ProCarManuals.com