Page 1512 of 2543

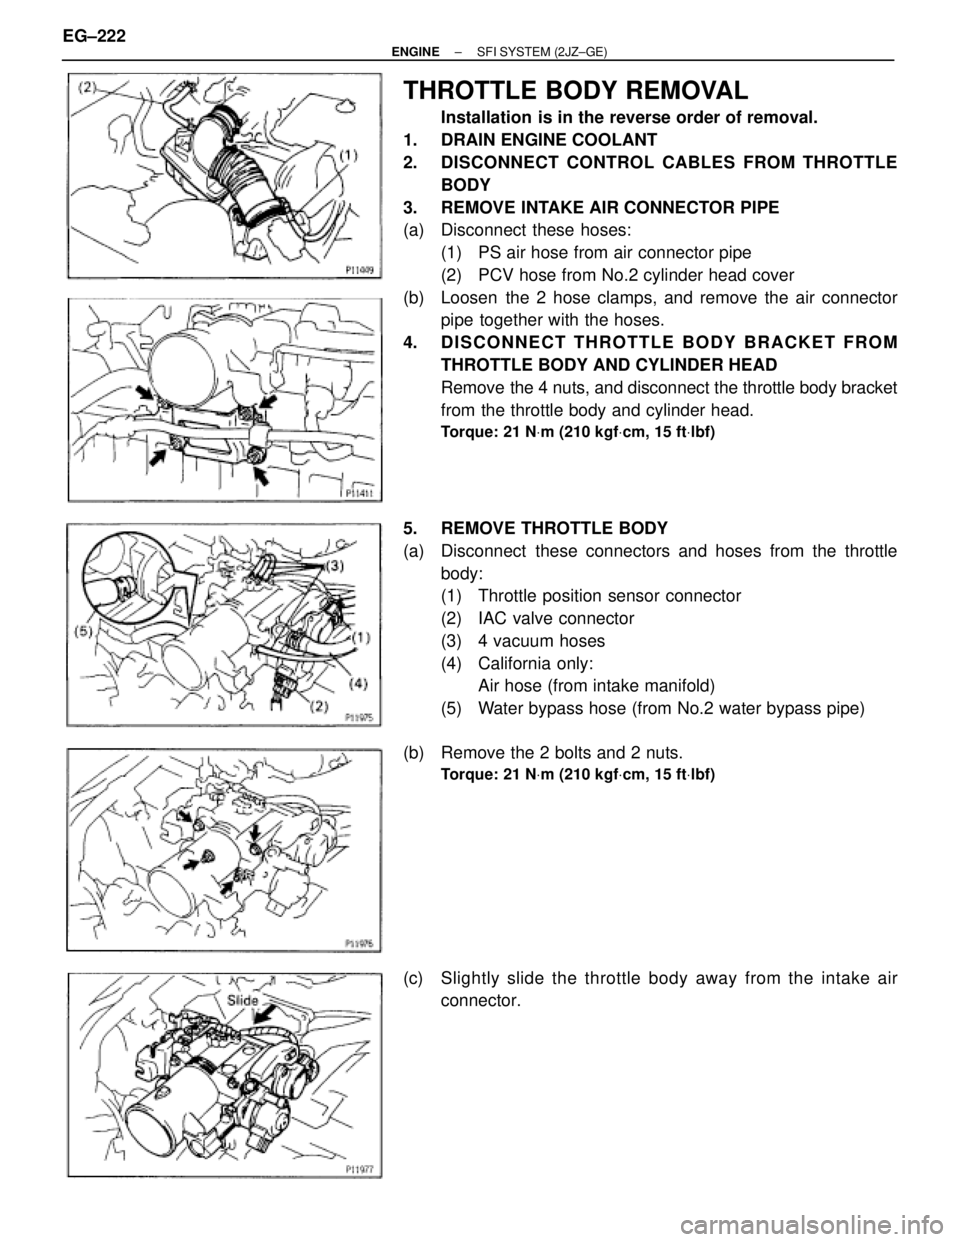
THROTTLE BODY REMOVAL
Installation is in the reverse order of removal.
1. DRAIN ENGINE COOLANT
2. DISCONNECT CONTROL CABLES FROM THROTTLE
BODY
3. REMOVE INTAKE AIR CONNECTOR PIPE
(a) Disconnect these hoses:
(1) PS air hose from air connector pipe
(2) PCV hose from No.2 cylinder head cover
(b) Loosen the 2 hose clamps, and remove the air connector
pipe together with the hoses.
4. DISCONNECT THROTTLE BODY BRACKET FROM
THROTTLE BODY AND CYLINDER HEAD
Remove the 4 nuts, and disconnect the throttle body bracket
from the throttle body and cylinder head.
Torque: 21 NVm (210 kgfVcm, 15 ftVlbf)
5. REMOVE THROTTLE BODY
(a) Disconnect these connectors and hoses from the throttle
body:
(1) Throttle position sensor connector
(2) IAC valve connector
(3) 4 vacuum hoses
(4) California only:
Air hose (from intake manifold)
(5) Water bypass hose (from No.2 water bypass pipe)
(b) Remove the 2 bolts and 2 nuts.
Torque: 21 NVm (210 kgfVcm, 15 ftVlbf)
(c) Slightly slide the throttle body away from the intake air
connector. EG±222
± ENGINESFI SYSTEM (2JZ±GE)
Page 1519 of 2543
Vacuum Tank
COMPONENTS FOR REMOVAL AND
INSTALLATION
VACUUM TANK REMOVAL
Installation is in the reverse order of removal.
1. REMOVE OIL DIPSTICK AND GUIDE FOR A/T
(a) Remove the bolt.
(b) Pull out the dipstick guide together with the dipstick.
INSTALLATION HINT: Apply soapy water to the O±ring, and
push in the dipstick guide.
(c) Remove the O±ring from the dipstick guide.
INSTALLATION HINT: Use a new O±ring.
2. REMOVE VACUUM TANK AND VSV ASSEMBLY
(a) Remove the 2 nuts, and disconnect the vacuum tank from the
intake manifold.
Torque: 21 NVm (210 kgfVcm, 15 ftVlbf)
± ENGINESFI SYSTEM (2JZ±GE)EG±229
Page 1522 of 2543

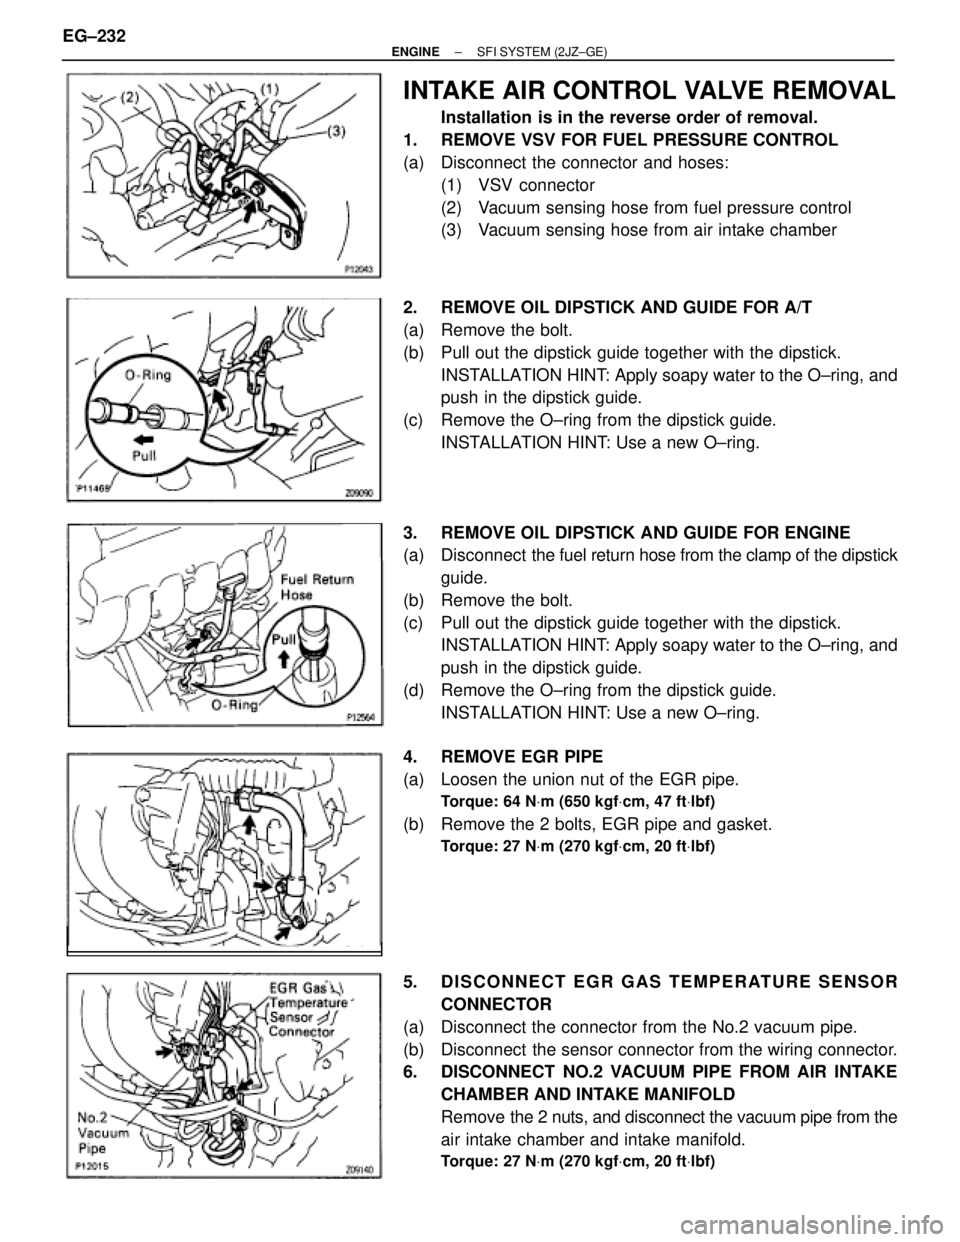
INTAKE AIR CONTROL VALVE REMOVAL
Installation is in the reverse order of removal.
1. REMOVE VSV FOR FUEL PRESSURE CONTROL
(a) Disconnect the connector and hoses:
(1) VSV connector
(2) Vacuum sensing hose from fuel pressure control
(3) Vacuum sensing hose from air intake chamber
2. REMOVE OIL DIPSTICK AND GUIDE FOR A/T
(a) Remove the bolt.
(b) Pull out the dipstick guide together with the dipstick.
INSTALLATION HINT: Apply soapy water to the O±ring, and
push in the dipstick guide.
(c) Remove the O±ring from the dipstick guide.
INSTALLATION HINT: Use a new O±ring.
3. REMOVE OIL DIPSTICK AND GUIDE FOR ENGINE
(a) Disconnect the fuel return hose from the clamp of the dipstick
guide.
(b) Remove the bolt.
(c) Pull out the dipstick guide together with the dipstick.
INSTALLATION HINT: Apply soapy water to the O±ring, and
push in the dipstick guide.
(d) Remove the O±ring from the dipstick guide.
INSTALLATION HINT: Use a new O±ring.
4. REMOVE EGR PIPE
(a) Loosen the union nut of the EGR pipe.
Torque: 64 NVm (650 kgfVcm, 47 ftVlbf)
(b) Remove the 2 bolts, EGR pipe and gasket.
Torque: 27 NVm (270 kgfVcm, 20 ftVlbf)
5. DISCONNECT EGR GAS TEMPERATURE SENSOR
CONNECTOR
(a) Disconnect the connector from the No.2 vacuum pipe.
(b) Disconnect the sensor connector from the wiring connector.
6. DISCONNECT NO.2 VACUUM PIPE FROM AIR INTAKE
CHAMBER AND INTAKE MANIFOLD
Remove the 2 nuts, and disconnect the vacuum pipe from the
air intake chamber and intake manifold.
Torque: 27 NVm (270 kgfVcm, 20 ftVlbf)
EG±232± ENGINESFI SYSTEM (2JZ±GE)
Page 1523 of 2543

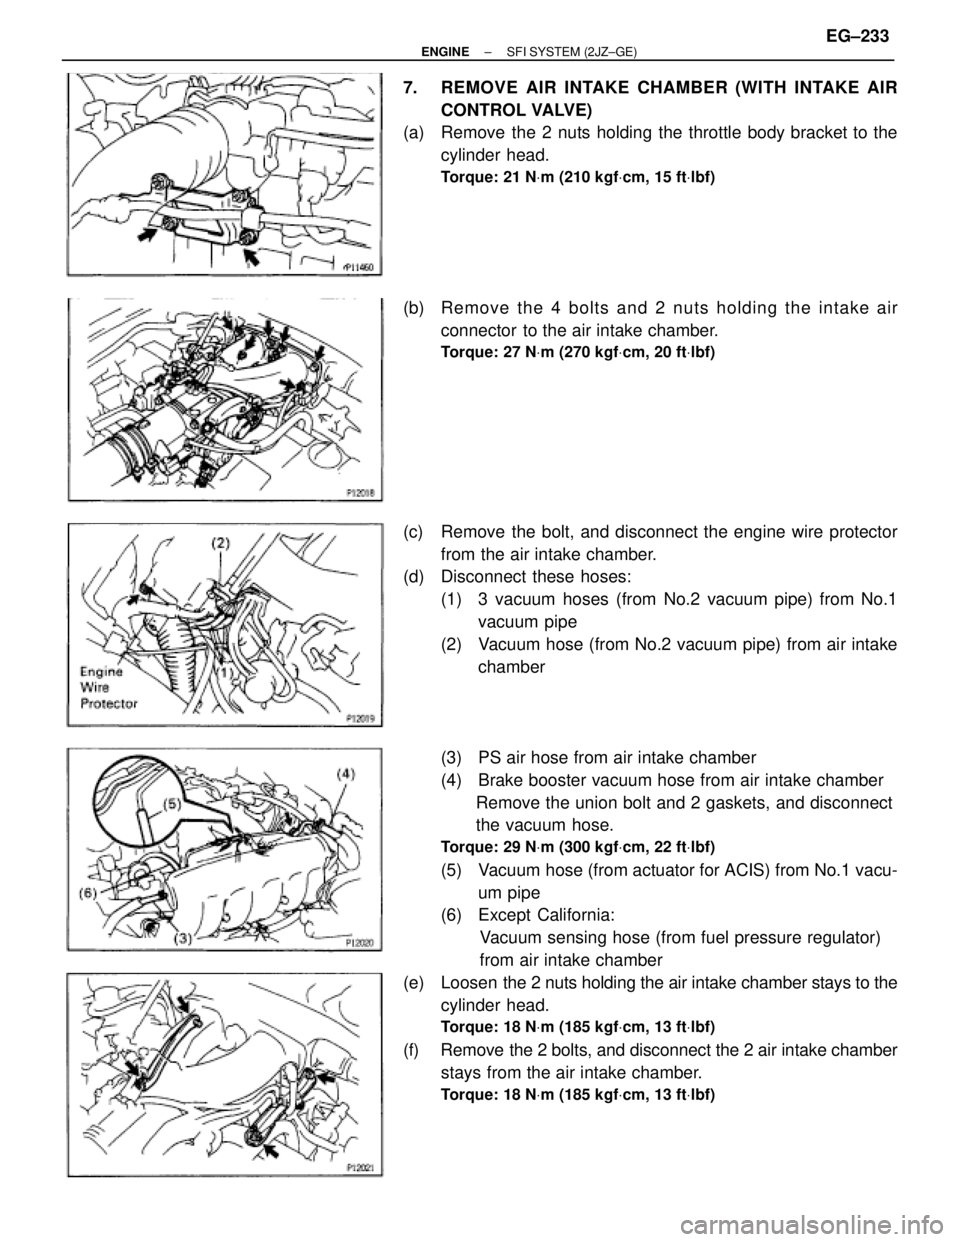
7. REMOVE AIR INTAKE CHAMBER (WITH INTAKE AIR
CONTROL VALVE)
(a) Remove the 2 nuts holding the throttle body bracket to the
cylinder head.
Torque: 21 NVm (210 kgfVcm, 15 ftVlbf)
(b) Re mo ve th e 4 bo lts an d 2 nu ts ho ld in g th e in ta ke air
connector to the air intake chamber.
Torque: 27 NVm (270 kgfVcm, 20 ftVlbf)
(c) Remove the bolt, and disconnect the engine wire protector
from the air intake chamber.
(d) Disconnect these hoses:
(1) 3 vacuum hoses (from No.2 vacuum pipe) from No.1
vacuum pipe
(2) Vacuum hose (from No.2 vacuum pipe) from air intake
chamber
(3) PS air hose from air intake chamber
(4) Brake booster vacuum hose from air intake chamber
Remove the union bolt and 2 gaskets, and disconnect
the vacuum hose.
Torque: 29 NVm (300 kgfVcm, 22 ftVlbf)
(5) Vacuum hose (from actuator for ACIS) from No.1 vacu-
um pipe
(6) Except California:
Vacuum sensing hose (from fuel pressure regulator)
from air intake chamber
(e) Loosen the 2 nuts holding the air intake chamber stays to the
cylinder head.
Torque: 18 NVm (185 kgfVcm, 13 ftVlbf)
(f) Remove the 2 bolts, and disconnect the 2 air intake chamber
stays from the air intake chamber.
Torque: 18 NVm (185 kgfVcm, 13 ftVlbf)
± ENGINESFI SYSTEM (2JZ±GE)EG±233
Page 1524 of 2543
(g) Remove the 5 bolts, nut, air intake chamber and 2 gaskets.
Torque: 27 NVm (270 kgfVcm, 20 ftVlbf)
INSTALLATION HINT: Install a new gasket to the air intake
chamber, facing the protrusion rearward.
INTAKE AIR CONTROL VALVE
INSPECTION
INSPECT INTAKE AIR CONTROL VALVE
(a) With 53.3 kPa (400 mmHg, 15.75 in.Hg) of vacuum applied
to the actuator, check that the actuator rod moves.
If operation is not as specified, turn the adjusting screw.
(b) 1 minute after applying the vacuum in (a), check that the
actuator rod does not return. EG±234
± ENGINESFI SYSTEM (2JZ±GE)
Page 1534 of 2543
EGR GAS TEMPERATURE SENSOR
COMPONENTS FOR REMOVAL AND
INSTALLATION
EGR GAS TEMPERATURE SENSOR
INSPECTION
1. REMOVE EGR GAS TEMPERATURE SENSOR
2. INSPECT EGR GAS TEMPERATURE SENSOR
Using an ohmmeter, measure the resistance between the ter-
minals.
Resistance:
At 50°C (112°F)
64±97 k�
At 100°C (212°F)
11±16 k�
At 150°C (302°F)
2±4 k�
If the resistance is not as specified, replace the sensor.
Torque: 20 NVm (200 kgfVcm, 14 ftVlbf)
3. REINSTALL EGR GAS TEMPERATURE SENSOR EG±244
± ENGINESFI SYSTEM (2JZ±GE)
Page 1536 of 2543
4. REINSTALL KNOCK SENSORS
(a) Using SST, install the knock sensor.
SST 09816±30010
Torque: 44 NVm (450 kgfVcm, 33 ftVlbf)
(b) Connect the knock sensor connector.
5. REINSTALL STARTER
(See starter installation in Starting System)
OXYGEN SENSOR
Main Heated Oxygen Sensors
(California) or Oxygen Sensors (Except
California)
COMPONENTS FOR REMOVAL AND
INSTALLATION
EG±246± ENGINESFI SYSTEM (2JZ±GE)
Page 1539 of 2543
3. California only:
INSPECT HEATER RESISTANCE OF MAIN HEATED OXY-
GEN SENSORS
(a) Disconnect the oxygen sensor connectors.
(b) Using an ohmmeter, measure the resistance between the
terminals +B and HT.
Resistance:
At 20°C (68°F) 11±16 �
If the resistance is not as specified, replace the sensor.
Torque: 44 NVm (450 kgfVcm, 33 ftVlbf)
(c) Reconnect the oxygen sensor connectors.
± ENGINESFI SYSTEM (2JZ±GE)EG±249