Page 1470 of 2543
2. INSPECT PROPELLER SHAFT JOINT ANGLE
(See page PR±17)
NOTICE: The joint angle should be checked when the
propeller shaft is removed and installed.
3. INSTALL CROSSMEMBER BRACE
Normal Roof:
Install the center floor crossmember brace and torque the 4
bolts.
Torque: 13 NVm (130 kgfVcm, 8 ftVlbf)
Sport Roof:
Install the center floor crossmember brace and torque the 6
bolts.
Torque: 13 NVm (130 kgfVcm, 8 ftVlbf)
4. INSTALL HEAT INSULATOR
Install the heat insulator and torque the 4 nuts.
Torque: 5.4 NVm (55 kgfVcm, 48 in.Vlbf)
5. INSTALL EXHAUST PIPE
(a) Install a new gasket.
(b) Insert the exhaust pipe.
(c) Install the exhaust pipe to the 2 exhaust pipe support rings.
(d) Install the exhaust pipe to the 2 exhaust pipe support
O±rings.
(e) Temporary install the pipe support bracket to the
transmission with 2 bolts.
(f) Install the exhaust pipe with the 2 bolts and new 2 nuts.
Torque: 58 NVm (590 kgfVcm, 43 ftVlbf)
(g) Torque the 2 bolts.
Torque: 37 NVm (380 kgfVcm, 27 ftVlbf)
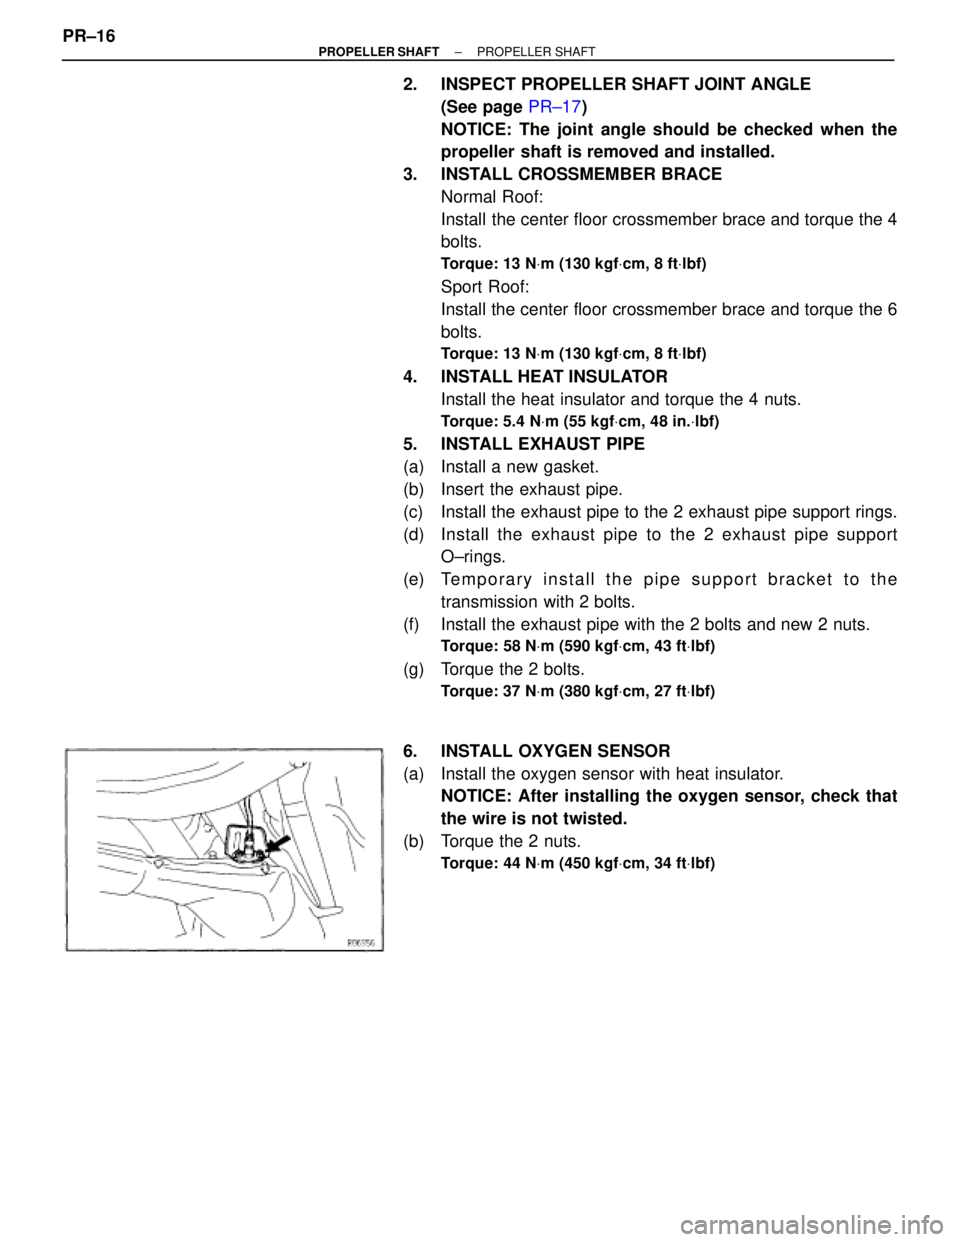
6. INSTALL OXYGEN SENSOR
(a) Install the oxygen sensor with heat insulator.
NOTICE: After installing the oxygen sensor, check that
the wire is not twisted.
(b) Torque the 2 nuts.
Torque: 44 NVm (450 kgfVcm, 34 ftVlbf)
PR±16± PROPELLER SHAFTPROPELLER SHAFT
Page 1476 of 2543
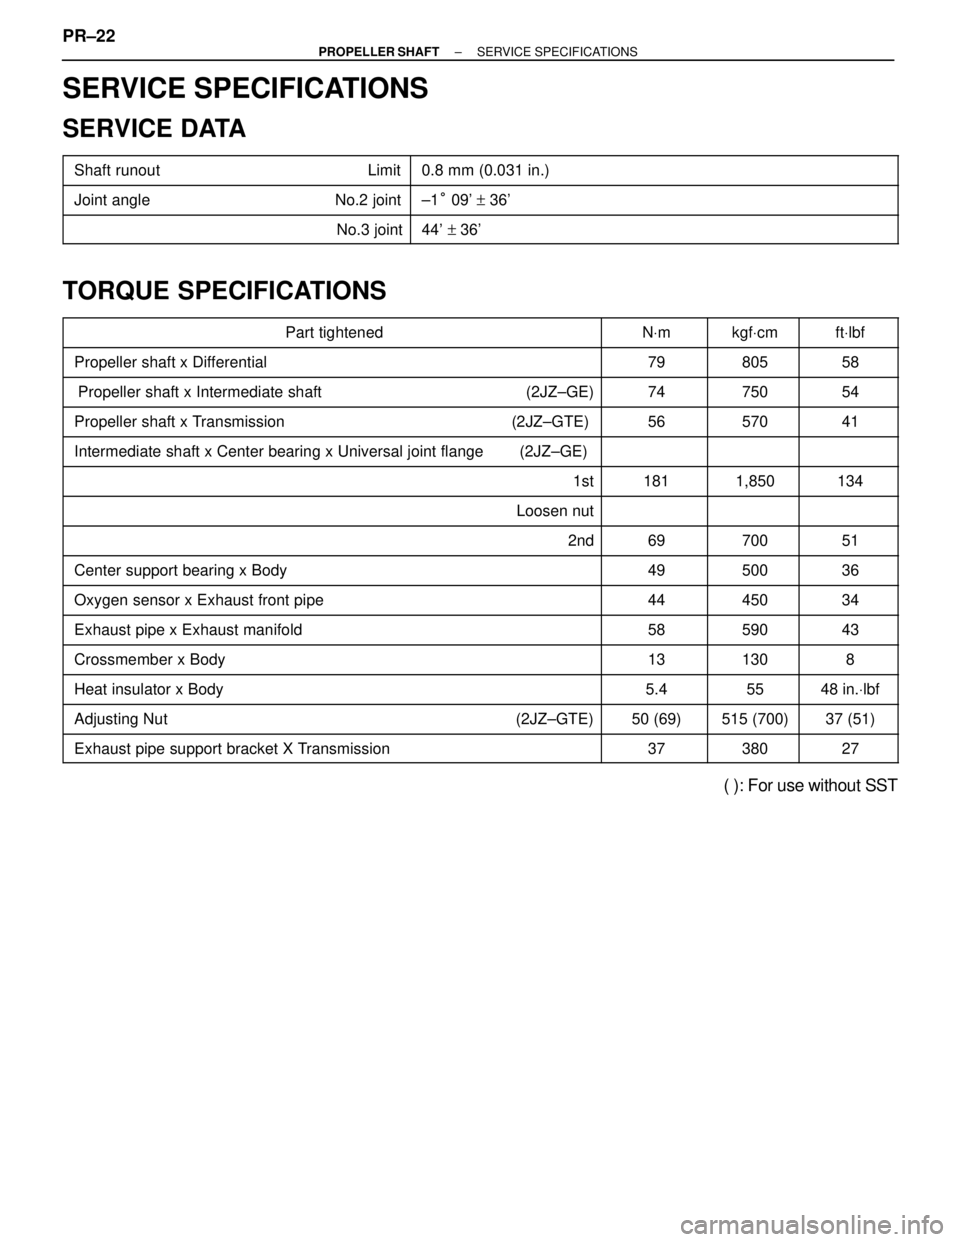
SERVICE SPECIFICATIONS
SERVICE DATA
��������������� ���������������Shaft runout Limit��������������������� ���������������������0.8 mm (0.031 in.)
��������������� ���������������Joint angle No.2 joint��������������������� ���������������������±1° 09' + 36'��������������� �
��������������
���������������
No.3 joint
��������������������� �
�������������������� ���������������������44' +36'
TORQUE SPECIFICATIONS
����������������������� �����������������������Part tightened������ ������NVm����� �����kgfVcm����� �����ftVlbf
����������������������� �����������������������Propeller shaft x Differential������ ������79����� �����805����� �����58
����������������������� �����������������������Propeller shaft x Intermediate shaft (2JZ±GE)������ ������74����� �����750����� �����54����������������������� �
���������������������� �����������������������Propeller shaft x Transmission (2JZ±GTE)
������ �
����� ������56
����� �
���� �����570
����� �
���� �����41
����������������������� �����������������������Intermediate shaft x Center bearing x Universal joint flange (2JZ±GE)������ ����������� ���������� �����
����������������������� �����������������������1st������ ������181����� �����1,850����� �����134
����������������������� �����������������������Loosen nut������ ����������� ���������� �����
����������������������� �
���������������������� �����������������������2nd
������ �
����� ������69
����� �
���� �����700
����� �
���� �����51
����������������������� �����������������������Center support bearing x Body������ ������49����� �����500����� �����36
����������������������� �����������������������Oxygen sensor x Exhaust front pipe������ ������44����� �����450����� �����34
����������������������� �����������������������Exhaust pipe x Exhaust manifold������ ������58����� �����590����� �����43����������������������� �����������������������Crossmember x Body������ ������13����� �����130����� �����8����������������������� �
���������������������� �����������������������Heat insulator x Body
������ �
����� ������5.4
����� �
���� �����55
����� �
���� �����48 in.Vlbf
����������������������� �����������������������Adjusting Nut (2JZ±GTE)������ ������50 (69)����� �����515 (700)����� �����37 (51)
����������������������� �����������������������Exhaust pipe support bracket X Transmission������ ������37����� �����380����� �����27
( ): For use without SST PR±22
± PROPELLER SHAFTSERVICE SPECIFICATIONS
Page 1478 of 2543
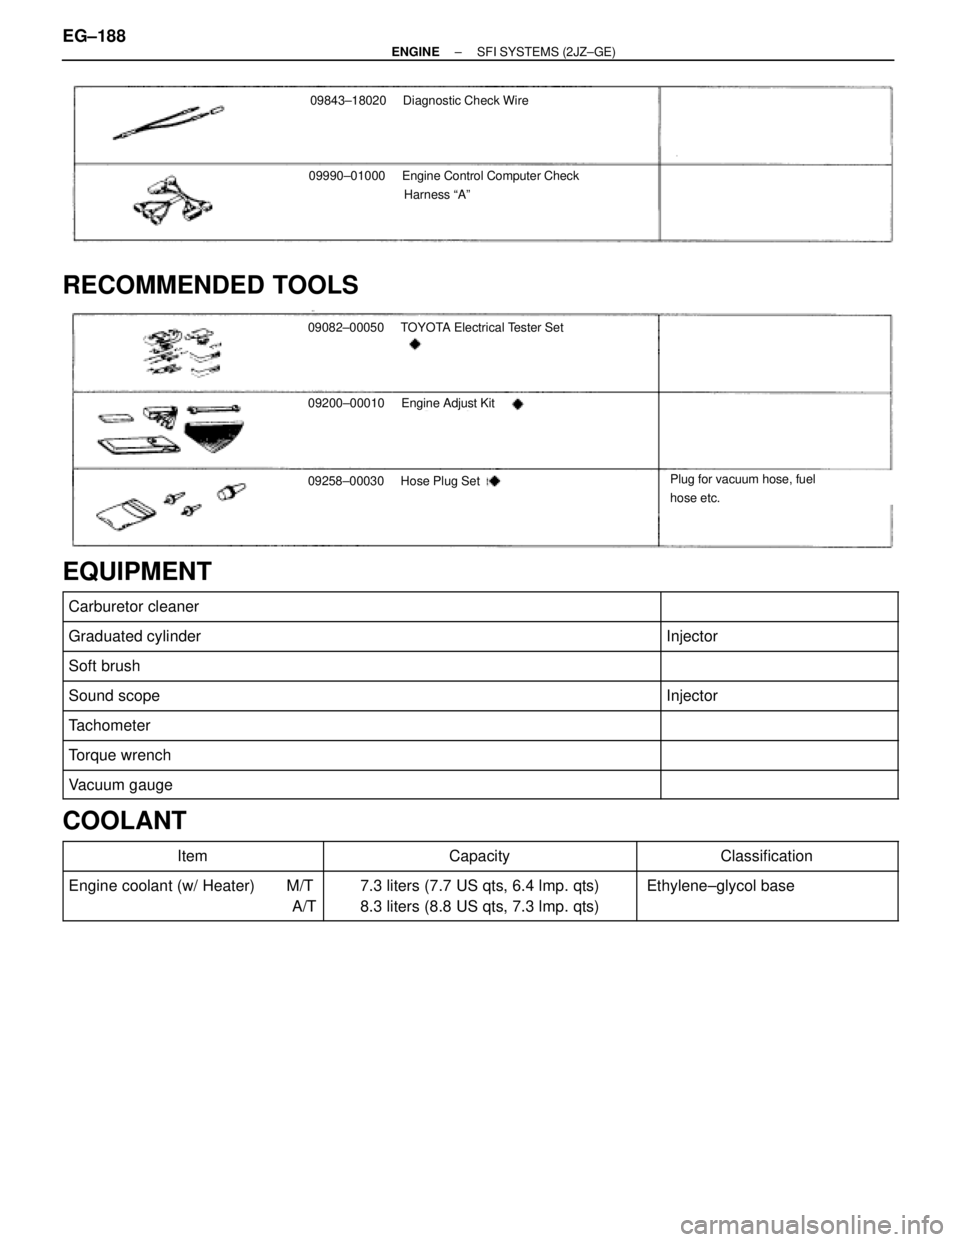
09843±18020 Diagnostic Check Wire
09990±01000Engine Control Computer Check
Harness ªAº
RECOMMENDED TOOLS
09082±00050 TOYOTA Electrical Tester Set
09200±00010Engine Adjust Kit
09258±00030 Hose Plug SetPlug for vacuum hose, fuel
hose etc.
EQUIPMENT
�������������������������� ��������������������������Carburetor cleaner����������� �����������
�������������������������� �
������������������������� ��������������������������Graduated cylinder����������� �
���������� �����������Injector
�������������������������� ��������������������������Soft brush����������� �����������
�������������������������� ��������������������������Sound scope����������� �����������Injector
�������������������������� ��������������������������Tachometer����������� �����������
�������������������������� ��������������������������Torque wrench����������� �����������
�������������������������� �
������������������������� ��������������������������Vacuum gauge
����������� �
���������� �����������
COOLANT������������ �
����������� ������������Item
�������������� �
������������� ��������������Capacity
������������ �
����������� ������������Classification
������������ �
����������� ������������
Engine coolant (w/ Heater) M/T
A/T�������������� �
������������� ��������������
7.3 liters (7.7 US qts, 6.4 lmp. qts)
8.3 liters (8.8 US qts, 7.3 lmp. qts)������������ �
����������� ������������
Ethylene±glycol base
EG±188± ENGINESFI SYSTEMS (2JZ±GE)
Page 1481 of 2543
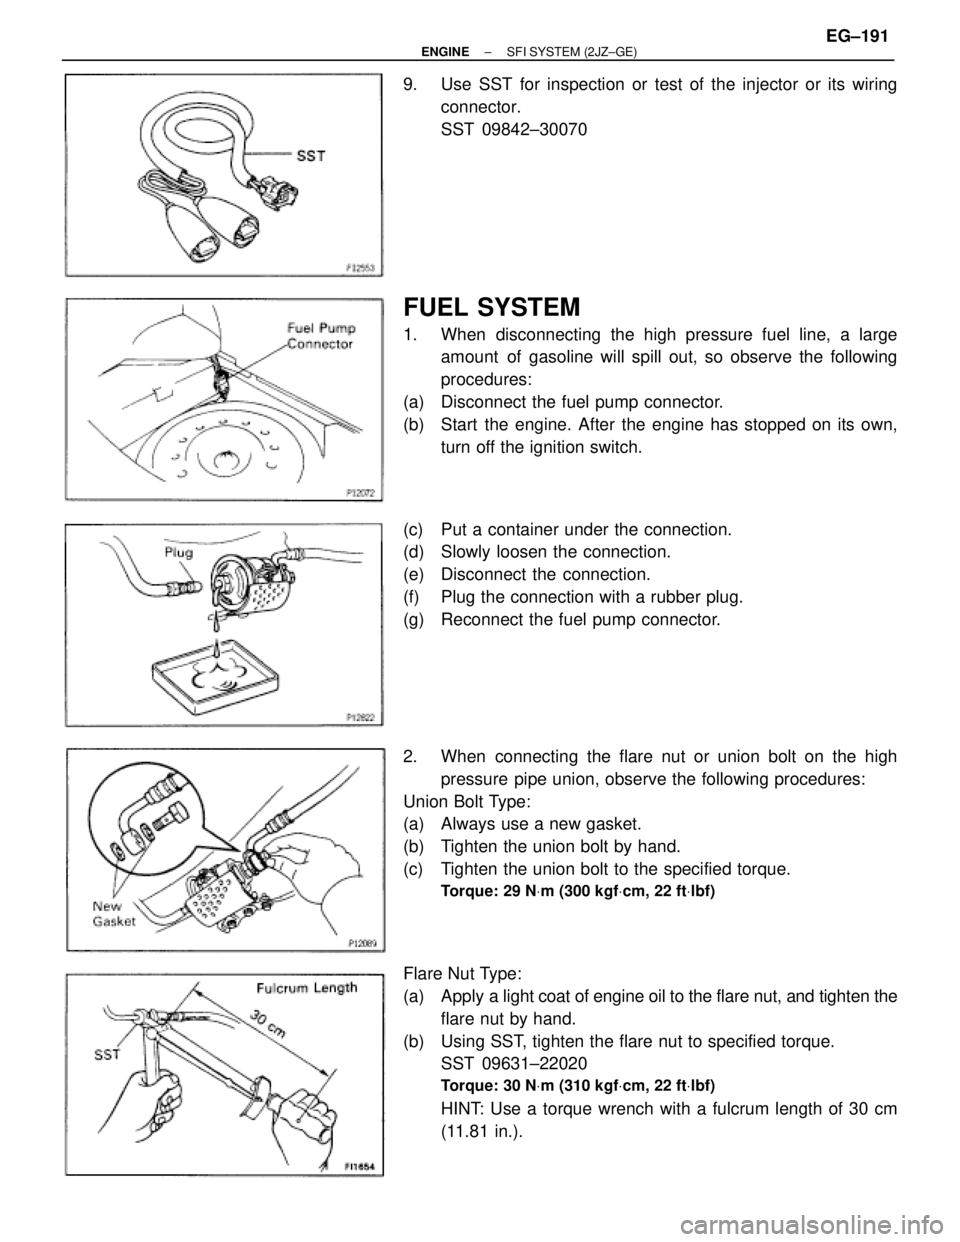
9. Use SST for inspection or test of the injector or its wiring
connector.
SST 09842±30070
FUEL SYSTEM
1. When disconnecting the high pressure fuel line, a large
amount of gasoline will spill out, so observe the following
procedures:
(a) Disconnect the fuel pump connector.
(b) Start the engine. After the engine has stopped on its own,
turn off the ignition switch.
(c) Put a container under the connection.
(d) Slowly loosen the connection.
(e) Disconnect the connection.
(f) Plug the connection with a rubber plug.
(g) Reconnect the fuel pump connector.
2. When connecting the flare nut or union bolt on the high
pressure pipe union, observe the following procedures:
Union Bolt Type:
(a) Always use a new gasket.
(b) Tighten the union bolt by hand.
(c) Tighten the union bolt to the specified torque.
Torque: 29 NVm (300 kgfVcm, 22 ftVlbf)
Flare Nut Type:
(a) Apply a light coat of engine oil to the flare nut, and tighten the
flare nut by hand.
(b) Using SST, tighten the flare nut to specified torque.
SST 09631±22020
Torque: 30 NVm (310 kgfVcm, 22 ftVlbf)
HINT: Use a torque wrench with a fulcrum length of 30 cm
(11.81 in.).
± ENGINESFI SYSTEM (2JZ±GE)EG±191
Page 1483 of 2543
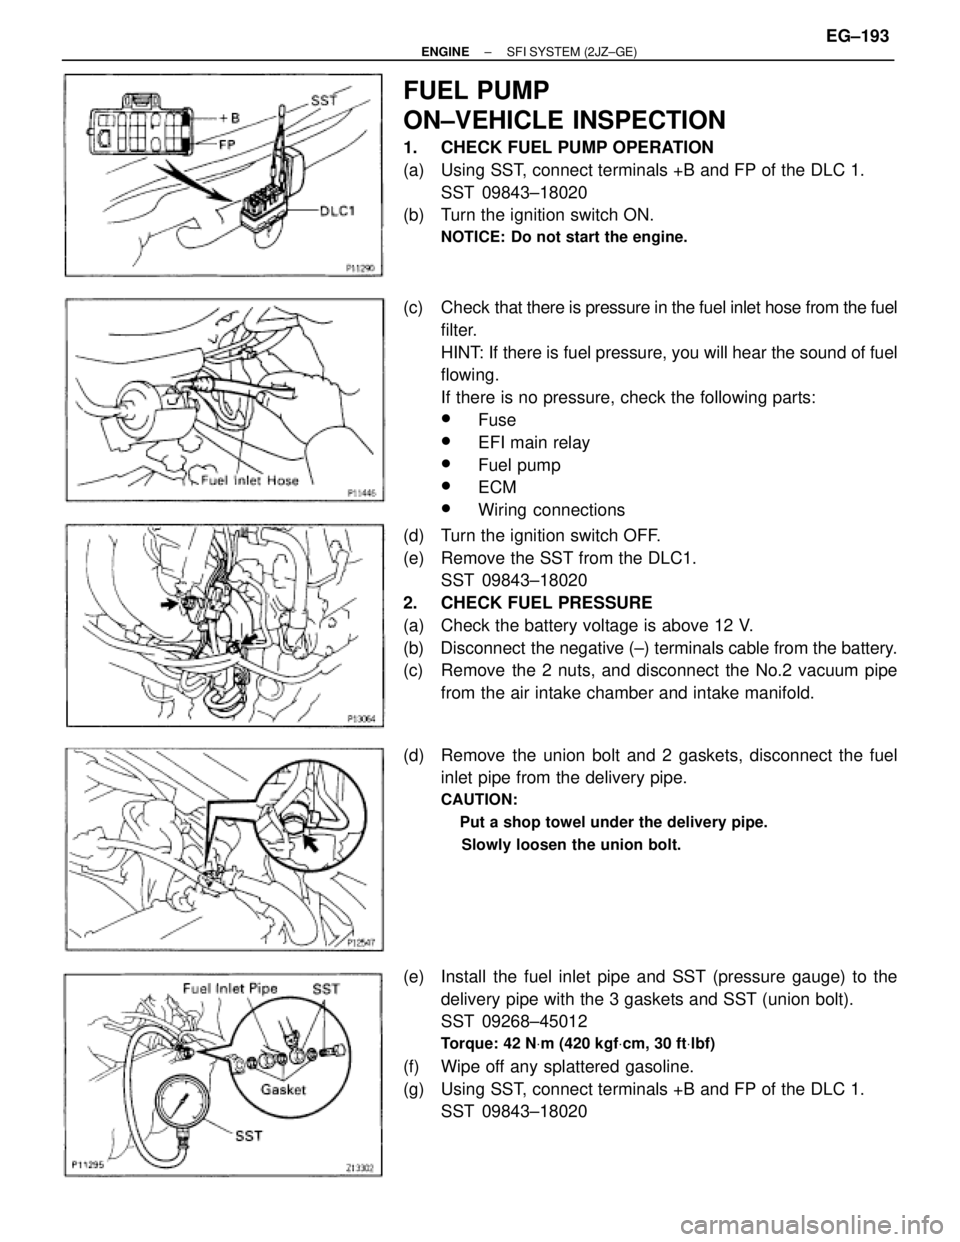
FUEL PUMP
ON±VEHICLE INSPECTION
1. CHECK FUEL PUMP OPERATION
(a) Using SST, connect terminals +B and FP of the DLC 1.
SST 09843±18020
(b) Turn the ignition switch ON.
NOTICE: Do not start the engine.
(c) Check that there is pressure in the fuel inlet hose from the fuel
filter.
HINT: If there is fuel pressure, you will hear the sound of fuel
flowing.
If there is no pressure, check the following parts:
wFuse
wEFI main relay
wFuel pump
wECM
wWiring connections
(d) Turn the ignition switch OFF.
(e) Remove the SST from the DLC1.
SST 09843±18020
2. CHECK FUEL PRESSURE
(a) Check the battery voltage is above 12 V.
(b) Disconnect the negative (±) terminals cable from the battery.
(c) Remove the 2 nuts, and disconnect the No.2 vacuum pipe
from the air intake chamber and intake manifold.
(d) Remove the union bolt and 2 gaskets, disconnect the fuel
inlet pipe from the delivery pipe.
CAUTION:
� Put a shop towel under the delivery pipe.
� Slowly loosen the union bolt.
(e) Install the fuel inlet pipe and SST (pressure gauge) to the
delivery pipe with the 3 gaskets and SST (union bolt).
SST 09268±45012
Torque: 42 NVm (420 kgfVcm, 30 ftVlbf)
(f) Wipe off any splattered gasoline.
(g) Using SST, connect terminals +B and FP of the DLC 1.
SST 09843±18020
± ENGINESFI SYSTEM (2JZ±GE)EG±193
Page 1484 of 2543
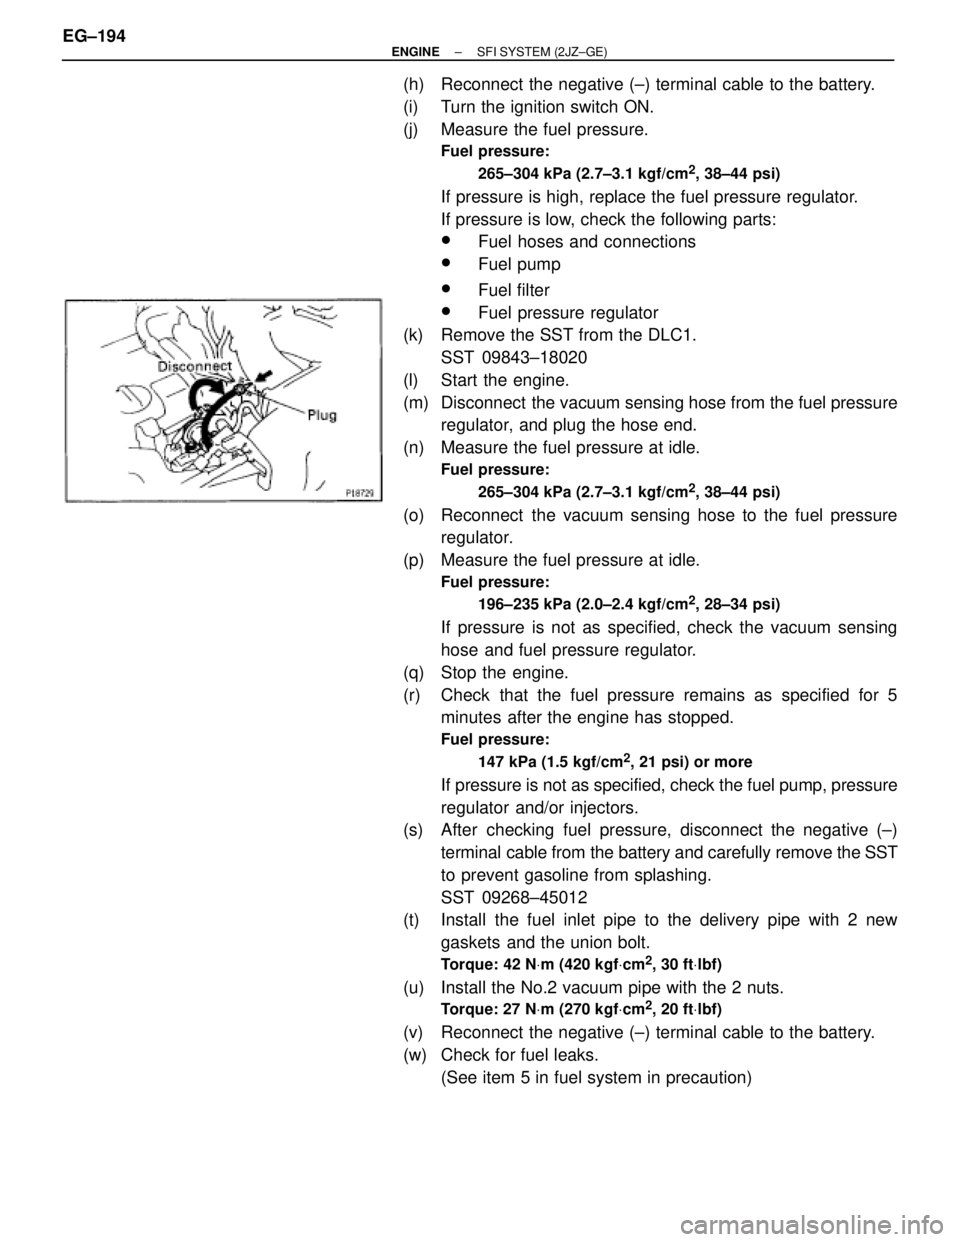
(h) Reconnect the negative (±) terminal cable to the battery.
(i) Turn the ignition switch ON.
(j) Measure the fuel pressure.
Fuel pressure:
265±304 kPa (2.7±3.1 kgf/cm
2, 38±44 psi)
If pressure is high, replace the fuel pressure regulator.
If pressure is low, check the following parts:
wFuel hoses and connections
wFuel pump
wFuel filter
wFuel pressure regulator
(k) Remove the SST from the DLC1.
SST 09843±18020
(l) Start the engine.
(m) Disconnect the vacuum sensing hose from the fuel pressure
regulator, and plug the hose end.
(n) Measure the fuel pressure at idle.
Fuel pressure:
265±304 kPa (2.7±3.1 kgf/cm
2, 38±44 psi)
(o) Reconnect the vacuum sensing hose to the fuel pressure
regulator.
(p) Measure the fuel pressure at idle.
Fuel pressure:
196±235 kPa (2.0±2.4 kgf/cm
2, 28±34 psi)
If pressure is not as specified, check the vacuum sensing
hose and fuel pressure regulator.
(q) Stop the engine.
(r) Check that the fuel pressure remains as specified for 5
minutes after the engine has stopped.
Fuel pressure:
147 kPa (1.5 kgf/cm
2, 21 psi) or more
If pressure is not as specified, check the fuel pump, pressure
regulator and/or injectors.
(s) After checking fuel pressure, disconnect the negative (±)
terminal cable from the battery and carefully remove the SST
to prevent gasoline from splashing.
SST 09268±45012
(t) Install the fuel inlet pipe to the delivery pipe with 2 new
gaskets and the union bolt.
Torque: 42 NVm (420 kgfVcm2, 30 ftVlbf)
(u) Install the No.2 vacuum pipe with the 2 nuts.
Torque: 27 NVm (270 kgfVcm2, 20 ftVlbf)
(v) Reconnect the negative (±) terminal cable to the battery.
(w) Check for fuel leaks.
(See item 5 in fuel system in precaution) EG±194
± ENGINESFI SYSTEM (2JZ±GE)
Page 1489 of 2543
(g) Install the retainer clamp.
(h) Connect the connector and hoses to the fuel pump bracket:
wFuel pump connector
wFuel outlet hose
Connect the outlet hose with 2 new gaskets and the union
bolt.
Torque: 29 NVm (300 kgfVcm, 22 ftVlbf)
wFuel return hose
wFuel breather hose
2. REMOVE SERVICE HOLE COVER
3. REMOVE SPARE WHEEL
4. REMOVE SPARE WHEEL COVER
5. TAKE OUT FLOOR CARPET
6. CHECK FOR FUEL LEAKS
(See item 5 in fuel system in precaution)
± ENGINESFI SYSTEM (2JZ±GE)EG±199
Page 1491 of 2543
FUEL PRESSURE REGULATOR
INSTALLATION
1. INSTALL FUEL PRESSURE REGULATOR
(a) Apply a light coat of gasoline to a new O±ring, and install it
to the pressure regulator.
(b) Attach the pressure regulator to the delivery pipe.
(c) Check that the pressure regulator rotates smoothly.
NOTICE: If it does not rotate smoothly, the O±ring may be
pinched, so remove the pressure regulator and do steps (b)
and (c) above again.
(d) Install the pressure regulator with the 2 bolts.
Torque: 8.8 NVm (90 kgfVcm, 78 in.Vlbf)
2. CONNECT FUEL RETURN PIPE TO FUEL PRESSURE
REGULATOR
Install the return pipe with 2 new gaskets and the union bolt.
Torque: 27 NVm (280 kgfVcm, 20 ftVlbf)
3. CONNECT VACUUM SENSING HOSE TO FUEL
PRESSURE REGULATOR
4. CHECK FOR FUEL LEAKS
(See item 5 in fuel system in precaution)
± ENGINESFI SYSTEM (2JZ±GE)EG±201