1995 ACURA TL service
[x] Cancel search: servicePage 654 of 1771
Troubleshooting
Reading th e DT C (cont'd )
SCS SERVIC E CONNECTO R
07PA Z-001010 0
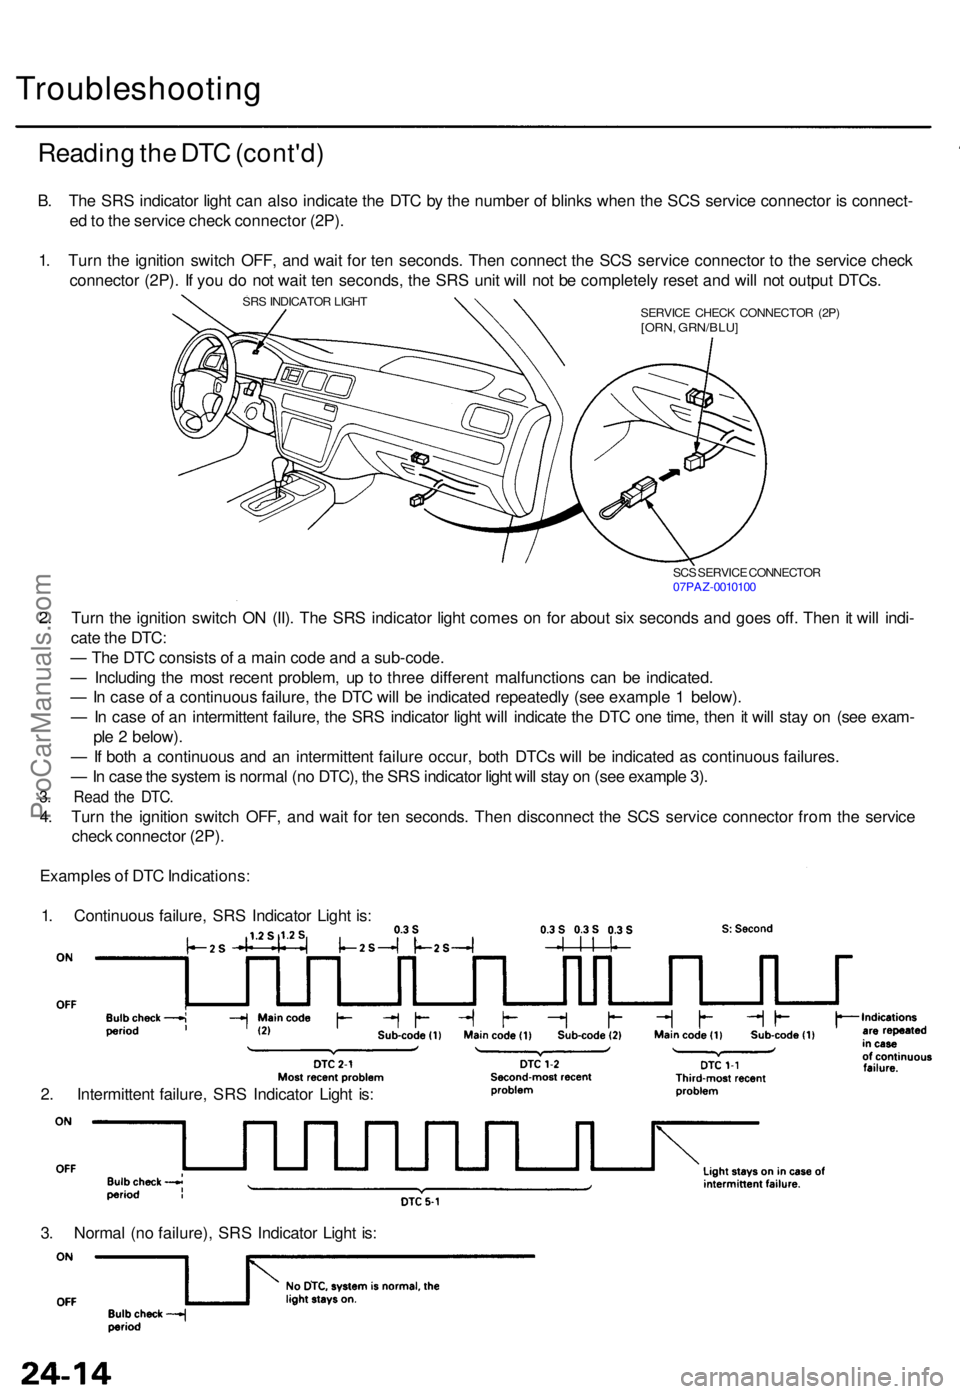
2. Tur n th e ignitio n switc h O N (II) . Th e SR S indicato r ligh t come s o n fo r abou t si x second s an d goe s off . The n it wil l indi -
cat e th e DTC :
— Th e DT C consist s o f a mai n cod e an d a sub-code .
— Includin g th e mos t recen t problem , u p t o thre e differen t malfunction s ca n b e indicated .
— In cas e o f a continuou s failure , th e DT C wil l b e indicate d repeatedl y (se e exampl e 1 below) .
— In cas e o f a n intermitten t failure , th e SR S indicato r ligh t wil l indicat e th e DT C on e time , the n it wil l sta y o n (se e exam -
pl e 2 below) .
— If bot h a continuou s an d a n intermitten t failur e occur , bot h DTC s wil l b e indicate d a s continuou s failures .
— In cas e th e syste m is norma l (n o DTC) , th e SR S indicato r ligh t wil l sta y o n (se e exampl e 3) .
3. Rea d th e DTC .
4. Tur n th e ignitio n switc h OFF , an d wai t fo r te n seconds . The n disconnec t th e SC S servic e connecto r fro m th e servic e
chec k connecto r (2P) .
Example s o f DT C Indications :
1 . Continuou s failure , SR S Indicato r Ligh t is :
2 . Intermitten t failure , SR S Indicato r Ligh t is :
3 . Norma l (n o failure) , SR S Indicato r Ligh t is :
B
. Th e SR S indicato r ligh t ca n als o indicat e th e DT C b y th e numbe r o f blink s whe n th e SC S servic e connecto r i s connect -
e d to th e servic e chec k connecto r (2P) .
1 . Tur n th e ignitio n switc h OFF , an d wai t fo r te n seconds . The n connec t th e SC S servic e connecto r t o th e servic e chec k
connecto r (2P) . I f yo u d o no t wai t te n seconds , th e SR S uni t wil l no t b e completel y rese t an d wil l no t outpu t DTCs .
SRS INDICATO R LIGH T
SERVICE CHEC K CONNECTO R (2P )
[ORN , GRN/BLU ]
ProCarManuals.com
Page 663 of 1771
7. Connec t a 12 vol t batter y to th e tool :
If th e gree n ligh t o n th e too l come s on , th e air -
ba g ignite r circui t i s defectiv e an d canno t deplo y
th e airbag . G o t o Damage d Airba g Specia l
Procedure .
If th e re d ligh t o n th e too l come s on , th e airba g i s
read y t o b e deployed .
8 . Pus h th e tool' s deploymen t switch . Th e airba g
shoul d deplo y (deploymen t i s bot h highl y audibl e
an d visibl e a lou d nois e an d rapi d inflatio n o f th e
bag , followe d b y slo w deflation) .
If audible/visibl e deploymen t happens , an d th e
gree n ligh t o n th e too l come s on , continu e wit h
this procedure .
I f th e airba g doesn' t deploy , ye t th e gree n ligh t
come s ON , it s ignite r i s defective . G o t o Dam -
age d Airba g Specia l Procedure .
Durin g deployment , th e airba g ca n becom e ho t
enoug h t o bur n you . Wai t thirt y minute s afte r
deploymen t befor e touchin g th e airbag .
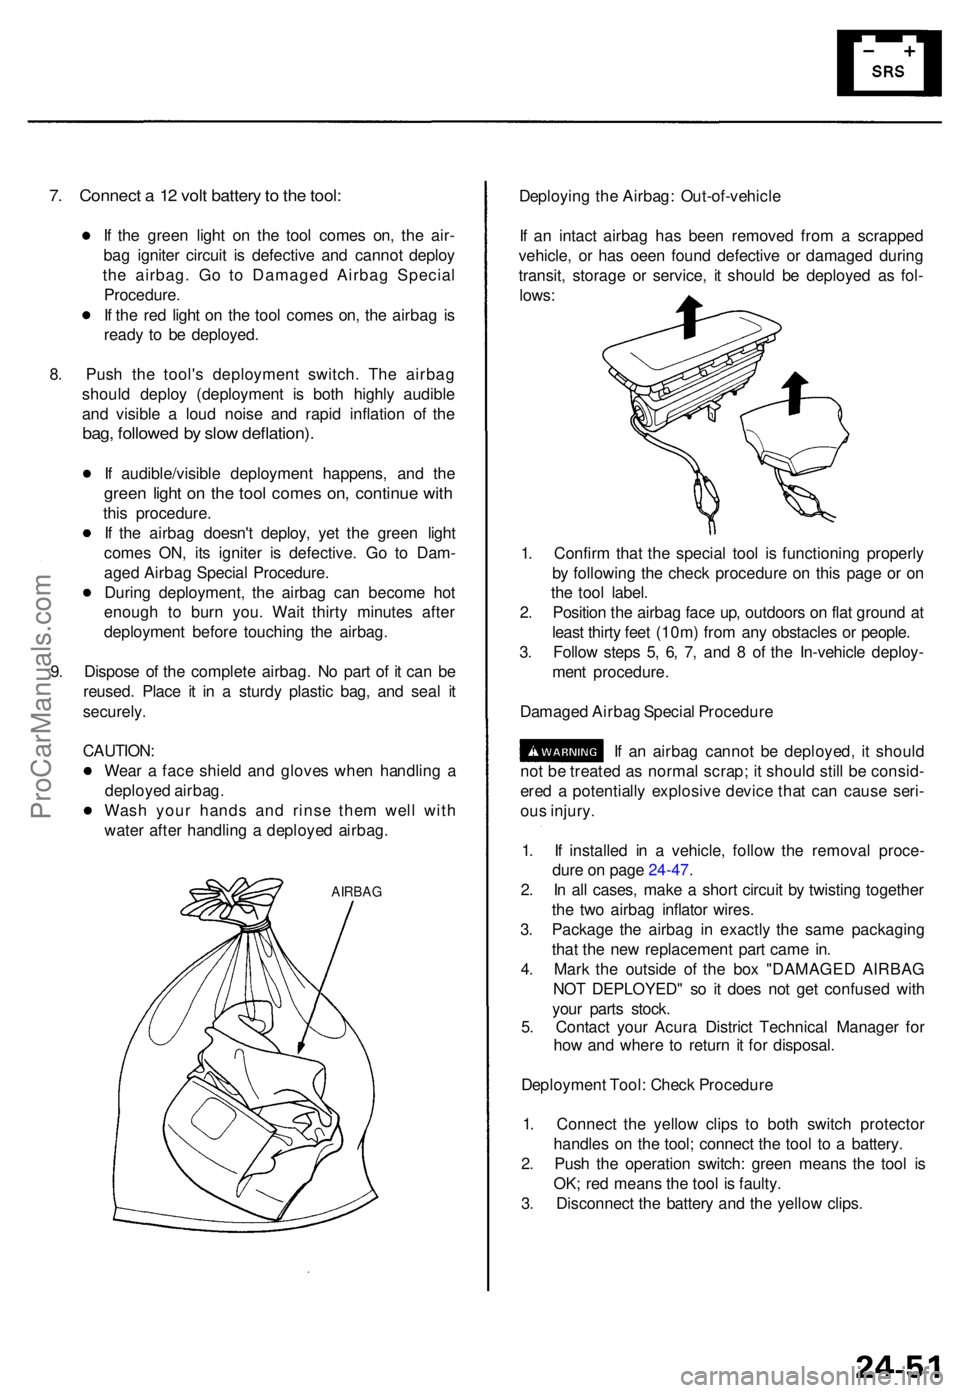
9 . Dispos e o f th e complet e airbag . N o par t o f i t ca n b e
reused . Plac e i t i n a sturd y plasti c bag , an d sea l i t
securely .
CAUTION :
Wea r a fac e shiel d an d glove s whe n handlin g a
deploye d airbag .
Was h you r hand s an d rins e the m wel l wit h
wate r afte r handlin g a deploye d airbag .
AIRBAG
Deployin g th e Airbag : Out-of-vehicl e
I f a n intac t airba g ha s bee n remove d fro m a scrappe d
vehicle , o r ha s oee n foun d defectiv e o r damage d durin g
transit , storag e o r service , i t shoul d b e deploye d a s fol -
lows :
1 . Confir m tha t th e specia l too l i s functionin g properl y
b y followin g th e chec k procedur e o n thi s pag e o r o n
th e too l label .
2 . Positio n th e airba g fac e up , outdoor s o n fla t groun d a t
leas t thirt y fee t (10m ) fro m an y obstacle s o r people .
3 . Follo w step s 5 , 6 , 7 , an d 8 of th e In-vehicl e deploy -
men t procedure .
Damage d Airba g Specia l Procedur e
I f a n airba g canno t b e deployed , i t shoul d
no t b e treate d a s norma l scrap ; i t shoul d stil l b e consid -
ere d a potentiall y explosiv e devic e tha t ca n caus e seri -
ou s injury .
1 . I f installe d i n a vehicle , follo w th e remova l proce -
dur e o n pag e 24-47 .
2 . I n al l cases , mak e a shor t circui t b y twistin g togethe r
th e tw o airba g inflato r wires .
3 . Packag e th e airba g i n exactl y th e sam e packagin g
tha t th e ne w replacemen t par t cam e in .
4 . Mar k th e outsid e o f th e bo x "DAMAGE D AIRBA G
NO T DEPLOYED " s o i t doe s no t ge t confuse d wit h
you r part s stock .
5 . Contac t you r Acur a Distric t Technica l Manage r fo r
ho w an d wher e t o retur n i t fo r disposal .
Deploymen t Tool : Chec k Procedur e
1 . Connec t th e yello w clip s t o bot h switc h protecto r
handle s o n th e tool ; connec t th e too l t o a battery .
2 . Pus h th e operatio n switch : gree n mean s th e too l i s
OK ; re d mean s th e too l i s faulty .
3 . Disconnec t th e batter y an d th e yello w clips .
ProCarManuals.com
Page 668 of 1771
SRS Uni t
Replacemen t
CAUTION:
Durin g installatio n o r replacement , d o no t bum p
(impac t wrench , hamme r etc. ) th e are a nea r th e SR S
unit .
D o no t damag e th e SR S uni t terminal s o r connec -
tors.
Do no t disassembl e th e SR S unit ; i t ha s n o service -
abl e parts .
Stor e th e SR S uni t i n a clean , dr y area .
D o no t us e an y SR S uni t whic h ha s bee n subjecte d
t o wate r damag e o r show s sign s o f bein g droppe d o r
improperl y handled , suc h a s dents , crack s o r defor -
mation .
1 . Mak e sur e yo u hav e th e anti-thef t cod e fo r th e
radio , the n writ e dow n th e frequencie s fo r th e
radio' s prese t buttons .
2 . Disconnec t th e batter y negativ e cable , the n discon -
nec t th e positiv e cabl e fro m th e battery , an d wai t a t
leas t thre e minutes .
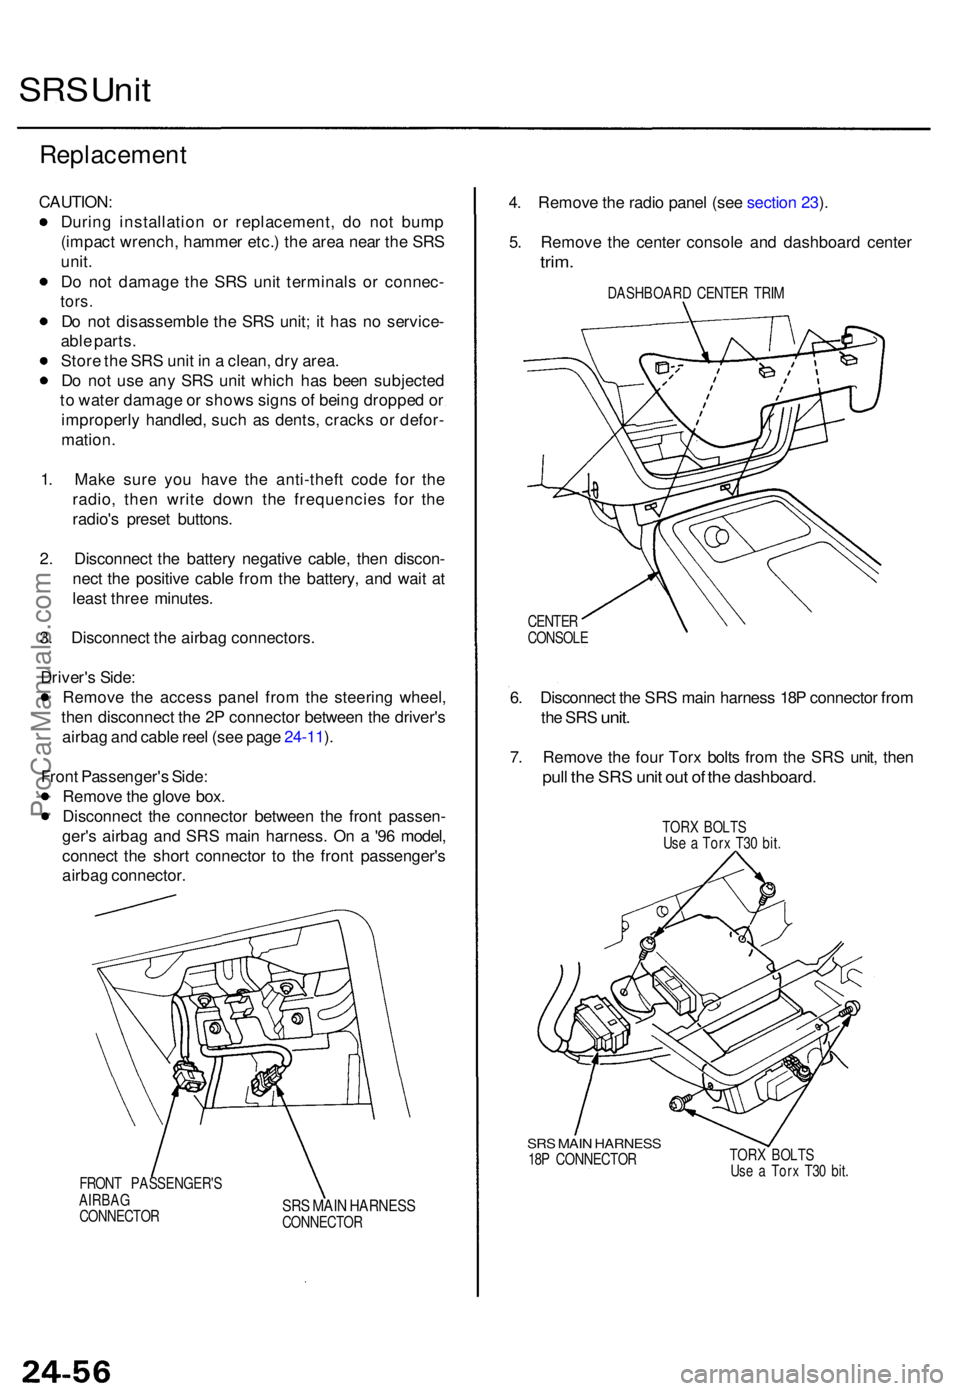
3 . Disconnec t th e airba g connectors .
Driver' s Side :
Remov e th e acces s pane l fro m th e steerin g wheel ,
the n disconnec t th e 2 P connecto r betwee n th e driver' s
airba g an d cabl e ree l (se e pag e 24-11 ).
Fron t Passenger' s Side :
Remov e th e glov e box .
Disconnec t th e connecto r betwee n th e fron t passen -
ger' s airba g an d SR S mai n harness . O n a '9 6 model ,
connec t th e shor t connecto r t o th e fron t passenger' s
airba g connector .
FRONT PASSENGER' S
AIRBA G
CONNECTO R
SRS MAI N HARNES SCONNECTO R
4. Remov e th e radi o pane l (se e sectio n 23 ).
5 . Remov e th e cente r consol e an d dashboar d cente r
trim.
DASHBOAR D CENTE R TRI M
CENTE R
CONSOL E
6. Disconnec t th e SR S mai n harnes s 18 P connecto r fro m
th e SR S
unit .
7. Remov e th e fou r Tor x bolt s fro m th e SR S unit , the n
pull th e SR S uni t ou t o f th e dashboard .
TORX BOLT S
Us e a Tor x T3 0 bit .
SRS MAI N HARNES S18P CONNECTO R TOR
X BOLT SUse a Tor x T3 0 bit .
ProCarManuals.com
Page 680 of 1771
Warning/Caution Label Locations
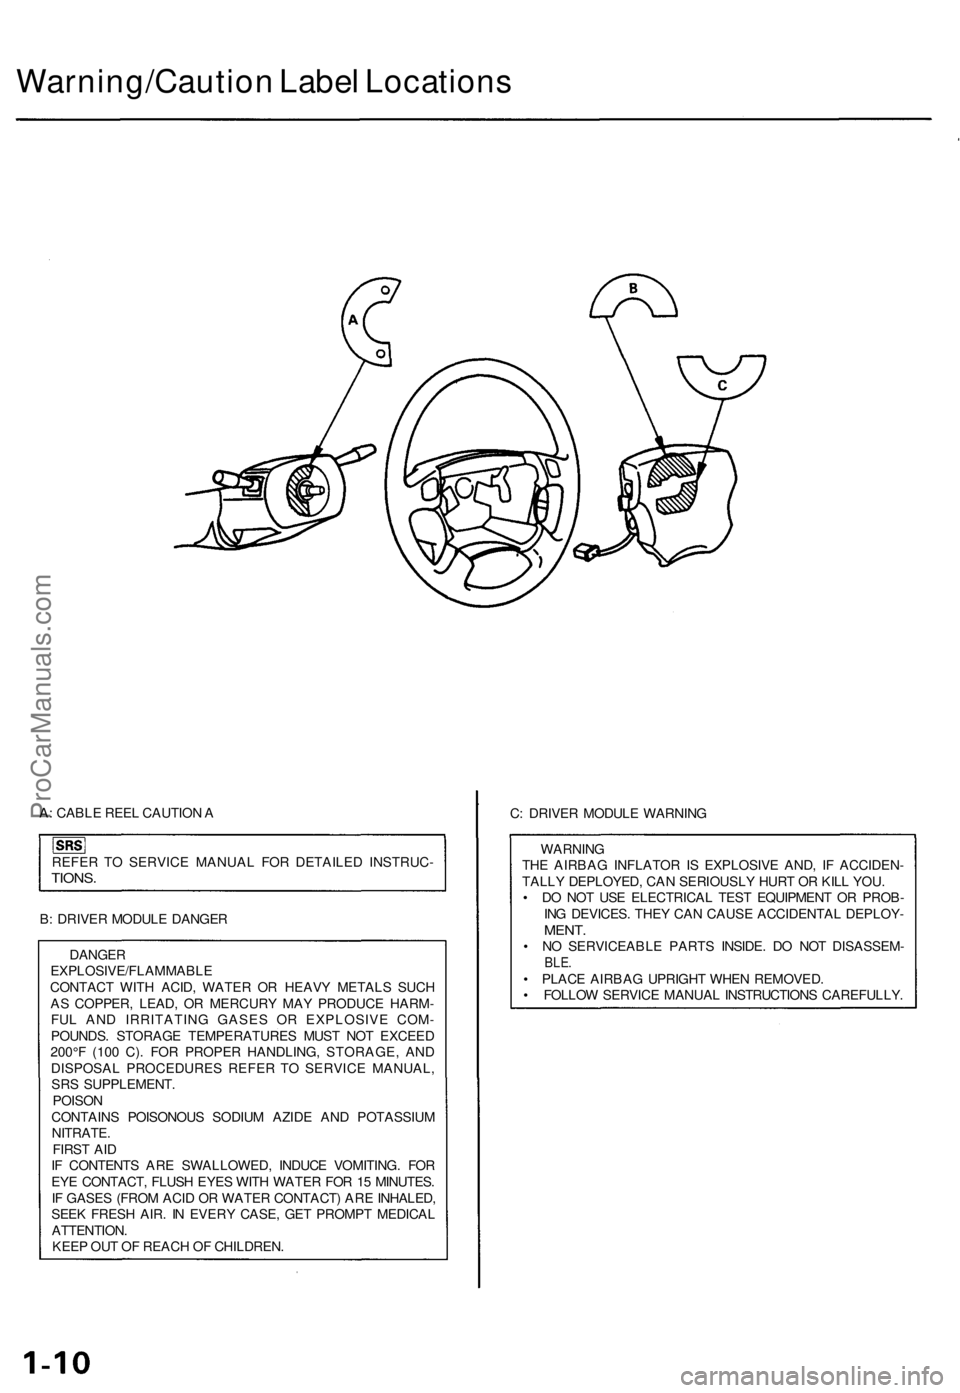
A: CABLE REEL CAUTION A
REFER TO SERVICE MANUAL FOR DETAILED INSTRUC-
TIONS.
B: DRIVER MODULE DANGER
DANGER
EXPLOSIVE/FLAMMABLE
CONTACT WITH ACID, WATER OR HEAVY METALS SUCH
AS COPPER, LEAD, OR MERCURY MAY PRODUCE HARM-
FUL AND IRRITATING GASES OR EXPLOSIVE COM-
POUNDS. STORAGE TEMPERATURES MUST NOT EXCEED
200°F (100 C). FOR PROPER HANDLING, STORAGE, AND
DISPOSAL PROCEDURES REFER TO SERVICE MANUAL,
SRS SUPPLEMENT.
POISON
CONTAINS POISONOUS SODIUM AZIDE AND POTASSIUM
NITRATE.
FIRST AID
IF CONTENTS ARE SWALLOWED, INDUCE VOMITING. FOR
EYE CONTACT, FLUSH EYES WITH WATER FOR 15 MINUTES.
IF GASES (FROM ACID OR WATER CONTACT) ARE INHALED,
SEEK FRESH AIR. IN EVERY CASE, GET PROMPT MEDICAL
ATTENTION.
KEEP OUT OF REACH OF CHILDREN.
C: DRIVER MODULE WARNING
WARNING
THE AIRBAG INFLATOR IS EXPLOSIVE AND, IF ACCIDEN-
TALLY DEPLOYED, CAN SERIOUSLY HURT OR KILL YOU.
• DO NOT USE ELECTRICAL TEST EQUIPMENT OR PROB-
ING DEVICES. THEY CAN CAUSE ACCIDENTAL DEPLOY-
MENT.
• NO SERVICEABLE PARTS INSIDE. DO NOT DISASSEM-
BLE.
• PLACE AIRBAG UPRIGHT WHEN REMOVED.
• FOLLOW SERVICE MANUAL INSTRUCTIONS CAREFULLY.ProCarManuals.com
Page 682 of 1771
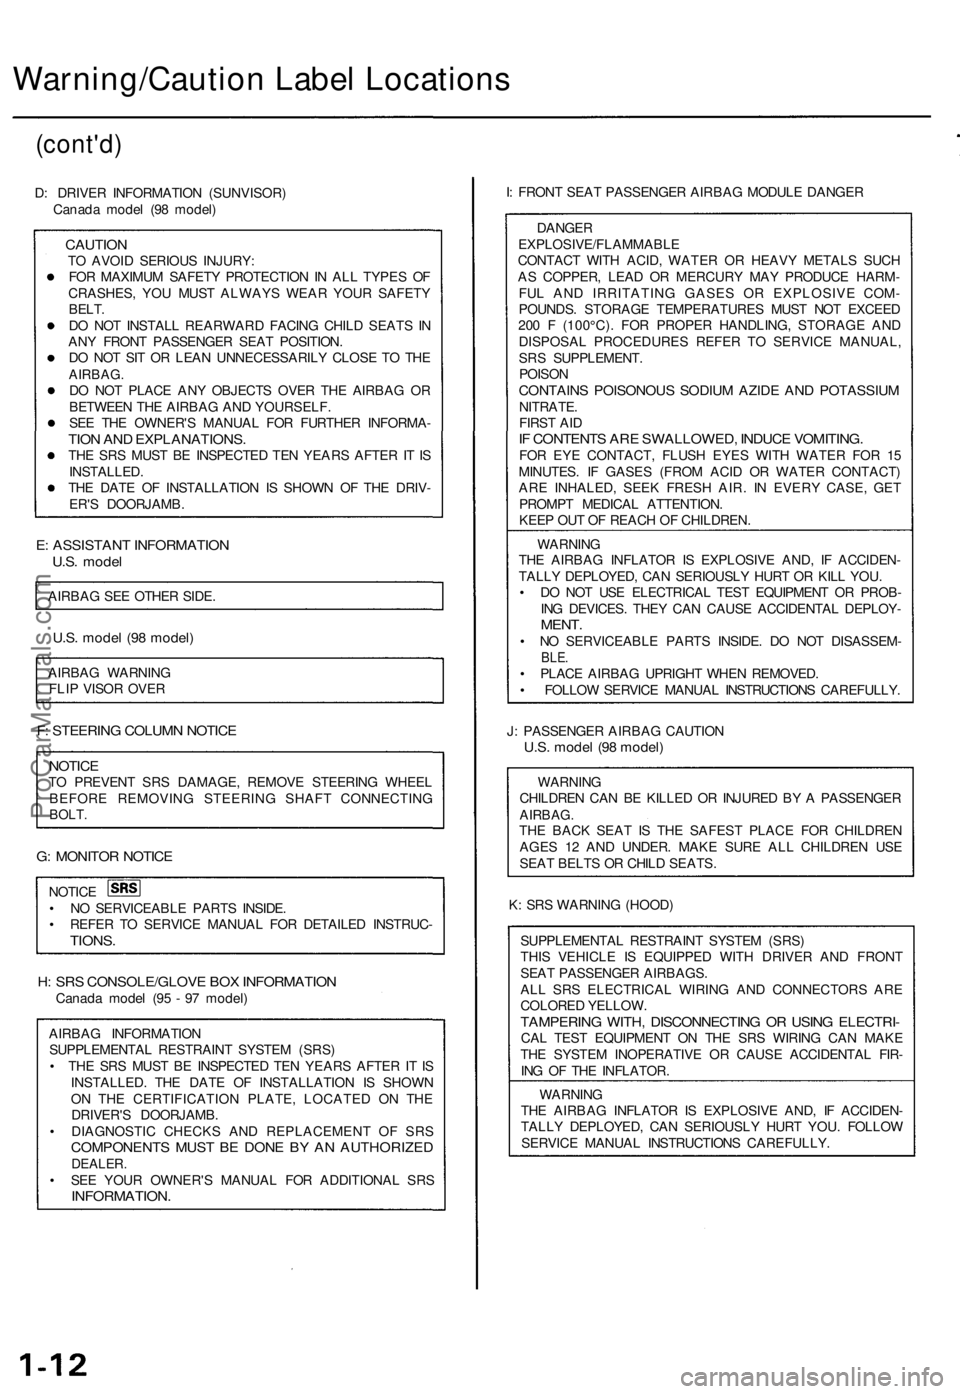
Warning/Caution Label Locations
(cont'd)
D: DRIVER INFORMATION (SUNVISOR)
Canada model (98 model)
CAUTION
TO AVOID SERIOUS INJURY:
FOR MAXIMUM SAFETY PROTECTION IN ALL TYPES OF
CRASHES, YOU MUST ALWAYS WEAR YOUR SAFETY
BELT.
DO NOT INSTALL REARWARD FACING CHILD SEATS IN
ANY FRONT PASSENGER SEAT POSITION.
DO NOT SIT OR LEAN UNNECESSARILY CLOSE TO THE
AIRBAG.
DO NOT PLACE ANY OBJECTS OVER THE AIRBAG OR
BETWEEN THE AIRBAG AND YOURSELF.
SEE THE OWNER'S MANUAL FOR FURTHER INFORMA-
TION AND EXPLANATIONS.
THE SRS MUST BE INSPECTED TEN YEARS AFTER IT IS
INSTALLED.
THE DATE OF INSTALLATION IS SHOWN OF THE DRIV-
ER'S DOORJAMB.
E: ASSISTANT INFORMATION
U.S. model
AIRBAG SEE OTHER SIDE.
U.S. model (98 model)
AIRBAG WARNING
FLIP VISOR OVER
F: STEERING COLUMN NOTICE
NOTICE
TO PREVENT SRS DAMAGE, REMOVE STEERING WHEEL
BEFORE REMOVING STEERING SHAFT CONNECTING
BOLT.
G: MONITOR NOTICE
NOTICE
• NO SERVICEABLE PARTS INSIDE.
• REFER TO SERVICE MANUAL FOR DETAILED INSTRUC-
TIONS.
H: SRS CONSOLE/GLOVE BOX INFORMATION
Canada model (95 - 97 model)
AIRBAG INFORMATION
SUPPLEMENTAL RESTRAINT SYSTEM (SRS)
• THE SRS MUST BE INSPECTED TEN YEARS AFTER IT IS
INSTALLED. THE DATE OF INSTALLATION IS SHOWN
ON THE CERTIFICATION PLATE, LOCATED ON THE
DRIVER'S DOORJAMB.
• DIAGNOSTIC CHECKS AND REPLACEMENT OF SRS
COMPONENTS MUST BE DONE BY AN AUTHORIZED
DEALER.
• SEE YOUR OWNER'S MANUAL FOR ADDITIONAL SRS
INFORMATION.
I: FRONT SEAT PASSENGER AIRBAG MODULE DANGER
DANGER
EXPLOSIVE/FLAMMABLE
CONTACT WITH ACID, WATER OR HEAVY METALS SUCH
AS COPPER, LEAD OR MERCURY MAY PRODUCE HARM-
FUL AND IRRITATING GASES OR EXPLOSIVE COM-
POUNDS. STORAGE TEMPERATURES MUST NOT EXCEED
200 F (100°C). FOR PROPER HANDLING, STORAGE AND
DISPOSAL PROCEDURES REFER TO SERVICE MANUAL,
SRS SUPPLEMENT.
POISON
CONTAINS POISONOUS SODIUM AZIDE AND POTASSIUM
NITRATE.
FIRST AID
IF CONTENTS ARE SWALLOWED, INDUCE VOMITING.
FOR EYE CONTACT, FLUSH EYES WITH WATER FOR 15
MINUTES. IF GASES (FROM ACID OR WATER CONTACT)
ARE INHALED, SEEK FRESH AIR. IN EVERY CASE, GET
PROMPT MEDICAL ATTENTION.
KEEP OUT OF REACH OF CHILDREN.
WARNING
THE AIRBAG INFLATOR IS EXPLOSIVE AND, IF ACCIDEN-
TALLY DEPLOYED, CAN SERIOUSLY HURT OR KILL YOU.
• DO NOT USE ELECTRICAL TEST EQUIPMENT OR PROB-
ING DEVICES. THEY CAN CAUSE ACCIDENTAL DEPLOY-
MENT.
• NO SERVICEABLE PARTS INSIDE. DO NOT DISASSEM-
BLE.
• PLACE AIRBAG UPRIGHT WHEN REMOVED.
• FOLLOW SERVICE MANUAL INSTRUCTIONS CAREFULLY.
J: PASSENGER AIRBAG CAUTION
U.S. model (98 model)
WARNING
CHILDREN CAN BE KILLED OR INJURED BY A PASSENGER
AIRBAG.
THE BACK SEAT IS THE SAFEST PLACE FOR CHILDREN
AGES 12 AND UNDER. MAKE SURE ALL CHILDREN USE
SEAT BELTS OR CHILD SEATS.
K: SRS WARNING (HOOD)
SUPPLEMENTAL RESTRAINT SYSTEM (SRS)
THIS VEHICLE IS EQUIPPED WITH DRIVER AND FRONT
SEAT PASSENGER AIRBAGS.
ALL SRS ELECTRICAL WIRING AND CONNECTORS ARE
COLORED YELLOW.
TAMPERING WITH, DISCONNECTING OR USING ELECTRI-
CAL TEST EQUIPMENT ON THE SRS WIRING CAN MAKE
THE SYSTEM INOPERATIVE OR CAUSE ACCIDENTAL FIR-
ING OF THE INFLATOR.
WARNING
THE AIRBAG INFLATOR IS EXPLOSIVE AND, IF ACCIDEN-
TALLY DEPLOYED, CAN SERIOUSLY HURT YOU. FOLLOW
SERVICE MANUAL INSTRUCTIONS CAREFULLY.ProCarManuals.com
Page 683 of 1771
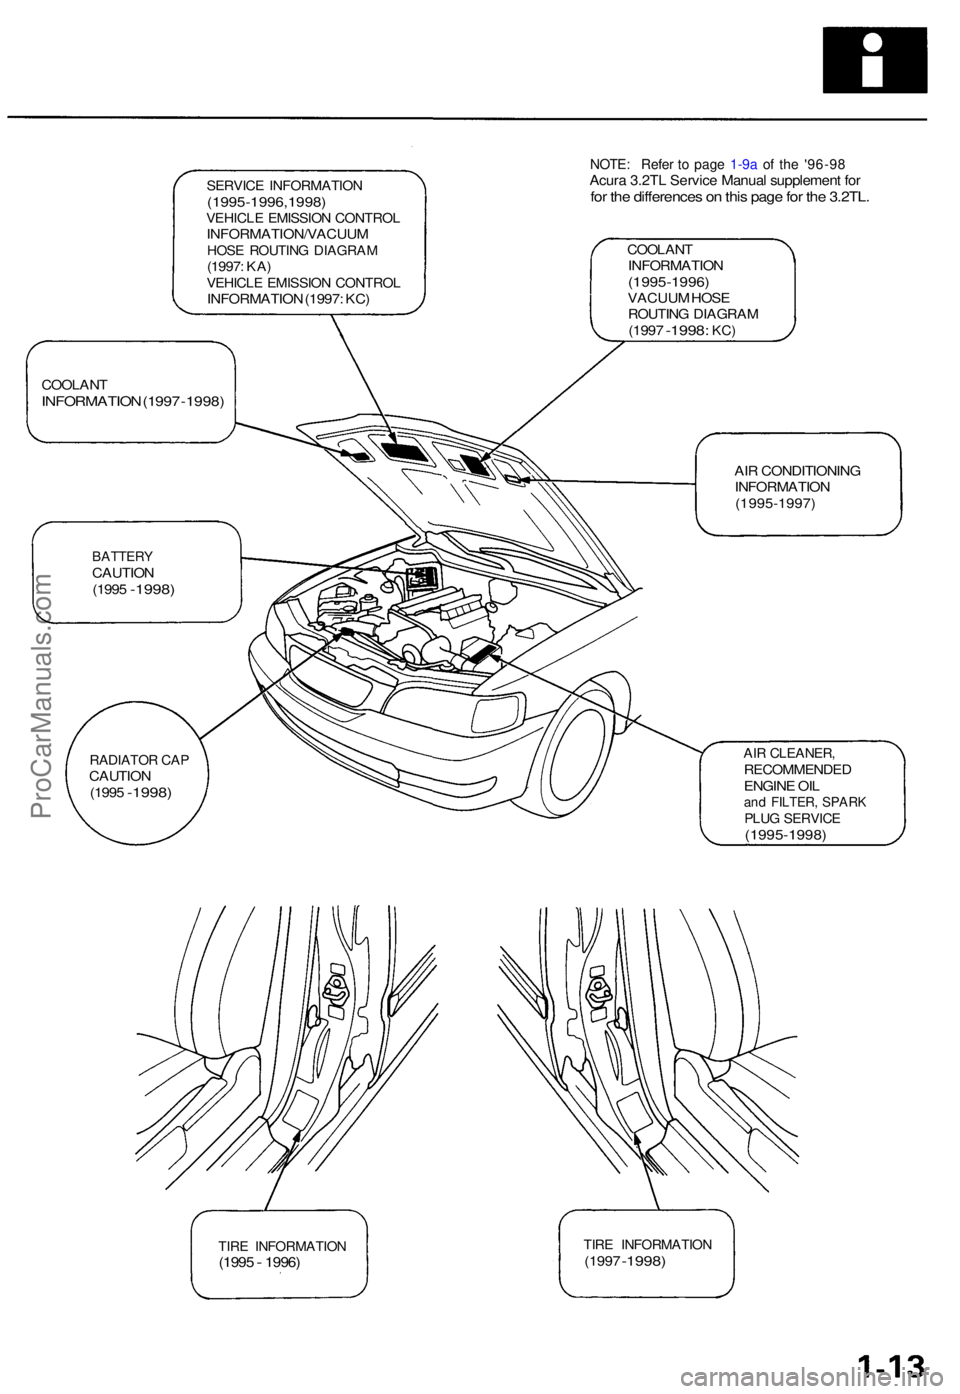
SERVICE INFORMATIO N(1995-1996,1998 )VEHICLE EMISSIO N CONTRO LINFORMATION/VACUU MHOSE ROUTIN G DIAGRA M(1997: KA )VEHICL E EMISSIO N CONTRO LINFORMATIO N (1997 : KC )
COOLAN TINFORMATIO N(1995-1996)VACUUM HOS EROUTIN G DIAGRA M(1997 -1998 : KC)
COOLAN TINFORMATIO N (199 7 -1998 )
AIR CONDITIONIN G
INFORMATIO N
(1995-1997 )
BATTERYCAUTION(1995 -1998 )
AIR CLEANER ,RECOMMENDE DENGINE OI Land FILTER , SPAR KPLUG SERVIC E(1995-1998 )
TIRE INFORMATIO N(1995 - 1996 )TIRE INFORMATIO N(1997 -1998 )
RADIATO R CA PCAUTIO N
(199 5 -1998 )
NOTE: Refe r t o page 1-9a of th e '9 6-9 8 Acura 3.2TL Servic e Manual supplement forfor the differences on this page for the 3.2TL.
ProCarManuals.com
Page 688 of 1771
Towing
If the vehicle needs to be towed, call a professional tow-
ing service. Never tow the vehicle behind another vehi-
cle with just a rope or chain. It is very dangerous.
Emergency Towing
There are three popular methods of towing a vehicle:
Flat-bed Equipment — The operator loads the vehicle on
the back of a truck. This is the best way of transporting the
vehicle.
Wheel Lift Equipment — The tow truck uses two pivoting
arms that go under the tires (front or rear) and lifts them
off the ground. The other two wheels remain on the
ground.
Sling-type Equipment — The tow truck uses metal cables
with hooks on the ends. These hooks go around parts of
the frame or suspension and the cables lift that end of
the vehicle off the ground. The vehicle's suspension and
body can be seriously damaged if this method of towing
is attempted.
If the vehicle cannot be transported by flat-bed, it should
be towed with the front wheels off the ground. If due to
damage, the vehicle must be towed with the front
wheels on the ground, do the following:
• Release the parking brake.
• Start the engine.
• Shift to position, then position.
• Turn off the engine.
CAUTION:
• Improper towing preparation will damage the trans-
mission. Follow the above procedure exactly. If you
cannot shift the transmission or start the engine, the
vehicle must be transported on a flat-bed.
• It is best to tow the vehicle no farther than 50 miles
(80 km), and keep the speed below 35 mph (55
km/h).
• Trying to lift or tow the vehicle by the bumpers will
cause serious damage. The bumpers are not
designed to support the vehicle's weight.
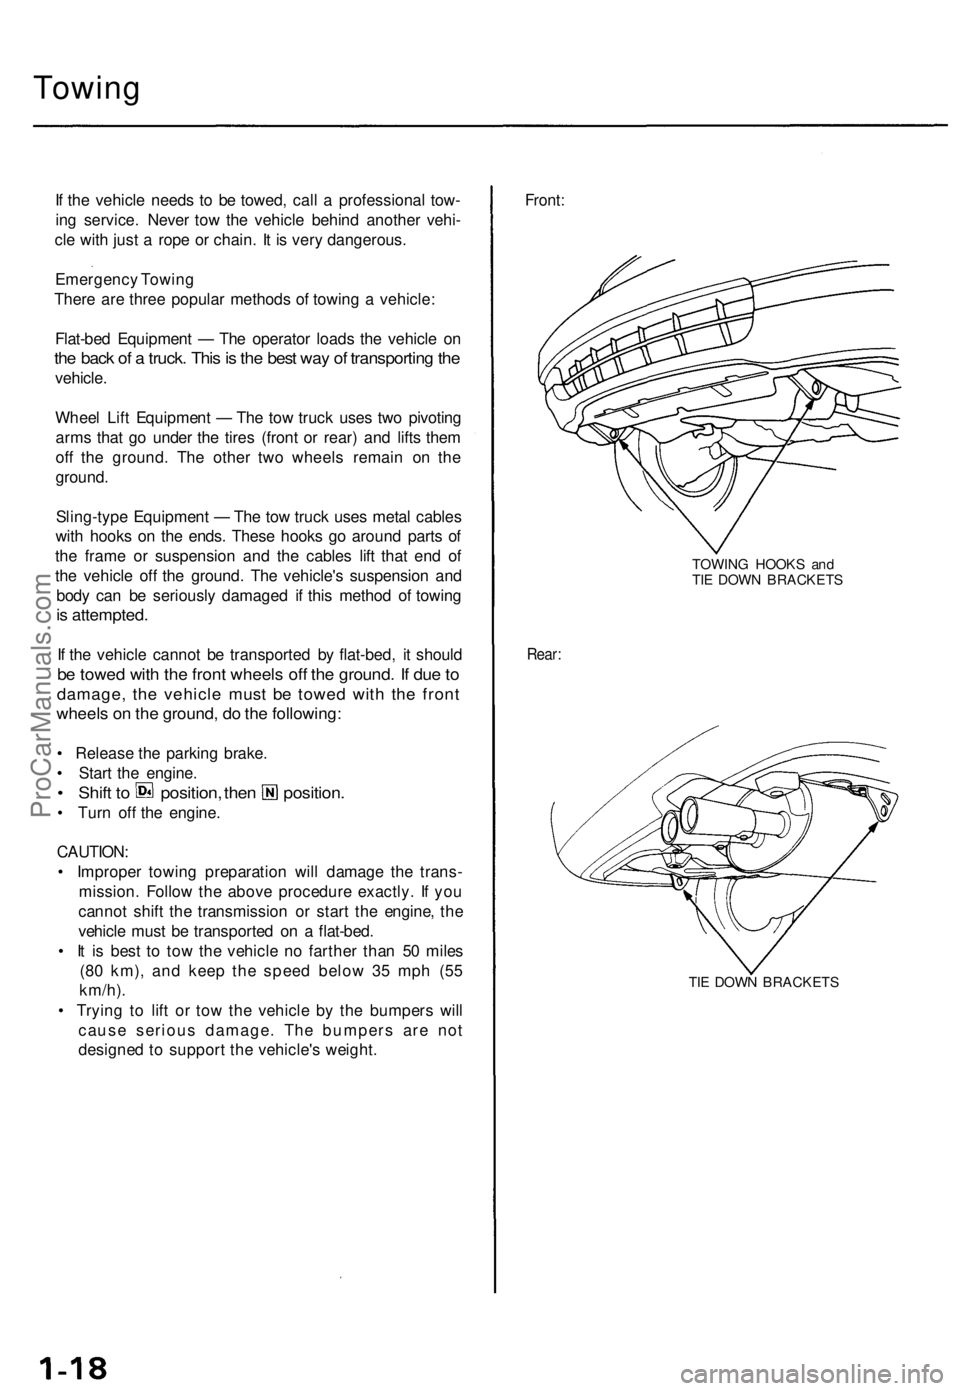
Front:
TOWING HOOKS and
TIE DOWN BRACKETS
Rear:
TIE DOWN BRACKETSProCarManuals.com
Page 689 of 1771
Service Precautions
Handling of Special Nuts and Bolts
Because the front sub frame sections on this vehicle are
constructed with aluminum alloys, use only the special
"Dacro" type nuts and bolts recommended by Acura.
NOTE:
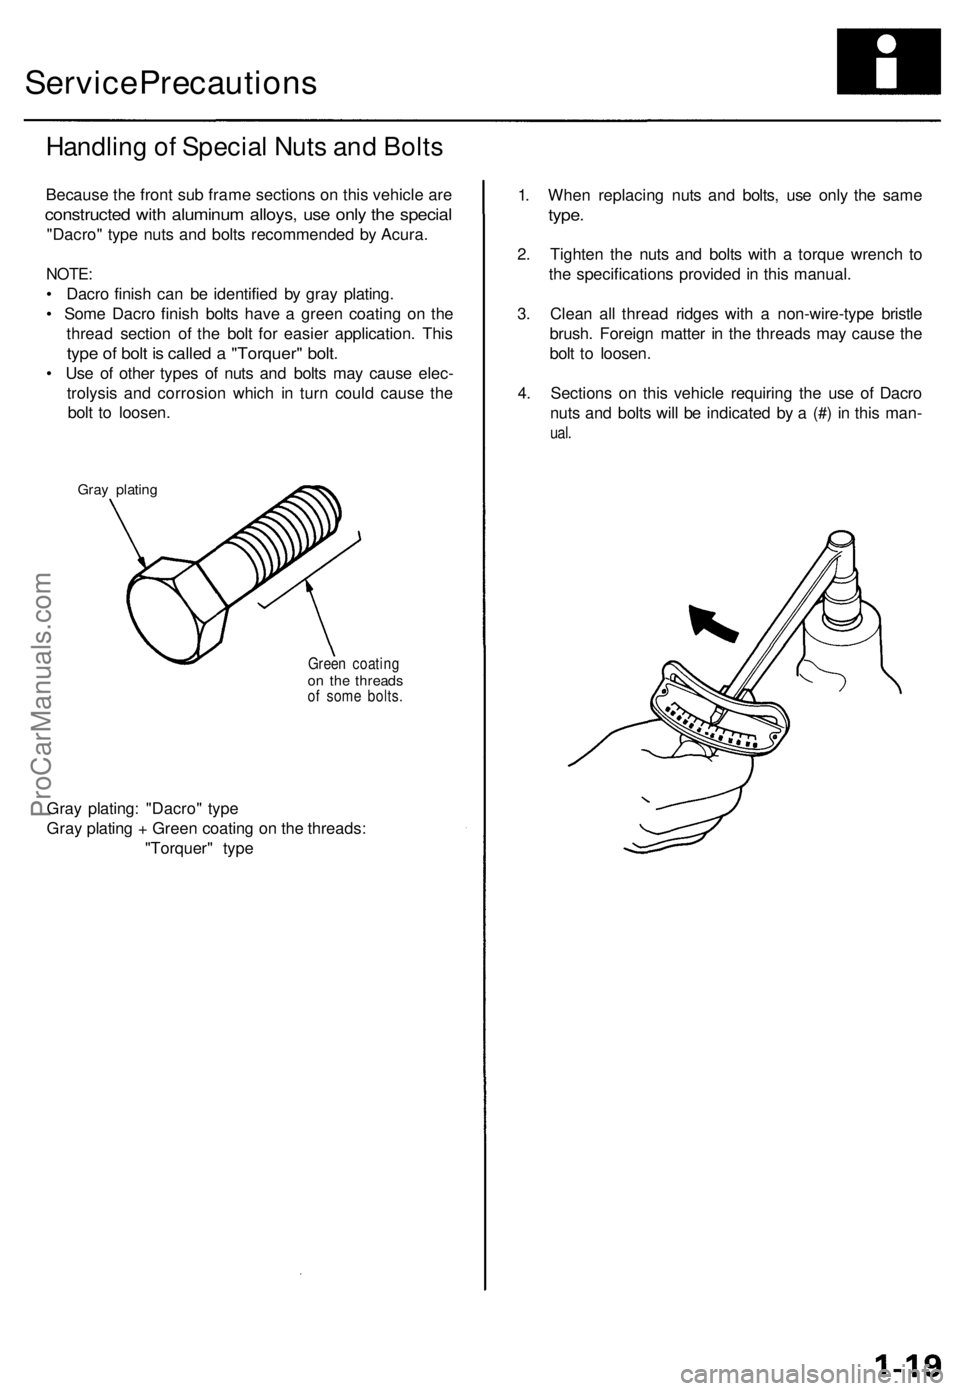
• Dacro finish can be identified by gray plating.
• Some Dacro finish bolts have a green coating on the
thread section of the bolt for easier application. This
type of bolt is called a "Torquer" bolt.
• Use of other types of nuts and bolts may cause elec-
trolysis and corrosion which in turn could cause the
bolt to loosen.
Gray plating
Green coating
on the threads
of some bolts.
Gray plating: "Dacro" type
Gray plating + Green coating on the threads:
"Torquer" type
1. When replacing nuts and bolts, use only the same
type.
2. Tighten the nuts and bolts with a torque wrench to
the specifications provided in this manual.
3. Clean all thread ridges with a non-wire-type bristle
brush. Foreign matter in the threads may cause the
bolt to loosen.
4. Sections on this vehicle requiring the use of Dacro
nuts and bolts will be indicated by a (#) in this man-
ual.ProCarManuals.com