Page 1091 of 1771

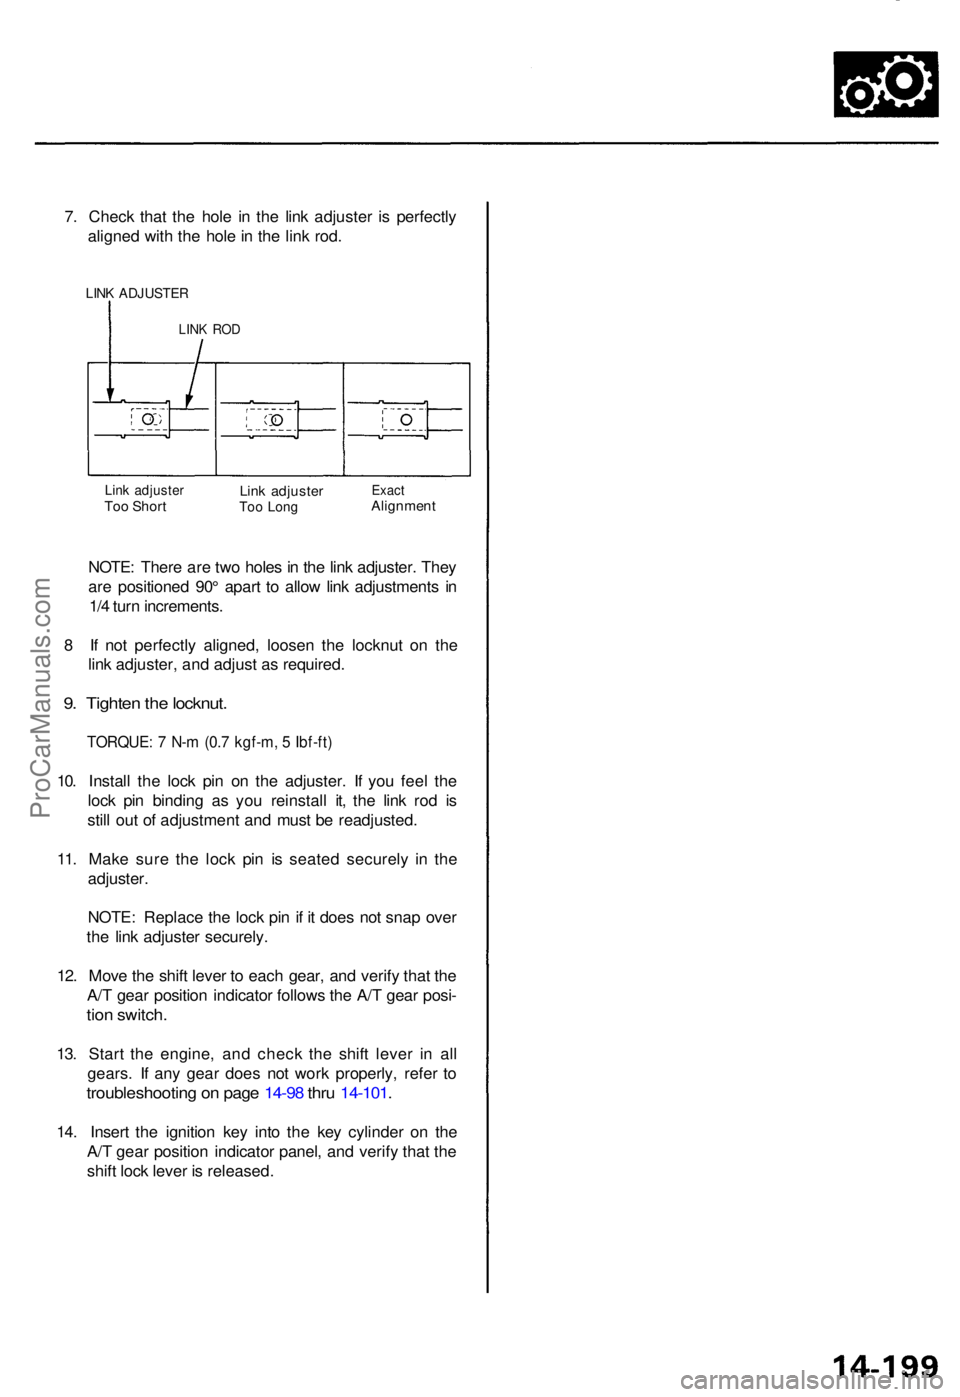
7. Chec k tha t th e hol e i n th e lin k adjuste r i s perfectl y
aligne d wit h th e hol e in th e lin k rod .
LINK ADJUSTE R
LINK RO D
Link adjuste rToo Shor tLink adjuste rToo Lon gExac tAlignmen t
NOTE: Ther e ar e tw o hole s in th e lin k adjuster . The y
ar e positione d 90 ° apar t t o allo w lin k adjustment s i n
1/ 4 tur n increments .
8 I f no t perfectl y aligned , loose n th e locknu t o n th e
lin k adjuster , an d adjus t a s required .
9. Tighte n th e locknut .
TORQUE : 7 N- m (0. 7 kgf-m , 5 Ibf-ft )
10. Instal l th e loc k pi n o n th e adjuster . I f yo u fee l th e
loc k pi n bindin g a s yo u reinstal l it , th e lin k ro d i s
stil l ou t o f adjustmen t an d mus t b e readjusted .
11 . Mak e sur e th e loc k pi n i s seate d securel y i n th e
adjuster .
NOTE : Replac e th e loc k pi n if i t doe s no t sna p ove r
th e lin k adjuste r securely .
12 . Mov e th e shif t leve r t o eac h gear , an d verif y tha t th e
A/ T gea r positio n indicato r follow s th e A/ T gea r posi -
tion switch .
13. Star t th e engine , an d chec k th e shif t leve r i n al l
gears . I f an y gea r doe s no t wor k properly , refe r t o
troubleshootin g o n pag e 14-9 8 thr u 14-101 .
14. Inser t th e ignitio n ke y int o th e ke y cylinde r o n th e
A/ T gea r positio n indicato r panel , an d verif y tha t th e
shif t loc k leve r i s released .
ProCarManuals.com
Page 1396 of 1771

Troubleshooting
Symptom
Water leak s
Win d nois e
Moto r nois e
Glas s doe s no t move , bu t
moto r turn s
Glas s doe s no t mov e an d
moto r doe s no t tur n (glas s ca n
be move d wit h moonroo f
wrench)
Probable Caus e
1.
2 .
3 .
4.
1.
1 .
2 .
3.
1.
2.
3 .
4 .
1.
2 .
3.
4 .
5.
Clogge d drai n tube .
Ga p betwee n glas s weatherstri p an d roo f panel .
Defectiv e o r improperl y installe d glas s weatherstrip .
Ga p betwee n drai n sea l an d roo f panel .
Excessiv e clearanc e betwee n glas s weatherstri p an d roo f panel .
Loos e motor .
Wor n gea r o r bearing .
Cabl e assembl y deformed .
Clutc h ou t o f adjustment .
Foreign matte r stuc k betwee n guid e rai l an d slider .
Inner cabl e loose .
Cabl e assembl y no t attache d properly .
Blow n fuse .
Fault y switch .
Batter y ru n down .
Defectiv e motor .
Fault y relay .
Glass Rea r Edg e Closin g Adjustmen t
Open th e glas s abou t a foot , the n clos e it t o chec k wher e
rea r edg e begin s t o rise . I f i t rise s to o soo n an d seat s to o
tightl y agains t th e roo f panel , o r to o lat e an d doe s no t
sea t tightl y enough , adjus t it .
1 . Ope n th e glas s fully .
2 . Remov e th e rai l cover s fro m bot h sides , an d loose n
th e nut s (se e pag e 20-50 ).
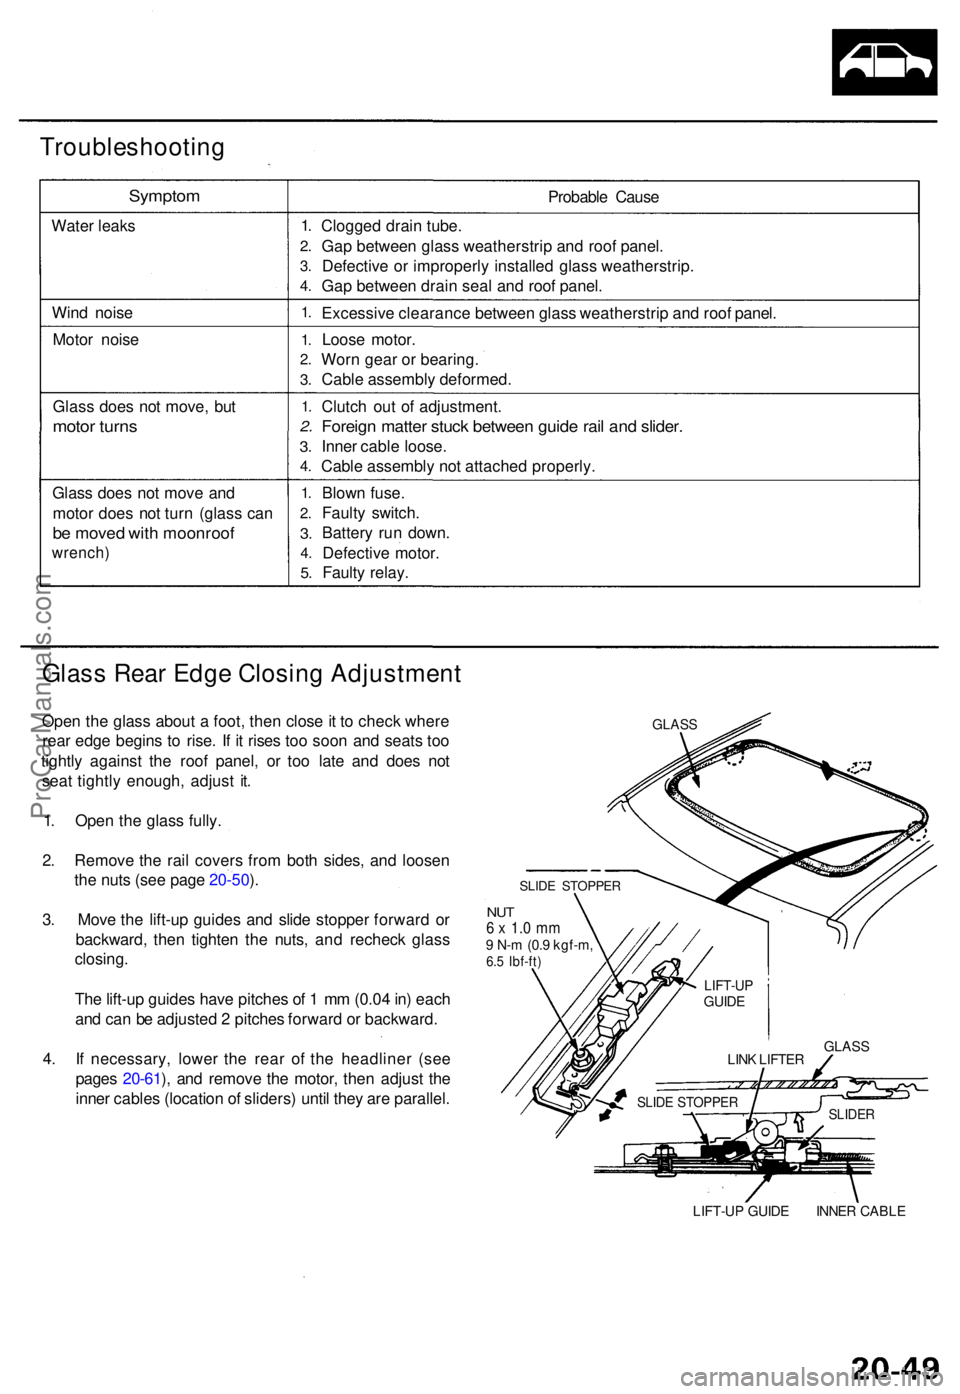
3 . Mov e th e lift-u p guide s an d slid e stoppe r forwar d o r
backward , the n tighte n th e nuts , an d rechec k glas s
closing .
Th e lift-u p guide s hav e pitche s o f 1 m m (0.0 4 in ) eac h
an d ca n b e adjuste d 2 pitche s forwar d o r backward .
4 . I f necessary , lowe r th e rea r o f th e headline r (se e
page s 20-61 ), an d remov e th e motor , the n adjus t th e
inne r cable s (locatio n o f sliders ) unti l the y ar e parallel .GLASS
SLIDE STOPPE R
NUT6 x 1. 0 m m9 N- m (0. 9 kgf-m ,6.5 Ibf-ft )
LIFT-U P GUID E INNE R CABL E
SLIDER
GLASSLINK LIFTE R
SLIDE STOPPE R
LIFT-UPGUIDE
ProCarManuals.com
Page 1706 of 1771
Driver's Power Seat
Switch Test/Replacement
1. Remove the recline cover from the driver's seat by
removing the two screws, and pulling off the adjust-
ment switch knobs.
RECLINE COVER
2. Disconnect the 6P connectors from the adjustment
switch, then remove the switch from the cover by
removing its two mounting screws.
3. Check for continuity between the terminals in each
switch position according to the table.
ADJUSTMENT SWITCH
TERMINAL SIDE OF MALE TERMINALS
TERMINAL SIDE OF MALE TERMINALSProCarManuals.com