Page 25 of 156

Downloaded from www.Manualslib.com manuals search engine CONTROLS AND EQUIPM ENT
Cla ss 3
=o r c h ild ren from approx . 7 years -les s than i .50 m/5' tall. Most suited are seat cushions
co mbined with the 3-po int seat belts.
Attention The shoulder belt must lay across the middle of the shoulder-on no account on the neck -and the upper body. The lap belt must sit across the pelvis -not across the stomach.
Child ren more than 1.50 m/5' tall can use "lle seat belt s fitted without seat cushions.
Attention
On no account should children,
even small babies, travel sitting
on somebody's lap.
When using the belt the section "Seat
belts" should also be noted.
Notes
• We recommend that child restraint sys
tems from the genuine access ory range of
th e Volkswag en dealer s are used. Here, re
straint systems for all age groups are of
f e red under the name "Bobsy"ll. These
syst ems fu lfil all the requirem ent s mentioned and over and ab ove this, hav e been
develope d and tested by us for use ill Volks
wag en ve hicl es.
I) Not in all e xport market s
Attention • Particular care is required if child restraint systems are used, which are bolted on together with the belts fitted in the v ehicle. The bolts must be screwed into the hole for the complete nominal length and tightened to 40Nm. • The seat belts must be checked for correct routing. Furthermore, the belt must not be able to be damaged by sharply edged fittings. • Only one child may be belted in u sing a child restraint system.
• For the installation and use, atte ntio n must b e paid to t he legal
regulations and the instruction s of the restraint system manufactu rer.
23
Page 26 of 156

Downloaded from www.Manualslib.com manuals search engine CONTROLS AND EQUIPMENT
Head restraints*
B1H-168 I
The head restraints are height adjustable and should be set to suit the size of the per
son in the seat. Correctly adjusted head re
straints togeth er with the seat belts offer ef
fective prot ection . The f
ront head restraints can also be adjuste d for rake.
Adjusting height
• Grip sides of head restraint with both
hands and pul l up or push dow n. • The best protection is obtained when
the upper edge of res traint is roughly at eye
l evel.
Note
Th e fr ont head restra ints can be pulled ou t an additional 20 mm using slightly more ef
fort.
Removing and installing
Front head restraints
Using a screwdri ver push spring clips side
ways out of the guide rings in the backrest. Pull out head restraint.
T o refit first push the spring clips into guide
rings so that the straight leg of the clip
is at
the front. Then push the head restraint rods
into the guides until they are heard to en
gage.
Recaro sports seat head restraints
Pull paddi ng apart, press the two springs (arr ow) on the guides simultaneous ly fo rw ards and have a second person pul l head
restraint out.
When installing f
irst insert head restraint and then adjust height.
24
Page 27 of 156

Downloaded from www.Manualslib.com manuals search engine CONTROLS AND EQUIPMENT
Front seats
Rear hea d restraints
=>ress button on guide ring and pull head re
s-rai nt out upwards.
-0 refit, insert head restra int ro ds as far as os sible into guides. When doing this it is ~ot necessary to press the button .
N
ote
On ve hicles without rear head restra ints it 5 possibl e to r etrofit t hem without excess-
e expenditure -Vol kswagen dealers have
-'"'e n ecessary information. The
correc t adjustment of the seats
is im
portant for
- reaching the controls safely and quick
ly
- rela xed low-fatigue body po sition
-maximum protection from the seat belts and the Airbag System_
Attention • For this reason, the front seats should not be pushed too close to the steering wheel or the instrument panel. • Feet should remain in the footwell when the vehicle is moving -never resting on the instrument panel or seats_
I B1H-012 I
1 -To move seat backwards and forwards
Lift lever and move seat. Then release lever
and move seat fu rther so that the catch engages
The driver's seat
should be adjusted so that
the peda ls can be fully depr essed with the
legs slightly angled.
Attention For safety reasons the driver's seat must only be moved backwards or forwards when vehicle is stationary_
25
Page 28 of 156

Downloaded from www.Manualslib.com manuals search engine CONTROLS AND EQUIPMENT
2 -Adjusting backrest angle
Take weight off back rest and turn knob.
The backrest of the driv er's seat shou ld be adjusted so that the top of the steerin g
whee l can be reached with the arms angled slightly.
Attention
Do not lower the backrest too far
when on the move because the seat belts are then no longer fully effective.
3 -Releasing backrest
(2 door vehicl es only)
Lif t the
lever (also belt holder) and move the
back rest forward. Before releasing the
backrest pull
belt out of the belt holder (see
page 17).
Attention For safety reasons, ensure that the backrest lock is engaged when the vehicle is moving!
4 -Adjusting angle of the seat
cushion*
If the angle of the seat cushion is to be changed, pull lever up and bring seat
cushion to the desired angle by placing
mo
re or less weight on the backrest.
5 -Adjusting seat height*
Take weight off seat cushion and pull up lever. The whole seat cushion moves up
war ds. To adjust the seat cushion down
w ards, push seat downwards with body
weight.
Attention • For safety reasons the height of the driver's seat must only be adjusted when vehicle is stationary. • Be careful when adjusting the seat height! Careless and uncontrolled adjustment can cause injuries.
6 -Adjusting lumbar support
By turn ing the hand-wheel the seat padding in the lumbar area of the spine can be made
to arch forward slightly. This gives effective
support to the natura l curvatu re of the spine
so that t
he sitting position is less fatigui ng ,
particul arly on long trips
26
Page 29 of 156

Downloaded from www.Manualslib.com manuals search engine CONTROLS AND EQUIPMENT ----------------------------------~~~--
Rear seat
-ncr ease the size of the luggage area the ar seat can be folded forward; on vehi cles
- h sp li t rear seat the two parts can be ov ed separately.
~r-e rear head restraints " should be re~oved before folding the backrests downsee page 24.
-0 pr ev ent damage, the front seats must be sltio ned beforehand so that the rear seat _~s not contact the front seats w hen the -r-2 rear seat is fo lded forward.
Folding seat forward
On the saloon lift seat cushion slightly
t h e loo p and pull forwar d onto stop :::-ow 1) T hen fold cushion forward (arrow
_ -se e left illust ration. •
On the Estate lift
seat cushion by the
l oop (arrow 3) and fold forward -see centre
Illustrat ion. • On both saloon and estate, pu ll release
knob (on the one piece back rest both knobs
simultaneous ly) in the rear seat back rest in direction of arrow (4) -see centre illustra
tion -and fold back rest forward -see flght
hand illustration.
Folding seat back
Sa loon and estate
• First fold back rear seat backrest.
•
Fold back seat cushion. On the saloo n, push seat cushion to rear
unti l it engages When doing this hold up the
centre seat belt, othe rwise the belt w ill b e
wedged between the backre s and seat
cushion and then cannot be used.
Attention The rear seat backrest m ust be properly engaged so tha t articles in the luggage area cannot slide forward if the brakes are applied suddenly.
27
Page 30 of 156
 is distribute")
Downloaded from www.Manualslib.com manuals search engine CONTROLS AND EQUIPMENT
Luggage compartment
In the interests of good handling ensure that
the load (persons and luggage) is distributed
e ven ly. Heavy items should always be car
ried as near to the rear axle as possible or
better still, between the axles. The permissible axle and gross weights must on no account be exceeded see page 143.
Attention • It should be noted that when transporting heavy items the handling will change due to the displacement of the centre of gravity. Driving style and speed must be altered to suit. • The load must be stowed so that no items of luggage can fly forward if brakes are applied suddenly.
One should ensure that
- the heater element
wires in the rear window are not damaged by articles rubbing
against them and
- the ventilation slots
in the luggage com
partment side trim * are not co vered .
Attention
Never drive with the tailgate not properly closed as exhaust gas
can then be drawn into the vehicle interior.
On the estate , four eye lets are provided in the luggage compartment fo r secur ing
items of luggage. These are accessib le
thr ough small flaps in the covering of the luggage compartment floor.
The
two front eyelets are also used to se
cure the mesh partition -see next page.
28
Page 31 of 156

e m esh partit ion prevents light articles of 99age and dogs from being thrown forar")
Downloaded from www.Manualslib.com manuals search engine CONTROLS AND EQUIPMENT
esh partition* (Estate)
e m esh partit ion prevents light articles of '99age and dogs from being thrown forard when brakes are applied suddenly or ~ an accident.
Installing
-"e part ition can be installed either behind "9 rear seat s or behind the front seats. For "'a::h position there are two upper and two ~ ve r securing points:
Attaching at the top
~:)Id the flaps in the opposing roof trims up, 5ert the upper cross bar on one side into
• e recess in the roof and press forward 5' ghtly. Then
place the other side of the bar
in the
r o of reinforcement and push forward slightly Subsequently fold flaps (A and 8)
down again -see left-hand illustration.
Attaching at the bottom
Depending on fittings, hook the tw o straps
on the lower cross bar into the tw o front
e yelets
in the luggage compartment floor
( see previous page) or onto the bars on the
vehicle floor in front of the rear seat -see
right-hand illustration . Ten sion straps by pul
ling the ends .
Removing
To take the partition off first loosen the straps . To do this it is only necessary to
press the button marked "PRESS" in the
belt tensioner and pull the released strap
until the hook can be detached at the bot
tom.
Open the flaps
and then pull the upper cross
bar bac kward slightly, first at one end, then
at the other, and remo ve from the recesses .
The upper recesses
can be closed with the
flaps when not in use.
29
Page 32 of 156

Downloaded from www.Manualslib.com manuals search engine CONTROLS AND EQUIPMENT
Luggage compartment cover / Folding/sliding cover*
Articles of clothing can be placed on the luggage compartment cover.
Attention Do not place heavy hard articles on the luggage compartment cover or folding/sliding cover they could endanger the vehicle occupants or damage the folding/sliding cover if the brakes are applied suddenly_
Furthermore, the heater element wires in
the heated rear window could be damaged
by articles rubbing against them.
The folding/s liding cover
can be pushed to
gether to the front or rear .
When the tailgate of the saloo n is opened ,
the luggage compartment cover is also
lifted .
If large items of lug gag e are to be carried,
the cover
can be removed:
Saloon
• Unhook retaining cords fro m the tailgate.
• Pull cover to rear out of the retainers
see arrow s in left-hand illustration.
When removed, the luggag e co mpartment
cover
can be stored behind the rear seat
backrest:
- Unlat
ch rear seat backrest and fold for
wards slightly.
- Place the cove r vertically between the back rest and the wheel housing, with the upper side to the front and the retain
ing straps at the bottom. Secu re back
r est.
• When installing , slide the cover forward
into the side retainers and hook the retain
ing cords onto tailgate.
Estate
• Press the two front locking flaps in the
side consoles forwards (arrow 1 in right
hand illus tration).
•
Pull fo lding/sliding cover backward and out of the consoles (arrow 2) I n so doing,
dislodge th e front/ rear cross bar of the
cover with a qUi ck jerk.
• When
installing the folding/s liding cover, push the front cross bar of the cover for
ward and the rear cross ba r backward un til
the y engage securely.
30
 1
1 2
2 3
3 4
4 5
5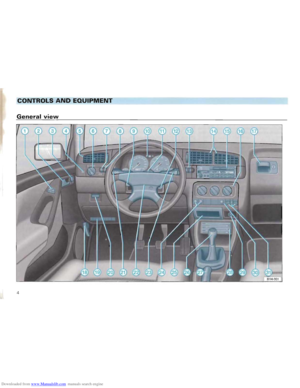 6
6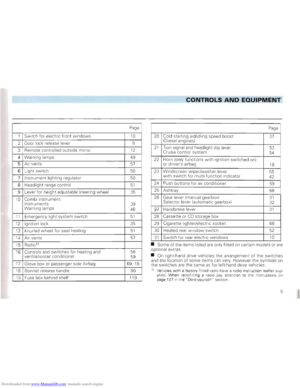 7
7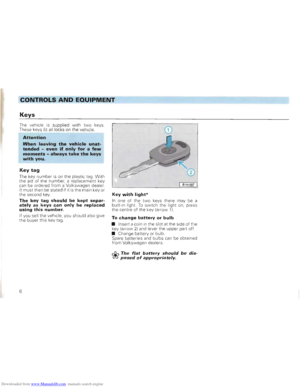 8
8 9
9 10
10 11
11 12
12 13
13 14
14 15
15 16
16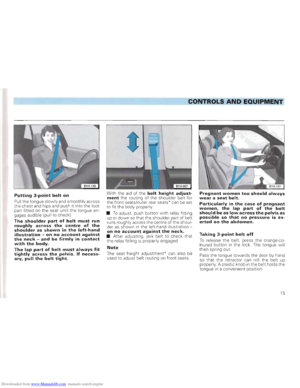 17
17 18
18 19
19 20
20 21
21 22
22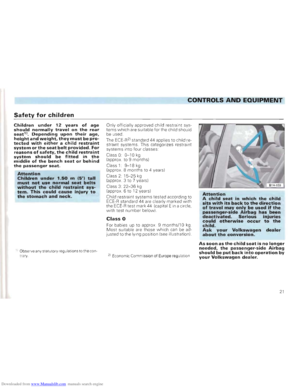 23
23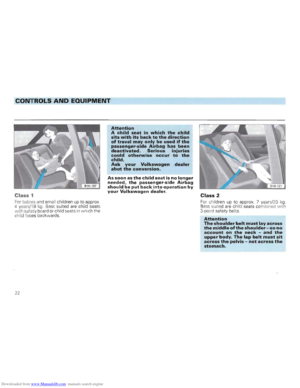 24
24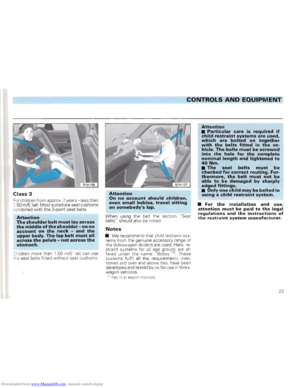 25
25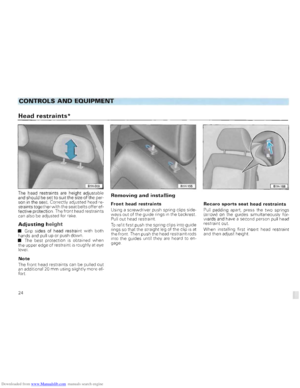 26
26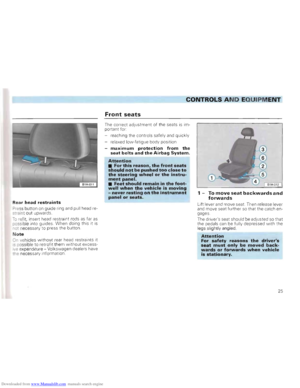 27
27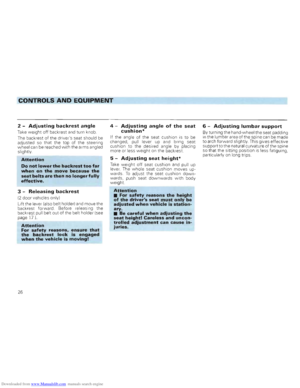 28
28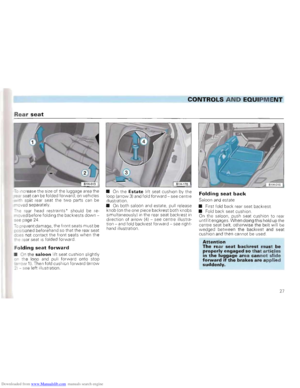 29
29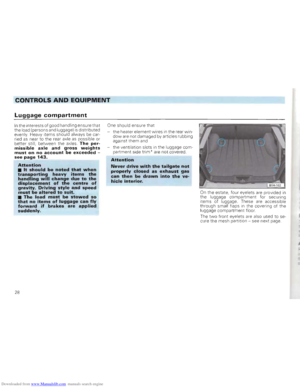 30
30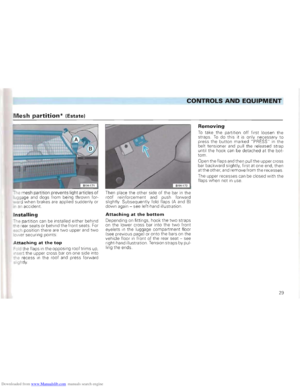 31
31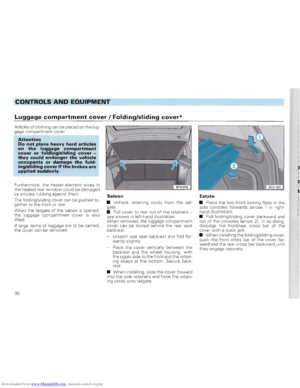 32
32 33
33 34
34 35
35 36
36 37
37 38
38 39
39 40
40 41
41 42
42 43
43 44
44 45
45 46
46 47
47 48
48 49
49 50
50 51
51 52
52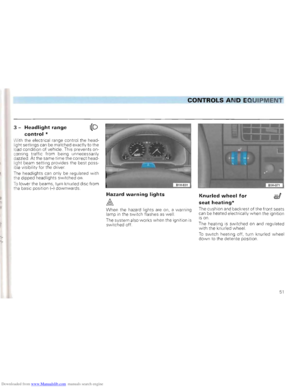 53
53 54
54 55
55 56
56 57
57 58
58 59
59 60
60 61
61 62
62 63
63 64
64 65
65 66
66 67
67 68
68 69
69 70
70 71
71 72
72 73
73 74
74 75
75 76
76 77
77 78
78 79
79 80
80 81
81 82
82 83
83 84
84 85
85 86
86 87
87 88
88 89
89 90
90 91
91 92
92 93
93 94
94 95
95 96
96 97
97 98
98 99
99 100
100 101
101 102
102 103
103 104
104 105
105 106
106 107
107 108
108 109
109 110
110 111
111 112
112 113
113 114
114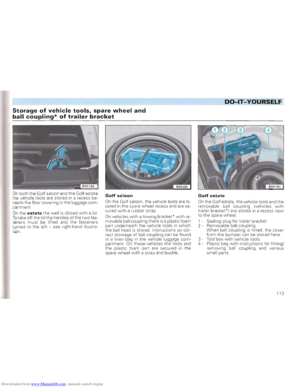 115
115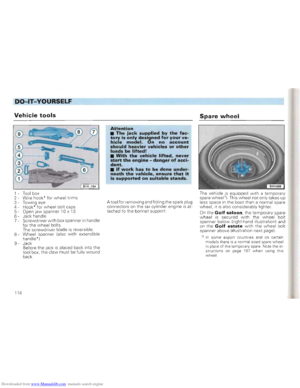 116
116 117
117 118
118 119
119 120
120 121
121 122
122 123
123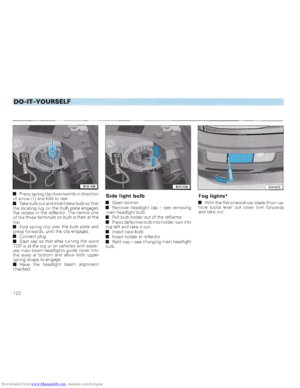 124
124 125
125 126
126 127
127 128
128 129
129 130
130 131
131 132
132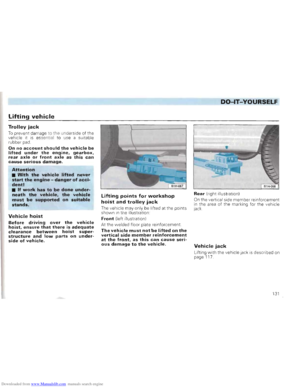 133
133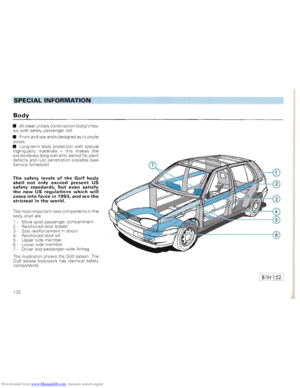 134
134 135
135 136
136 137
137 138
138 139
139 140
140 141
141 142
142 143
143 144
144 145
145 146
146 147
147 148
148 149
149 150
150 151
151 152
152 153
153 154
154 155
155