1993 DODGE TRUCK sensor
[x] Cancel search: sensorPage 1148 of 1502
•
AUTOMATIC TRANSMISSION REMOVAL
AND
INSTALLATION
21 - 147
Fig.
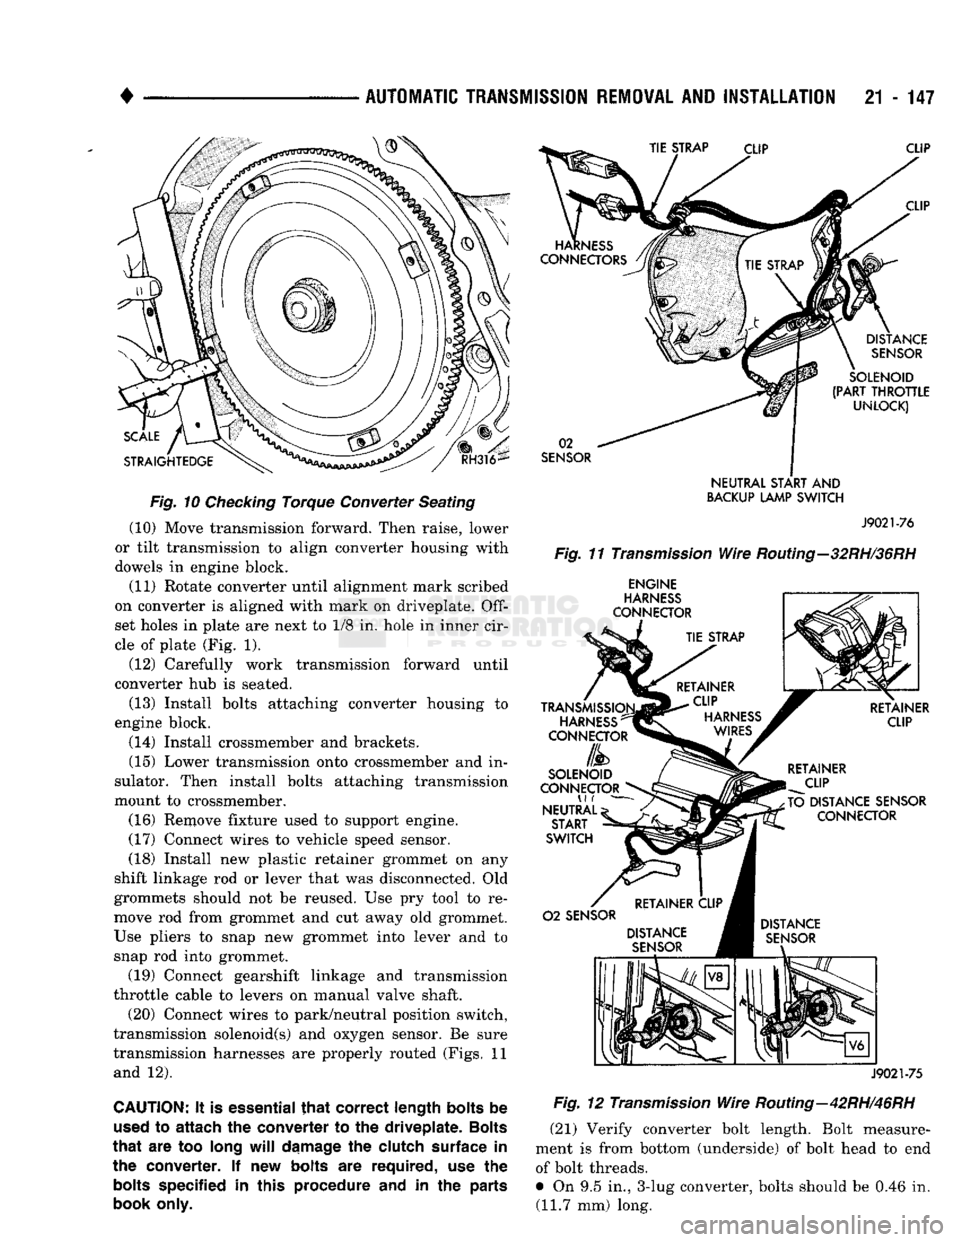
10 Checking Torque Converter Seating (10) Move transmission forward. Then raise, lower
or tilt transmission to align converter housing with
dowels in engine block.
(11) Rotate converter until alignment mark scribed
on converter is aligned with mark on driveplate.
Off
set holes in plate are next to 1/8 in. hole in inner cir
cle of plate (Fig. 1).
(12) Carefully work transmission forward until
converter hub is seated.
(13) Install bolts attaching converter housing to
engine block. (14) Install crossmember and brackets.
(15) Lower transmission onto crossmember and in
sulator. Then install bolts attaching transmission
mount to crossmember.
(16) Remove fixture used to support engine.
(17) Connect wires to vehicle speed sensor.
(18) Install new plastic retainer grommet on any
shift linkage rod or lever that was disconnected. Old
grommets should not be reused. Use pry tool to re
move rod from grommet and cut away old grommet.
Use pliers to snap new grommet into lever and to
snap rod into grommet.
(19) Connect gearshift linkage and transmission
throttle cable to levers on manual valve shaft.
(20) Connect wires to park/neutral position switch,
transmission solenoid(s) and oxygen sensor. Be sure
transmission harnesses are properly routed (Figs. 11 and 12).
CAUTION:
It is
essential
that
correct length bolts
be
used
to
attach
the
converter
to the
driveplate. Bolts
that
are too
long
will
damage
the
clutch surface
in the
converter.
If new
bolts
are
required,
use the
bolts
specified
in
this procedure
and in the
parts
book only.
SENSOR
NEUTRAL
START
AND
BACKUP
LAMP
SWITCH
J9021-76
Fig.
11
Transmission
Wire
Routing—32RH/36RH
ENGINE
J9021-75
Fig.
12
Transmission
Wire
Routing—42RH/46RH
(21) Verify converter bolt length. Bolt measure
ment is from bottom (underside) of bolt head to end of bolt threads.
• On 9.5 in., 3-lug converter, bolts should be 0.46 in. (11.7 mm) long.
Page 1150 of 1502
•
AUTOMATIC
TRANSMISSION
REMOVAL
AND
INSTALLATION
21 - 149
10).
Surface of converter lugs should be approxi
mately 13 mm (1/2 in.) to rear of straight edge when converter is fully seated.
(5) Temporarily secure converter in pump and
housing with C-clamp attached to housing edge, or
with metal strap attached across converter housing.
(6) Position transmission on jack. Secure transmis
sion to jack with safety chains.
(7) Check condition of converter driveplate. Re
place plate if cracked, distorted or damaged. If driveplate replacement was necessary, be sure
transmission dowel pins are seated in engine block and protrude far enough to held transmis sion in alignment.
(8) Coat pilot hub of torque converter with trans
mission fluid.
(9) Raise transmission and align converter with
drive plate and crankshaft.
(10) Move transmission forward. Then raise, lower
or tilt transmission to align converter housing with
dowels on engine block.
(11) Rotate converter to align marks scribed on
converter and driveplate. Offset holes in plate are
next to 1/8 in. hole in inner circle of plate (Fig. 1).
(12) Carefully work transmission forward and over
engine block dowels until converter hub is seated in crankshaft.
(13) Install bolts attaching converter housing to
engine.
(14) Install crossmember.
(15) Lower transmission onto crossmember and in
stall bolts attaching transmission and insulator to
crossmember (Figs. 4 and 5). (16) Remove fixture used to support engine.
(17) Connect vehicle speed sensor wires. (18) Install new plastic retainer grommet on any
shift linkage rod or lever that was disconnected. Old
grommets should not be reused. Use pry tool to re
move rod from grommet and cut away old grommet.
Use pliers to snap new grommet into lever and to snap rod into grommet. (19) Connect gearshift and throttle linkage to
transmission. (20) Connect wires to park/neutral position switch,
transmission solenoids and to oxygen sensor. Be sure
transmission harnesses are properly routed.
CAUTION:
It is essential
that
correct length
bolts
be
used
to
attach
the
converter
to the
driveplate.
Bolts
that
are too long
will
damage
the
clutch
surface
in
the converter. If new
bolts
are required, use the
bolts
specified in this procedure and in the parts
book
only.
(21) Verify converter bolt length. Bolt measure
ment is from bottom (underside) of bolt head to end
of bolt threads. • On 9.5 in., 3-lug converter, bolts should be 11.7
mm (0.46 in.) long.
• On 9.5 in., 4-lug converter, bolts should be 13.2
mm (0.52 in.) long.
• On 10.0 in., 4-lug converter, bolts should be 13.2
mm (0.52 in.) long.
• On 10.75 in., 4-lug converter, bolts should be 11.2
mm (0.44 in.) long.
(22) Install torque converter bolts. Tighten bolts as
follows:
• On models with 9.5 in., 3-lug converter, tighten
bolts to 54 Nnn (40 ft. lbs.).
• On models with 9.5 in., 4-lug converter, tighten
bolts to 74 Nnn (55 ft. lbs.).
• On models with 10.0 in., 4-lug converter, tighten
bolts to 74 Nnn (55 ft. lbs.) torque.
• On models with 10.75 in., 4-lug converter, tighten
bolts to 31 Nnn (270 in. lbs.).
• On diesel models with 12.2 in. converter, tighten
bolts to 47 Nnn (35 ft. lbs.) torque.
(23) Install converter housing access cover. (24) Install starter motor and cooler line bracket.
(25) Connect cooler lines to transmission.
(26) Install transmission fill tube. Install new
O-ring seal on tube before installation.
(27) Install any exhaust components removed for
service access. (28) Support transfer case on transmission jack.
Secure transfer case to jack with safety chains. (29) Install gasket on transmission adapter. Coat
gasket with Mopar perfect, seal, or silicone sealer be
forehand. (30) Install transfer case on transmission. Tighten
transfer case attaching nuts to 47 Nnn (35 ft. lbs.) torque. (31) Remove jack supporting transfer case.
(32) Connect transfer case shift lever to range le
ver. (33) Align and install propeller shafts. Tighten
clamp bolts to 19 Nnn 170 in. lbs.) torque. (34) Install transfer case skid plate and crossmem
ber. (35) Lower vehicle.
(36) Fill transmission with Mopar ATF Plus, Type
7176, or Mopar Dexron II if ATF Plus is not readily
available. (37) Check and adjust gearshift, throttle valve and
transfer case shift linkages if necessary.
OVERDRIVE
UNIT
REMOVAL—42RH/46RH
The following removal and installation procedures
apply to the 42RH/46RH overdrive unit only. If the
complete transmission assembly must be removed,
refer to the Transmission And Converter Removal and Installation procedures. (1) Shift transmission into Park.
(2) Raise vehicle.
Page 1151 of 1502
21 - 150
AUTOMATIC TRANSMISSION REMOVAL
AND
INSTALLATION
• (3) Remove transmission oil pan, remove gasket,
drain oil and reinstall pan. (4) If overdrive unit had malfunctioned, or if fluid
is contaminated, remove entire transmission. If diag
nosis indicated overdrive clutch or governor problems
only, remove overdrive unit only.
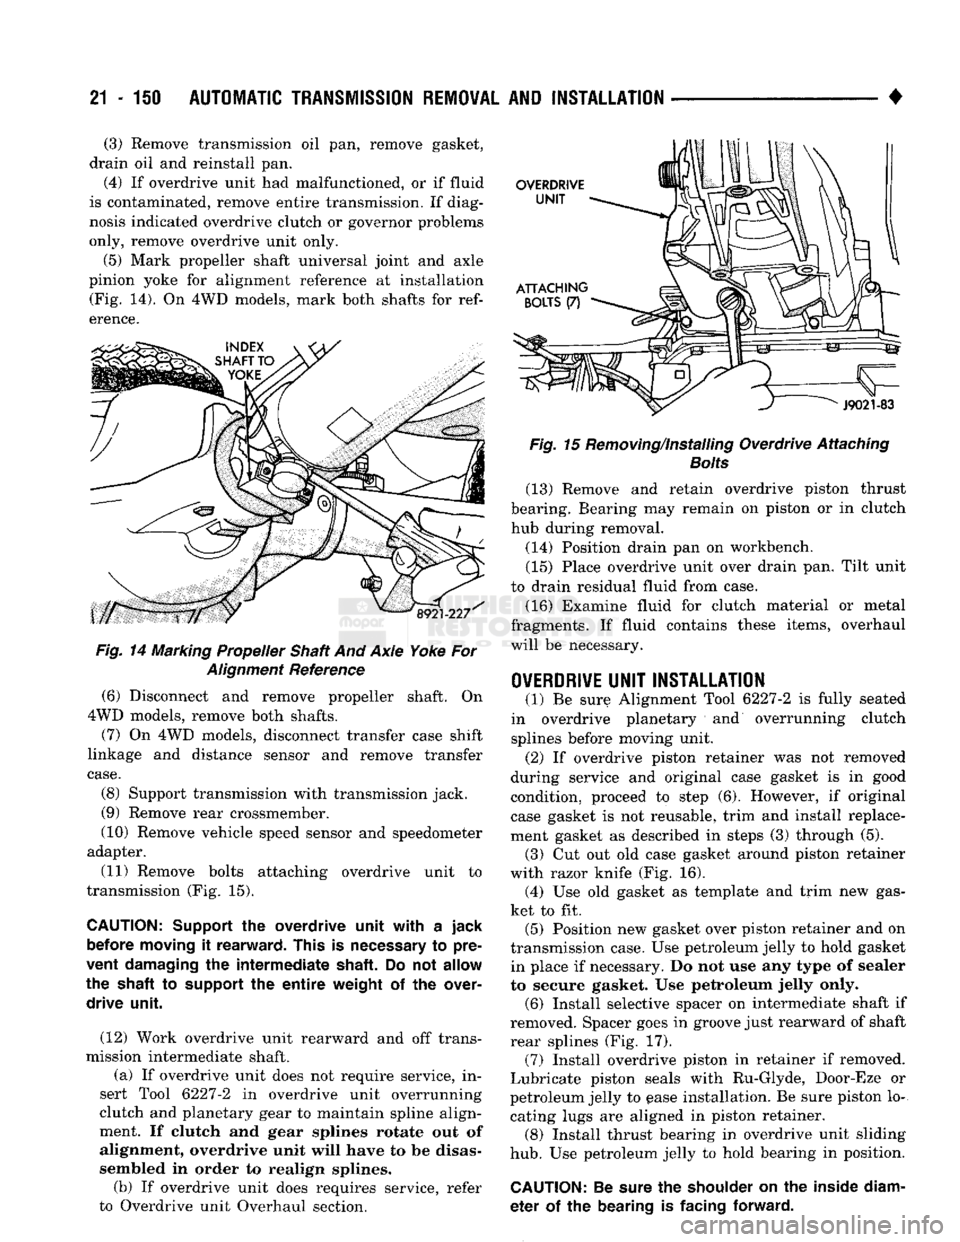
(5) Mark propeller shaft universal joint and axle
pinion yoke for alignment reference at installation (Fig. 14). On 4WD models, mark both shafts for
ref
erence.
Fig.
14 Marking Propeller Shaft And Axle Yoke For
Alignment
Reference
(6) Disconnect and remove propeller shaft. On
4WD models, remove both shafts.
(7) On 4WD models, disconnect transfer case shift
linkage and distance sensor and remove transfer
case.
(8) Support transmission with transmission jack.
(9) Remove rear crossmember.
(10) Remove vehicle speed sensor and speedometer
adapter.
(11) Remove bolts attaching overdrive unit to
transmission (Fig. 15).
CAUTION:
Support
the
overdrive unit with
a
jack before moving
it
rearward. This
is
necessary
to
pre
vent damaging
the
intermediate shaft.
Do not
allow
the shaft
to
support
the
entire
weight
of the
over drive unit.
(12) Work overdrive unit rearward and off trans
mission intermediate shaft.
(a) If overdrive unit does not require service, in
sert Tool 6227-2 in overdrive unit overrunning
clutch and planetary gear to maintain spline align
ment. If clutch and gear splines rotate out of
alignment, overdrive unit will have to be disas
sembled in order to realign splines.
(b) If overdrive unit does requires service, refer
to Overdrive unit Overhaul section.
Fig.
15 Removing/Installing Overdrive Attaching
Bolts
(13) Remove and retain overdrive piston thrust
bearing. Bearing may remain on piston or in clutch hub during removal.
(14) Position drain pan on workbench.
(15) Place overdrive unit over drain pan. Tilt unit
to drain residual fluid from case. (16) Examine fluid for clutch material or metal
fragments. If fluid contains these items, overhaul
will be necessary.
OVERDRIVE
UNIT INSTALLATION
(1) Be sure Alignment Tool 6227-2 is fully seated
in overdrive planetary and overrunning clutch
splines before moving unit.
(2) If overdrive piston retainer was not removed
during service and original case gasket is in good
condition, proceed to step (6). However, if original case gasket is not reusable, trim and install replace
ment gasket as described in steps (3) through (5).
(3) Cut out old case gasket around piston retainer
with razor knife (Fig. 16). (4) Use old gasket as template and trim new gas
ket to fit. (5) Position new gasket over piston retainer and on
transmission case. Use petroleum jelly to hold gasket in place if necessary. Do not use any type of sealer
to secure gasket. Use petroleum jelly only. (6) Install selective spacer on intermediate shaft if
removed. Spacer goes in groove just rearward of shaft
rear splines (Fig. 17). (7) Install overdrive piston in retainer if removed.
Lubricate piston seals with Ru-Glyde, Door-Eze or
petroleum jelly to ease installation. Be sure piston lo
cating lugs are aligned in piston retainer. (8) Install thrust bearing in overdrive unit sliding
hub.
Use petroleum jelly to hold bearing in position.
CAUTION:
Be
sure
the
shoulder
on the
inside diam
eter
of the
bearing
is
facing forward.
Page 1152 of 1502
•
AUTOMATIC
TRANSMISSION
REMOVAL
AND
INSTALLATION
21 - 151
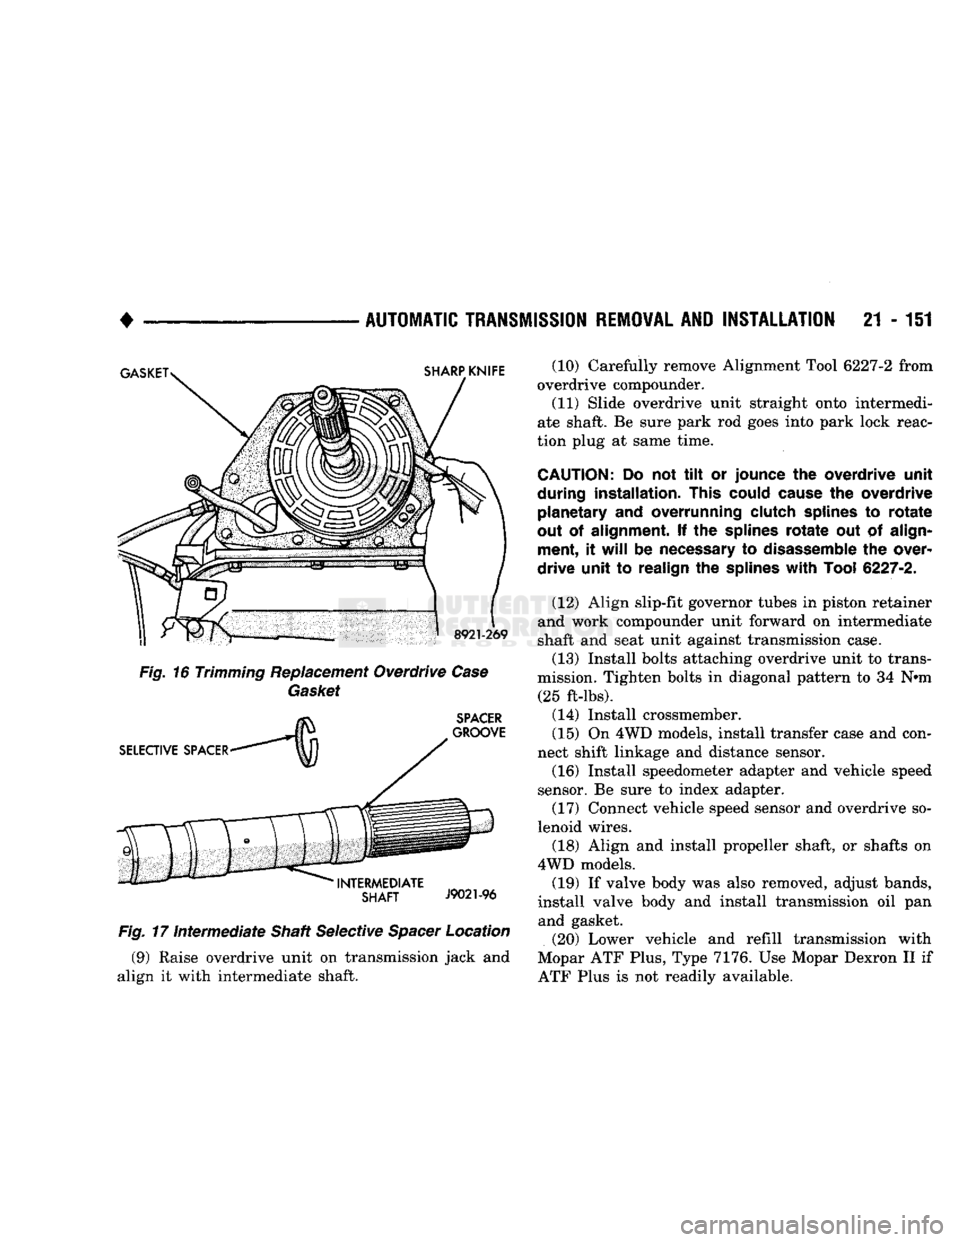
Fig.
17
Intermediate
Shaft Selective
Spacer
Location (9) Raise overdrive unit on transmission jack and
align it with intermediate shaft. (10) Carefully remove Alignment Tool 6227-2 from
overdrive compounder.
(11) Slide overdrive unit straight onto intermedi
ate shaft. Be sure park rod goes into park lock reac
tion plug at same time.
CAUTION:
Do not tilt or
jounce
the
overdrive unit
during installation. This could cause
the
overdrive planetary
and
overrunning clutch splines
to
rotate
out
of
alignment.
If the
splines
rotate
out of
align ment,
it
will
be
necessary
to
disassemble
the
over
drive unit
to
realign
the
splines
with
Tool
6227-2.
(12) Align slip-fit governor tubes in piston retainer
and work compounder unit forward on intermediate
shaft and seat unit against transmission case.
(13) Install bolts attaching overdrive unit to trans
mission. Tighten bolts in diagonal pattern to 34 N»m (25 ft-lbs).
(14) Install crossmember.
(15) On 4WD models, install transfer case and con
nect shift linkage and distance sensor. (16) Install speedometer adapter and vehicle speed
sensor. Be sure to index adapter.
(17) Connect vehicle speed sensor and overdrive so
lenoid wires.
(18) Align and install propeller shaft, or shafts on
4WD models. (19) If valve body was also removed, adjust bands,
install valve body and install transmission oil pan and gasket.
(20) Lower vehicle and refill transmission with
Mopar ATF Plus, Type 7176. Use Mopar Dexron II if
ATF Plus is not readily available.
Page 1346 of 1502
•
NP20I
TRANSFER CASE
21 - 34i (5) Verify that transfer case range lever is in Neu
tral.
(6) Move shift lever bracket forward and retighten
bracket bolts (Fig. 3). Shift rod should not bind in shift lever and range lever. Rod should be slip-fit
both levers. (7) Shift transfer case into 4H range. Shift rod
should now be tension-fit in each lever. Shift lever
should be in 4H detent in gate and range lever should be fully into 4H position.
(8) Shift transfer case into 2H and 4L ranges to
verify correct adjustment.
SPEEDOMETER SERVICE
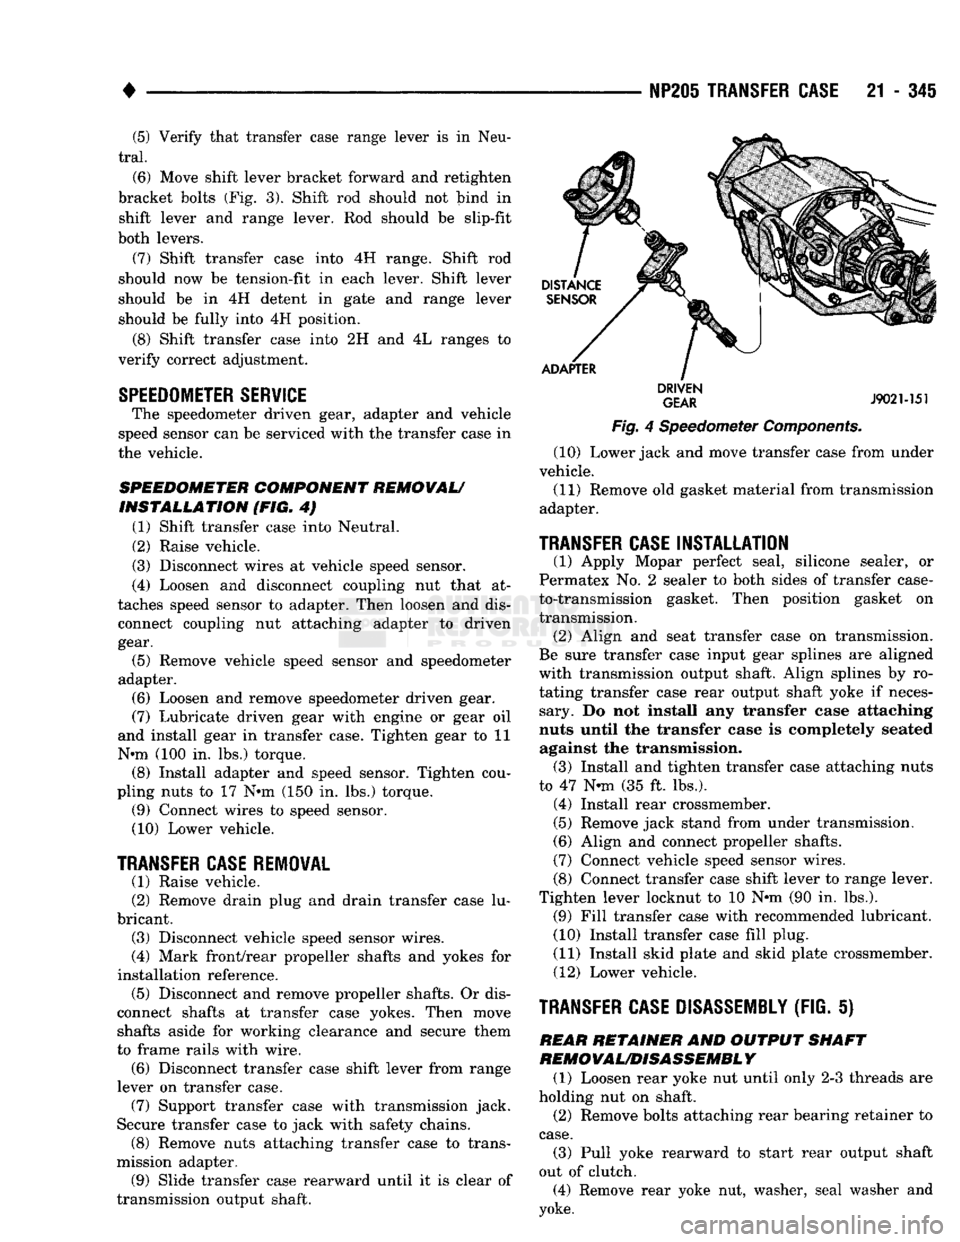
The speedometer driven gear, adapter and vehicle
speed sensor can be serviced with the transfer case in
the vehicle.
SPEEDOMETER COMPONENT REMOVAL/
INSTALLATION (FIG. 4) (1) Shift transfer case into Neutral.
(2) Raise vehicle.
(3) Disconnect wires at vehicle speed sensor.
(4) Loosen and disconnect coupling nut that at
taches speed sensor to adapter. Then loosen and dis connect coupling nut attaching adapter to driven
gear.
(5) Remove vehicle speed sensor and speedometer
adapter. (6) Loosen and remove speedometer driven gear.
(7) Lubricate driven gear with engine or gear oil
and install gear in transfer case. Tighten gear to 11
N*m (100 in. lbs.) torque. (8) Install adapter and speed sensor. Tighten cou
pling nuts to 17 N»m (150 in. lbs.) torque. (9) Connect wires to speed sensor.
(10) Lower vehicle.
TRANSFER CASE
REMOVAL
(1) Raise vehicle.
(2) Remove drain plug and drain transfer case lu
bricant. (3) Disconnect vehicle speed sensor wires.
(4) Mark front/rear propeller shafts and yokes for
installation reference. (5) Disconnect and remove propeller shafts. Or dis
connect shafts at transfer case yokes. Then move shafts aside for working clearance and secure them
to frame rails with wire. (6) Disconnect transfer case shift lever from range
lever on transfer case. (7) Support transfer case with transmission jack.
Secure transfer case to jack with safety chains. (8) Remove nuts attaching transfer case to trans
mission adapter. (9) Slide transfer case rearward until it is clear of
transmission output shaft.
DISTANCE
SENSOR
ADAPTER
DRIVEN
GEAR
J9021-151
Fig.
4 Speedometer Components.
(10) Lower jack and move transfer case from under
vehicle.
(11) Remove old gasket material from transmission
adapter.
TRANSFER CASE
INSTALLATION
(1) Apply Mopar perfect seal, silicone sealer, or
Permatex No. 2 sealer to both sides of transfer case-
to-transmission gasket. Then position gasket on
transmission. (2) Align and seat transfer case on transmission.
Be sure transfer case input gear splines are aligned
with transmission output shaft. Align splines by ro
tating transfer case rear output shaft yoke if neces sary. Do not install any transfer case attaching
nuts until the transfer case is completely seated against the transmission. (3) Install and tighten transfer case attaching nuts
to 47 N*m (35 ft. lbs.). (4) Install rear crossmember.
(5) Remove jack stand from under transmission.
(6) Align and connect propeller shafts.
(7) Connect vehicle speed sensor wires.
(8) Connect transfer case shift lever to range lever.
Tighten lever locknut to 10 N»m (90 in. lbs.). (9) Fill transfer case with recommended lubricant.
(10) Install transfer case fill plug.
(11) Install skid plate and skid plate crossmember.
(12) Lower vehicle.
TRANSFER CASE DISASSEMBLY
(FIG.
S) REAR RETAINER AND OUTPUT SHAFT
REMOVAL/DISASSEMBL
Y
(1) Loosen rear yoke nut until only 2-3 threads are
holding nut on shaft. (2) Remove bolts attaching rear bearing retainer to
case.
(3) Pull yoke rearward to start rear output shaft
out of clutch. (4) Remove rear yoke nut, washer, seal washer and
yoke.
Page 1351 of 1502
21 - 350 NP241
TRANSFER CASE
• NP241 TRANSFER CASE
INDEl
page
Checking
Fluid
Level
351
Component Cleaning
and
Inspection
359
Fluid
Drain/Refill
351
General
Information
350
Recommended
Lubricant
.................. 350
Service
Diagnosis
....................... 350
Shift
Linkage
Adjustment
354
Speedometer Adapter/Distance
Sensor
Service
. 352
page
Speedometer Gear, Shaft
Seal,
Bearing
and
Retainer
Service
352
Transfer
Case
Assembly
.................. 361
Transfer
Case
Bearing Replacement
......... 360
Transfer
Case
Disassembly
................ 356
Transfer
Case
Identification ................ 350
Transfer
Case
Installation
................. 356
Transfer
Case
Removal
356
GENERAL
INFORMATION
The NP241 is a part-time transfer case with a low-
range gear system. It has three operating ranges
plus a Neutral position. The low range system pro vides a gear reduction ratio for increased low speed
torque capability. NP241 operating ranges are: 2-high, 4-high and 4-low. The NP241 has an aluminum, two-piece gear case.
Drive sprockets and an interconnecting drive chain are used to transmit engine torque to the propeller
shafts.
Four-wheel high and low ranges are undifferenti
ated. The transfer case is not designed for continuous
operation in 4WD range on hard or paved surfaces.
Four wheel drive ranges are recommended for off
road operation, or on snow covered or similar low
traction surfaces. A front axle disconnect system is used to achieve
two-wheel drive mode. The axle disconnect vacuum motor is actuated by a vacuum switch on the transfer
case.
The switch is operated by the transfer case
range rod. Two-wheel drive range is used for on road, high
way operation. The four-wheel drive ranges are for off road operation or when the vehicle is driven on
paved road surfaces covered by snow, ice or similar low traction elements.
TRANSFER CASE
IDENTIFICATION
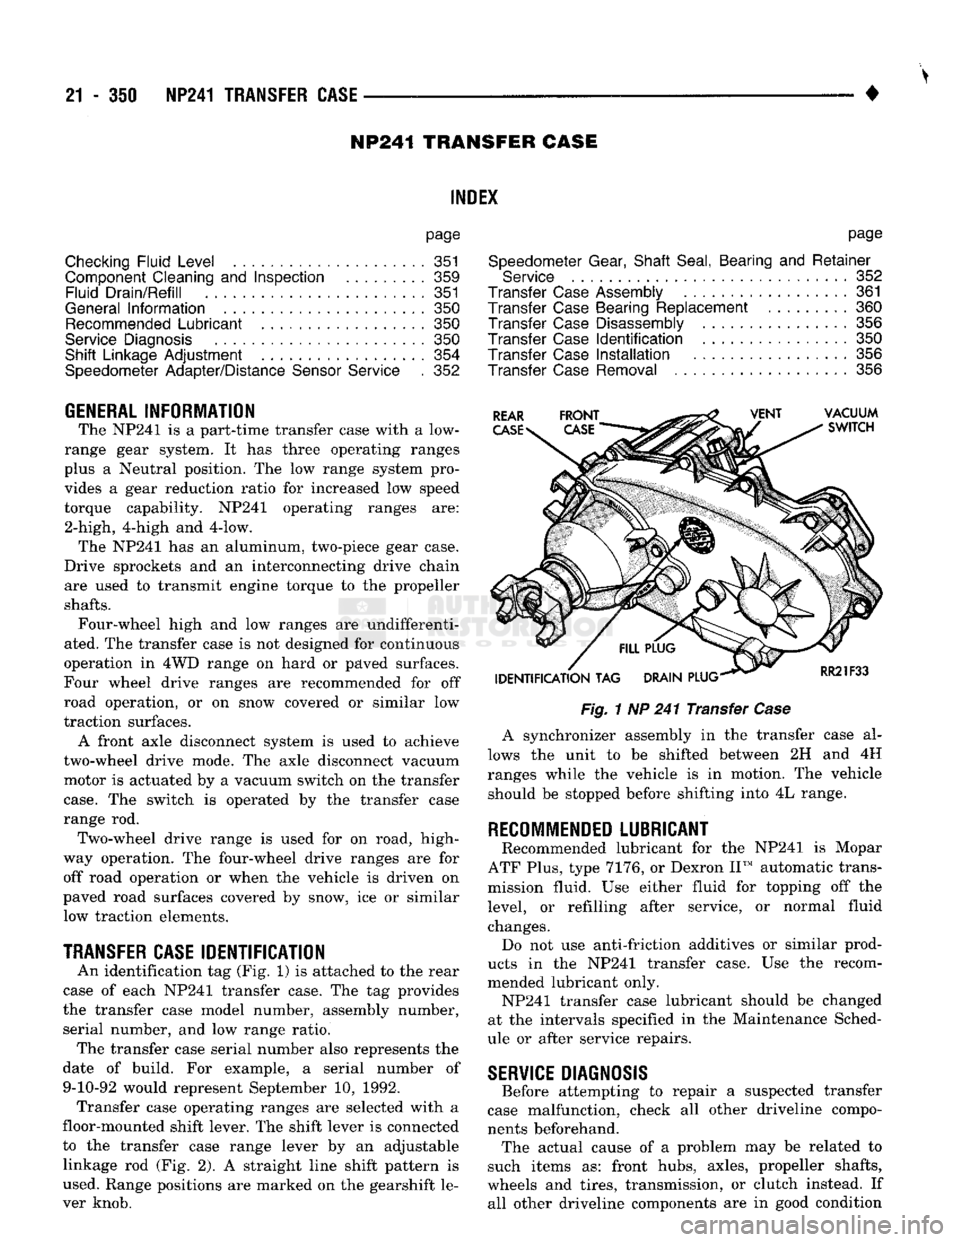
An identification tag (Fig, 1) is attached to the rear
case of each NP241 transfer case. The tag provides
the transfer case model number, assembly number, serial number, and low range ratio. The transfer case serial number also represents the
date of build. For example, a serial number of 9-10-92 would represent September 10, 1992. Transfer case operating ranges are selected with a
floor-mounted shift lever. The shift lever is connected
to the transfer case range lever by an adjustable linkage rod (Fig. 2). A straight line shift pattern is
used. Range positions are marked on the gearshift le
ver knob.
Fig.
1 NP 241 Transfer
Case
A synchronizer assembly in the transfer case al
lows the unit to be shifted between 2H and 4H
ranges while the vehicle is in motion. The vehicle should be stopped before shifting into 4L range.
RECOMMENDED
LUBRICANT
Recommended lubricant for the NP241 is Mopar
ATF Plus, type 7176, or Dexron II™ automatic trans
mission fluid. Use either fluid for topping off the
level, or refilling after service, or normal fluid
changes. Do not use anti-friction additives or similar prod
ucts in the NP241 transfer case. Use the recom
mended lubricant only. NP241 transfer case lubricant should be changed
at the intervals specified in the Maintenance Sched
ule or after service repairs.
SERVICE
DIAGNOSIS
Before attempting to repair a suspected transfer
case malfunction, check all other driveline compo
nents beforehand. The actual cause of a problem may be related to
such items as: front hubs, axles, propeller shafts,
wheels and tires, transmission, or clutch instead. If all other driveline components are in good condition
Page 1353 of 1502
21 - 352 NP241
TRANSFER
CASE
—
•
Fig.
2
Loosening
Rear Retainer
Fig.
3 Removing/Installing Rear Retainer
(7) Install speedometer driven gear.
(8) Install drain plug. Tighten plug to 54 N-m (40
ft. lbs.). (9) Fill transfer case to edge of fill plug opening
with recommended transmission fluid. (10) Install fill plug. Tighten plug to 54 N-m (40 ft.
lbs.).
(11) Connect propeller shaft. Tighten attaching
bolts to 19 N-m (170 in. lbs.).
(12) Lower vehicle.
SPEEDOMETER
ADAPTER/DISTANCE
SENSOR
SERVICE
ADAPTER/SENSOR
REMOVAL
(1) Raise vehicle.
(2) Remove skid plate and crossmember for access,
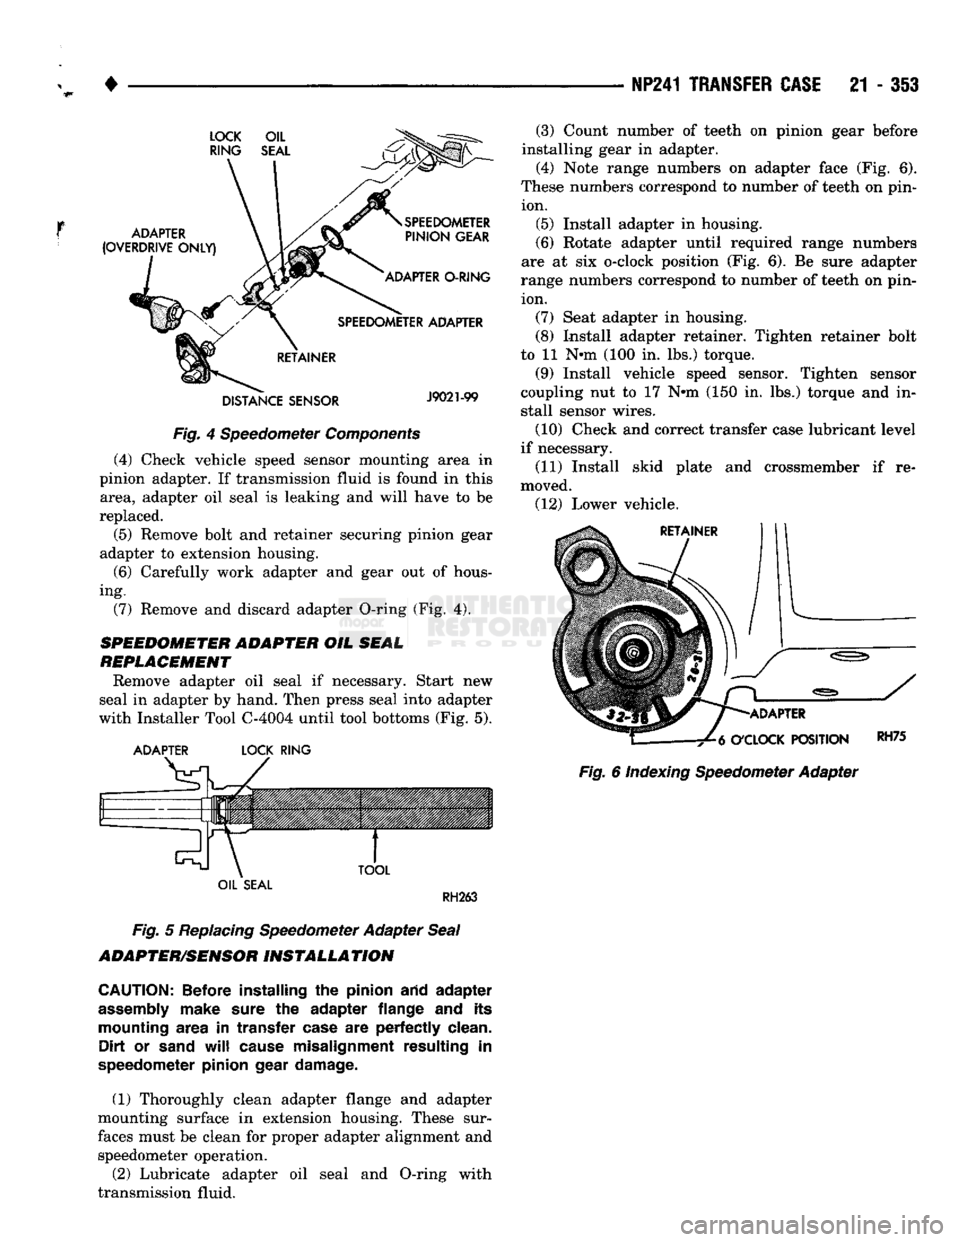
if necessary. (3) Remove vehicle speed sensor from pinion gear
adapter (Fig. 4). On models with automatic transmis
sion, remove sensor adapter as well.
(6) Fill transfer case to bottom edge of fill plug
opening with Mopar ATF Plus, or Dexron II auto
matic transmission fluid.
(7) Install fill plug. Tighten plug to 54 N«m (40 ft.
lbs.).
(8) Lower vehicle.
SPEEDOMETER
GEAR, SHAFT
SEAL,
BEARING
AND RETAINER SERVICE
The front and rear yokes, output shaft seals, re
tainers and bearings, and speedometer drive gear can all be serviced with the transfer case in the vehicle.
The following combined procedure outlines removal and installation of these components:
RETAINER
AND
SPEEDOMETER COMPONENT REMOVAL
(1) Raise vehicle.
(2) Remove fill and drain plugs and drain oil from
transfer case. (3) Mark propeller shaft and transfer case yoke for
alignment reference. (4) Disconnect propeller shaft. Secure shaft to un
derside of vehicle. (5) Remove transfer case yoke retaining nut and
seal washer. Use Special Tool C-3281 to hold yoke
while removing nut. (6) Remove transfer case yoke. (7) Remove retainer seal (if seal or bushing is to be
replaced) using suitable tool.
(8) Install a new seal, if old seal was removed.
(9) Remove speedometer gear from rear retainer.
(10) Mark rear retainer for assembly alignment
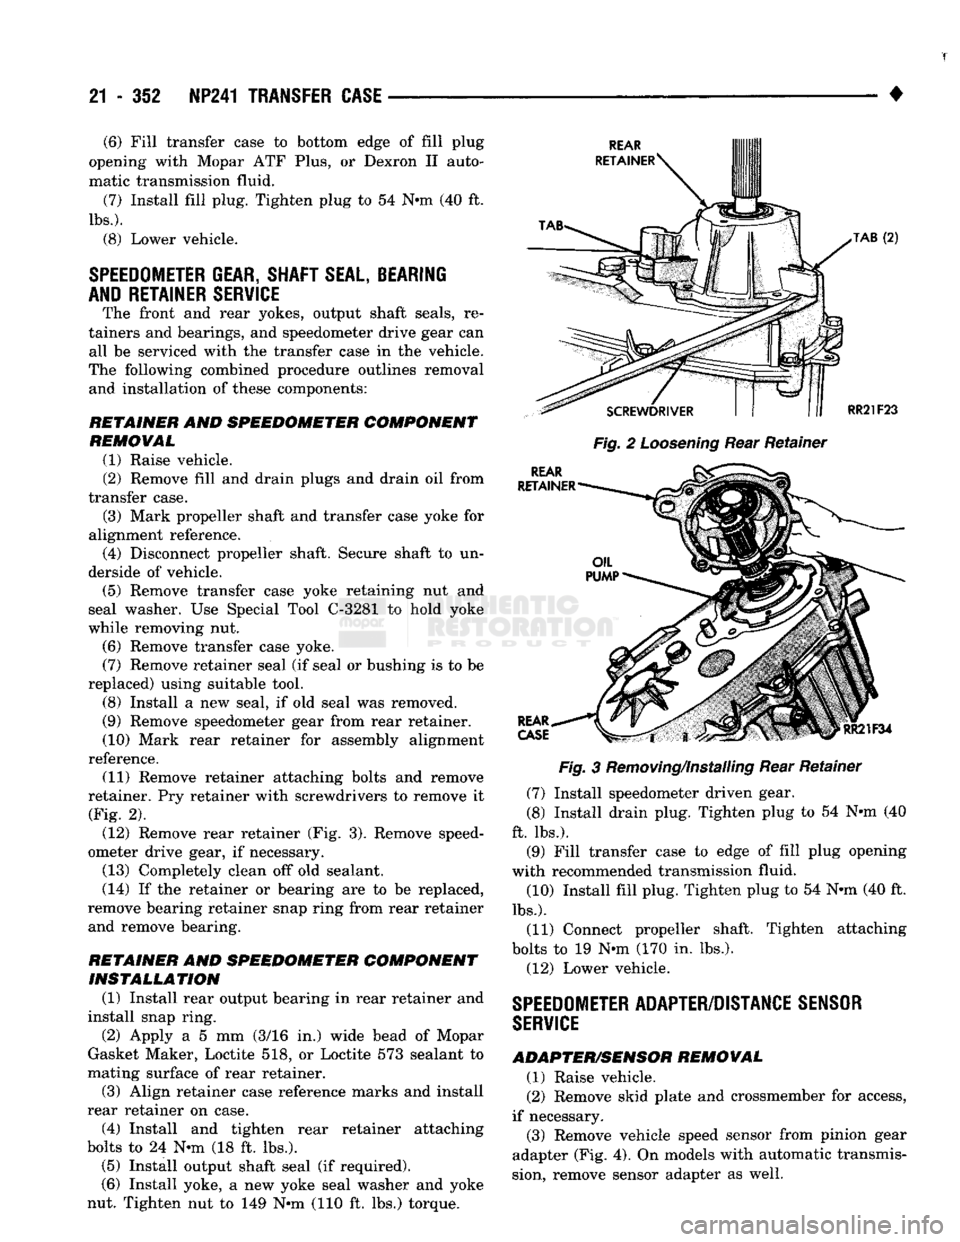
reference. (11) Remove retainer attaching bolts and remove
retainer. Pry retainer with screwdrivers to remove it (Fig. 2). (12) Remove rear retainer (Fig. 3). Remove speed
ometer drive gear, if necessary.
(13) Completely clean off old sealant.
(14) If the retainer or bearing are to be replaced,
remove bearing retainer snap ring from rear retainer
and remove bearing.
RETAINER
AND
SPEEDOMETER COMPONENT INSTALLATION
(1) Install rear output bearing in rear retainer and
install snap ring. (2) Apply a 5 mm (3/16 in.) wide bead of Mopar
Gasket Maker, Loctite 518, or Loctite 573 sealant to
mating surface of rear retainer.
(3) Align retainer case reference marks and install
rear retainer on case. (4) Install and tighten rear retainer attaching
bolts to 24 N«m (18 ft. lbs.). (5) Install output shaft seal (if required).
(6) Install yoke, a new yoke seal washer and yoke
nut. Tighten nut to 149 N-m (110 ft. lbs.) torque.
Page 1354 of 1502
•
NP241 TRANSFER
CASE
21 - 313
LOCK OIL RING SEAL
ADAPTER
(OVERDRIVE
ONLY)
SPEEDOMETER
PINION
GEAR
ADAPTER
O-RING
SPEEDOMETER
ADAPTER
RETAINER
DISTANCE
SENSOR
J9021-99
Fig.
4 Speedometer
Components
(4) Check vehicle speed sensor mounting area in
pinion adapter. If transmission fluid is found in this area, adapter oil seal is leaking and will have to be
replaced.
(5) Remove bolt and retainer securing pinion gear
adapter to extension housing.
(6)
Carefully work adapter and gear out of hous
ing. (7) Remove and discard adapter O-ring (Fig. 4).
SPEEDOMETER ADAPTER
OIL
SEAL
REPLACEMENT
Remove adapter oil seal if necessary. Start new
seal in adapter by hand. Then press seal into adapter
with Installer Tool C-4004 until tool bottoms (Fig. 5).
ADAPTER
LOCK
RING
TOOL
(3) Count number of teeth on pinion gear before
installing gear in adapter.
(4) Note range numbers on adapter face (Fig. 6).
These numbers correspond to number of teeth on pin ion. (5) Install adapter in housing.
(6)
Rotate adapter until required range numbers
are at six o-clock position (Fig. 6). Be sure adapter
range numbers correspond to number of teeth on pin ion. (7) Seat adapter in housing.
(8) Install adapter retainer. Tighten retainer bolt
to 11 N-m (100 in. lbs.) torque.
(9) Install vehicle speed sensor. Tighten sensor
coupling nut to 17 N-m (150 in. lbs.) torque and in
stall sensor wires.
(10) Check and correct transfer case lubricant level
if necessary.
(11) Install skid plate and crossmember if re
moved. (12) Lower vehicle.
ADAPTER
O'CLOCK
POSITION
Fig.
6 Indexing Speedometer Adapter
RH75
OIL
SEAL
RH263
Fig.
5
Replacing
Speedometer Adapter
Seal
ADAPTER/SENSOR
INSTALLATION
CAUTION:
Before installing
the
pinion arid adapter
assembly
make sure
the
adapter flange
and its
mounting area
in
transfer case
are
perfectly clean. Dirt
or
sand
will
cause misalignment resulting
in
speedometer pinion gear damage.
(1) Thoroughly clean adapter flange and adapter
mounting surface in extension housing. These sur
faces must be clean for proper adapter alignment and speedometer operation.
(2) Lubricate adapter oil seal and O-ring with
transmission fluid.