Page 332 of 1216
9-48 ENGINE <1.8L Engine> -Rocker Arms, Rocker Arm Shafts and Camshaft
ROCKER ARMS, ROCKER ARM SHAFTS AND CAMSHAFTUOSLE-ADISASSEMBLY AND REASSEMBLY
5-7 Nm
4-5 ft.lbr
8a----
20-27 Nm
19-21 Nm8
Disassembly steps
1. Camshaft sprocket
2. Breather hose
3. P.C.V. hose4. P.C.V. valve5. Oil seal;. Fbz;~; cover
SO-100 Nm
58-72 ft.lbs.l +
8: Semi-circular packing+e I)+9. Rocker arm and shaft assembly
10. Camshaft
l * 11. Oil seal
NOTE(1) Reverse the disassembly procedures to reassemble.(2) +e : Refer to “Service Points of Disassembly”.(3) W : Refer to “Service Points of Reassembly”.(4) q : Non-reusable parts
Page 333 of 1216

ENGINE <1.8L Ennine> -Rocker Arms, Rocker Arm Shafts and Camshaft&49
MD9984431
6EN245
IFuel pump
3EN287
r
0
Camheight6EN0184
hl,
3EN153, Oil seal
MD998364
DEN632
SERVICE POINTS OF DISASSEMBLYNWLFM.
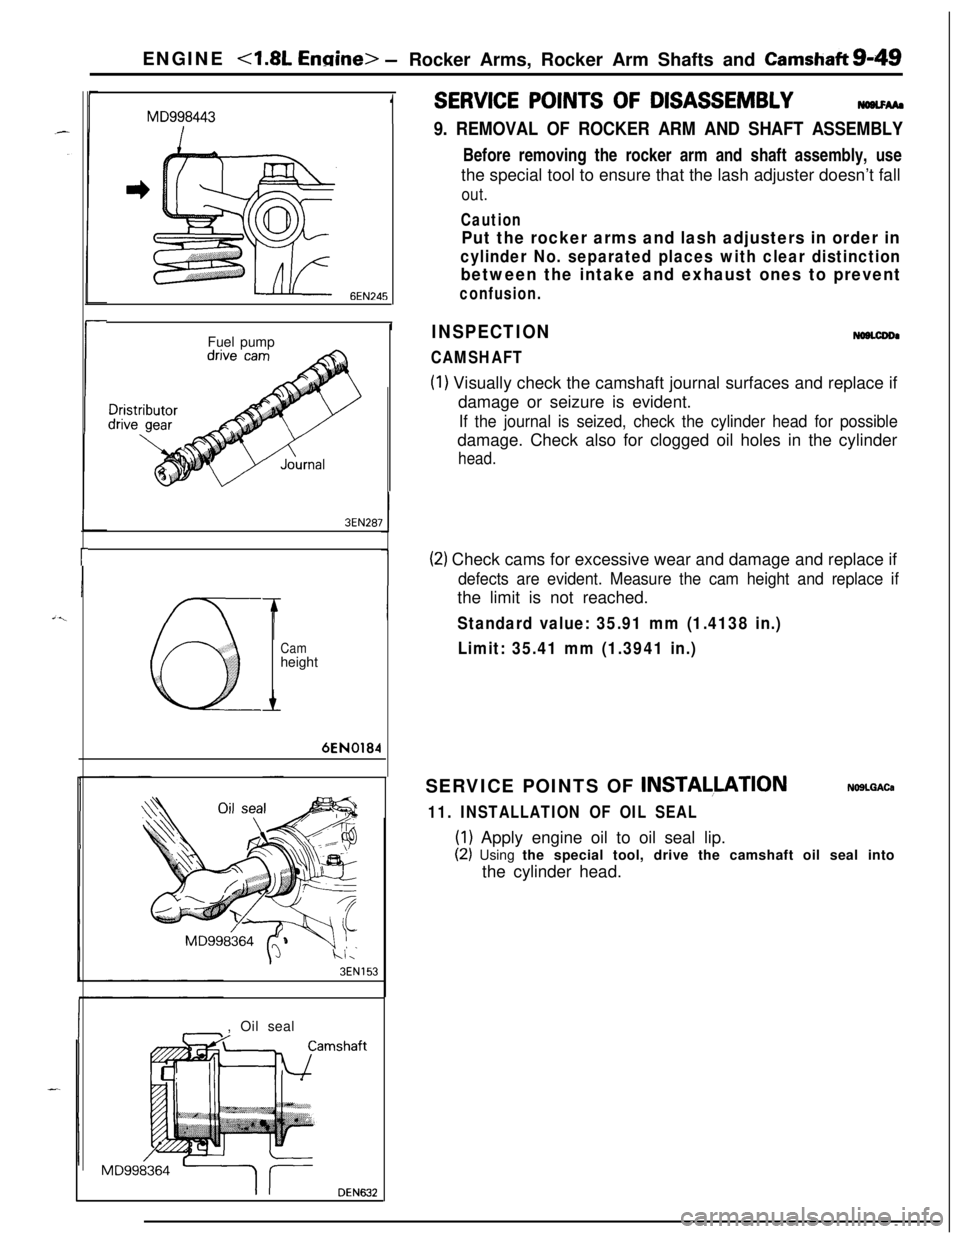
9. REMOVAL OF ROCKER ARM AND SHAFT ASSEMBLYBefore removing the rocker arm and shaft assembly, use
the special tool to ensure that the lash adjuster doesn’t fall
out.
Caution
Put the rocker arms and lash adjusters in order in
cylinder No. separated places with clear distinction
between the intake and exhaust ones to prevent
confusion.
INSPECTION
CAMSHAFT
NOBLCDDI
(1) Visually check the camshaft journal surfaces and replace if
damage or seizure is evident.
If the journal is seized, check the cylinder head for possibledamage. Check also for clogged oil holes in the cylinder
head.
(2) Check cams for excessive wear and damage and replace if
defects are evident. Measure the cam height and replace ifthe limit is not reached.
Standard value: 35.91 mm (1.4138 in.)
Limit: 35.41 mm (1.3941 in.)SERVICE POINTS OF
INSTALLATIONNOSLQACa
11. INSTALLATION OF OIL SEAL
(1) Apply engine oil to oil seal lip.
(2) Using the special tool, drive the camshaft oil seal into
the cylinder head.
Page 335 of 1216
ENGINE <1.8L Engine> -Rocker Arms and Rocker Shafts
ROCKER ARMS AND ROCKER SHAFTS
RDISASSEMBLY AND REASSEMBLYNOSNE-A3EN0080
Disassembly steps
1. Rear camshaft bearing cap
2. Rocker arml 3. Wave washer
~~ 4. Camshaft bearing cap No. 45. Rocker shaft spring
l +6. Camshaft bearing cap No. 3~~ 7. Camshaft bearing cap No. 2l +8. Right rocker shaft
l 9. Left rocker shaft
10. Front bearing cap
lybeverse the disassembly procedures to reassemble.(2) l : Refer to “Service Points of Reassembly”.
Page 336 of 1216

7EN0064
IIENGINE
<1.8L Engine> -Rocker Arms and Rocker Shafts
SERVICE POINTS OF DISASSEMBLY
NOTEBefore disassembly, mark the rocker arm for
indentificahon.
INSPECTIONNoaNGAG
ROCKER ARM(1) Visually check the roller and replace if dent, damage, or
seizure is evident.
(2) Check roller for smooth rotation. Replace if it is binds or
there is an excessive play.
ICuts in rocker shafts(3) Check the inside diameter and replace the rocker arm if
damage or seizure is observed.SERVICE POINTS OF REASSEMBLYNOBNHBC
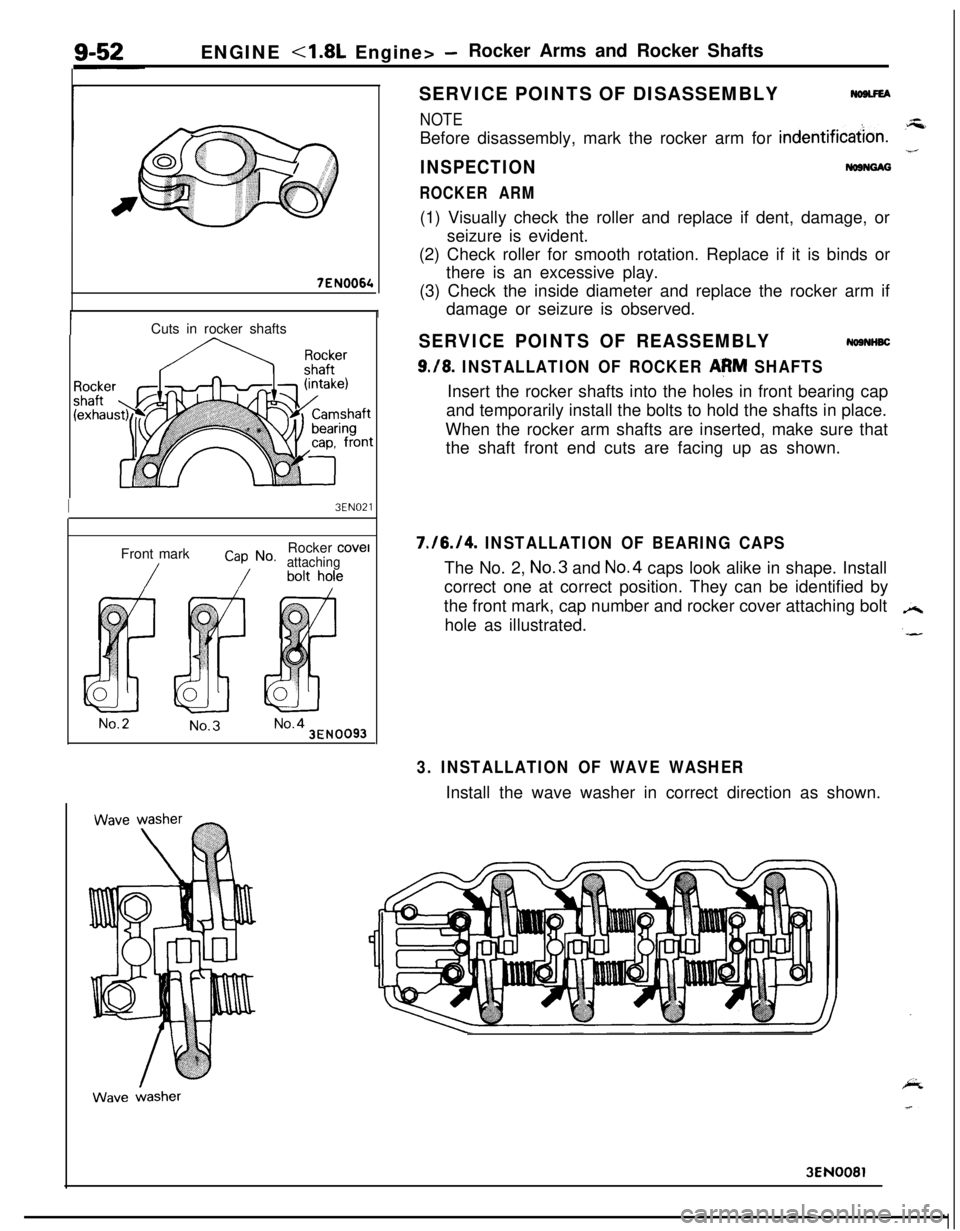
9./8. INSTALLATION OF ROCKER AeM SHAFTSInsert the rocker shafts into the holes in front bearing cap
and temporarily install the bolts to hold the shafts in place.
When the rocker arm shafts are inserted, make sure that
the shaft front end cuts are facing up as shown.
I3EN021Front mark
Cap No.Rocker cove1attaching
No.2No.3No.43EN0093
7./6./4. INSTALLATION OF BEARING CAPSThe No. 2, No.3 and No.4 caps look alike in shape. Install
correct one at correct position. They can be identified by
the front mark, cap number and rocker cover attaching bolt
hole as illustrated.
3. INSTALLATION OF WAVE WASHERInstall the wave washer in correct direction as shown.
3EN0081
Page 337 of 1216
ENGINE <1.8L Engine>- Cylinder Head and Valve9-53
CYLINDERHEADAND VALVE
-’DISASSEMBLY AND REASSEMBLYNDSPE-A
C;;d ;;g$;
51154 ftlbs.
&
, tP-----5
1g-.-a
105 y----2g&---l4
Disassembly steps
+e ~~I. Cylinder head bolts
2. Washer
3. Cylinder head4. Gasket
+e l +5. Retainer lock
6. Valve spring retainer
l + 7. Valve spring
~~ 8. Intakevalve+e e+ 9. Retainer lock10. Valve spring retainer
l a 11. Valve springl + 12. Exhaust valve+* l 4 13. Valve stem seall 4 14. Valve spring seat4I) l * 15. Valve stem seall + 16. Valve spring seat17. Intake valve guide
18. Exhaust valve guide
19. Intake valve seat20. Exhaust valve seatNOTE(I) Reverse the disassembly procedures to reassemble.(2) +e : Refer to “Service Points of Disassembly”.(3) ~~ : Refer to “Service Points of Reassembly”.(4) m : Non-reusable parts
3EN289
Page 338 of 1216
ENGINE - Cylinder Head and ValveSERVICE POINTS OF DISASSEMBLY
1. REMOVAL OF CYLINDER HEAD BOLTS
3EN123Front of engine (Timing belt side)
c
1 EN025
3EN324Loosen the bolts in the order shown.
Loosen them little by little and uniformly.
5./9. REMOVAL OF RETAINER LOCKS(1) Using the special
tool, remove the retainer locks.
(2) Keep the removed retainer locks valve by valve so that
they can be reinstalled in their original positions.
A
13.115. REMOVAL OF VALVE STEM SEALRemove the stem seals with pliers. Do not reuse the valve
stem seal.
Page 340 of 1216

9-56ENGINE <1.8L Engine> - Cylinder Head and ValveStem O.D.
YEN323
3EN0039
-I
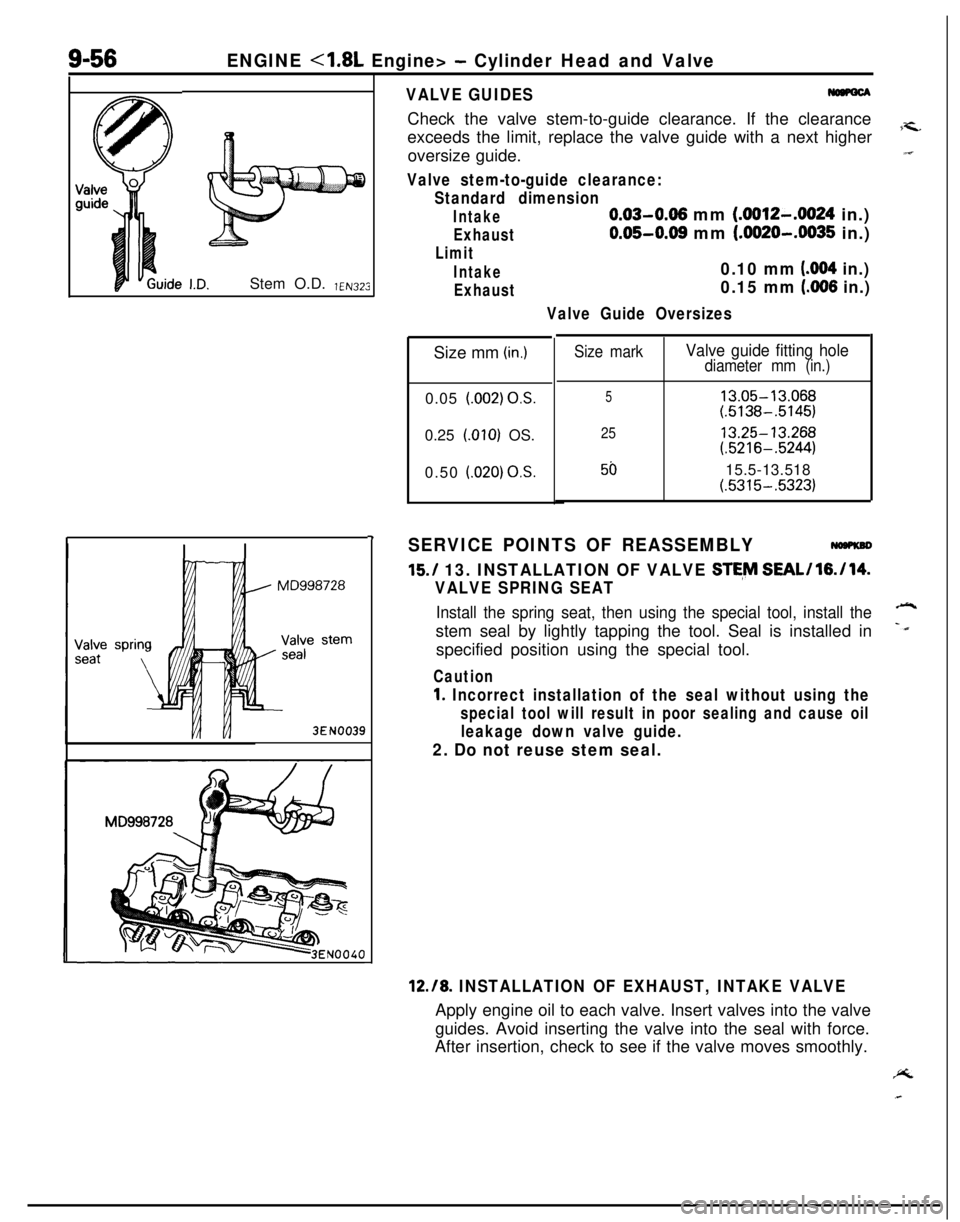
VALVE GUIDESCheck the valve stem-to-guide clearance. If the clearance
exceeds the limit, replace the valve guide with a next higher
7-c.oversize guide.“I
Valve stem-to-guide clearance:
Standard dimension
Intake0.03-0.06 mm (.0012-.0024 in.)
Exhaust0.05-0.08 mm (.0020-.0035 in.)
Limit
Intake0.10 mm (004 in.)
Exhaust0.15 mm (.006 in.)
Valve Guide OversizesSize mm
(in.)0.05
l.002) OS.0.25
LOlO) OS.
0.50
i.020) OS.
Size markValve guide fitting holediameter mm (in.)
513.05-13.068(.5138-.5145)
2513.25-13.268(.5216-.5244)
5015.5-13.518(.5315-.5323)
SERVICE POINTS OF REASSEMBLY
15./ 13. INSTALLATION OF VALVE STE,M SEAL/l6./14.
VALVE SPRING SEAT
Install the spring seat, then using the special tool, install the-stem seal by lightly tapping the tool. Seal is installed in
-dspecified position using the special tool.
Caution
1. Incorrect installation of the seal without using the
special tool will result in poor sealing and cause oil
leakage down valve guide.
2. Do not reuse stem seal.
12.18. INSTALLATION OF EXHAUST, INTAKE VALVEApply engine oil to each valve. Insert valves into the valve
guides. Avoid inserting the valve into the seal with force.
After insertion, check to see if the valve moves smoothly.PL
Page 342 of 1216

9-58ENGINE <1.8L Engine> -Front Case, Oil Pump and Silent Shaft
FRONT CASE, OIL PUMP AND SILENT SHAFTrl
L
I1
26:
25
15-18 Nm
11-13 ftlbs.DISASSEMBLY AND REASSEMBLY8-12 Nm
6.0-8.5 ft.lbs.15-22 Nm11-15 ft.lbs.
Disassembly steps
l +1. Oil filter~~ l +2. Oil pressure switch
3. Oil pressure gauge unit4. Oil filter bracket
5. Gasket
6. Drain plug
7. Drain plug gasket
+e*+ 8. Oil pan
9. Oil screen10. Oil screen gasket
11. Oil pump cover18-25
Nm/13-18 ftlbs.
8-8 Nm
4-8 ft.lbs.
l + 12. Oil pump oil seall + 13. Oil pump gasket
~~ l + 14. Flange boltI)+ 15. Oil pump driven geare+ 16. Oil pump drive gear
+e l + 17. Front case18. Plug
19. Relief spring20. Relief plunger
l + 21.Silent shaft oil seal
l + 22.Crankshaft front oil seal
35-45 Nm25-33 ftlbs.23.
Front case gasket
24. Silent shaft, right
25. Silent shaft, left
4* l + 26.Silent shaft front bearing~~ l + 27.Silent shaft rear bearing
i=G.NogRF-A.r
3EN0088
NOTE(1) Reverse the disassembly procedures to reassemble.(2) +e : Refer to “Service Points of Disassembly”.(3) l + : Refer to “Service Points of Reassembly”.(4) 0 : Non-reusable parts