Page 321 of 1216
ENGINE - Cylinder Head Gasket9-375-7 Nm
70-75 Nm51-54 ftlbs.
80-100 Nm
58-72 ftlbs.I-12
Nm.9 ft.lbs.
ii-29 ft.lbs.
18-25
hm13-18 ft.lbs.30. Rocker cover
M 31. Semi-circular packing
32. Timing belt front upper cover
4*33. Camshaft sprocket
34. Timing belt rear upper cover
35. Self-locking nuts
36. Gasket
+* l + 37. Cylinder head assemblyl + 38. Cylinder head gasketOlAoO92
NOTE(1) Reverse the removal procedures to reinstall.
(2) *I) : Refer to “Service Points of Removal”.
(3) l 4 : Refer to “Service Points of Installation”.
(4) m : Non-reusable parts
Page 322 of 1216
9-38ENGINE <1.8L Engine> - Cylinder Head Gasket
04UOO27Timing mark
\Timing mark
OlR0153
SERVICE POINTS OF REMOVALNWJSAO7. REMOVAL OF RADIATOR UPPER HOSE
,zMake mating marks on the radiator hose and hose clamp,
b-and then disconnect the radiator hose.
29. REMOVAL OF ENGINE MOUNTING BRACKET
(1) Jack up the vehicle after placing a wooden block
between the jack and the engine’s oil pan.
CautionJack up carefully, so as not to apply an excessive
load to the various parts.
(2) Remove the engine mount bracket.
33. REMOVAL OF CAMSHAFT SPROCKET
(1) Turn the crankshaft clockwise and align the timing
mark.Caution
rzThe crankshaft must always be rotated in the
-’clockwise only.
(2) Remove the camshaft sprocket (with the timing belt
attached), and place on the timing belt front lower
cover.Caution
After removing the camshaft sprocket, be sure not
to rotate the crankshaft.
R
Page 323 of 1216

ENGlNE <1.8L Engine> - Cylinder Head Gasket9-3937. REMOVAL OF CYLINDER HEAD ASSEMBLY
(1) Using the special tool, remove cylinder head bolts in
sequence shown in figure.
(2) Remove the cylinder head assembly.
TW-1 OBIntake sideFront of engine
r,Exhaust side
01R0390identification
I
mark
6EN025
Olm415SERVICE POINTS OF INSTALLATION
NO9JDDHs38. INSTALLATION OF CYLINDER HEAD GASKET
(1) Use a scraper to remove the cylinder head gasket from
the cylinder block.
CautionTake care that no foreign material gets into the
cylinder, or into coolant or oil passages.
(2) Clean the cylinder block and head surfaces that are in
contact with the gasket.
(3) Lay the cylinder head gasket on cylider block with the
identification mark at front top.
CautionDo not apply sealant to cylinder head gasket.
37. INSTALLATION OF CYLINDER HEAD ASSEMBLY
(1) Use a scraper to remove the cylinder head gasket from
the cylinder head assembly.
CautionTake care that no foreign material gets into the
coolant or oil passages.
Page 324 of 1216

ENGINE <1.8L Engine> - Cylinder Head Gasket
OlAOlO:Intake sideFront of engine
I,Exhaust side
01R0390
4pply
sealant 1Mating marks
.,
iighDelivery pipe3ressureloseO-ring03Aoo79(2) Using the special tool, tighten the bolts in the
ordershown in two or three steps.
a-2
31. APPLICATION OF SEALANT TO SEMI-CIRCULAR PACK-ING
Apply a coating of the specified sealant to the semi-circularpacking and the cylinder head top surfaces.
/LSpecified sealant: MOPAR Part No.4318034 or equiva-
_ ‘-lent
7.INSTALLATION OF RADIATOR UPPER HOSE
Align the mating marks (of the radiator hose and hose
clamp), and then, while applying force in the direction of
the arrow in the illustration, set the hose clamp to the
trace marks (on the hose) remaining from the prior
connection.
Caution
Be sure to install the hose clamp at the trace marks (onthe hose) remaining from the prior connection.
5. CONNECTION OF FUEL HIGH PRESSURE HOSE
When connecting the fuel high-pressure hose to the
delivery pipe, apply a coating of gasoline to the hose union,and insert so that the O-ring is not damaged.
3. INSTALLATION OF ACCELERATOR CABLE OR
THROT- +TLE CABLE CONNECTION
Refer to GROUP
14-Service Adjustment Procedures.
Page 325 of 1216

ENGINE <1.8L Engine> - Timing Belt
TIMING BELT
- REMOVAL AND INSTALLATION,
50-65 Nm
36-47 ft.lbs.Pre-removal Operation
@Removal of Under Cover
\ 16-22 ftlbs.\
lo-12 Nm
7-9 ft.lbs.
I28
15-22 Nm
11-16 ft.lbs.
3hO Nm
26-29 ft.lbs.
110-130 Nm(( \\ _ 60-94 ftlbs.
15-16 Nm-23-27 Nm
11-13 ft.lbs.17-20 ft.lbs.12-15 Nm
9- 11 ft.lbs.OlAO555
Removal steps
1. Clamp for pressure hose (power steering)
4*2. Engine mount bracketI)* 3. Drive belt (power steering)
4. Tensioner pulley bracket
H 5. Drive belt (air conditioner)
l + 6. Drive belt (alternator)
7. Water pump pulley (power steering)
8. Water pump pulley
9. Damper pulley
10. Adapter
11. Crankshaft pulley
I)4 12. Timing belt front upper cover
13. Gasket
l 14. Timing belt front lower cover
15. Gasket
16. Access cover
17. Crankshaft sprocket bolt
18. Special washer
Adjustment of timing belt tensioner
l *
:: 19. Timing beltl 4 20. Timing belt tensioner
I)+ 21. Tensioner spacer
l 22. Tensioner spring
23. Camshaft sprocket
4*24. Oil pump sprocket
25. Crankshaft sprocket
l 26. Flange
27. Timing belt tensioner “B”
~~ l 28. Timing belt “B”
l 4Adjustment of timing belt “B” tension
29. Right silent shaft sprocket
l * 30. Spacer
~~ 31. Crankshaft sprocket “B”32. Key
33. Left engine support bracket
34. Timing belt rear upper cover
35. Timing belt rear lower cover
NOTE(1) Reverse the removal procedures to reinstall.
(2)
4* : Refer to “Service Points of Removal”.
(3) l 4 : Refer to “Service Points of Installation”.
Page 326 of 1216

g-42ENGINE <1.8L Engine> - Timing Belt
r-04UOO27
,Timing mark
Timing‘mark
lEN0017
c
li
OlA0550SERVICE POINTS OF REMOVAL
NO9KBBCa2. REMOVAL OF ENGINE MOUNT BRACKET
a(1) Jack up the vehicle after placing a wooden block
:.between the jack and the engine’s oil pan.
CautionJack up carefully so as not to apply an excessive
load to the various parts.
(2) Remove the engine mount bracket.
19. REMOVAL OF TIMING BELT
(1) Turn the crankshaft clockwise and align the timing
marks.Caution
The crankshaft must always be turned clockwise.
(2) Make a mark on the back of the timing belt indicating
the direction of rotation so it may be reassembled in thesame direction if it is to be reused.
(3) Loosen the bolt and tension spacer of the timing belt
tensioner.(4) Move the timing belt tensioner to the water pump side
and loosely tighten the bolt so that the tensioner
doesn’t return; then remove the timing belt.
NOTE
If the timing belt is to be re-used, use chalk to’mark (on
its flat side) an arrow indicating the clockwise direction.
Caution
1.As water or oil on the belt can seriously reduce
its usable life, ensure that the timing belt,
sprocket, and tensioner stay clean and dry whileremoved, and never wash them. Parts that haveic
*become too dirty should be replaced.
2. When any of the parts are oily, check to see
whether there are any oil leaks in any of the oil
seals or the camshaft oil seal on the front of the
engine.
Page 328 of 1216

9-44ENGINE <1.8L Engine> - Timing Belt
Rubber
exposedTooth missing and
1 EN0002
Crankshaftsprocket “6
Crankshaft 6EN304
Spacer
Chamfered
6EN009
J
TiGGrnmarkCrankshaft
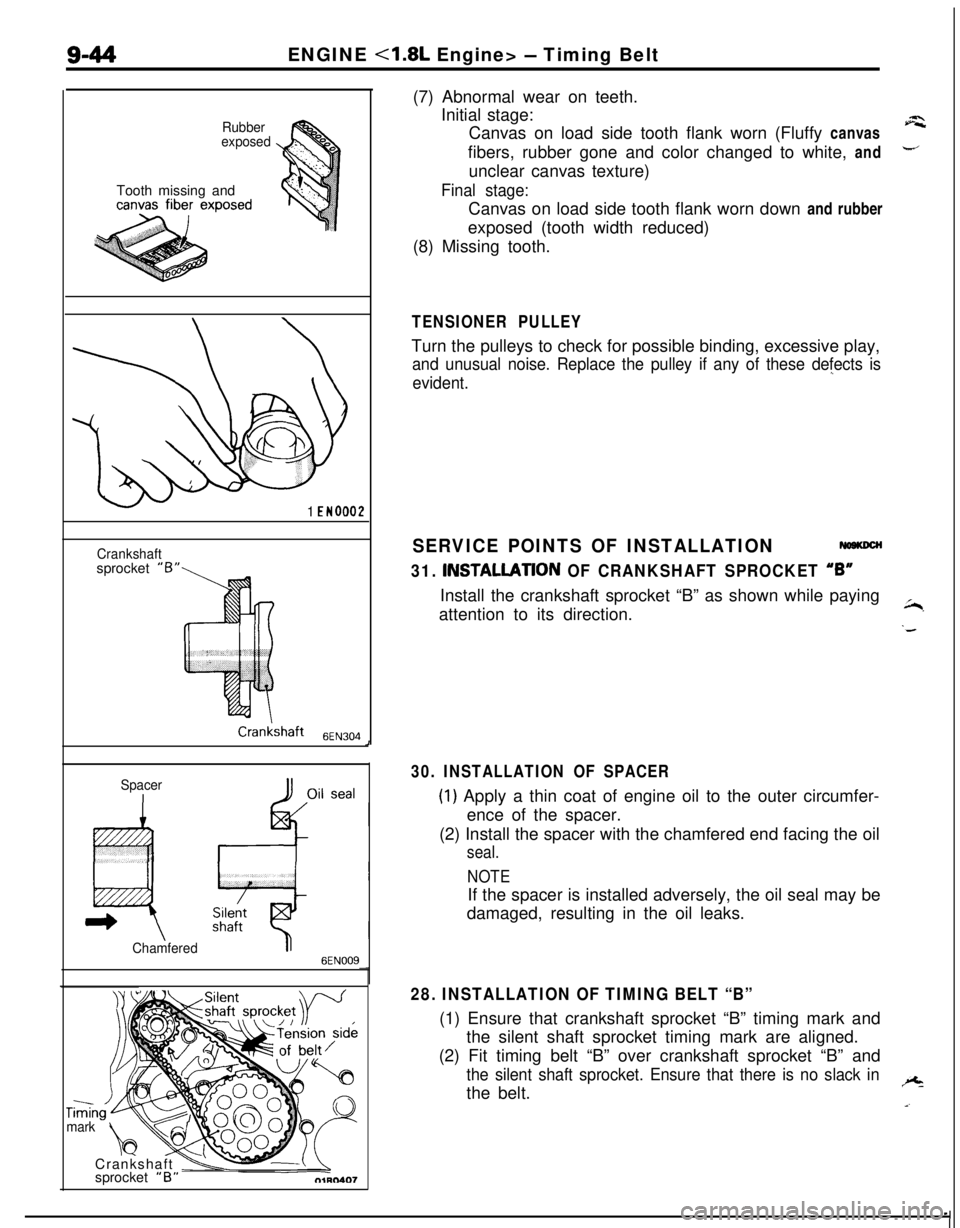
\vsprocket “B”(7) Abnormal wear on teeth.
Initial stage:
Canvas on load side tooth flank worn (Fluffy canvas
afibers, rubber gone and color changed to white, and
-unclear canvas texture)
Final stage:Canvas on load side tooth flank worn down and rubber
exposed (tooth width reduced)
(8) Missing tooth.
TENSIONER PULLEYTurn the pulleys to check for possible binding, excessive play,
and unusual noise. Replace the pulley if any of these defects is
evident.”
SERVICE POINTS OF INSTALLATION
31. INSTALLATlON OF CRANKSHAFT SPROCKET “6”Install the crankshaft sprocket “B” as shown while paying
attention to its direction.
~,
‘d
30. INSTALLATION OF SPACER
(1) Apply a thin coat of engine oil to the outer circumfer-
ence of the spacer.
(2) Install the spacer with the chamfered end facing the oil
seal.
NOTEIf the spacer is installed adversely, the oil seal may be
damaged, resulting in the oil leaks.
28. INSTALLATION OF TIMING BELT “B”(1) Ensure that crankshaft sprocket “B” timing mark and
the silent shaft sprocket timing mark are aligned.
(2) Fit timing belt “B” over crankshaft sprocket “B” and
the silent shaft sprocket. Ensure that there is no slack inthe belt.+
a.
Page 331 of 1216

ENGINE <1.8L Engine> - Timing Belt9-47
Timing mark
Nut
;olt diameter x lengthim (in.)
6x50(.23 x 1.97)
6
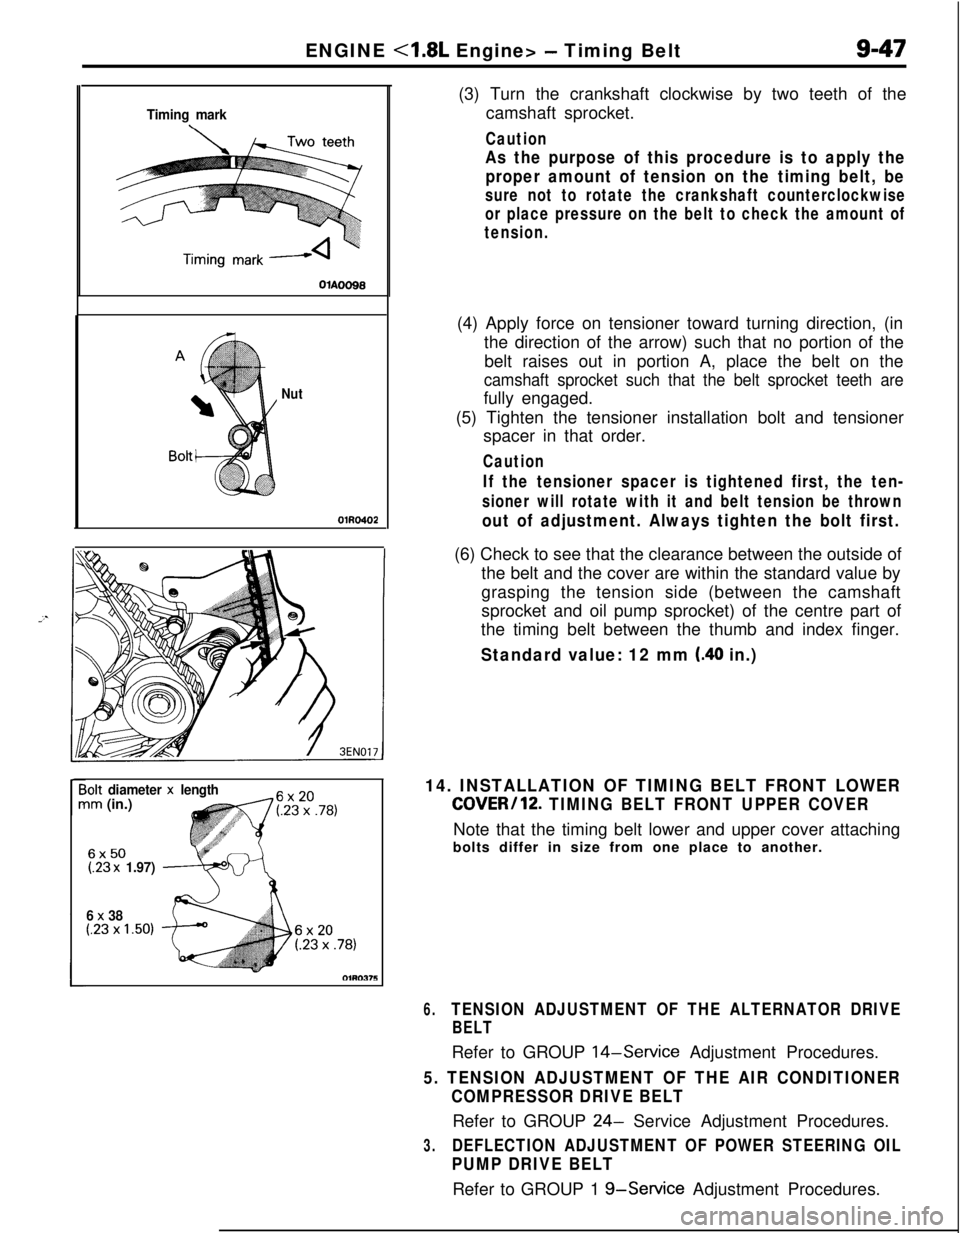
x 38(.23 x 1.50)(3) Turn the crankshaft clockwise by two teeth of the
camshaft sprocket.
Caution
As the purpose of this procedure is to apply the
proper amount of tension on the timing belt, be
sure not to rotate the crankshaft counterclockwise
or place pressure on the belt to check the amount of
tension.(4) Apply force on tensioner toward turning direction, (in
the direction of the arrow) such that no portion of the
belt raises out in portion A, place the belt on the
camshaft sprocket such that the belt sprocket teeth arefully engaged.
(5) Tighten the tensioner installation bolt and tensioner
spacer in that order.
Caution
If the tensioner spacer is tightened first, the ten-
sioner will rotate with it and belt tension be thrown
out of adjustment. Always tighten the bolt first.(6) Check to see that the clearance between the outside of
the belt and the cover are within the standard value by
grasping the tension side (between the camshaft
sprocket and oil pump sprocket) of the centre part of
the timing belt between the thumb and index finger.
Standard value: 12 mm (.40 in.)
14. INSTALLATION OF TIMING BELT FRONT LOWER
COVER/12. TIMING BELT FRONT UPPER COVERNote that the timing belt lower and upper cover attaching
bolts differ in size from one place to another.
6.TENSION ADJUSTMENT OF THE ALTERNATOR DRIVE
BELTRefer to GROUP
14-Service Adjustment Procedures.
5. TENSION ADJUSTMENT OF THE AIR CONDITIONER
COMPRESSOR DRIVE BELTRefer to GROUP
24- Service Adjustment Procedures.
3.DEFLECTION ADJUSTMENT OF POWER STEERING OIL
PUMP DRIVE BELTRefer to GROUP 1
g-Service Adjustment Procedures.