Page 2730 of 4087
DIAGNOSTIC CHART
DIAGNOSTIC
CHART
NG (NSW)
Check for input signal.
Proceed to next circuit inspection shown
on maxtrix chart (See page TR±35).
Check resistance of throttle
position sensor.
Check input circuit of A/C.
Check and repair harness or connector
between sensor and ECU.
Check for open and short in harness
and connector beteen A/C control assy.
and ECU.
Repair or replace harness or
connector.
Check and replace A/C control
assembly.
Adjust or replace throttle position
sensor (See page FI-73).
See page TR±122.
Check and replace ECU.
±
ENGINE TROUBLESHOOTING Circuit InspectionTR±119
WhereEverybodyKnowsYourName
Page 2731 of 4087

OKNG
OKNG
INSPECTION PROCEDURE
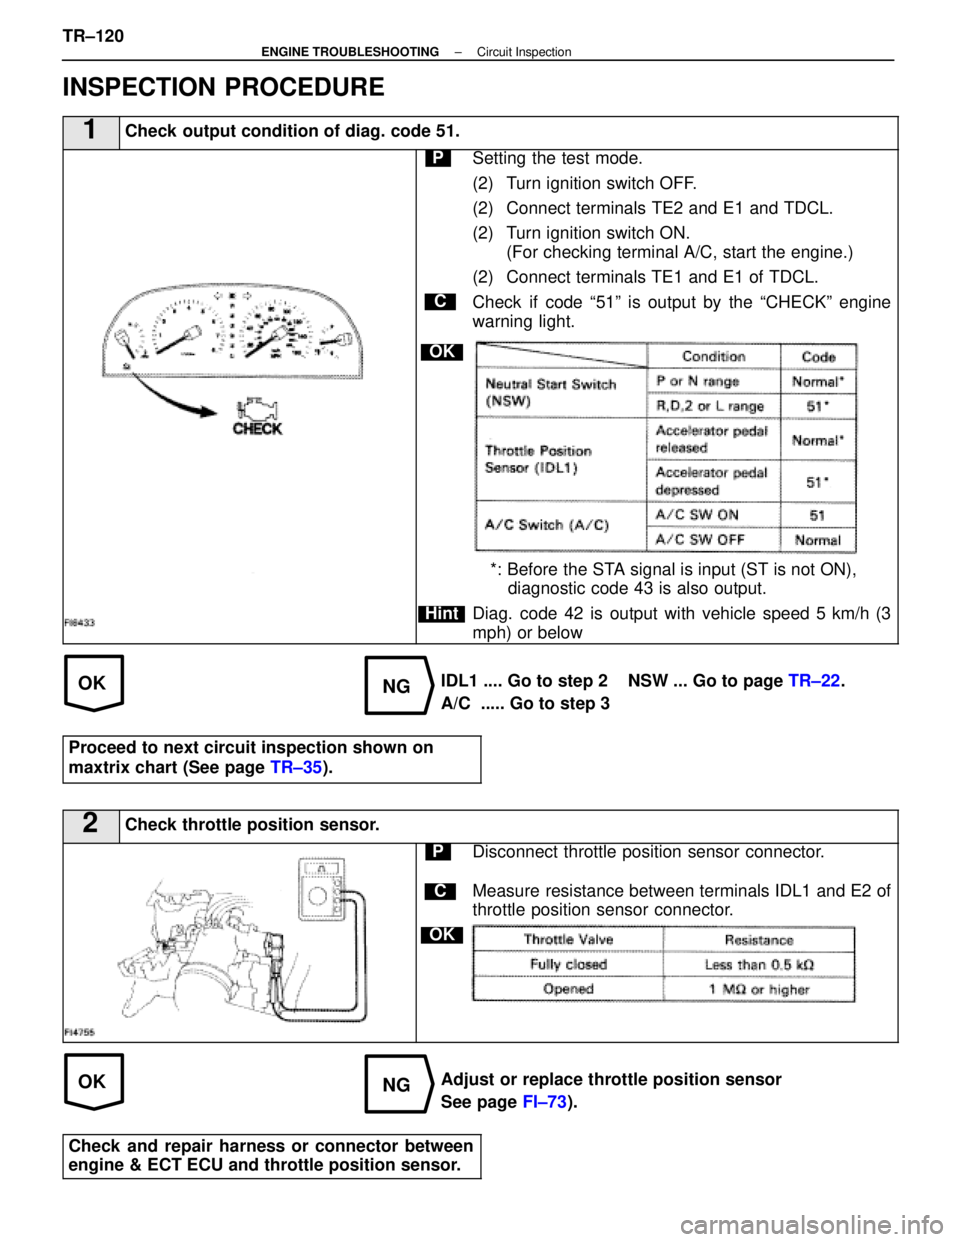
1Check output condition of diag. code 51.
C
OK
Hint
PSetting the test mode.
(2) Turn ignition switch OFF.
(2) Connect terminals TE2 and E1 and TDCL.
(2) Turn ignition switch ON.(For checking terminal A/C, start the engine.)
(2) Connect terminals TE1 and E1 of TDCL.
Check if code ª51º is output by the ªCHECKº engine
warning light.
*: Before the STA signal is input (ST is not ON), diagnostic code 43 is also output.
Diag. code 42 is output with vehicle speed 5 km/h (3
mph) or below
IDL1 .... Go to step 2 NSW ... Go to page TR±22.
A/C ..... Go to step 3
Proceed to next circuit inspection shown on
maxtrix chart (See page TR±35).
2Check throttle position sensor.
C
OK
PDisconnect throttle position sensor connector.
Measure resistance between terminals IDL1 and E2 of
throttle position sensor connector.
Adjust or replace throttle position sensor
See page FI±73).
Check and repair harness or connector between
engine & ECT ECU and throttle position sensor.
TR±120±
ENGINE TROUBLESHOOTING Circuit Inspection
WhereEverybodyKnowsYourName
Page 2802 of 4087
REMOVAL OF RADIATOR
(See Components on page CO±15)
1. REMOVE BATTERY CAUTION: Work must be started after approx. 20 seconds or
longer from the time the ignition switch is turned to the
ºLOCKº position and the negative (±) terminal cable is dis-
connected from the battery.
2. REMOVE ENGINE UNDER COVERS
3. DRAIN ENGINE COOLANT (See page CO±6)
4. REMOVE RADIATOR RESERVOIR TANK (a) Disconnect the coolant level sensor connector.
(b) Disconnect the following hoses:(1) Reservoir hose from water inlet housing
(2) Reservoir hose from radiator
(c) Remove the two bolts and reservoir tank bracket.
(d) Disconnect the reservoir tank from the reservoir tank bracket, and remove the reservoir tank.
5. DISCONNECT HOSES Disconnect the following hoses:(1) Upper radiator hose from radiator
(2) Lower radiator hose from radiator
(3) Two oil cooler hoses (for A/T) from radiator. Plug hose end.
CO±16
±
COOLIING SYSTEM Radiator
WhereEverybodyKnowsYourName
Page 2803 of 4087
(4) Pressure hose from hydraulic motor
(5) Return hose from hydraulic motor
6. DISCONNECT COOLING FAN INLET PIPE FROM FAN SHROULD
Remove the two bolts, brackets and bushings, and discon-
nect the inlet pipe.
7. DISCONNECT COOLING FAN RESERVOIR TANK FROM FAN SHROULD
(a) Disconnect the suction hose from the clamp on the fanshrould.
(b) Remove the four bolts, and disconnect the reservoir tank.
8. DISCONNECT WATER TEMPERATURE SENSOR CONNECTOR
(a) Disconnect the water temperature sensor connector.
(b) Disconnect the wire cl amp from the radiator fan shrould.
9. REMOVE RADIATOR (a) Re mo ve th e two bo lts, scre w an d u pper radiator
support. Remove the two upper radiator supports.
±
COOLIING SYSTEM RadiatorCO±17
WhereEverybodyKnowsYourName
Page 2805 of 4087
(d) Install the upper radiator support with the two bolts andscrew. Install the two upper radiator supports.
Torque: 12 N Vm (120 kgf Vcm, 9 ft Vlbf)
3. CONNECT WATER TEMPERATURE SENSOR
CONNECTOR
(a) Connect the water temperature sensor connector.
(b) Install the wire clamp to the radiator fan shrould.
4. INSTALL COOLING FAN RESERVOIR TANK TO FAN SHROULD
(a) Install the reservoir tank with the four bolts.
Torque: 4.9 N Vm (50 kgf Vcm, 43 in. Vlbf)
(b) Install the suction hose to the clamp on the fan shrould.
5. INSTALL COOLING FAN INLET PIPE TO FAN SHROULD Install the inlet pipe with the two bushings, brackets and
bolts.
Torque: 4.9 N Vm (50 kgf Vcm, 43 in. Vlbf)
6. CONNECT HOSES
Connect the following hoses:(1) Pressure hose to hydraulic motor Connect the pres-
sure hose with a new gasket and union bolt.
Torque: 64 N Vm (650 kgf Vcm, 47 ft Vlbf)
(2) Return hose to hydraulic motor
±
COOLIING SYSTEM RadiatorCO±19
WhereEverybodyKnowsYourName
Page 2806 of 4087
(3) Two oil cooler hoses (for A/T) to radiator.
(4) Lower radiator hose to radiator
(5) Upper radiator hose to radiator
7. INSTALL RADIATOR RESERVOIR TANK (a) Install the reservoir tank to the reservoir tank bracket.
(b) Install the reservoir tank bracket with two bolts.
Torque: 4.9 N Vm (50 kgf Vcm, 43 in. Vlbf)
(c) Connect the following hoses:
(1) Reservoir hose to water inlet housing
(2) Reservoir hose to radiator
(d) Connect the coolant level sensor connector.
8. INSTALL BATTERY
CO±20
±
COOLIING SYSTEM Radiator
WhereEverybodyKnowsYourName
Page 2809 of 4087

On±Vehicle Inspection
INSPECTION OF DRIVE BELT
(See step 1 on page CH±5)
INSPECTION OF FLUID LEVEL
1. KEEP VEHICLE LEVEL
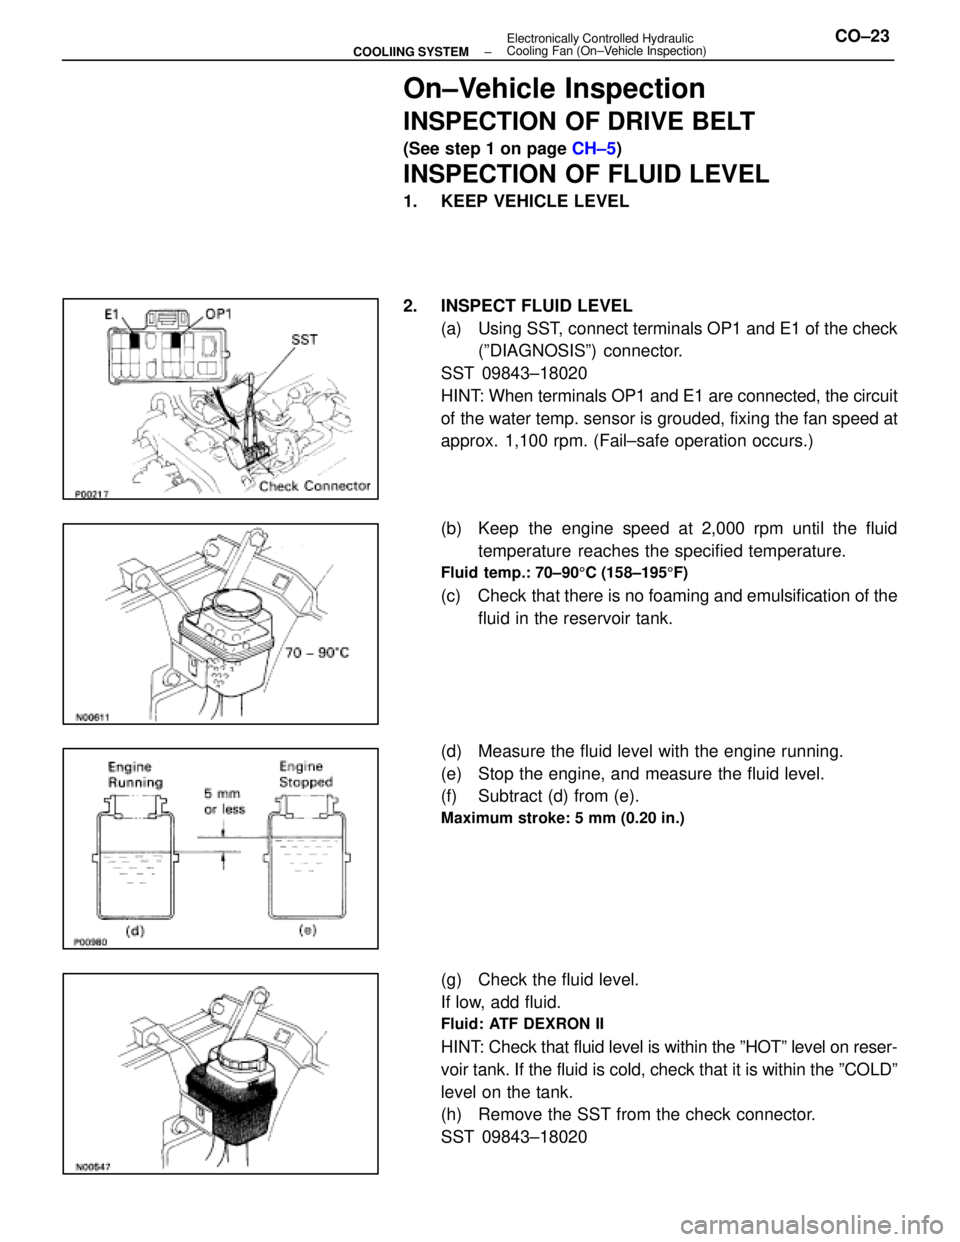
2. INSPECT FLUID LEVEL
(a) Using SST, connect terminals OP1 and E1 of the check(ºDIAGNOSISº) connector.
SST 09843±18020
HINT: When terminals OP1 and E1 are connected, the circuit
of the water temp. sensor is grouded, fixing the fan speed at
approx. 1,100 rpm. (Fail±safe operation occurs.)
(b) Keep the engine speed at 2,000 rpm until the fluid temperature reaches the specified temperature.
Fluid temp.: 70±90 5C (158±195 5F)
(c) Check that there is no foaming and emulsification of the
fluid in the reservoir tank.
(d) Measure the fluid level with the engine running.
(e) Stop the engine, and measure the fluid level.
(f) Subtract (d) from (e).
Maximum stroke: 5 mm (0.20 in.)
(g) Check the fluid level.
If low, add fluid.
Fluid: ATF DEXRON II
HINT: Check that fluid level is within the ºHOTº level on reser-
voir tank. If the fluid is cold, check that it is within the ºCOLDº\
level on the tank.
(h) Remove the SST from the check connector.
SST 09843±18020
±
COOLIING SYSTEM Electronically Controlled Hydraulic
Cooling Fan (On±Vehicle Inspection)CO±23
WhereEverybodyKnowsYourName
Page 2810 of 4087

BLEEDING OF HYDRAULIC COOLING
SYSTEM
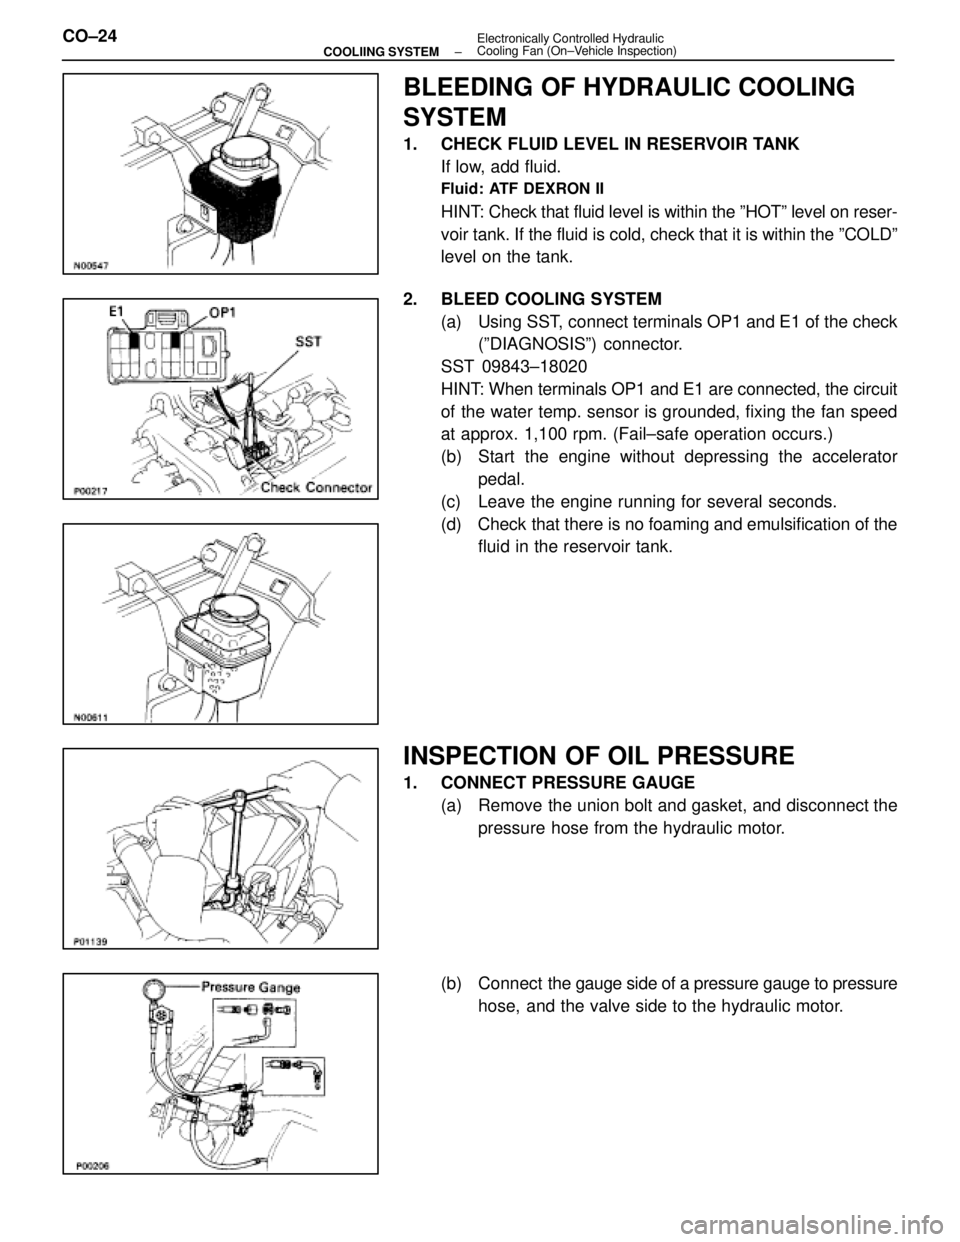
1. CHECK FLUID LEVEL IN RESERVOIR TANKIf low, add fluid.
Fluid: ATF DEXRON II
HINT: Check that fluid level is within the ºHOTº level on reser-
voir tank. If the fluid is cold, check that it is within the ºCOLDº\
level on the tank.
2. BLEED COOLING SYSTEM (a) Using SST, connect terminals OP1 and E1 of the check(ºDIAGNOSISº) connector.
SST 09843±18020
HINT: When terminals OP1 and E1 are connected, the circuit
of the water temp. sensor is grounded, fixing the fan speed
at approx. 1,100 rpm. (Fail±safe operation occurs.)
(b) Start the engine without depressing the accelerator pedal.
(c) Leave the engine running for several seconds.
(d) Check that there is no foaming and emulsification of the fluid in the reservoir tank.
INSPECTION OF OIL PRESSURE
1. CONNECT PRESSURE GAUGE
(a) Remove the union bolt and gasket, and disconnect thepressure hose from the hydraulic motor.
(b) Connect the gauge side of a pressure gauge to pressure
hose, and the valve side to the hydraulic motor.
CO±24
±
COOLIING SYSTEM Electronically Controlled Hydraulic
Cooling Fan (On±Vehicle Inspection)
WhereEverybodyKnowsYourName