1991 ACURA NSX wheel
[x] Cancel search: wheelPage 6 of 1640
![ACURA NSX 1991 Service Repair Manual
Warning/Caution Label Locations
A: CABLE REEL CAUTION
[SRS]
REFER TO SERVICE MANUAL FOR DETAILED IN-
STRUCTIONS.
B: STEERING WHEEL NOTICE
NOTICE
IMPROPER STEERING WHEEL REMOVAL OR IN-
STALLAT](/manual-img/32/56988/w960_56988-5.png "ACURA NSX 1991 Service Repair Manual
Warning/Caution Label Locations
A: CABLE REEL CAUTION
[SRS]
REFER TO SERVICE MANUAL FOR DETAILED IN-
STRUCTIONS.
B: STEERING WHEEL NOTICE
NOTICE
IMPROPER STEERING WHEEL REMOVAL OR IN-
STALLAT")
Warning/Caution Label Locations
A: CABLE REEL CAUTION
[SRS]
REFER TO SERVICE MANUAL FOR DETAILED IN-
STRUCTIONS.
B: STEERING WHEEL NOTICE
NOTICE
IMPROPER STEERING WHEEL REMOVAL OR IN-
STALLATION CAN DAMAGE SRS COMPONENTS.
FOLLOW SERVICE MANUAL INSTRUCTIONS
CAREFULLY.
C: DRIVER MODULE WARNING
A WARNING
THE AIRBAG INFLATOR IS EXPLOSIVE AND. IF AC-
CIDENTALLY DEPLOYED. CAN SERIOUSLY HURT OR
KILL YOU.
• DO NOT USE ELECTRICAL TEST EQUIPMENT OR
PROBING DEVICES.
THEY CAN CAUSE ACCIDENTAL DEPLOYMENT.
• NO SERVICEABLE PARTS INSIDE. DO NOT DISAS-
SEMBLE.
• PLACE AIRBAG UPRIGHT WHEN REMOVED.
• FOLLOW SERVICE MANUAL INSTRUCTIONS
CAREFULLY.
D: DRIVER'S INFLATOR CAUTION
A DANGER
EXPLOSIVE/FLAMMABLE
CONTACT WITH ACID, WATER OR HEAVY METALS
SUCH AS COPPER, LEAD OR MERCURY MAY PRODUCE
HARMFUL AND IRRITATING GASES OR EXPLOSIVE
COMPOUNDS. STORAGE TEMPERATURES MUST NOT
EXCEED 200°F (100°C). FOR PROPER HANDLING,
STORAGE AND DISPOSAL PROCEDURES REFER TO
SERVICE MANUAL, SRS SUPPLEMENT.
POISON
CONTAINS POISONOUS SODIUM AZIDE AND POTAS-
SIUM NITRATE.
FIRST AID
IF CONTENTS ARE SWALLOWED, INDUCE VOMITING.
FOR EYE CONTACT, FLUSH EYES WITH WATER FOR 15
MINUTES. IF GASES (FROM ACID OR WATER CON-
TACT) ARE INHALED, SEEK FRESH AIR. IN EVERY CASE,
GET PROMPT MEDICAL ATTENTION.
KEEP OUT OF REACH OF CHILDREN.ProCarManuals.com
Page 10 of 1640
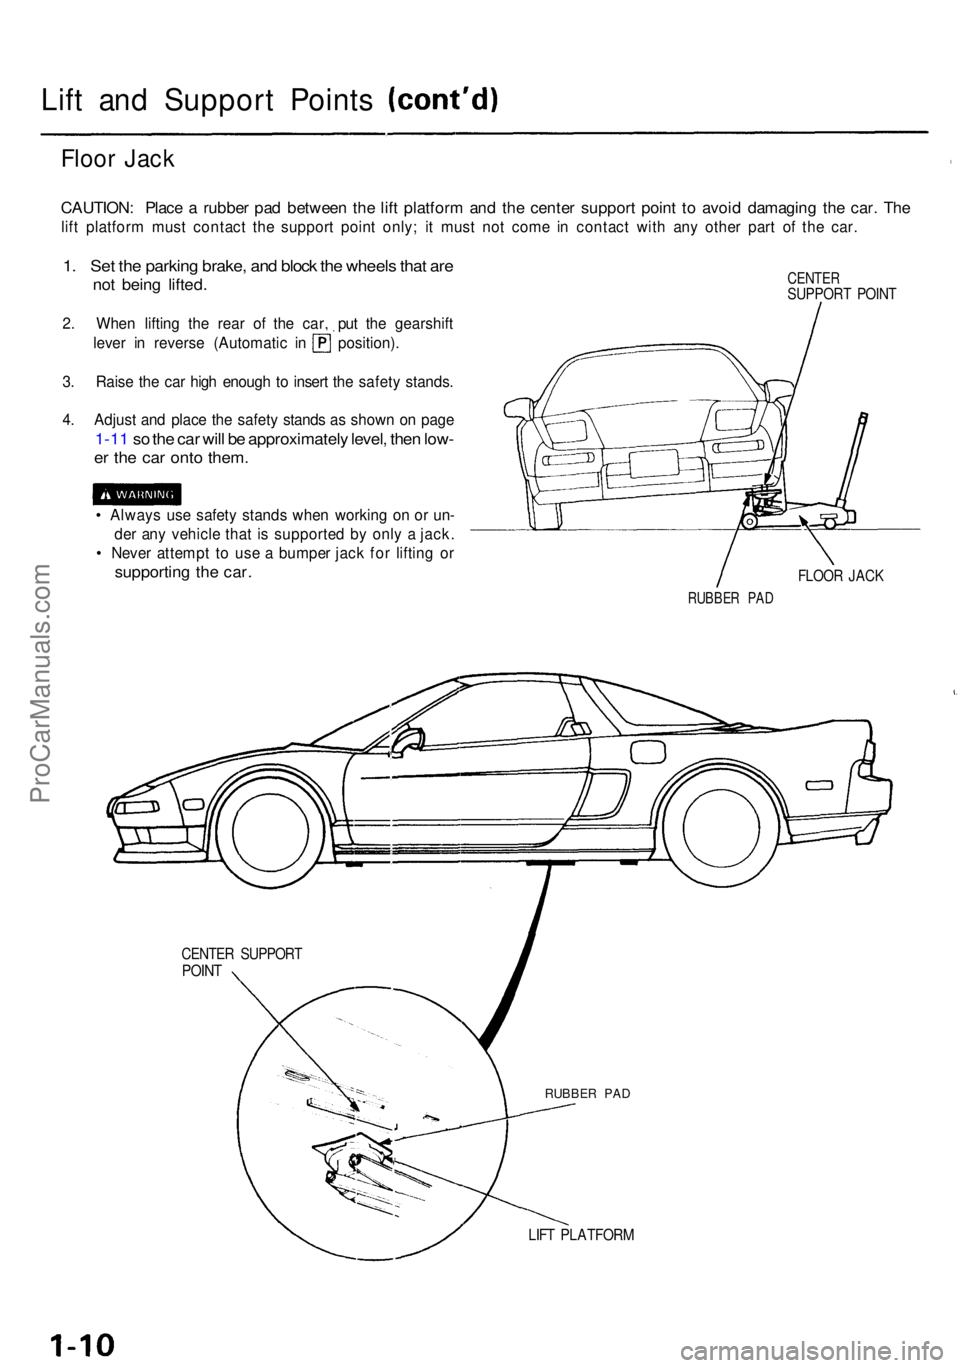
Lift an d Suppor t Point s
Floor Jac k
CAUTION : Plac e a rubbe r pa d betwee n th e lif t platfor m an d th e cente r suppor t poin t t o avoi d damagin g th e car . Th e
lift platfor m mus t contac t th e suppor t poin t only ; i t mus t no t com e i n contac t wit h an y othe r par t o f th e car .
1. Se t th e parkin g brake , an d bloc k th e wheel s tha t ar e
no t bein g lifted .
2. Whe n liftin g th e rea r o f th e car , pu t th e gearshif t
lever i n revers e (Automati c i n position) .
3 . Rais e th e ca r hig h enoug h t o inser t th e safet y stands .
4 . Adjust and plac e th e safet y stand s a s show n o n pag e
1-11 s o th e ca r wil l b e approximatel y level , the n low -
er th e ca r ont o them .
• Alway s us e safet y stand s whe n workin g o n o r un -
de r an y vehicl e tha t i s supporte d b y onl y a jack .
• Neve r attemp t t o us e a bumpe r jac k fo r liftin g o r
supportin g th e car .
CENTE RSUPPOR T POIN T
FLOOR JAC K
RUBBE R PA D
LIFT PLATFOR M
CENTER SUPPOR TPOINT
RUBBE R PA D
ProCarManuals.com
Page 11 of 1640
Towing
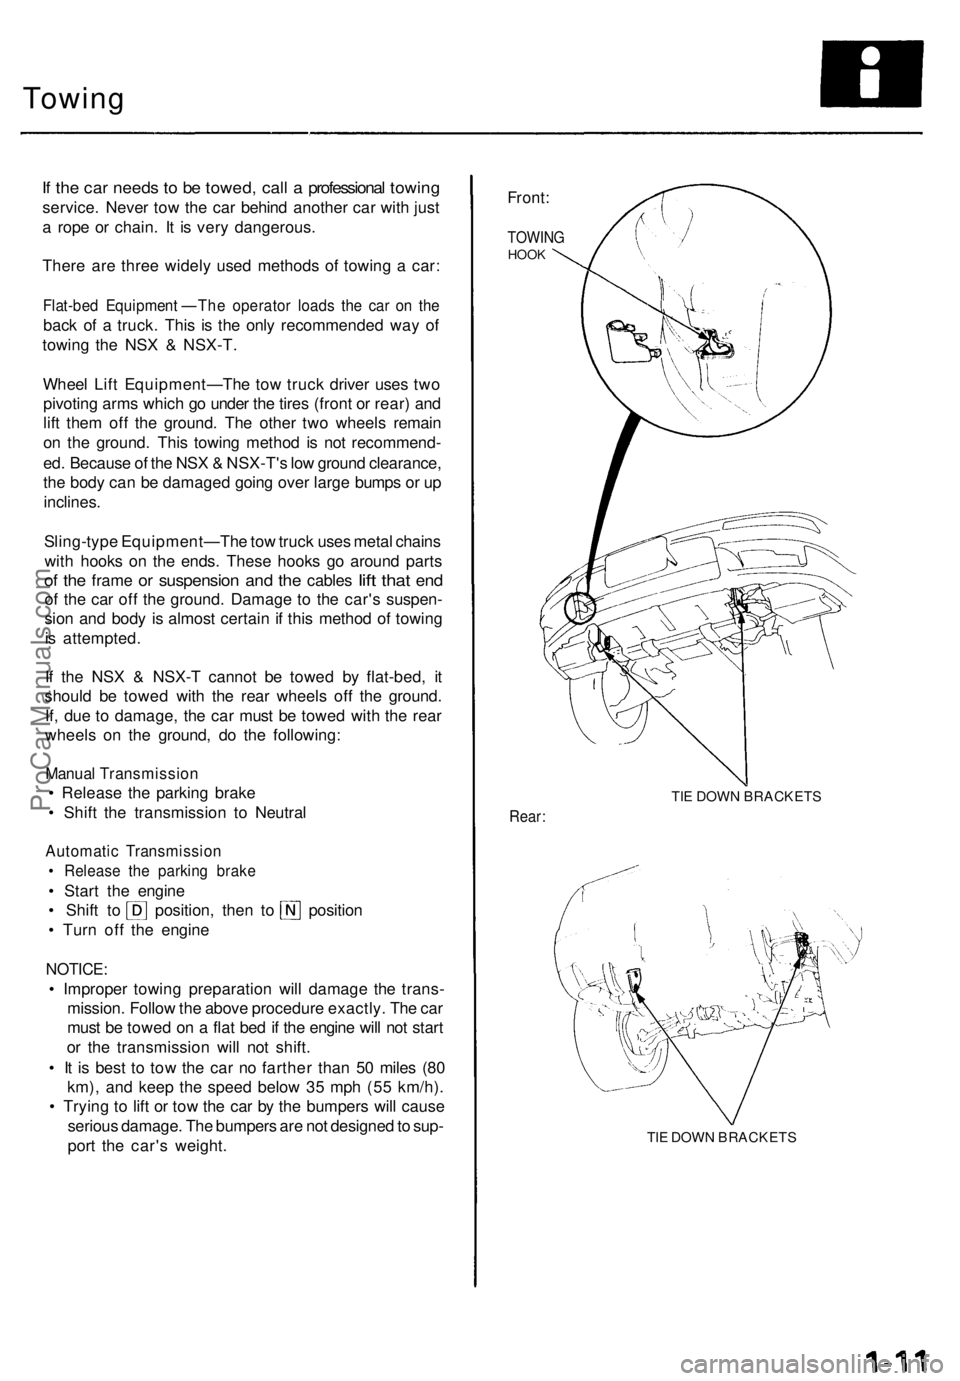
If th e ca r need s t o b e towed , cal l a professiona l towin g
service . Neve r to w th e ca r behin d anothe r ca r wit h jus t
a rop e o r chain . I t i s ver y dangerous .
Ther e ar e thre e widel y use d method s o f towin g a car :
Flat-be d Equipmen t — Th e operato r load s th e ca r o n th e
bac k o f a truck . Thi s i s th e onl y recommende d wa y o f
towin g th e NS X & NSX-T .
Whee l Lif t Equipment— The to w truc k drive r use s tw o
pivotin g arm s whic h g o unde r th e tire s (fron t o r rear ) an d
lif t the m of f th e ground . Th e othe r tw o wheel s remai n
o n th e ground . Thi s towin g metho d i s no t recommend -
ed . Becaus e o f th e NS X & NSX-T' s lo w groun d clearance ,
th e bod y ca n b e damage d goin g ove r larg e bump s o r u p
inclines .
Sling-typ e Equipment— The tow truc k use s meta l chain s
wit h hook s o n th e ends . Thes e hook s g o aroun d part s
of th e fram e or suspensio n and th e cable s lift tha t end
of th e ca r of f th e ground . Damag e t o th e car' s suspen -
sio n an d bod y i s almos t certai n if thi s metho d o f towin g
i s attempted .
I f th e NS X & NSX- T canno t b e towe d b y flat-bed , i t
shoul d b e towe d wit h th e rea r wheel s of f th e ground .
If , du e t o damage , th e ca r mus t b e towe d wit h th e rea r
wheel s o n th e ground , d o th e following :
Manual Transmissio n
• Releas e th e parkin g brak e
• Shif t th e transmissio n t o Neutra l
Automati c Transmissio n
• Releas e th e parkin g brak e
• Star t th e engin e
• Shif t t o position , the n t o positio n
• Tur n of f th e engin e
NOTICE :
• Imprope r towin g preparatio n wil l damag e th e trans -
mission . Follo w th e abov e procedur e exactly . Th e ca r
mus t b e towe d o n a fla t be d if th e engin e wil l no t star t
o r th e transmissio n wil l no t shift .
• I t i s bes t t o to w th e ca r n o farthe r tha n 5 0 mile s (8 0
km) , an d kee p th e spee d belo w 3 5 mp h (5 5 km/h) .
• Tryin g t o lif t o r to w th e ca r b y th e bumper s wil l caus e
seriou s damage . Th e bumper s ar e no t designe d to sup -
por t th e car' s weight .
Front:
TOWIN GHOOK
TIE DOW N BRACKET S
Rear:
TIE DOW N BRACKET S
ProCarManuals.com
Page 39 of 1640
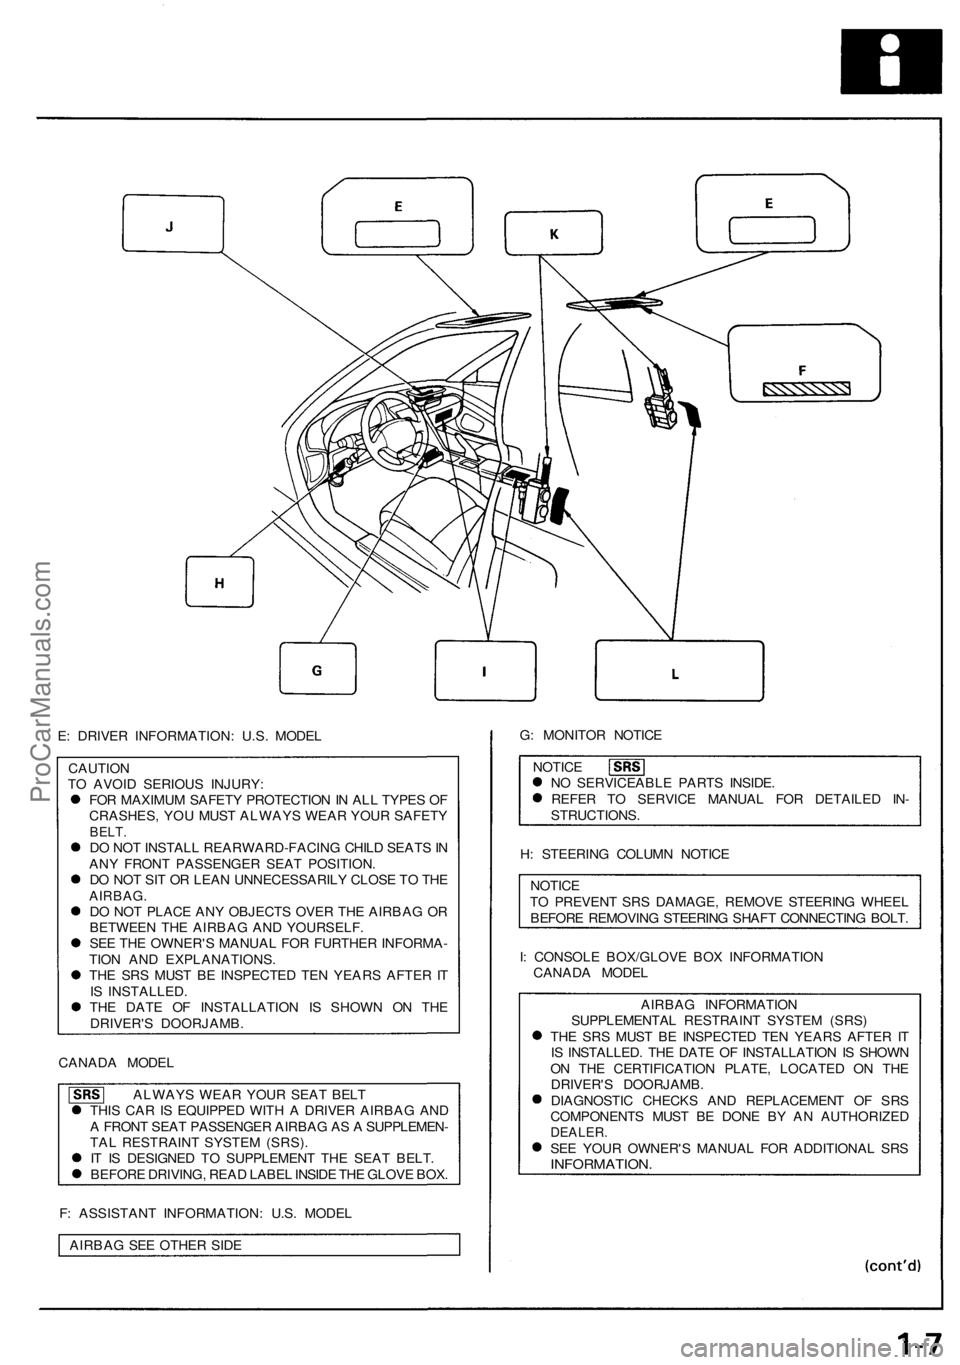
E: DRIVER INFORMATION: U.S. MODEL
CAUTION
TO AVOID SERIOUS INJURY:
FOR MAXIMUM SAFETY PROTECTION IN ALL TYPES OF
CRASHES, YOU MUST ALWAYS WEAR YOUR SAFETY
BELT.
DO NOT INSTALL REARWARD-FACING CHILD SEATS IN
ANY FRONT PASSENGER SEAT POSITION.
DO NOT SIT OR LEAN UNNECESSARILY CLOSE TO THE
AIRBAG.
DO NOT PLACE ANY OBJECTS OVER THE AIRBAG OR
BETWEEN THE AIRBAG AND YOURSELF.
SEE THE OWNER'S MANUAL FOR FURTHER INFORMA-
TION AND EXPLANATIONS.
THE SRS MUST BE INSPECTED TEN YEARS AFTER IT
IS INSTALLED.
THE DATE OF INSTALLATION IS SHOWN ON THE
DRIVER'S DOORJAMB.
CANADA MODEL
ALWAYS WEAR YOUR SEAT BELT
THIS CAR IS EQUIPPED WITH A DRIVER AIRBAG AND
A FRONT SEAT PASSENGER AIRBAG AS A SUPPLEMEN-
TAL RESTRAINT SYSTEM (SRS).
IT IS DESIGNED TO SUPPLEMENT THE SEAT BELT.
BEFORE DRIVING, READ LABEL INSIDE THE GLOVE BOX.
F: ASSISTANT INFORMATION: U.S. MODEL
AIRBAG SEE OTHER SIDE
G: MONITOR NOTICE
NOTICE
NO SERVICEABLE PARTS INSIDE.
REFER TO SERVICE MANUAL FOR DETAILED IN-
STRUCTIONS.
H: STEERING COLUMN NOTICE
NOTICE
TO PREVENT SRS DAMAGE, REMOVE STEERING WHEEL
BEFORE REMOVING STEERING SHAFT CONNECTING BOLT.
I: CONSOLE BOX/GLOVE BOX INFORMATION
CANADA MODEL
AIRBAG INFORMATION
SUPPLEMENTAL RESTRAINT SYSTEM (SRS)
THE SRS MUST BE INSPECTED TEN YEARS AFTER IT
IS INSTALLED. THE DATE OF INSTALLATION IS SHOWN
ON THE CERTIFICATION PLATE, LOCATED ON THE
DRIVER'S DOORJAMB.
DIAGNOSTIC CHECKS AND REPLACEMENT OF SRS
COMPONENTS MUST BE DONE BY AN AUTHORIZED
DEALER.
SEE YOUR OWNER'S MANUAL FOR ADDITIONAL SRS
INFORMATION.ProCarManuals.com
Page 42 of 1640
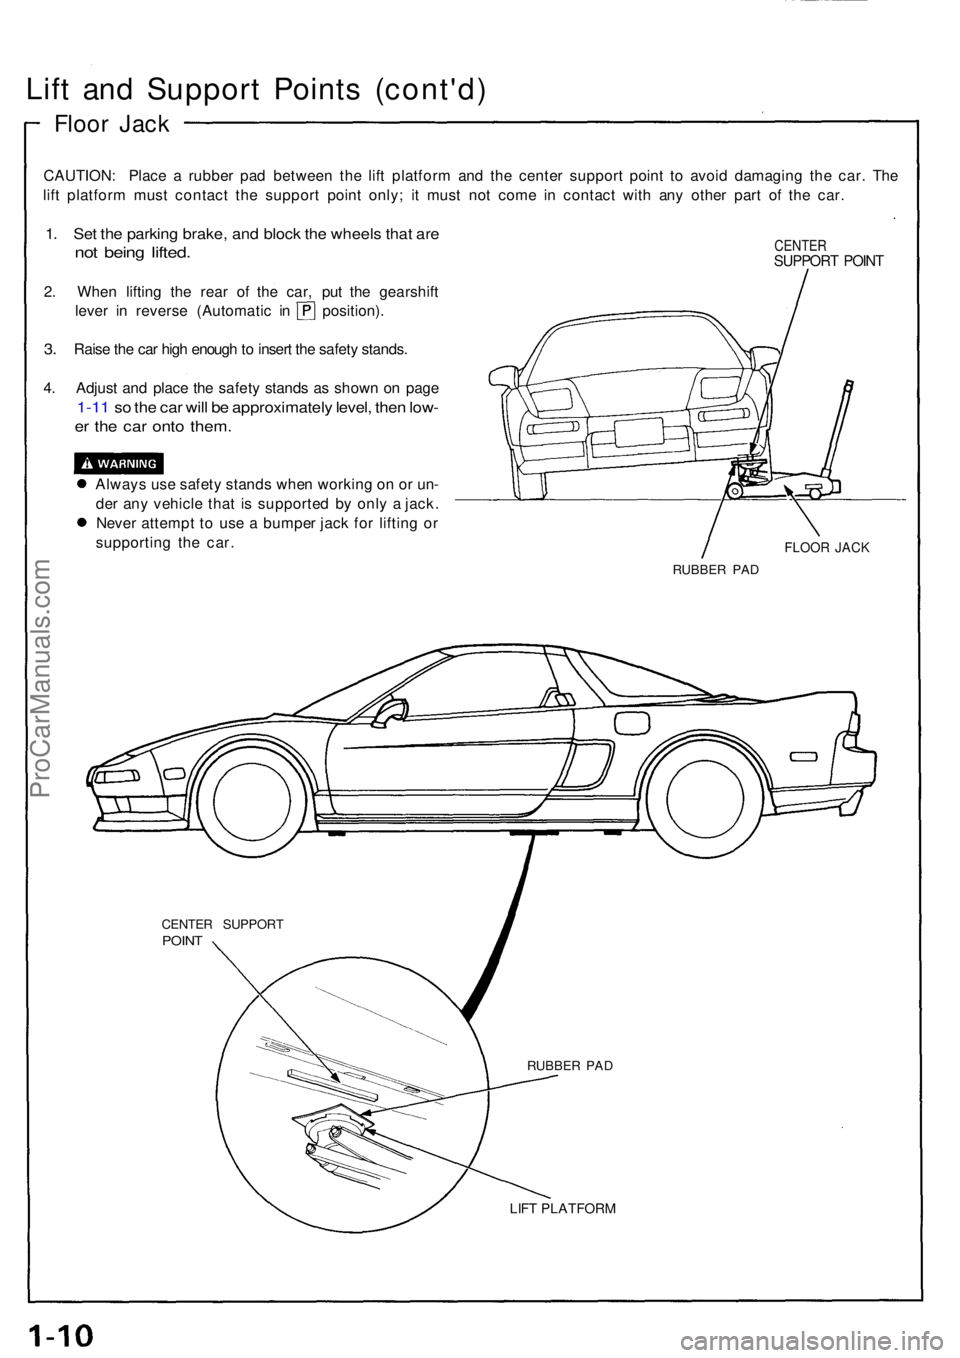
Lift an d Suppor t Point s (cont'd )
Floor Jac k
CAUTION : Plac e a rubbe r pa d betwee n th e lif t platfor m an d th e cente r suppor t poin t t o avoi d damagin g th e car . Th e
lif t platfor m mus t contac t th e suppor t poin t only ; i t mus t no t com e i n contac t wit h an y othe r par t o f th e car .
1. Se t th e parkin g brake , an d bloc k th e wheel s tha t ar e
not bein g lifted .
2. Whe n liftin g th e rea r o f th e car , pu t th e gearshif t
lever i n revers e (Automati c i n position) .
3. Rais e th e ca r hig h enoug h to inser t th e safet y stands .
4 . Adjus t an d plac e th e safet y stand s a s show n o n pag e
1-11 s o th e ca r wil l b e approximatel y level , the n low -
er th e ca r ont o them .
Alway s us e safet y stand s whe n workin g o n o r un -
de r an y vehicl e tha t i s supporte d b y onl y a jack .
Neve r attemp t t o us e a bumpe r jac k fo r liftin g o r
supportin g th e car .
CENTE RSUPPOR T POIN T
FLOO R JAC K
RUBBE R PA D
LIFT PLATFOR M
CENTER SUPPOR TPOINT
RUBBE R PA D
ProCarManuals.com
Page 44 of 1640
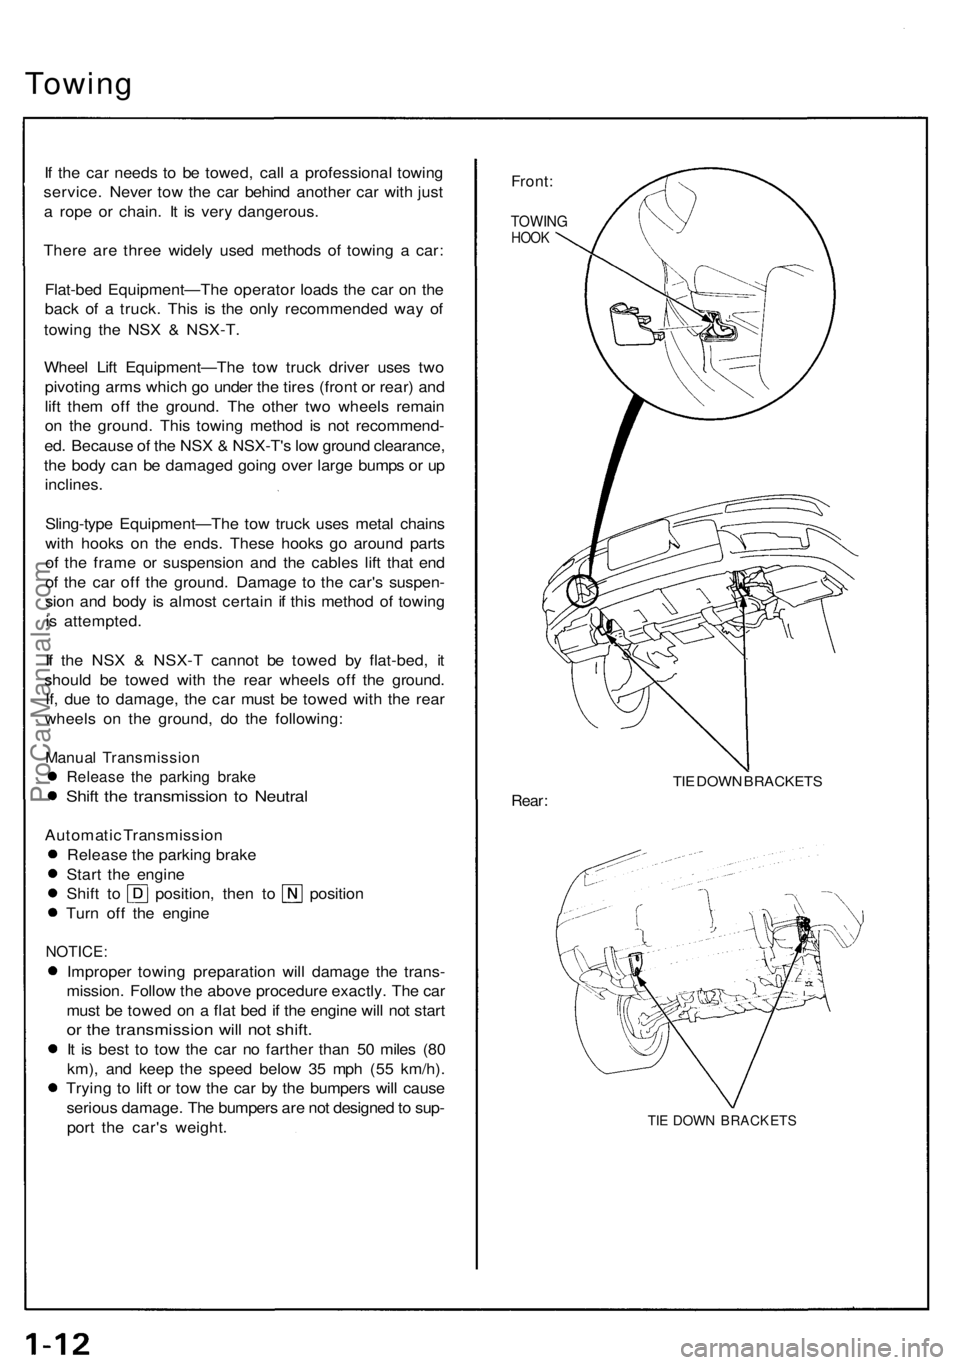
Towing
If th e ca r need s t o b e towed , cal l a professiona l towin g
service . Neve r to w th e ca r behin d anothe r ca r wit h jus t
a rop e o r chain . I t i s ver y dangerous .
Ther e ar e thre e widel y use d method s o f towin g a car :
Flat-be d Equipment—Th e operato r load s th e ca r o n th e
bac k o f a truck . This is th e onl y recommende d wa y o f
towin g th e NS X & NSX-T .
Whee l Lif t Equipment—Th e to w truc k drive r use s tw o
pivotin g arm s whic h g o unde r th e tire s (fron t o r rear ) an d
lif t the m of f th e ground . Th e othe r tw o wheel s remai n
o n th e ground . Thi s towin g metho d i s no t recommend -
ed . Becaus e o f th e NS X & NSX-T' s lo w groun d clearance ,
th e bod y ca n b e damage d goin g ove r larg e bump s o r u p
inclines .
Sling-typ e Equipment—Th e to w truc k use s meta l chain s
wit h hooks on th e ends . Thes e hook s g o aroun d part s
o f th e fram e o r suspensio n an d th e cable s lif t tha t en d
o f th e ca r of f th e ground . Damag e t o th e car' s suspen -
sio n an d bod y i s almos t certai n if thi s metho d o f towin g
i s attempted .
I f th e NS X & NSX- T canno t b e towe d b y flat-bed , i t
shoul d b e towe d wit h th e rea r wheel s of f th e ground .
If , du e t o damage , th e ca r mus t b e towe d wit h th e rea r
wheel s o n th e ground , d o th e following :
Manual Transmissio n
Release th e parkin g brak e
Shift th e transmissio n t o Neutra l
Automati c Transmissio n
Releas e th e parkin g brak e
Star t th e engin e
Shift t o position , the n t o positio n
Tur n of f th e engin e
NOTICE :
Improper towin g preparatio n wil l damag e th e trans -
mission . Follo w th e abov e procedur e exactly . Th e ca r
mus t b e towe d o n a fla t be d if th e engin e wil l no t star t
or th e transmissio n wil l no t shift .
It i s bes t t o to w th e ca r n o farthe r tha n 5 0 mile s (8 0
km) , an d kee p th e spee d belo w 3 5 mp h (5 5 km/h) .
Tryin g t o lif t o r to w th e ca r b y th e bumper s wil l caus e
seriou s damage . Th e bumper s ar e no t designe d to sup -
por t th e car' s weight .
Front:
TOWIN GHOOK
TIE DOW N BRACKET S
Rear:
TIE DOW N BRACKET S
ProCarManuals.com
Page 45 of 1640
Service Precaution s
Handling o f Specia l Nut s an d Bolt s
Becaus e man y section s o n thi s ca r ar e constructe d wit h
aluminu m alloys , us e onl y th e specia l "Dacro " typ e
nut s an d bolt s recommende d b y Acura .
NOTE:
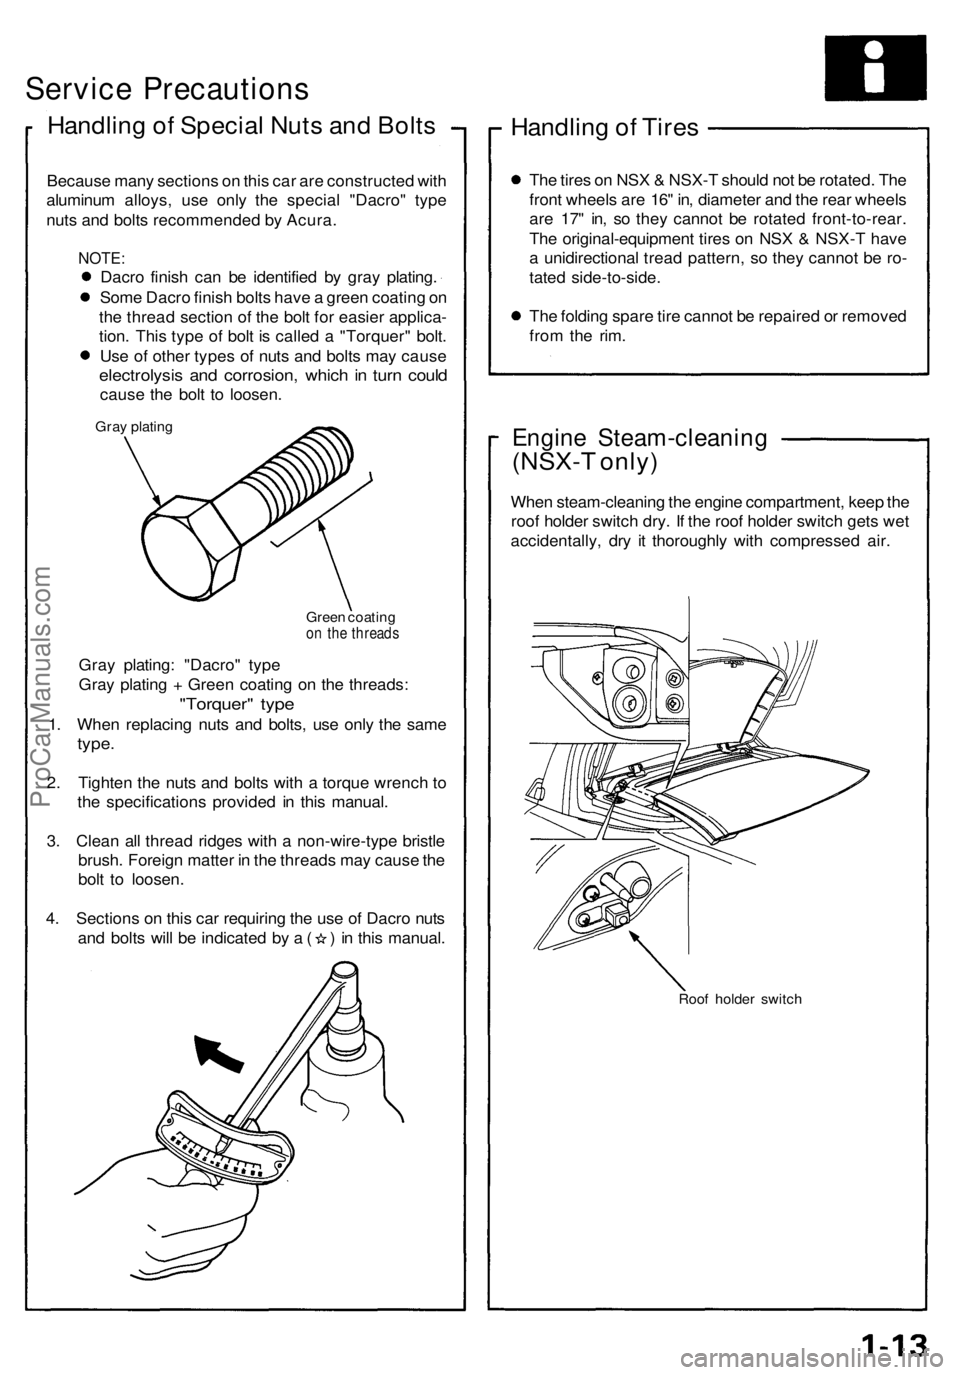
Dacro finis h ca n b e identifie d b y gra y plating .
Som e Dacr o finis h bolt s hav e a gree n coatin g o n
th e threa d sectio n of the bol t fo r easie r applica -
tion . Thi s typ e of bol t i s calle d a "Torquer " bolt .
Us e o f othe r type s of nut s an d bolt s ma y caus e
electrolysi s an d corrosion , whic h in tur n coul d
caus e th e bol t t o loosen .
Gray platin g
Green coatin g
on th e thread s
Gray plating : "Dacro " typ e
Gra y platin g + Gree n coatin g o n th e threads :
"Torquer " typ e
1. Whe n replacin g nut s an d bolts , us e onl y th e sam e
type.
2. Tighte n th e nut s an d bolt s with a torqu e wrenc h t o
th e specification s provide d i n thi s manual .
3 . Clea n al l threa d ridge s wit h a non-wire-typ e bristl e
brush . Foreig n matte r i n th e thread s ma y caus e th e
bol t t o loosen .
4 . Section s o n thi s ca r requirin g th e us e o f Dacr o nut s
and bolt s wil l b e indicate d b y a ( ) in thi s manual .
Handling o f Tire s
The tire s o n NS X & NSX- T shoul d no t b e rotated . Th e
fron t wheel s ar e 16 " in , diamete r an d th e rea r wheel s
ar e 17 " in , s o the y canno t b e rotate d front-to-rear .
Th e original-equipmen t tire s o n NS X & NSX- T hav e
a unidirectiona l trea d pattern , s o the y canno t b e ro -
tate d side-to-side .
Th e foldin g spar e tir e canno t b e repaire d o r remove d
fro m th e rim .
Engin e Steam-cleanin g
(NSX-T only )
When steam-cleanin g th e engin e compartment , kee p th e
roo f holde r switc h dry . I f th e roo f holde r switc h get s we t
accidentally , dr y i t thoroughl y wit h compresse d air .
Roo f holde r switc h
ProCarManuals.com
Page 80 of 1640
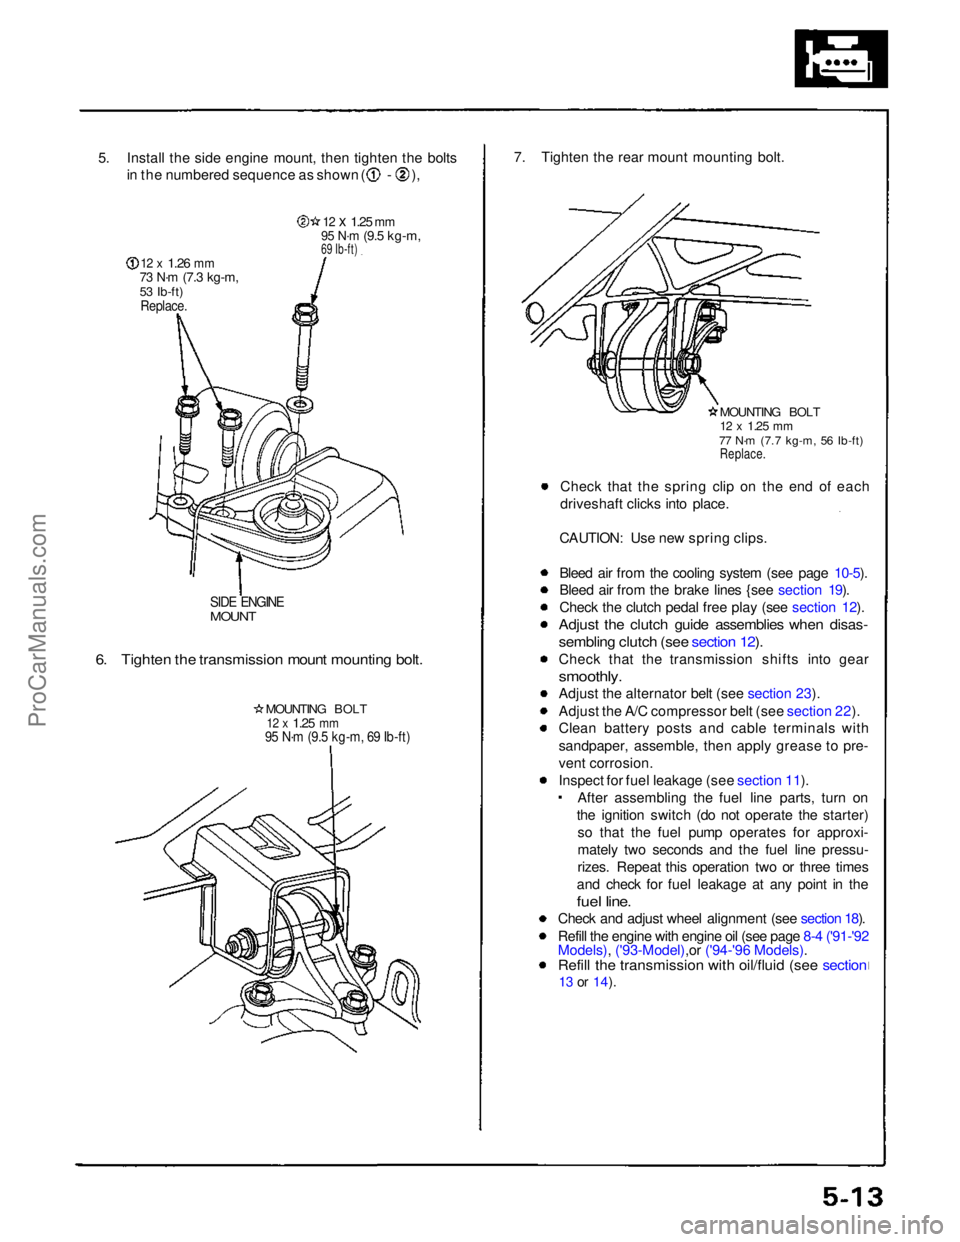
5. Install the side engine mount, then tighten the bolts
in the numbered sequence as shown ( - ),
12 x
1.26
mm
73 N·m
(7.3 kg-m,
53 Ib-ft)
Replace.
12 x
1.25
mm
95 N·m
(9.5 kg-m,
69 Ib-ft)
SIDE ENGINE
MOUNT
6. Tighten the transmission mount mounting bolt.
MOUNTING BOLT
12 x
1.25
mm
95 N·m (9.5 kg-m, 69 Ib-ft)
7. Tighten the rear mount mounting bolt.
MOUNTING BOLT
12 x
1.25
mm
77 N·m (7.7 kg-m, 56 Ib-ft)
Replace.
Check that the spring clip on the end of each
driveshaft clicks into place.
CAUTION: Use new spring clips.
Bleed air from the cooling system (see page 10-5).
Bleed air from the brake lines {see section 19).
Check the clutch pedal free play (see section 12).
Adjust the clutch guide assemblies when disas-
sembling clutch (see section 12).
Check that the transmission shifts into gear
smoothly.
Adjust the alternator belt (see section 23).
Adjust the A/C compressor belt (see section 22).
Clean battery posts and cable terminals with
sandpaper, assemble, then apply grease to pre-
vent corrosion.
Inspect for fuel leakage (see section 11). After assembling the fuel line parts, turn on
the ignition switch (do not operate the starter) so that the fuel pump operates for approxi-
mately two seconds and the fuel line pressu-
rizes. Repeat this operation two or three times
and check for fuel leakage at any point in the
fuel line.
Check and adjust wheel alignment (see section 18).
Refill the engine with engine oil (see page 8-4 ('91-'92
Models), ('93-Model),or ('94-'96 Models).
Refill the transmission with oil/fluid (see section
13 or
14).ProCarManuals.com