Page 764 of 1640

Ignition System
Spark Plug Inspection
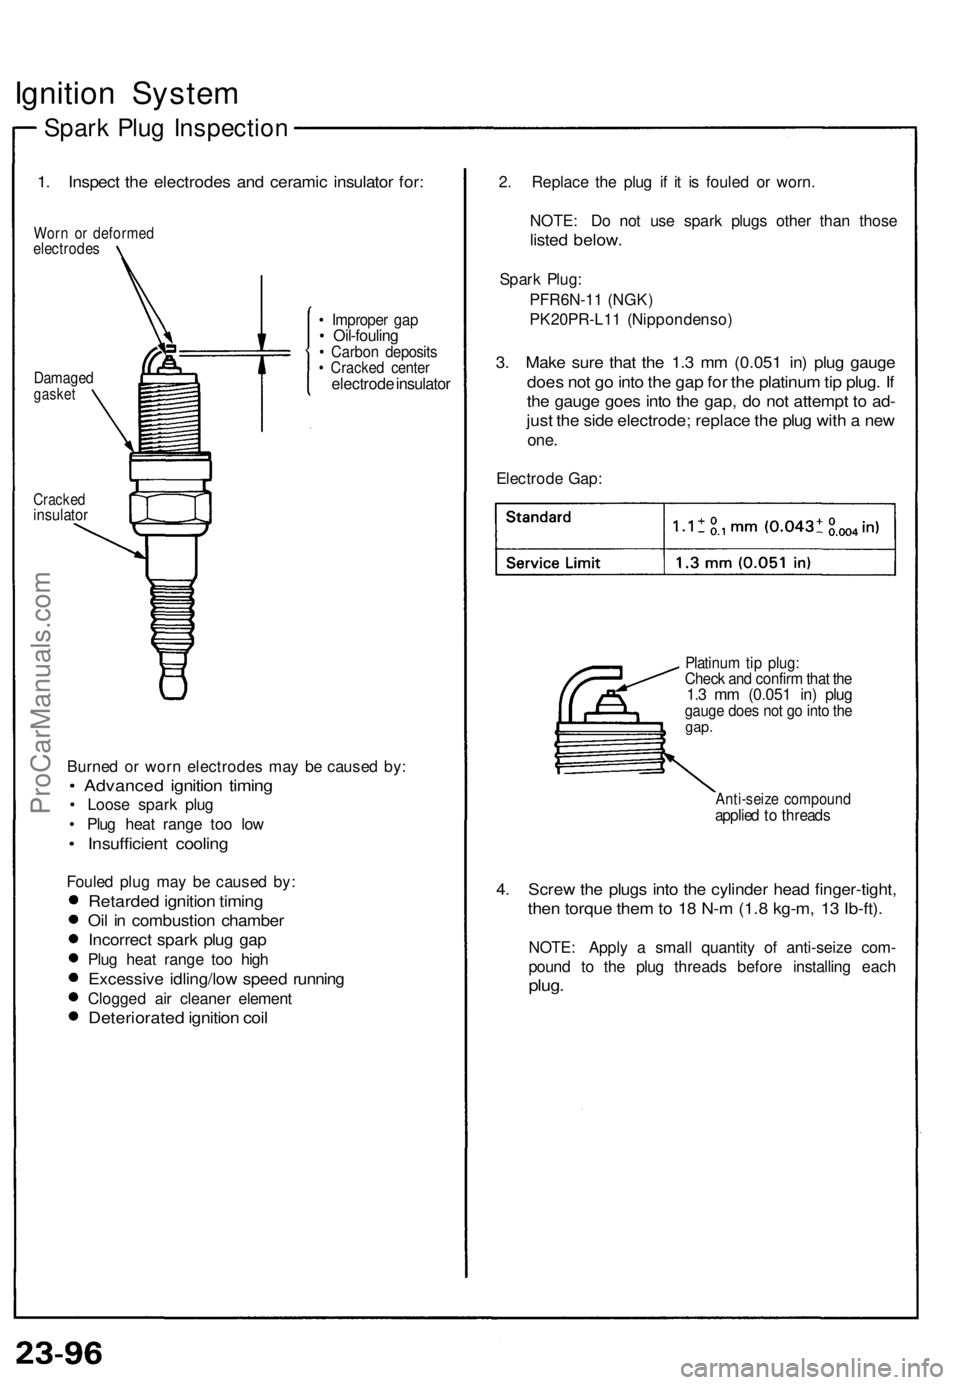
1. Inspect the electrodes and ceramic insulator for:
Worn or deformed
electrodes
Damaged
gasket
• Improper gap
• Oil-fouling
• Carbon deposits
• Cracked center
electrode insulator
Cracked
insulator
Burned or worn electrodes may be caused by:
• Advanced ignition timing
• Loose spark plug
• Plug heat range too low
• Insufficient cooling
Fouled plug may be caused by:
Retarded ignition timing
Oil in combustion chamber
Incorrect spark plug gap
Plug heat range too high
Excessive idling/low speed running
Clogged air cleaner element
Deteriorated ignition coil
2. Replace the plug if it is fouled or worn.
NOTE: Do not use spark plugs other than those
listed below.
Spark Plug:
PFR6N-11 (NGK)
PK20PR-L11 (Nippondenso)
3. Make sure that the 1.3 mm (0.051 in) plug gauge
does not go into the gap for the platinum tip plug. If
the gauge goes into the gap, do not attempt to ad-
just the side electrode; replace the plug with a new
one.
Electrode Gap:
Platinum tip plug:
Check and confirm that the
1.3 mm (0.051 in) plug
gauge does not go into the
gap.
Anti-seize compound
applied to threads
4. Screw the plugs into the cylinder head finger-tight,
then torque them to 18 N-m (1.8 kg-m, 13 Ib-ft).
NOTE: Apply a small quantity of anti-seize com-
pound to the plug threads before installing each
plug.ProCarManuals.com
Page 1011 of 1640

Installation
CAUTION: Do not rotate the crankshaft or camshaft without installing the belt. The piston could hit a valve
and damage may result.
1 . Install the timing belt in the reverse order of removal; Only keypoints are described here.
2 . Remove all spark plugs.
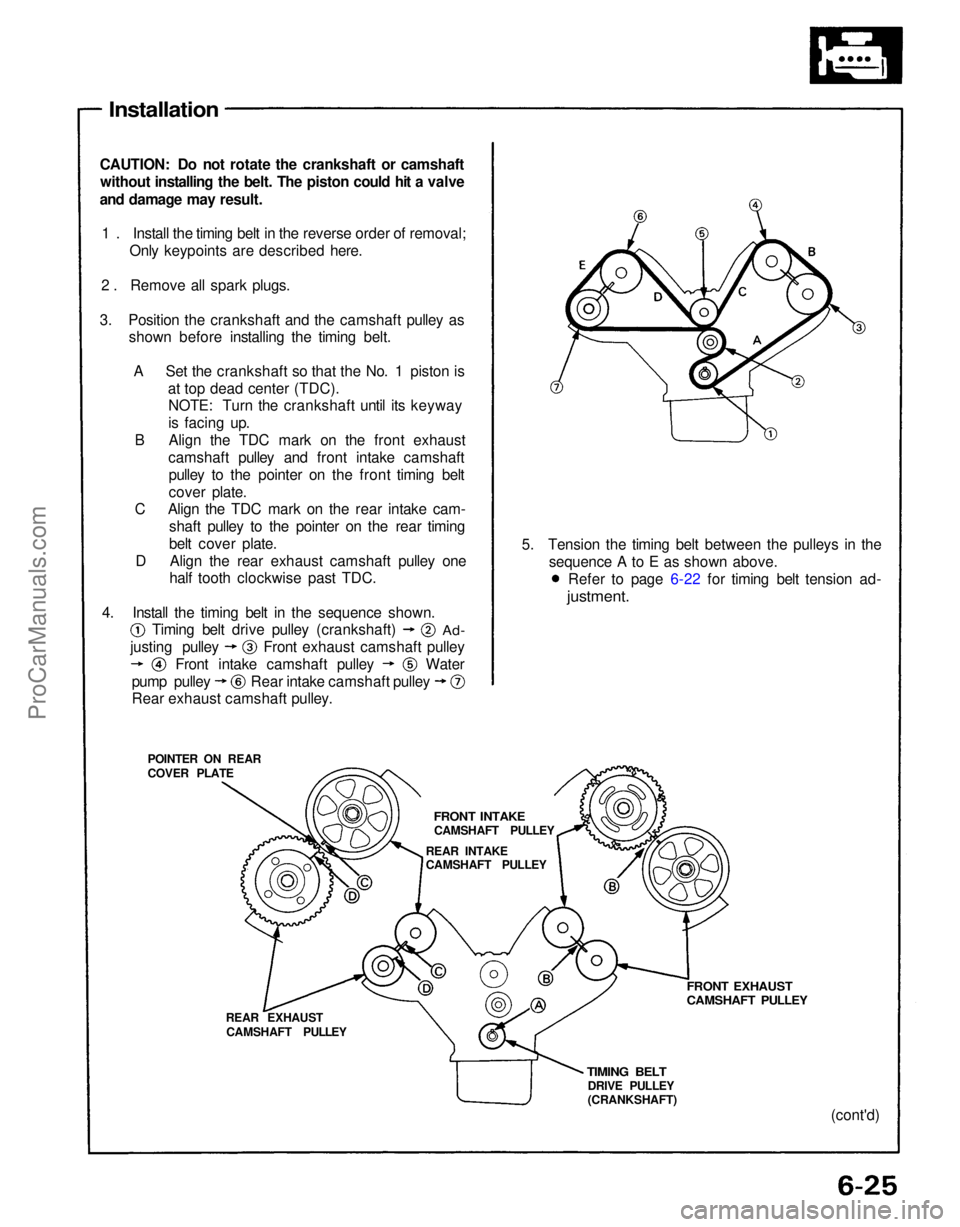
3. Position the crankshaft and the camshaft pulley as shown before installing the timing belt.
A Set the crankshaft so that the No. 1 piston is at top dead center (TDC).NOTE: Turn the crankshaft until its keyway
is facing up.
B Align the TDC mark on the front exhaust camshaft pulley and front intake camshaftpulley to the pointer on the front timing belt
cover plate.
C Align the TDC mark on the rear intake cam-
shaft pulley to the pointer on the rear timing
belt cover plate.
D Align the rear exhaust camshaft pulley one half tooth clockwise past TDC.
POINTER ON REAR
COVER PLATE
REAR EXHAUSTCAMSHAFT PULLEY
TIMING BELT
DRIVE PULLEY
(CRANKSHAFT)
FRONT EXHAUST
CAMSHAFT PULLEY
(cont'd)
5. Tension the timing belt between the pulleys in the
sequence A to E as shown above.
4. Install the timing belt in the sequence shown.
FRONT INTAKE
CAMSHAFT PULLEY
REAR INTAKE
CAMSHAFT PULLEY
Rear exhaust camshaft pulley.
Timing belt drive pulley (crankshaft)
Ad-
Water
justing pulley
Front intake camshaft pulley Front exhaust camshaft pulley
pump pulley Rear intake camshaft pulley Refer to page 6-22 for timing belt tension ad-
justment.ProCarManuals.com
Page 1394 of 1640
Ignition System
Ignition Coils/Spark Plugs Removal
CAUTION:
Ignition coils and spark plugs can become very hot in
use, do not touch them until the engine has cooled
down.
1. Remove the ignition coil covers.
2. Disconnect the 2-P connectors from the ignition
coils.
3. Remove the ignition coils.
4. Remove the spark plugs.
IGNITION COIL COVER
IGNITION COIL
VALVE COVER
PLATINUM TIP SPARK PLUG
RUBBER
SEAL
2-P CONNECTOR
NOTE: Different ignition coils and ignition coil
covers are used for the front and rear cylinders. Be
sure to use the correct ones when mounting them.ProCarManuals.com
Page 1640 of 1640
Ignition system
Component Location Index
IGNITION TIMING CONTROL SYSTEM
Troubleshooting, section 11Inspection and setting, page 23-91
Description, page 23-89
RADIO NOISE CONDENSER
Test, page 23-97
SPARK PLUGS (6)
Inspection, page 23-96
TACHOMETER CONNECTOR
(Engine revolution detected)
CYL/CRANK SENSOR
Troubleshooting, section 11 Replacement, section 5
IGNITION COILS (6) Removal, page 23-94 Test, page 23-95
IGNITER UNIT
Replacement, page 23-92Input Test, page 23-93 Troubleshooting, Section 11
SERVICE LOOPProCarManuals.com