Page 843 of 2103
CLUTCHClutch Master Cylinder. . .
CLUTCH MASTER CYLINDER
DISASSEMBLY AND REASSEMBLY
Piston repair kitBrake fluid DOT 3 or
DOT 4Grease:Rubber
(Non-turbo)
Engine (Turbo)>
Disassembly steps
1. Piston stopper ring rod assembly
Piston assembly
5. Return spring
6.Reservoir hose
121 mm (4.8 in.)
7.Reservoir cap8. Reservoir tank
9. Reservoir band
10. Nipple11. Clutch master cylinder body
INSTALLATION SERVICE POINT
PUSH ROD ASSEMBLY INSTALLATION
NOTE
Set the length of the push rod assembly to the shown
dimension to make the adjustment of the clutch peda l easier.
0 8 2 0 0 0 4
INSPECTION
lCheck the inside cylinder body for rust or scars.
lCheck the piston cup for wear or deformation.
lCheck the piston rust or scars.
lCheck the clutch pipe connection for clogging.
TSB Revision
Page 852 of 2103
21CLUTCH OVERHAUL Clutch
INSPECTION21200110043
Engine (Turbo) and Engine>
CLUTCH COVER ASSEMBLY
lCheck the diaphragm spring end for wear and uneven
height.
limit. if wear is evident ‘or height difference exceeds
Limit:
mm in.)
lCheck the pressure plate surface for wear, cracks a nd
seizure.
lCheck the strap plate rivets for looseness and replace
the clutch cover assembly if loose.
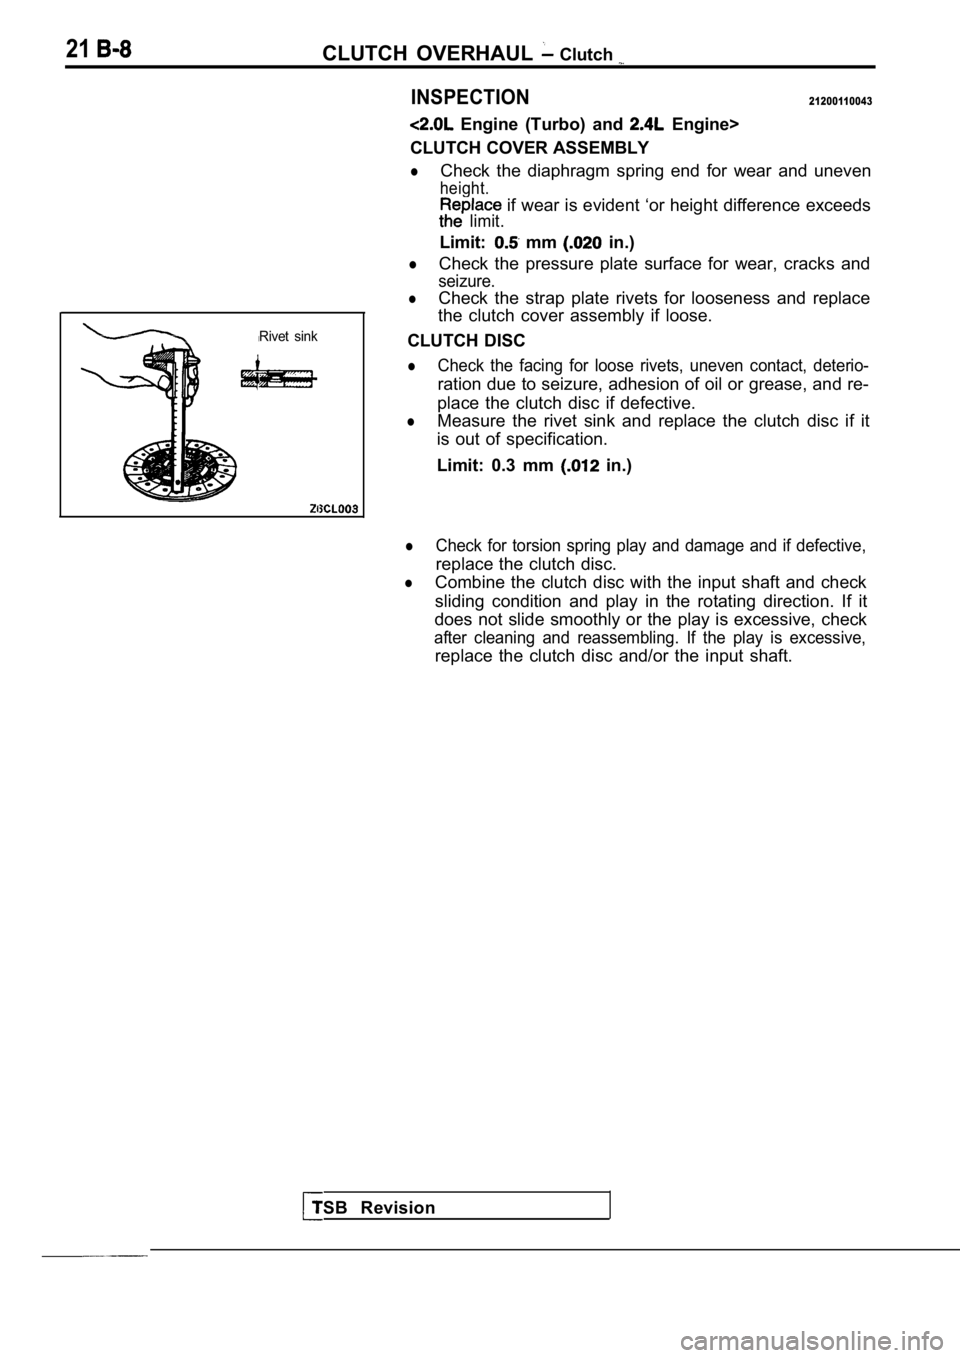
Rivet sink
TSB Revision
CLUTCH DISC
lCheck the facing for loose rivets, uneven contact, deterio-
ration due to seizure, adhesion of oil or grease, and re-
place the clutch disc if defective.
lMeasure the rivet sink and replace the clutch disc if it
is out of specification.
Limit: 0.3 mm
in.)
lCheck for torsion spring play and damage and if def ective,
replace the clutch disc.
lCombine the clutch disc with the input shaft and ch eck
sliding condition and play in the rotating directio n. If it
does not slide smoothly or the play is excessive, c heck
after cleaning and reassembling. If the play is exc essive,
replace the clutch disc and/or the input shaft.
Page 853 of 2103
CLUTCH OVERHAUL Clutch
CLUTCH RELEASE
Caution
Release bearing is packed with grease. do
wash it in cleaning solvent the like.
lCheck bearing for seizure, damage, noise, or improper
rotation. Check also diaphragm spring contact surfa ce
for wear.
lReplace bearing if its release fork contact surface is abnor-
mally worn.
RELEASE FORK
lReplace release fork if its bearing contact surface is abnor-
mally worn.
Engine (Non-turbo)>
CLUTCH
FLYWHEEL ASSEMBLY
l Check clutch assembly for contamination (dirt, oil) .
Replace clutch assembly, if required.
lCheck to see if the clutch disc hub are damaged.
Replace with new clutch assembly, if necessary.
lCheck for uneven wear on clutch fingers.
lCheck for broken clutch cover diaphragm spring fing ers.
Replace with new clutch assembly, if necessary.
CLUTCH RELEASE BEARING
lCheck to see if the release bearing is sticky or bi nding.
Replace bearing, if needed.
CLUTCH RELEASE LEVER/CLUTCH CONTROL EQUIP
STUD
lCheck linkage for excessive wear on the pivot stud and
fork fingers. Replace all worn parts.
TSB Revision
Page 855 of 2103
Clutch Release Cylinder
CLUTCH
Engine (Turbo) and Engine>
DISASSEMBLY SERVICE POINT
AND PISTON CAP REMOVAL
Remove the piston from the release cylinder using c ompressed
air.
Caution
1. Cover with shop towel to prevent the piston from
popping out.
2. Apply compressed air slowly to prevent brake flu id
from splashing.
INSPECTION
Check the inner of the release cylinder for
scratches or irregular wear.
l Check the piston cup for scratch or deformation, an d
the lip for wear.
TSB Revision
Page 859 of 2103

CONTENTS
MANUAL TRANSAXLE ENGINEMANUAL TRANSAXLE ENGINE
(NON-TURBO)>(TURBO) AND ENGINE>
GENERAL INFORMATION . . . . . . . . . . . . . . 22GENERAL INFORMATION . . . . . . . . . . . . . . . .
2
LUBRICANTS. . . . . . . . . . . . . . . . . . . . . . . . . . 24LUBRICANTS. . . . . . . . . . . . . . . . . . . . . . . . . . .6
ON-VEHICLE SERVICE. . . . . . . . . . . . . . . . .
2 4
Transaxle Oil Level Check . . . . . . . . . . . . . . . .
24
Transaxle Oil Replacement . . . . . . . . . . . . . . .
24
SERVICE SPECIFICATIONS. . . . . . . . . . . . .24
SPECIAL TOOLS. . . . . . . . . . . . . . . . . . . . . . .24
TRANSAXLE ASSEMBLY. . . . . . . . . . . . . . .28
TRANSAXLE CONTROL*. . . . . . . . . . . . . . . .25ON-VEHICLE SERVICE
. . . . . . . . . . . . . . . . 8
Shift Lever Assembly
. . . . . . . . . . . . . . . . . . . . .
27
TROUBLESHOOTING. . . . . . . . . . . . . . . . . . .24
Transaxle Oil Level Check . . . . . . . . . . . . . . . . .8
Transaxle Oil Replacement
. . . . . . . . . . .. . .
Transfer Oil Level Check ...... . . . . . . . . . . .
Transfer Oil Replacement. . . . . . . . . . . . . . . . . .8
SERVICE SPECIFICATIONS. . . . . . . . . . ...
SPECIAL TOOLS 7. . . . . . . . . . . . . . . . . .
TRANSAXLE ASSEMBLY
. . . . . . . . . . . . . . . . . . . . ... . . .
. . . . . . . . . . . . . . . . . . . . . . . . . . . .
. . 1 2
TRANSAXLE CONTROL*... . . . . . . . .
Shift Lever Assembly. . . . . . . . . . . . . . . . . . . . . .1 1
TRANSFER ASSEMBLY . . . . . . . .
TROUBLESHOOTING . . . . . . . . . . . . . . . . . .
WARNINGS REGARDING SERVICING OF SUPPLEMENTAL RESTRA
INT SYSTEM (SRS) EQUIPPED VEHICLES
WARNING!
(1)Improper service or maintenance of any component of the or any component, can lead to personalinjury or death to service personnel (from inadvertent firing of the air bag) or to the driver and passenger (from
rendering the inoperative).Service or maintenance of any or component must be performed only at an authorized MITSUBISHI dealer.(3)MITSUBISHI dealer personnel must thoroughly review this manual,and especially its GROUP
Restraint System and GROUP 00 Maintenance Service, before beginning any or maintenance of
any component of the or any component.
NOTEThe SRS includes the following components: warning light, air bag module,clock spring, and interconnecting
wiring. Other
components (that may have to be removed/installed in connection with service or maintenance)
are indicated in the table of contents by an asterisk
Page 866 of 2103
MANUAL TRANSAXLETroubleshooting!
ENGINE (TURBO) AND ENGINE> On-vehicle Service
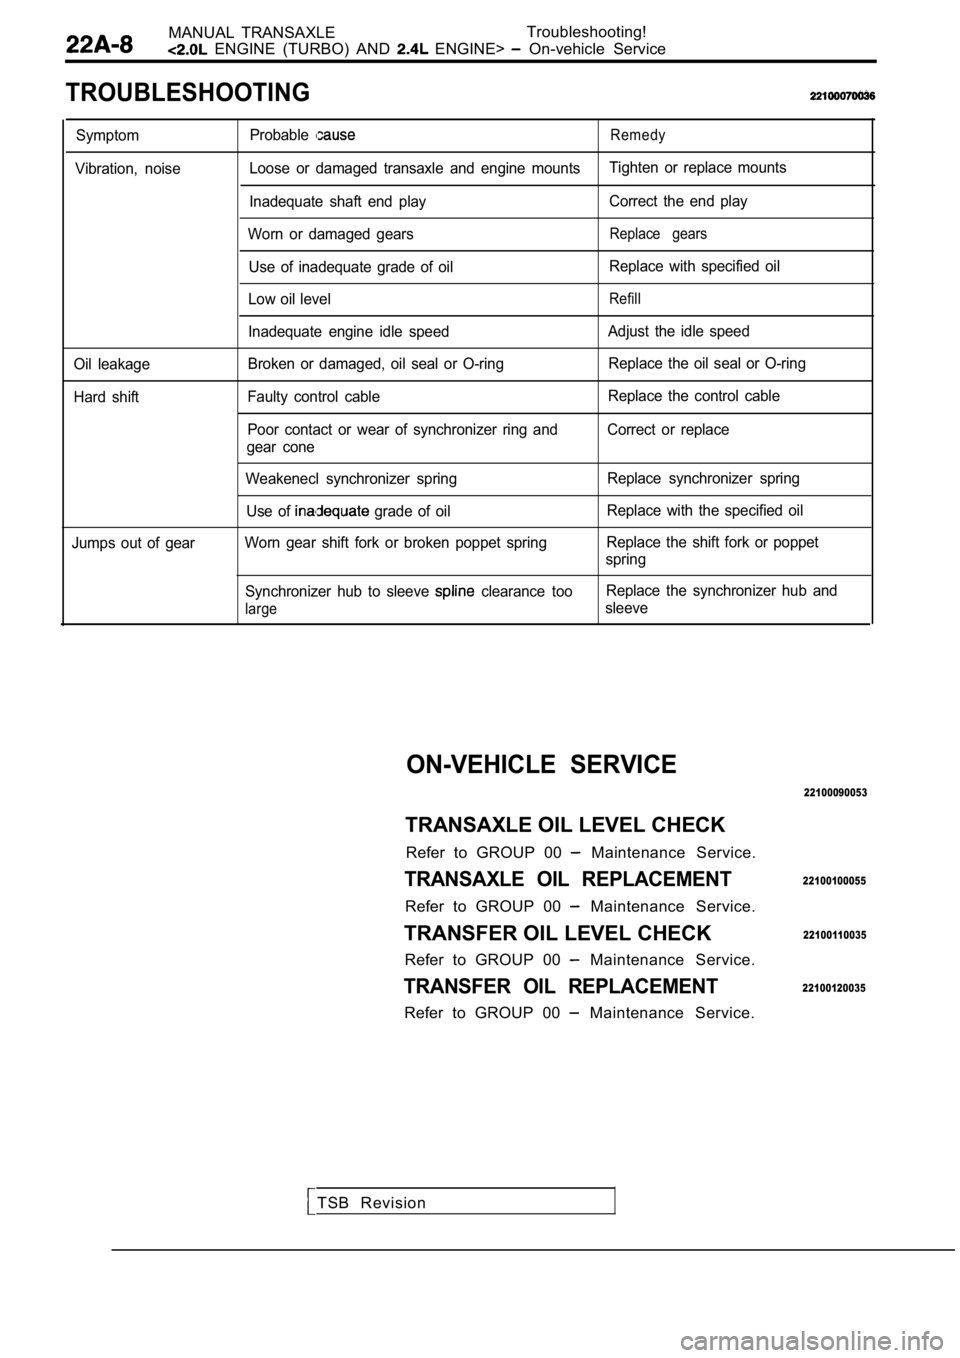
TROUBLESHOOTING
Symptom
Vibration, noise
Oil leakage
Hard shift
Jumps out of gear ProbableRemedy
Loose or damaged transaxle and engine mounts
Tighten or replace mounts
Inadequate shaft end play Correct the end play
Worn or damaged gears
Replace gears
Use of inadequate grade of oil Replace with specified oil
Low oil level
Refill
Inadequate engine idle speed Adjust the idle speed
Broken or damaged, oil seal or O-ring Replace the oil seal or O-ring
Faulty control cable Replace the control cable
Poor contact or wear of synchronizer ring and Correc t or replace
gear cone
Weakenecl synchronizer spring Replace synchronizer spring
Use of
grade of oil Replace with the specified oil
Worn gear shift fork or broken poppet spring Replace the shift fork or poppet
spring
Synchronizer hub to sleeve
clearance too
large
Replace the synchronizer hub and
sleeve
TSB Revision
ON-VEHICLE SERVICE
22100090053
TRANSAXLE OIL LEVEL CHECK
Refer to GROUP 00
Maintenance Service.
TRANSAXLE OIL REPLACEMENT
Refer to GROUP 00 Maintenance Service.
TRANSFER OIL LEVEL CHECK Refer to GROUP 00
Maintenance Service.
TRANSFER OIL REPLACEMENT
Refer to GROUP 00 Maintenance Service.
22100100055
22100110035
22100120035
Page 870 of 2103
MANUAL TRANSAXLE
ENGINE AND ENGINE> Transaxle
TRANSAXLE
REMOVAL AND INSTALLATION
Pre-removal Operationl Transaxle Oil Draining (Refer to GROUP 00 Maintenance Service.)l Removal
l Under Cover Removal
(Refer to GROUP 42
Under Cover.)
Engine>
Post-installation Operationl Supplying Transaxle Oil (Refer to GROUP 00 Maintenance Service.)l Shift Lever Operation Check
l Speedometer Operation Check
l Under Cover Installation
(Refer to GROUP 42
Under Cover.)
l Battery installation
56
6942
Engine (Turbo)>51
32
6
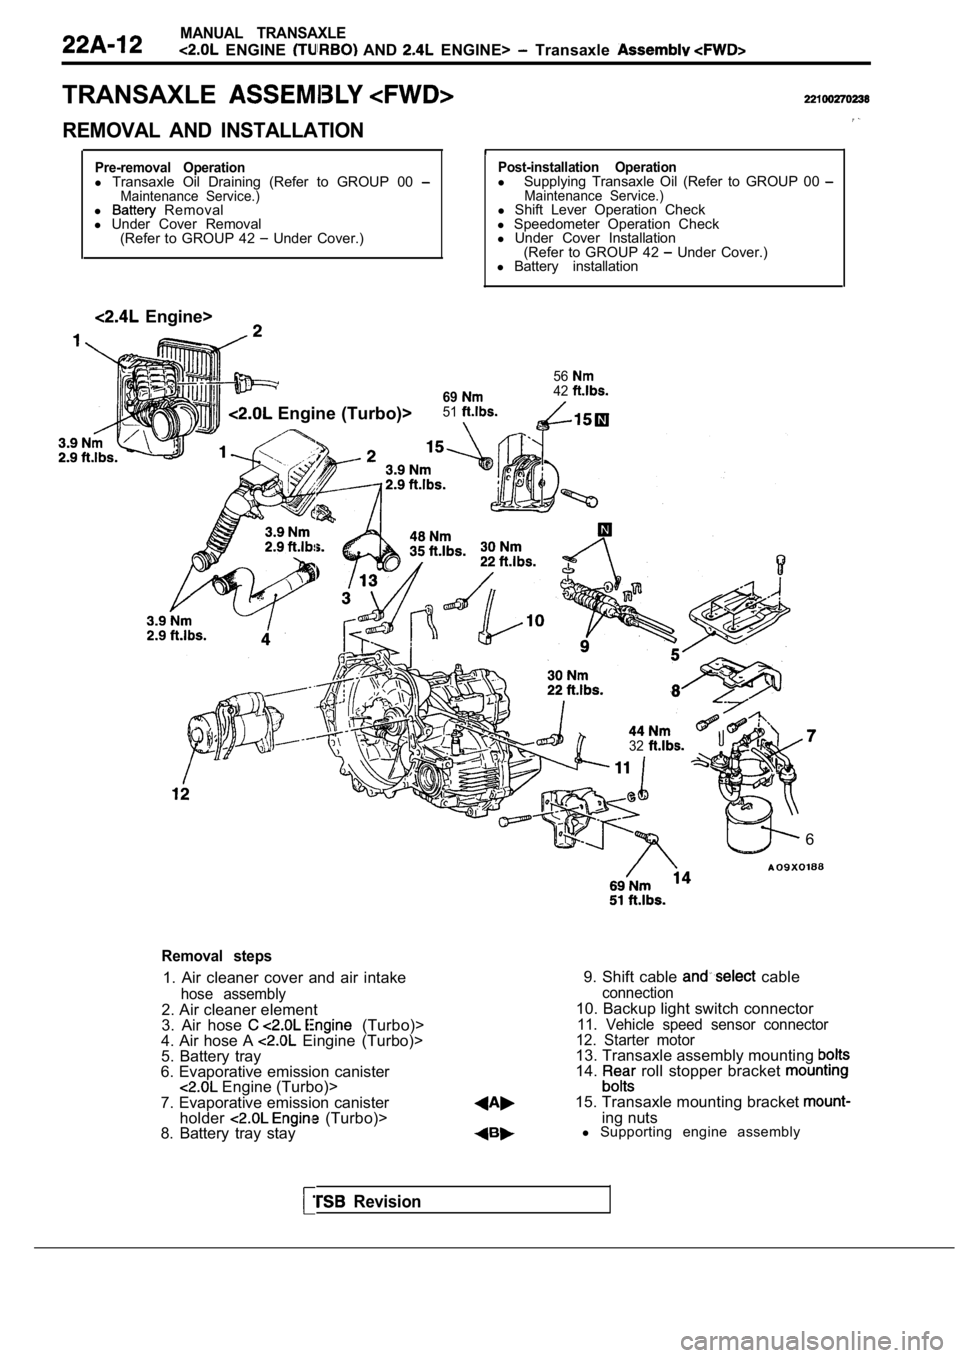
Removal steps
1. Air cleaner cover and air intake
hose assembly2. Air cleaner element
3. Air hose (Turbo)>
4. Air hose A Eingine (Turbo)>
5. Battery tray
6. Evaporative emission canister
Engine (Turbo)>
7. Evaporative emission canister holder
(Turbo)>
8. Battery tray stay 9. Shift cable
cableconnection10. Backup light switch connector11. Vehicle speed sensor connector
12. Starter motor
13. Transaxle assembly mounting 14. roll stopper bracket
15. Transaxle mounting bracket ing nuts
l Supporting engine assembly
Revision
Page 874 of 2103
MANUAL ,
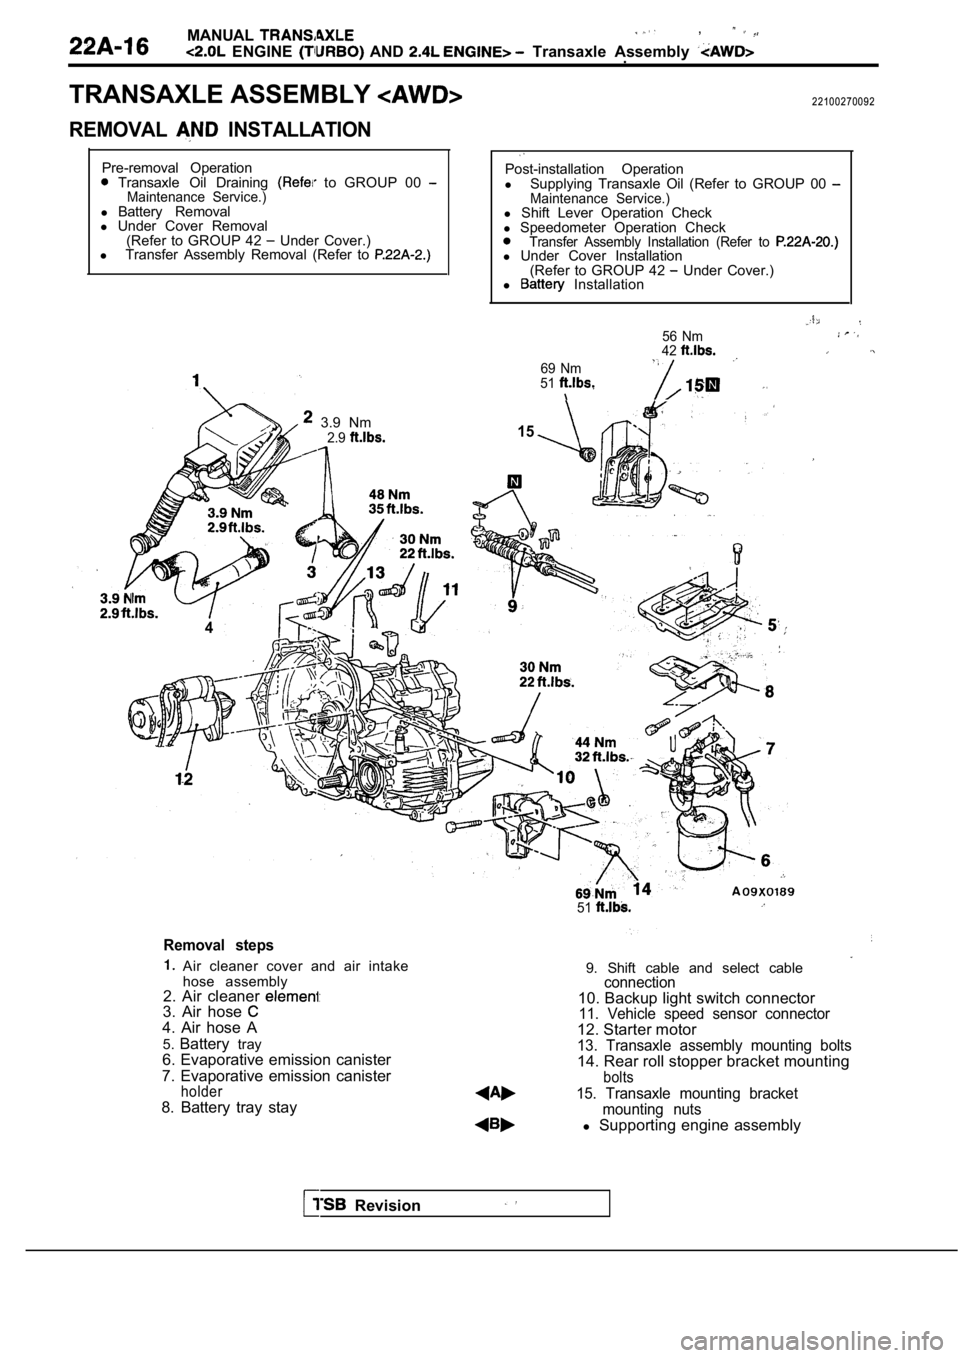
ENGINE AND Transaxle Assembly .
TRANSAXLE ASSEMBLY
REMOVAL INSTALLATION
22100270092
Pre-removal Operation
Transaxle Oil Draining to GROUP 00 Maintenance Service.)l Battery Removal
l Under Cover Removal
(Refer to GROUP 42
Under Cover.)
l Transfer Assembly Removal (Refer to
3.9 Nm
4
2.9
Post-installation Operation
l Supplying Transaxle Oil (Refer to GROUP 00
Maintenance Service.)l Shift Lever Operation Check
l Speedometer Operation Check
Transfer Assembly Installation (Refer to l Under Cover Installation
(Refer to GROUP 42 Under Cover.)
l Installation
69 Nm
51
56 Nm
42
15
51
Removal steps
Air cleaner cover and air intake
hose assembly
2. Air cleaner
3. Air hose 4. Air hose A
5. Battery tray
6. Evaporative emission canister
7. Evaporative emission canister
holder8. Battery tray stay 9. Shift cable and select cable
connection10. Backup light switch connector11. Vehicle speed sensor connector12. Starter motor13. Transaxle assembly mounting bolts14. Rear roll stopper bracket mountingbolts
15. Transaxle mounting bracket
mounting nuts
l Supporting engine assembly
Revision