1988 PONTIAC FIERO steering wheel
[x] Cancel search: steering wheelPage 1602 of 1825
LIGHTING SYSTEMS AND HORNS 8B-3
HORNS the steering wheel sounds the horn by closing the horn
relay (in the convenience center behind the instrument
panel, to the right of the steering column). The horns
The holm(§) are mounted behind the front fascia use a solenoid-operated diaphragm to generate sound.
on the driver's side. $ushing the pad in the center of See Section 8A-40 for wiring and circuit information.
ON-CAR SERVICE
Wiring diagrams and other diagnosis information
is given in Section
8A. Information on properly
repairing wiring harnesses, connectors, etc., is on
8A-5.
Most lighting problems are caused by loose
connectors, open or shorted wiring, burned-out bulbs,
bad switches, inadequate ground or blown fuses. Many
of these require only replacement of a defective part.
When replacing a part that requires a special procedure
(such as a lens and housing assembly sealed together),
follow the instructions normally included in the
replacement parts package.
When removing a part that requires special
sealing items (such as sealing washers), be sure to
reinstall those items when replacing the part. Also, if
any body sealing items (grommets, etc.) are disturbed,
be sure to repair them so the passenger compartment
remains properly sealed.
EXTERlOR LIGHTS
BACK-UP LIGHTS
Fig. 8B-8
Replacement Bulb: Trade No. 1156, 32
Candlepower
To replace a back-up light bulb, see "Rear
Tail/Stop/Turn Signal Lights9' in this section. For
information on the back-up light switch on the
transmission, see Section
7.
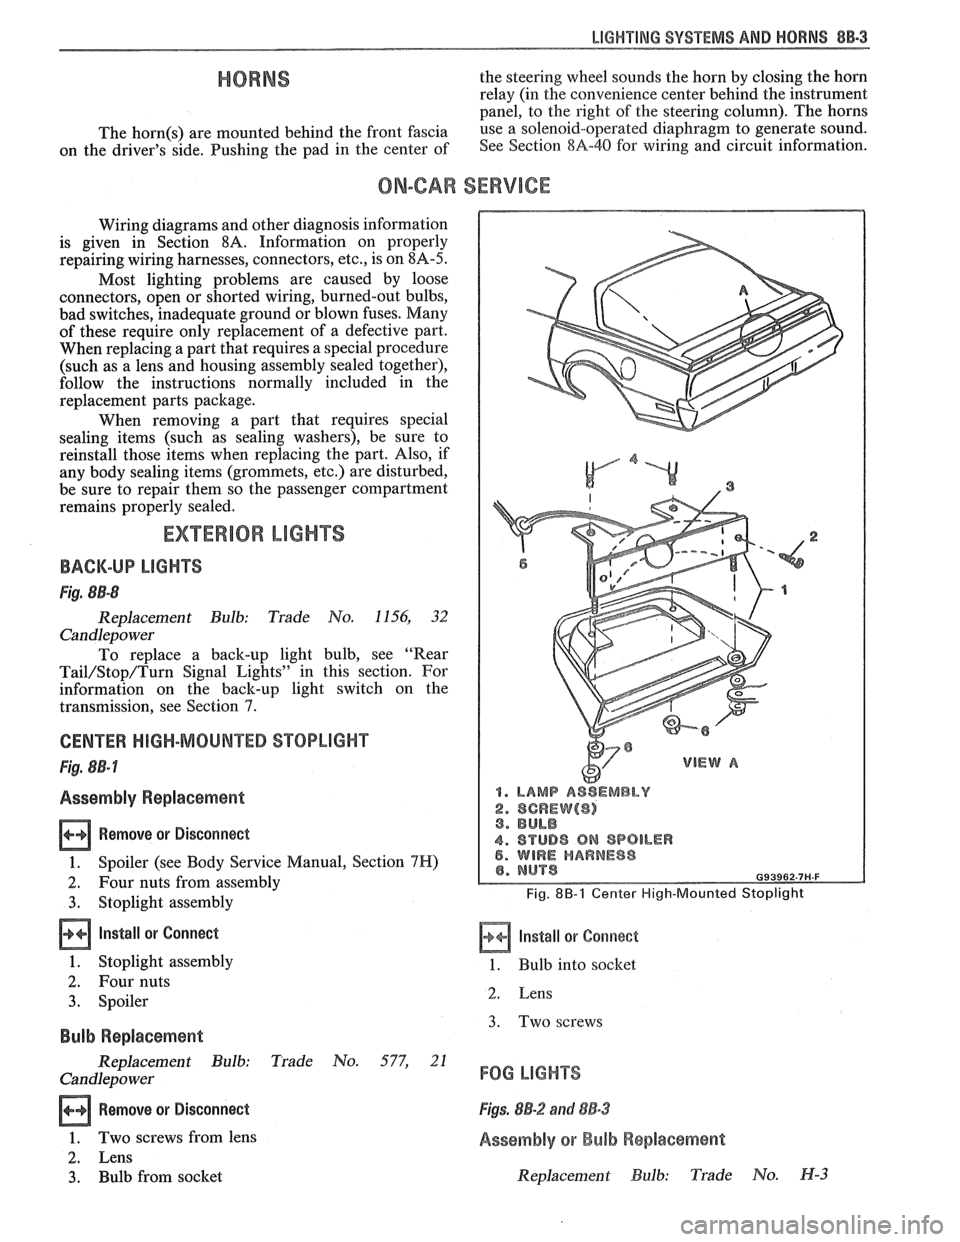
CENTER HIGH-MOUNTED STOPLIGHT
Fig. 8B-7
Assembly Replacement
Remove or Disconnect
1. Spoiler (see Body Service Manual, Section 7H)
2. Four nuts from assembly
3. Stoplight assembly
Install or Connect
1. Stoplight assembly
2. Four nuts
3. Spoiler
Bulb Replacement
Replacement Bulb: Trade No. 577, 21
Candlepo wer
Remove or Disconnect
1. Two screws from lens
2. Lens
3. Bulb from socket
1. LAMP ASSEMBLY
2. SCREW($) 3. BULB
4. STUD8 ON SPOILER 5. WIRE HARNESS
Fig. 8B-1 Center High-Mounted Stoplight
Install or Corrnect
1. Bulb into socket
2. Lens
3. Two screws
FOG LIGHTS
Figs. 8B-2 and 88-3
Assembly or Bulb Replacement
Replacement Bulb: Trade No. H-3
Page 1650 of 1825
RADIO SYSTEMS AND ANTENNAS 9A-1
SECTION 9A
0 SYSTEMS AND ANTENNAS
CONTENTS
............................................. General Description .................................... 9A-1 Radio Operation 9A-4
Radio
............................................................ 9A-1 ETR AM/FM Stereo (UM-7) ....................... 9A-4
Antennas
........................................................ 9A- 1 ETR Stereo Cassette (UM-6) ......................... 9A-5
Fixed Antenna
.......................................... 9A- 1 ETR Stereo/Cassette/Eaualizer
Diagnosis ........................................................
Radio ....................... .. ................................
Static and Noise .................................... .....
........................................ Popping Noise
Preliminary Diagnostics
.............................
Antenna ................................. .. ................
Tape Player .................. .... .......................
Service Procedures ....................................
Radio and Speakers ........................... .............
Radio Noise Suppression Equipment ............
Stereo Cassette Tape Player ..........................
Tape & Tape Player Care ........................
(UX-1) ..................................................... 9A-6
Advanced ETR
Stereo/Cassette/Equalizer Touch
Control
.................................... ... .............. 9A-7
On-Car Service .............................................. 9A-9
Radio Receiver
............................................ 9A-9
Radio Steering Wheel Controls
..................... 9A-9
Audio Amplifier
........................................... 9A-9
Radio Suppression
..................................... 9A-9
Front Speaker
................................................. 9A-9
............... Rear Speaker; Sub Woofer Speaker
9A-9
Antenna
..................... .. ............................. 9A- 10
GENERAL DESCRIPUION
RADIO ANTENNAS
For radios and radio use see the "Radio Fixed Antenna
Operation" section. ETR means 'Electronically Tuned The
fixed antenna on the right front fender
Receiver'. cannot be adjusted up or down. It may provide
improved reception in rural areas.
- The fixed antenna is designed to withstand most
car washes without damage. If the antenna becomes
slightly bent, you can straighten it by hand. The
antenna can be replaced if severely bent (by vandalism,
etc.). Antennas must be kept clean for good
performance.
RADIO
Because radio problems are normally repaired at
authorized warranty repair stations, the tendency is to
remove the set when a problem is reported, without any
preliminary diagnosis. This results in a large number
of radios being "No Trouble Found" units when
received by the warranty repair stations. Often the
trouble can be corrected without radio removal. wire.
If equipped with
A/C, the blower motor has a
built-in capacitor. Extra electrical equipment added to
the static if not properly grounded or wiring was
improperly routed.
Weak
FM station reception will be affected by
nearby buildings, car speed and direction. These
"flutter" and "fading" conditions are characteristic of
weak FM signals.
ETR radios require clock and button reset if the
battery is disconnected.
Popping Noise
Static and Noise Operating devices such as turn signals, pushing in
cigarette lighter, operating stop lights, etc., may cause
Ground strap connections must be clean and
a popping noise on distant (weak) AM signals.
tight, spark plug cables must be TVRS type and in
good condition and resistance-type spark plugs used.
Preliminary Diagnostics
Capacitors are used in the generator, heating/air
conditioning system, and fuse panel to reduce noise
The inconvenience of driving without a radio
entering the radio through the feed wires. If the car has
while the set is being serviced can often be avoided if
a heater only, the capacitor is in the blower motor feed
the following quick checks are used to eliminate
Page 1656 of 1825
RADIO SVSEEMS AND ANTENNAS 9A-7
fully up. If this occurs, move it down until the
hiss disappears.
This radio has automatic Dynamic Noise
Reduction
(DNRB) to reduce high frequency
background hiss on AM, FM,
AM Stereo, FM
Stereo, and tape.
e Station Preset Buttons
The radio has four pushbuttons for presetting
favorite stations:
1. Select
the desired band (AM or
FM), and
tune to the desired station.
2. Press SET button. Within five secorads press
one of the four station buttons.
The radio will tune in the selected station
whenever you press that station button.
NOTE: Up to three additional stations on
each band may be preset by "pairing" the
pushbuttons:
1. Tune in the desired station;
2. press SET, and within five seconds press
any two
adjacant pushbuttons at the same
time. (The station will return when the two
buttons are pressed again.)
CB Seek and Scan
Use the SEEM and SCAN buttons for automatic
station tuning.
Press SCAN button to sample each station being
received automatically. To stop SCAN, press
SCAN button again.
The SCAN indicator light on the frequency dial
will be lit during SCAN operation.
Press the SEEK button to locate and retain the
next listenable station on the band automatically.
The
FM stereo indicator will light when tuned to
an
FM station broadcasting in stereo. Stereo
(dual channel) sound is more realistic.
o Time Set
To set hour, press SET button. The SET indicator
light on the dial will then light up. Then press
SCAN button, holding SCAN button in until
correct hour appears.
To set minutes, press SET button. The SET
indicator light will then light up. Then press
SEEK button, holding SEEK button in until
correct minute appears.
NOTE: After you press the SET button, the radio
frequency will be displayed. The time of day will
be displayed when you press the SCAN or SEEK
button.
e To Operate Tape Player:
Insert the cassette squarely through the door.
This automatically switches the unit from radio
to tape operation. If the sound is garbled (or there
is no sound), eject the tape and reinsert it
squarely.
To advance the tape, press the forward ("FWD")
button. To listen to the earlier portion of the tape,
press the reverse ("REV") button. To stop
forward or reverse movement, press the opposite
button lightly.
To listen to the next selection, slide the
"SEARCH" button to the right and press the forward
("FWD") button. The radio will seek the
next selection.
To listen to the previous selection again, slide the
"SEARCH" button to the right and press the
reverse ("REV") button. The radio will repeat
the previous selection.
The "ON" light, to the right of the search switch,
will be on while the search function is engaged.
When the left triangle indicator light is lit, the top
side of the tape is playing. When the right triangle
indicator light is lit, the bottom side of the tape
is playing.
To play the other side of the tape before the
present side has ended, press the upper left knob.
This will automatically play the opposite side of
the tape.
NOTE: When end-of-tape is reached in one
direction, the unit will automatically play the
other side of the tape. To remove the tape or listen
to the radio, push the EJECT button.
When the ignition is turned off, the tape is
automatically ejected.
The equalization setting which is desired will
vary according to the type of tape being used.
Chrome
(CrO,) and metal tapes usually have 70
usec equalization, while standard (iron) tapes
have
120 usec equalization. The tape bias is often
indicated on the cassette label or case.
Select the setting for proper tape equalization as
follows:
1. Select 70
usec (push button in).
2. Select 120 usec (button is out).
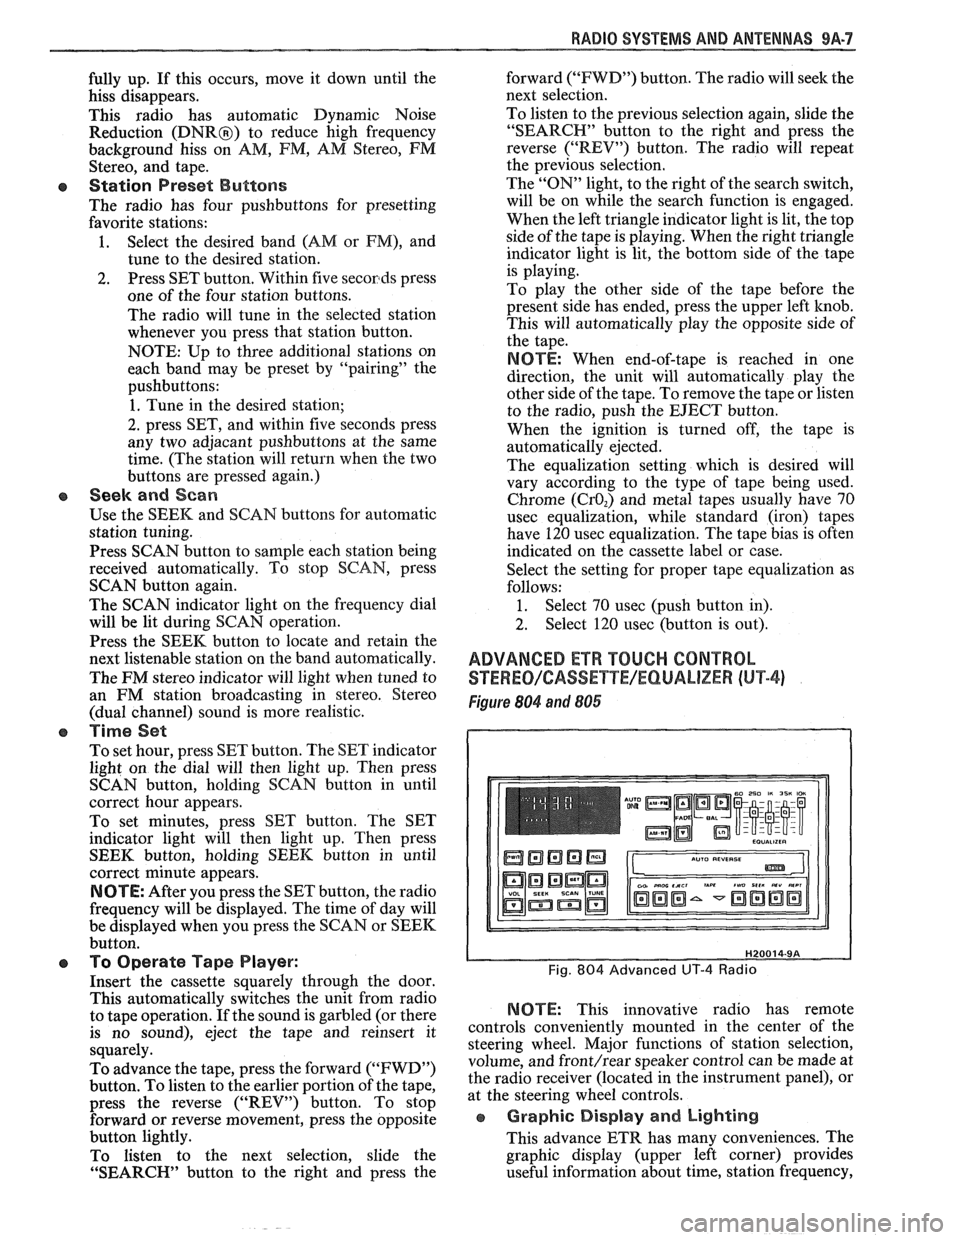
ADVANCED ETR TOUCH CONTROL
STEWEO/CASSETYE/EQUALIZER (hl"P-4)
Figure 804 and 806
NOTE: This innovative radio has remote
controls conveniently mounted in the center of the
steering wheel. Major functions of station selection,
volume, and
front/rear speaker control can be made at
the radio receiver (located in the instrument panel), or
at the steering wheel controls.
e Graphic Display and Lighting
This advance ETR has many conveniences. The
graphic display (upper left corner) provides
useful information about time, station frequency,
Page 1657 of 1825
9A-8 RADIO SYSTEMS AND ANTENNAS
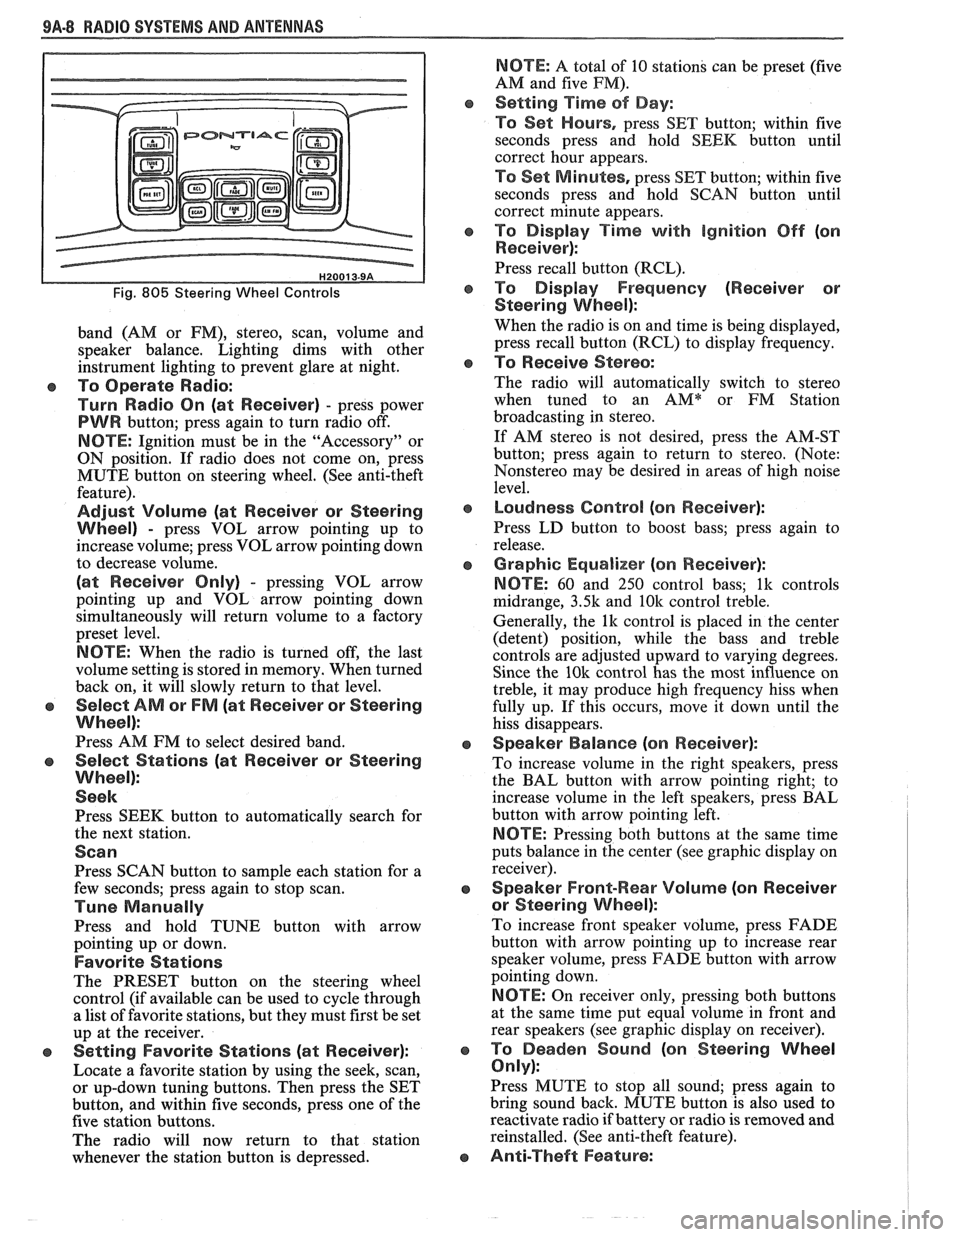
Fig. 805 Steering Wheel Controls
band (AM or FM), stereo, scan, volume and
speaker balance. Lighting dims with other
instrument lighting to prevent glare at night.
To Operate Radio:
Turn Radio On (at Receiver)
- press power
PWR button; press again to turn radio off.
NOTE: Ignition must be in the "Accessory" or
ON position. If radio does not come on, press
MUTE button on steering wheel. (See anti-theft
feature).
Adjust Volume (at Receiver or Steering
Wheel)
- press VOL arrow pointing up to
increase volume; press VOL arrow pointing down
to decrease volume.
(at Receiver Only) - pressing VOL arrow
pointing up and VOL arrow pointing down
simultaneously will return volume to a factory
preset level.
NOTE: When the radio is turned off, the last
volume setting is stored in memory. When turned
back on, it will slowly return to that level.
Select AM or FM (at Receiver or Steering
Wheel):
Press AM FM to select desired band.
Select Stations (at Receiver or Steering
Wheel):
Seek
Press SEEK button to automatically search for
the next station.
Scan
Press SCAN button to sample each station for a
few seconds; press again to stop scan.
Tune Manually
Press and hold TUNE button with arrow
pointing up or down.
Favorite Stations
The PRESET button on the steering wheel
control (if available can be used to cycle through
a list of favorite stations, but they must first be set
up at the receiver.
e Setting Favorite Stations (at Receiver):
Locate a favorite station by using the seek, scan,
or up-down tuning buttons. Then press the SET
button, and within five seconds, press one of the
five station buttons.
The radio will now return to that station
whenever the station button is depressed.
NBTE: A total of 10 stations can be preset (five
AM and five
PM).
Setting Time of Day:
To Set Hours,
press SET button; within five
seconds press and hold SEEK button until
correct hour appears.
TO Set M inlotes, press SET button; within five
seconds press and hold SCAN button until
correct minute appears.
To Display Time with ignition Off (on
Receiver):
Press recall button (RCL).
To Display Frequency (Receiver or
Steering
Wheel):
When the radio is on and time is being displayed,
press recall button (RCL) to display frequency.
To Receive Stereo:
The radio will automatically switch to stereo
when tuned to an
AMQr FM Station
broadcasting in stereo.
If AM stereo is not desired, press the AM-ST
button; press again to return to stereo. (Note:
Nonstereo may be desired in areas of high noise
level.
Loudness Control (on Receiver):
Press LD button to boost bass; press again to
release.
Graphic Equalizer (on Receiver):
NOTE:
60 and 250 control bass; lk controls
midrange,
3.5k and 10k control treble.
Generally, the
lk control is placed in the center
(detent) position, while the bass and treble
controls are adjusted upward to varying degrees.
Since the
10k control has the most influence on
treble, it may produce high frequency hiss when
fully up. If this occurs, move it down until the
hiss disappears.
Speaker Balance (on Receiver):
To increase volume in the right speakers, press
the BAL button with arrow pointing right; to
increase volume in the left speakers, press BAL
button with arrow pointing left.
NBTE: Pressing both buttons at the same time
puts balance in the center (see graphic display on
receiver).
Speaker Front-Wear Volume (on Receiver
or Steering Wheel):
To increase front speaker volume, press FADE
button with arrow pointing up to increase rear
speaker volume, press FADE button with arrow
pointing down.
NOTE: On receiver only, pressing both buttons
at the same time put equal volume in front and
rear speakers (see graphic display on receiver).
To Deaden Sound (on Steering Wheel
Only):
Press MUTE to stop all sound; press again to
bring sound back. MUTE button is also used to
reactivate radio if battery or radio is removed and
reinstalled. (See anti-theft feature).
Anti-Theft Feature:
Page 1658 of 1825
RADIO SYSTEMS AND ANTENNAS 9A.9
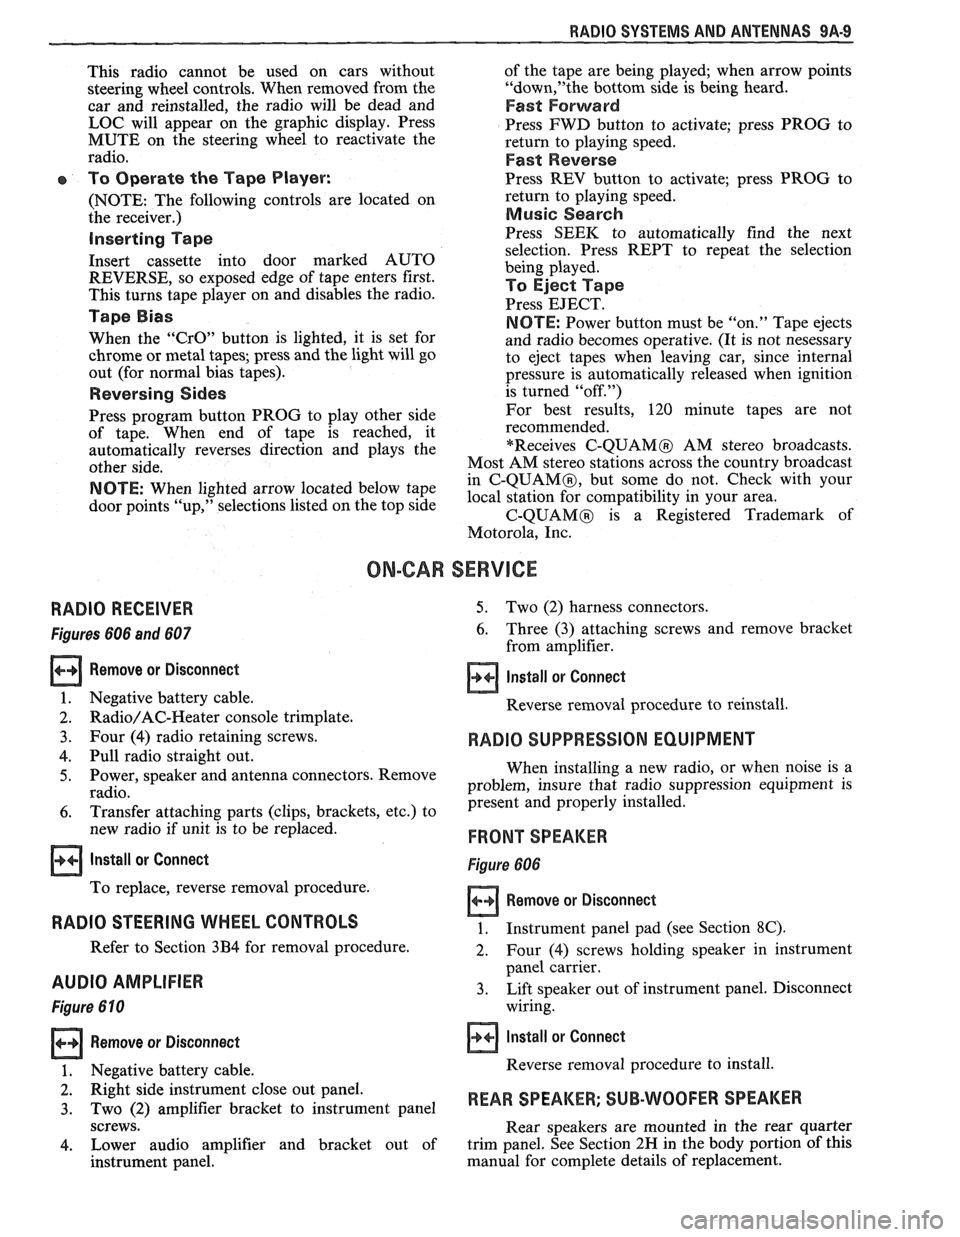
This radio cannot be used on cars without
steering wheel controls. When removed from the
car and reinstalled, the radio will be dead and
LOC will appear on the graphic display. Press
MUTE on the steering wheel to reactivate the
radio.
To Operate the Tape Player:
(NOTE: The following controls are located on
the receiver.)
inserting f ape
Insert cassette into door marked AUTO
REVERSE, so exposed edge of tape enters first.
This turns tape player on and disables the radio.
Tape Bias
When the "CrO" button is lighted, it is set for
chrome or metal tapes; press and the light will go
out (for normal bias tapes).
Reversing Sides
Press program button PROG to play other side
of tape. When end of tape is reached, it
automatically reverses direction and plays the
other side.
NOTE: When lighted arrow located below tape
door points "up," selections listed on the top side of
the tape are being played; when arrow points
"down,"the bottom side is being heard.
Fast Forward
Press FWD button to activate; press PROG to
return to playing speed.
Fast Reverse
Press REV button to activate; press PROG to
return to playing speed.
Music Search
Press SEEK to automatically find the next
selection. Press REPT to repeat the selection
being played.
To Eject Tape
Press EJECT.
NOTE: Power button must be "on." Tape ejects
and radio becomes operative. (It is not nesessary
to eject tapes when leaving car, since internal
pressure is automatically released when ignition
is turned "off.")
For best results,
120 minute tapes are not
recommended.
"Receives
C-QUAMO AM stereo broadcasts.
Most AM stereo stations across the country broadcast
in
C-QUAMO, but some do not. Check with your
local station for compatibility in your area.
C-QUAMO is a Registered Trademark of
Motorola, Inc.
ON-GAR SERVICE
RADIO RECEIVER
Figures 606 and 607
Remove or Disconnect
1. Negative battery cable.
2. Radio/AC-Heater console trimplate.
3. Four (4) radio retaining screws.
4. Pull radio straight out.
5. Power, speaker and antenna connectors. Remove
radio.
6. Transfer attaching parts (clips, brackets, etc.) to
new radio if unit is to be replaced.
Install or Connect
To replace, reverse removal procedure.
RADIO STEERING WHEEL CONTROLS
Refer to Section 3B4 for removal procedure.
AUDIO AMPLIFIER
Figure 610
Remove or Disconnect
5. Two (2) harness connectors.
6. Three (3) attaching screws and remove bracket
from amplifier.
Install or Connect
Reverse removal procedure to reinstall.
RADIO SUPPRESSION EQUIPMENT
When installing a new radio, or when noise is a
problem, insure that radio suppression equipment is
present and properly installed.
FRONnSPEAKER
Figure 606
Remove or Disconnect
1. Instrument panel pad (see Section 8C).
2. Four (4) screws holding speaker in instrument
panel carrier.
3. Lift speaker out of instrument panel. Disconnect
wiring.
Install or Connect
1. Negative battery cable. Reverse removal procedure to install.
2. Right side
instrument close out panel.
3. Two (2) amplifier bracket to instrument panel REAR SPEAKER; SUB-WOOFER SPEAKER
screws.
Rear speakers are mounted in the rear quarter
4. Lower audio amplifier and bracket out of trim panel. See Section
2N in the body portion of this
instrument panel. manual for complete details
of replacement.
Page 1818 of 1825
Battery .......................................................... 6D1-2
Brakes
.................................................................. 5-3
................................ Bumper. Energy Absorber 2B-2
........................................... Charging System 6D3- 1
........................................ Cooling and Radiator 6B-3
....................... ................ Cranking System .. 6D2- 1
Cruise Control
................................. 9B-4, 8A-34-0
......................................... Drive Axles (Rear) 4B1-2
Engine Performance
......................................... 6-3
.............................................. Ignition System 6D4-3
Instrument Panel, Gages and
.................................................... Console 8C-3
............................. Miscellaneous Accessories 9G-2
............................................... Power Antenna 9A-2
Power Recirculation Ball
.................................. 3-3
Power Steering Pumps
........................................ 3-4
.............................................. Propeller Shaft 4A- 1
................................................................ Radio 9A-1
.............. Seal Replacement Recommendations 3- 10
........................ . Steering Gear and Pump Leaks 3-10
.............. Strut Dampener and Shock Absorber 3- 12
.................................................... Trim
Height 3- 14
.................................................. Steering Linkage 3-3
Steering, Suspension, Tires and
Wheels
.............................. .. ................. Section 3
Steering Wheels and Columns
............................ 3-4 ......................................................... Vibrations 3- 14
................................................. Wheel Bearing 3-14 .............................................. Wheels and Tires 3- 13
........................... Windshield Wiper System 8El-2
............................................. Digital Cloclc 8A- 150-0
Disc Brake Caliper Assembly
.......................................... (3000/3 100 Series) 5B1
............... ................... General Description .. 5B 1-2 ............................................... On-Car Service 5B 1-2
...................................... Caliper Assembly 5B 1-2
.......................... Shoe and Lining Assembly 5B 1-4
...................................................... Unit Repair
5B 1-4
.......................................... Caliper Overhaul 5B 1-4
?isc Brake Caliper Assembly (3548
Series)
............................................................. 5B6
General Description
....................................... 5B6-2
On-Car Service
............................................... 5B6-2
....................................... Caliper Assembly 5B6-2
.......................... Parking Brake Adjustment 5B6-3
.......................... Shoe and Lining Assembly 5B6-4
Unit Repair
............................... ... .................... 5B6-5
Caliper Overhaul
.......................................... 5B6-5
.......................... Door Lock Relay (Circuit) 8A- 130-0
Driveability and Emissions
........................ Section 6E
Fuel Injection (Port)
..................................... 6E3-1
Index
................................... follows 6E3-(213-2
...................................... Fuel Injection (TB 1) .6E
2- 1
...................................... Index follows 6E2-C 14-4
Drum Brake Assembly
................... ......... Section 5C3
General Description
......................... ... ............ 5C3-1
........................................... On-Car Service 5C3- 1
Backing Plate
........................................ 5C3-7
....................................... Brake Adjustment .5C 3-4
..................................... Brake Components 5C3-1
Parking Brake Adjustment
.......................... 5C3-4
Wheel Cylinder ........................................... 5C3-5 ..................................................... Unit Repair 5C3-7
............................ Wheel Cylinder Overhaul 5C3-7
CHASSIS INDEX m3
E
........................ Electric Rear Window Defogger 9G-2 ............................................ Electrical Diagnosis 88-1
Audible Alarms .............................................. 81%-77
.......................................... Component Data 818-201
.................................................... Headlights 8A- 100
........................ Heating and Air Conditioning 8A-60 .............................................................. Index $A- 1
........................................... Instrument Panel .8 A-82
.................................................. Introduction 8A-2
........................................................... Lights .8 A- 100
............................................ Repair Procedure 88-5 ........................................ Seats and Mirrors 8A- 141
......................................................... Symbols 8A-3
Troubleshooting Procedures ............................ 8A-4
.................................................. ... Windows .. .8 A- 120
............................................... Wiper/Washers .8 A-90
Electronic Glare Control Mirror
........................ 9G-4
.......................... Electronic Instrument Cluster 86-4, 6
Emissions and Driveability
....................................... Fuel Injection (Port) 6E3- 1
....................................... Fuel Injection (TB1) 6E2-1
Engine
.... V-6 2.8L VIN CODE S RPO (LB8) Section 6A2
.... V-8 5.OL VIN E and F, 5.7L VIN 8 Section 6A3
................................................. Cooling Section 6B
Engine Specifications
............................................................ V-6 6A2-26
............................................................. V-8 683-28
General Description
.............................................................. V-6 61 ............................................................. V-8 6A3-1
Lubrication System ........................................................... V-6 ..6A 2- 1
................................................................ V-8 6A3-2
Multi-port Fuel Injection
..................................................... VIN S 8A-20-0
................................................. VIN 8 8A-23-0
............ Throttle Body Injection (VIN E) 8A-22-0
................ Tuned Port Injection (VIN F) 8A-2 1-0
On-Vehicle Service Camshaft
......................................................... V-6 6A2-16
................................ ..................... V-8 .. 6A3-16
Camshaft Bearings
......................................................... V-6 6A2-16
...................................................... V-8 ..6A 3-17
Connecting Rod Bearings
......................................................... V-6 .6A 2- 18
................................................... V-8 6A3-13
...................... Crankcase (Front Cover) .6A
2- 15
............ Crankcase/Camshaft Sensors Section 6E3
Crankshaft
....................................................... V-6 6A2-25
......................................................... V-8 .6A 3-28
......................................... Cylinder Block .6A 3-26
Cylinder Head
.......................................................... V-6 682-12
.......................................................... V-8 6A3-11
Dipstick Tube .............................................. 6A3-7
Engine Assembly
....................................................... V-6 6212
.......................................................... V-8 6A3-27
Exhaust Manifold
........................................................ V-6 .6A 2-9
V-8
....................................................... 6A3-7
Page 1821 of 1825
6- CHASSIS INDEX
Upper Air Outlet Deflectors ...................... 8C-12
Interior Lights ............................................. 8A- 1 17-0
Intermediate Shaft (Steering Column)
.............. 3B5-3
J
Jump Starting .................................................... 6D 1-4
Junction Block
((2238) ................................. 8A-202-2
L
Lamp Monitoring ......................................... 8A- 1 1 1-0
License Plate Lights .............................................. 8B-2
Light Switch
.................................................... 8A- 12-0
Lighting Systems and Horns
...................... Section 8B
General Description ......................................... .8 B- 1
Exterior Lights
............................................ 8B- 1
Horns ....................... .. ................................. 8B-3
On-Car Service
.................................................. 8B-3
Exterior Lights 8B-3
Horns
.............................................................. 8B-9
Replacement Bulb Specifications .................... 8B-10
Lights (Exterior) Electrical Diagnosis
Back-up
...................................................... 8A- 1 12-0
Fog ............................................... 8A- 100.3,10 3.0
Front
Marker/Park/Hazard .................... 8A-110-0
Hazard with Lamp Monitor .................... 8A-103-0
Headlights .................................................. 8A- 100-0
High Level Stop
..................................... 8A-110-0
License .................................................. .8A.110.3, 4
Rear Marker
........................................... .8 A. 1 10.3, 4
Stop ........................................................... 8A-110-1
Tail ......................................................... .8 A. 1 10.3, 4
Tail with Monitor
................ .... ........... 8A- 1 1 1-2
Turn
......................................................... 8A- 1 10-0
Lights (Interior) Electrical
Diagnosis Cargo Compartment
............................. 8A- 1 14- 1
Courtesy
................................................. 8A- 1 14-0
Dome
.................................. .. ...................... 8A- 1 14-0
Glove Box .................................................. 8A- 1 14-0
Lights Dimming
...................................... 8A- 1 17-0
Reading
...................................................... 8A- 1 14-0
Lower Heater Outlet
........................................ 1A-14
Lubrication Fitting Locations .............................. OB-6
M
Maintenance and Lubrication .................... Section OB
Manual Transmission
. 5 Speed 77 mm .... Section 7B
Diagnosis
........... .. ............................................ 7B-2
On-Vehicle Service
.......................................... 7B-3
Repairs
................................... .... .................... 7B- 12
Special Tools
................................................. 7B-20
. Specifications .............................................. 7B 19
Maintenance Items
................................................ OB-2
Master Cylinder
........................................ Section 5A3
General Description
...................................... ..5A 3.2
On-car Sevice
................................................ 5A3-2
Unit Repair ..................................................... .5A 3.2
Master Cylinder Overhaul
......................... .5A 3.2
Master Cylinder Reservoir
......................... .5A 3.3
Metric Fasteners
................................................ OA- 1
Metric-English Conversion Table ..................... .O A. 10
Miscellaneous Accessories
........................ Section 9G
Diagnosis
.......................................................... 9G-2
Dash/Console Mounted Accessory
Switches
.................................................... 9G-4 Electric
Rear Window Defogger
................ 9G-2
Power Remote Control
Rearview
......................... Mirror ...................... .. 9G-2
Rally Gages
................................................. 9G-2
Tachometer
.................................................. 9G-2
..................................... General Description 9G-4
Electric Glare Control Monitor
.................. 9G-4
Electric Rear Window Defogger
................ 9G-2
Power Remote Control
Rearview
Mirror ..................................................... 9G-2
Rally Gages
................................................. 9G-1
Tachometer
................................................. 9G-1
Trip Odometer
............................................ 9G-1
............................................. On-Car Service 9G-4
Power Remote Control Mirror
.................... 9G-4
Rally Gages. Tach
..................................... 9G-4
Rear Window Defogger
.............................. 9G-4
Mirrors..Power ............................................ 8A- 141-0
Automatic
Day/Night ............................. 8A- 143-0
..................................... Defogger. Mirror 8A-61-0
.......................................... Model Identification OA-'
Muffler ................................................................. 6Fi
N
Neutral Start and Back-Up Lamp
Switch
...................................... ..
0
On-Vehicle Service
Air Conditioning
.................................... ... . 1B-20
Automatic Transmission
............................... .7A 1.3
Battery
........................................................ 6D1-5
................................ ......................... Brakes ... 5-7
Bumpers
......................................................... 2B-4
Charging System
.............................. ... ........... 6D3-2
Chassis Sheet Metal
.......................................... 2C-7
Clutch
................................................................ 7C-5
Cranking System
............................................ 6D2-4
Cruise Control ............................................... 9B-6
Disc Brake Caliper Assembly,
3000/3 100 Series .......................................... 5BliC
Disc Brake Caliper Assembly,
3548 Series
................................................... 5B6-3
Drum Brake Assembly .................................... 5C3-1
Engine (V-6) .................................................... 6A2-7
Engine (V-8) ................................................ -6A3-5
Engine Cooling ....................................... .. .... 6B- 14
Front Suspension
........................................... 3C-1
Horns and Lighting System .............................. 8B-3
Ignition System
.............................................. 6D4-5
Instrument Panel, Gages and
Console
.......................................................... 8C-4
Lighting System and Horns
.......................... .... 8B-3
Miscellaneous Accessories
.......................... .... 9G-4
Power Head Assembly
. Tandem
Diaphragm
................................................. 5D-2
Power Steering Gear and Pump
.................... 3B7-3
Propeller Shaft
............................................. 4A-1
.......................... Radio Systems and Antennas 9A-9
Rear Axle
.......................................................... 4B-8
Rear Axle (Borg Warner)
........................... ... 4B 1-7
Steering Linkage ............................................. 3B6-2
........................ Steering Wheels and Columns 3B5-2
Wheel Alignment
......................................... 3A-2
Windshield Wiper
- Washer System ................ 8E-3
Page 1823 of 1825
8- CHASSIS INDEX
Recommended Fluids and Lubricants ................ OB-6
Relay Rod
......................................................... 3B6-2
Remote Mirror Control
...... See Body Service Section
5H.1. 15
Repair Procedures
.......................................... 88-50
S
........................................ Scheduled Maintenance OB- 1
Seats (Power) ....................................... Lumbar Support 8A- 145-0
............................. Sequential Fuel Injection 6E3-C2- 1
Service Engine Soon Light
.................................... 8C-3
Sheet Metal and Grille
................................ Section 2C
......................................... General Description .2 C. 1
........................................... Service Procedures .2 C. 1
................................................................. Hood .2 C. 1
...................................................... Hood Hinge 2C-2
Hood Latch and Cable
...................................... 2C-2
Paint
.............................................. Color Matching 2C-5
................................................ Identification -32-6
Interior Plastic Parts ...................................... 2C-6
................................................ Shock Absorbers 3D-
1
Shoe and Lining Assembly
. Brake
............................................ 3000/3 100 Series 5B1-3
3548 Series ...................................................... 5B6-4
Side Marker Lights
.............................................. 8B-2
........ Speakers See 8A- 150-0 & Body
Manual Section
6H- 1
.................... Spark Plug Gap .. .................. 6E3-13-3
................................ Speaker and Speaker Grille 9A-9
Special Tools
............................................ Air Conditioning 1 B-3 5
Air Conditioning Compressor
................................................. Overhaul 1D1-21
........................ Automatic Transaxle AT-700-R4-64
................................................................ Brakes SF-1
Clutch ................................................................ 7C-8
................................................................ Rear 4B1-20
....................................... Rear (Borg Warner) 4B-20
........................... Driveability and Emissions .6 E. 17
................................................ Engine Cooling 6B- 14
Power Steering Pump
& Gear ...................... 3B7-17
............................................... Propeller Shaft .4 A. 12
Steering Wheels and Columns
.......................... 5-35
Specifications Automatic Transmission Unit
............................................ Repair AT-700-R4-59
..................................................... Battery 6D 1-7
................................................................ Brakes 5F-1
Bumpers
......................................................... 2B-5
Charging System
................ .. ................... 6D3-3
.............................................................. Clutch .7 (2.8
....................................... Cranking System 6D2- 1 1
Driveability and Emissions ............................ 6E-23
................................................ Engine (V-6) ..6A 2.26
Engine (V-8) .................................................. 683-28
........................................ Front Suspension 3C- 10
Power Steering Gear and Pump
.................. 3B7-18 ............................................. Propeller Shaft .4 A. 12 ........................................................ Rear Axle 4B-19 ............................ Rear Axle (Borg Warner) 4B 1- 19
Rear Suspension
.............................................. 3D-9
.......................................... Replacement Bulbs 8Br 10 .............................................. Steering Linkage 3B6-6
Steering Wheels and Columns
...................... 3B5-35
........................................ Wheel Alignments 3A-4
....................................................... Speedometer 8C-2
........................................ Speedometer (Removal) 8C-5
...................................................... Speed Sensors 8C-1
Starter ........................................ Section 6D2. 8A-30-0
............................................. Starter (Circuit) 8A-30-0
Steering Linkage ...................................... Section 3B6
....................................... General Description 3B6-1
........................ Maintenance and Adjustments 3B6-1
................................................ On-Car Service 3B6-2
..................................................... Idler Arm 3B6-4
................................................ Pitman Arm 3B6-5
.................................................... Relay Rod 3B6-3
Tie Rods
...................................................... 3B6-2
.................................................. Specifications 3B6-6
Steering, Suspension, Tires and
Wheels Diagnosis
............................................................. 3-1
Steering Wheels and Columns
............................ 3B5-1
..................................... General Information 3B5- 1
Maintenance and Adjustments
...................... 3B5-'
On-Car Service .............................. .. ........... 3B5
Checking for Accident Damage
.................. 3B5-5
Intermediate Shaft ............... .. .................... 3B5-3
Park Lock Cable .......................................... 3B5-4
Standard Column
............................. Automatic Transaxle 3B5-13
Manual Transaxle ................................. 3B5- 19
Tilt Column
.............................. Automatic Transaxle 3B5-27
.................................. Manual Transaxle 3B5-19
Unit Repair Intermediate Shaft
...................................................... Assembly 3B5-6
................................................. Special Tools 3B5-35
Torque Specifications
.................................... 3B5-35
............................................. Starting System 8A-30-0
........................................ Strut Assembly (Front) 3C-4
.................................... ..... Symbols Chart ... 8A-3-0
T
.......................................................... Tachometer 9G-1
Tail/Stop/Turn Signal/Lights .......................... 8B-2
Temperature Cable
.............................................. 112 A-
Temperature Warning Light ................................ 8C-3
Theft Deterrent (Circuit)
.............................. 8A-133-0
Tie Rods
.............................................................. 3B6-2
Tires and Wheels
........................................ Section 3E
Diagnosis
.................................................. Section 3
General Information
......................................... 3E-1
................................................... Metric Tires 3E-2
....................................... Replacement Tires .31 E-
.................................................... Tire Placard 3E-2
........................................................... Wheels 3E-2
Maintenance and Adjustments
.......................... 3E-2
.......................... Aluminum Wheel Cleaning 3E-9
............................. ......... Inflation of Tires .. 3E-3
........................................ Tire Chain Usage 3E-4
.................................................. Tire Rotation 3E-3
.............................................. Wheel Repair 3E-2
...................................... Wheel Studs/Nuts 3E-3
........................................... Service Operations 3E-4
........................ Aluminum Wheel Cleaning 3E-9
.................................... Balance Precautions 3E-7
............................ Balancing Tire and Wheel 3E-7
.............................................. Compact Spare 3E-6
........................ Correcting Nonuniform Tires 3E-8