Page 461 of 962
INSPECTION21-8. OIL PRESSURE LAMP
[Brake fluid level switch]
Use ohmmeter to check switch for resistance
and continuity.
If found defective, replace switch.
The oil pressure lamp circuit consists of the oil
pressure switch installed to the cylinder block
and the lamp (warning lamp) inside the combi-
nation meter.
The oil pressure switch so operates that it is
switched OFF when oil pressure is produced by
the started engine and then fed to switch.
Fig. 21-23W/R : White/Red
6 : Black
RI0 : RedlBlack
1. Battery
2. Main switch
3. Fuse4. Oil pressure lamp
6. Oil pressure switch
B/El : Black/Blue
B/W : Black/White
Y/0 : Yellow/Black
W/Y : White/Yellow
Fig. 21-24
INSPECTION
[Oil pressure switch]
Use a ohmmeter to check the switch continuity.
During engine
Running
No continuity
obtained (- 52 1
IAt Engine StopContinuity obtained
(052)
1. To wiring harness
2. Cylinder block
Fig. 21-2521-14
Page 462 of 962

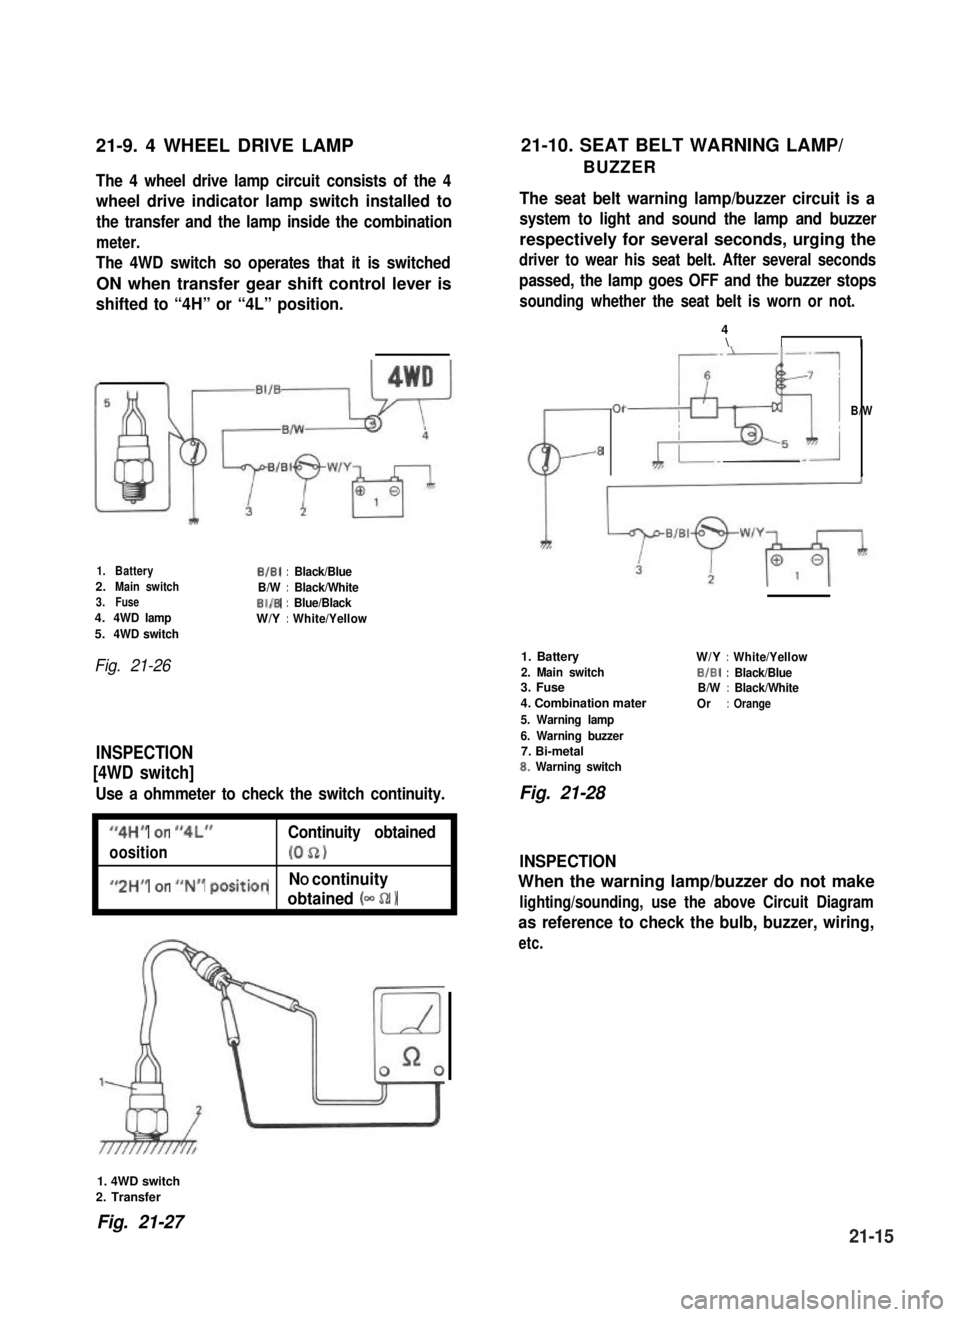
21-9. 4 WHEEL DRIVE LAMP21-10. SEAT BELT WARNING LAMP/
BUZZERThe 4 wheel drive lamp circuit consists of the 4
wheel drive indicator lamp switch installed to
the transfer and the lamp inside the combination
meter.
The 4WD switch so operates that it is switched
ON when transfer gear shift control lever is
shifted to “4H” or “4L” position.
The seat belt warning lamp/buzzer circuit is a
system to light and sound the lamp and buzzer
respectively for several seconds, urging the
driver to wear his seat belt. After several seconds
passed, the lamp goes OFF and the buzzer stops
sounding whether the seat belt is worn or not.
1.BatteryB/B1:Black/Blue2.Main switchB/W:Black/White3.FuseBI/B:Blue/Black4.4WD lampW/Y:White/Yellow5.4WD switch
Fig. 21-26
INSPECTION
[4WD switch]
Use a ohmmeter to check the switch continuity.
I
“4H” or “4L”Continuity obtained
oosition(052)I
I
#,2HM or ##N## positionNO continuity
obtained (- 52 1I
CL-
01
8
4\II
B/W
1. Battery
2. Main switch3. Fuse
4. Combination mater
5. Warning lamp
6. Warning buzzer7. Bi-metal8. Warning switch
W/Y:White/Yellow
BIBI:Black/BlueB/W:Black/White
Or:Orange
Fig. 21-28
INSPECTION
When the warning lamp/buzzer do not make
lighting/sounding, use the above Circuit Diagram
as reference to check the bulb, buzzer, wiring,
etc.
1. 4WD switch
2. Transfer
Fig. 21-2721-15
Page 463 of 962

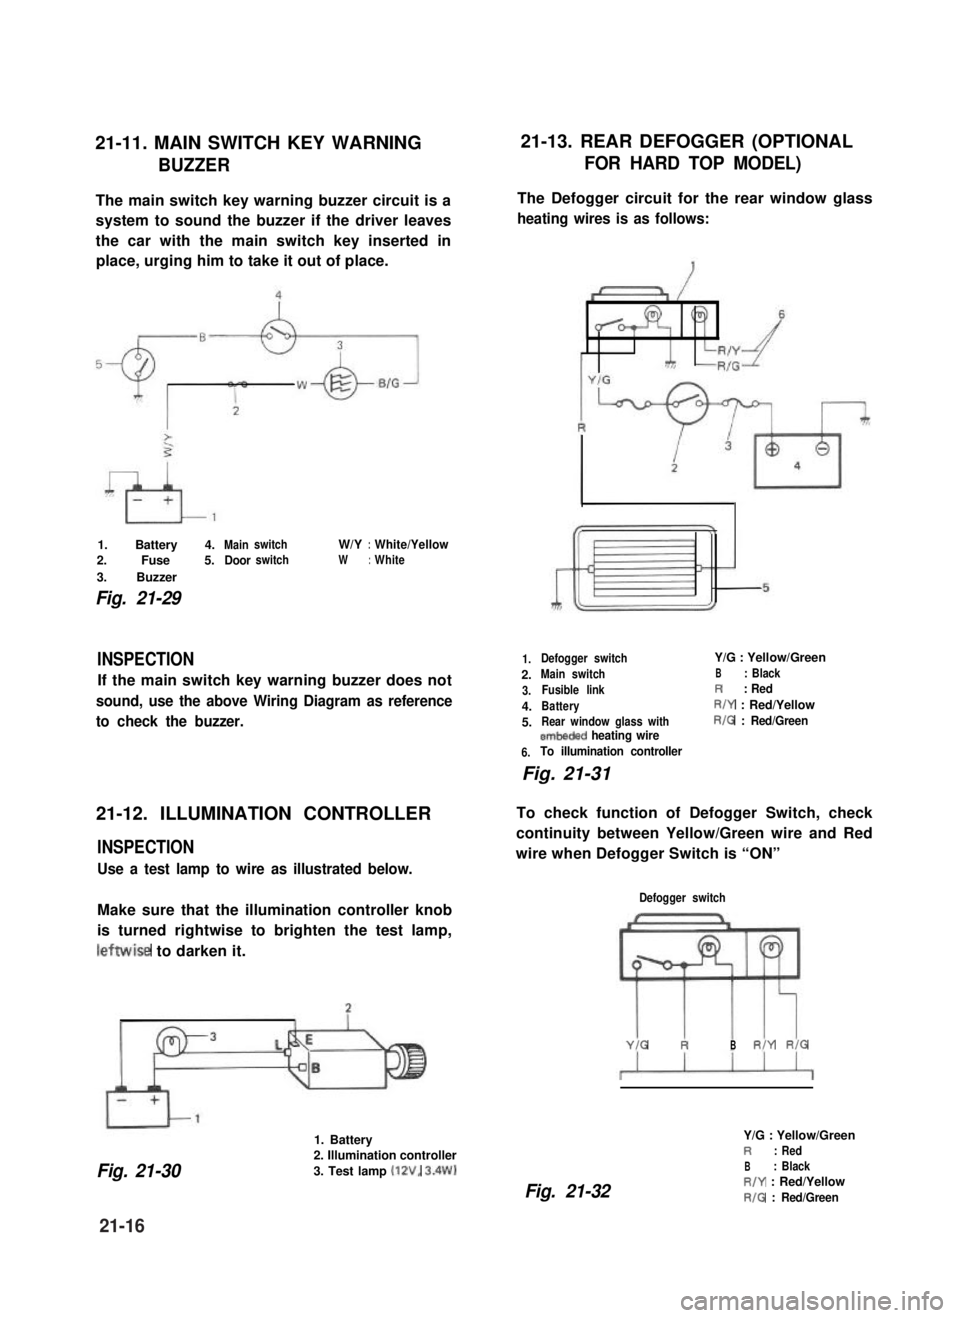
21-11. MAIN SWITCH KEY WARNING21-13. REAR DEFOGGER (OPTIONAL
BUZZERFOR HARD TOP MODEL)
The main switch key warning buzzer circuit is a
system to sound the buzzer if the driver leaves
the car with the main switch key inserted in
place, urging him to take it out of place.
1. Battery 4.MainswitchW/Y:White/Yellow
2. Fuse 5.DoorswitchW:White
3. Buzzer
Fig. 21-29
INSPECTION
If the main switch key warning buzzer does not
sound, use the above Wiring Diagram as reference
to check the buzzer.
21-12. ILLUMINATION CONTROLLER
INSPECTION
Use a test lamp to wire as illustrated below.
Make sure that the illumination controller knob
is turned rightwise to brighten the test lamp,
leftwise to darken it.
1. Battery
Fig. 21-30
2. Illumination controller
3. Test lamp (12V, 3.4W)
The Defogger circuit for the rear window glass
heating wires is as follows:
1.
2.
3.
4.
5.
6.
Defogger switchY/G : Yellow/Green
Main switchB: Black
Fusible linkR: Red
BatteryR/Y : Red/Yellow
Rear window glass withR/G : Red/Greenembeded heating wire
To illumination controller
Fig. 21-31
To check function of Defogger Switch, check
continuity between Yellow/Green wire and Red
wire when Defogger Switch is “ON”
Defogger switch
YIG RBR/Y RIG
Fig. 21-32
Y/G : Yellow/GreenR: Red
B: BlackR/Y : Red/Yellow
R/G : Red/Green
21-16
Page 465 of 962
21-14. FUSE BOX
The fuses in the fuse box is wired as follows.
Head light (R)
Fuse box
Head light (L)Battery7
Horn, Interior light, Door warning
buzzer, ctock (optional)
Stop light
Hazard warning light-W/GI10AW,YI
Cigarette lighter (optional),
Radio (optional)
-w’B++-B7Ignition coil, Fuel cut solenoid,
TWSV, MCSV, vent solenoid,-B/W15A
3
BIBI-
ECM
Heater blower motor-L9
Rear defogger (optional)-Y/G15A
Wiper motor, washer motor-Y/El15A:: BIBI-
Turn signal light, Back-up light-Y10A
Illumination light, License light,
Meter illumination light
-R’y++lFront position and tail light (RI,
Side marker light (RI--RIG5A:: RIB
Lighting switch
Front position and tail light (L), --R,a,
Side marker light (L)
-t
-c
Mainswitch
Tostarter
B/R--,
-
21-18
Page 468 of 962
Fig. 21-39
Instrument Panel Wiring
1.Wire harness No.2
2. Side marker light3.Head light
4.Earth
5.Washer motor
6. To oil pressure gauge
7. To combination light
16
1.Wire harness No. 1
2.To wire~harness No.2
3.To wire harness No.2
4. To fuse box5.Horn relay
6. To combination switch7.To clutch switch
8.Tostop lampswitch15.Doorwarning buzzer
9. To heater blower motor16. Check relay
10.Toradio17.To wipermotor
Il. To heater fan switch18.To illumination lamp
12. To cigar light19. To optional meter
13.Toradio20.Toclock
14.ToECM21.Tometer
Fig. 21-40
21-21