1987 SUZUKI GRAND VITARA check oil
[x] Cancel search: check oilPage 83 of 962
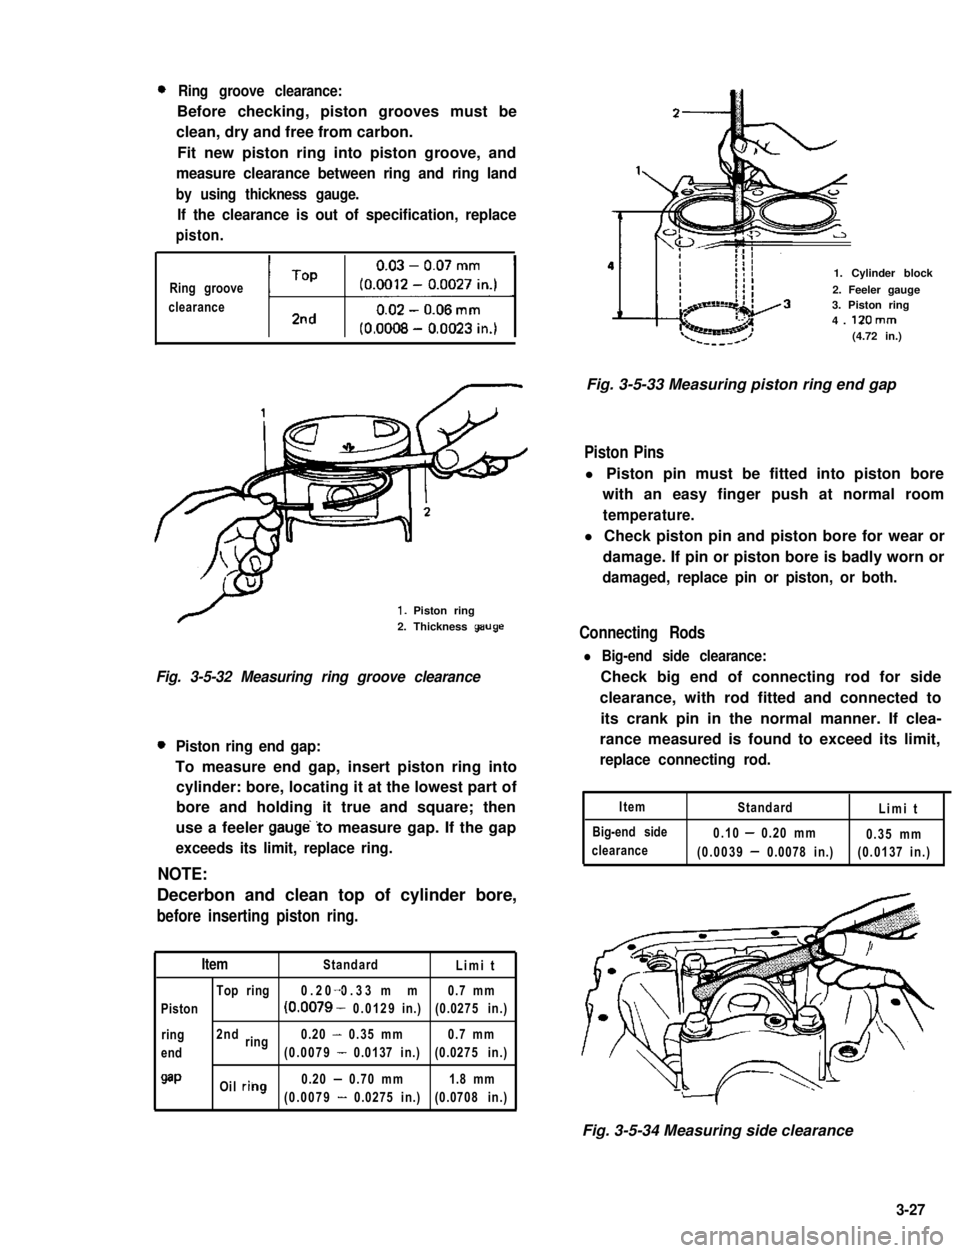
0Ring groove clearance:
Before checking, piston grooves must be
clean, dry and free from carbon.
Fit new piston ring into piston groove, and
measure clearance between ring and ring land
by using thickness gauge.
If the clearance is out of specification, replace
piston.
Ring groove
clearanceti1
1. Piston ring
2. Thickness geuge
Fig. 3-5-32 Measuring ring groove clearance
0Piston ring end gap:
To measure end gap, insert piston ring into
cylinder: bore, locating it at the lowest part of
bore and holding it true and square; then
use a feeler gauge’to measure gap. If the gap
exceeds its limit, replace ring.
NOTE:
Decerbon and clean top of cylinder bore,
before inserting piston ring.
ItemStandardLimit
Top ring0.20 0.33 mm-0.7 mm
Piston(0.0079 - 0.0129in.)(0.0275 in.)
ring2ndring0.20 - 0.35 mm0.7 mm
end(0.0079 - 0.0137 in.)(0.0275 in.)
QaPOil riilg0.20 - 0.70 mm1.8 mm
(0.0079 - 0.0275 in.)(0.0708 in.)
1. Cylinder block
2. Feeler gauge3. Piston ring4. 12Omm(4.72 in.)
Fig. 3-5-33 Measuring piston ring end gap
Piston Pins
l Piston pin must be fitted into piston bore
with an easy finger push at normal room
temperature.
l Check piston pin and piston bore for wear or
damage. If pin or piston bore is badly worn or
damaged, replace pin or piston, or both.
Connecting Rods
l Big-end side clearance:
Check big end of connecting rod for side
clearance, with rod fitted and connected to
its crank pin in the normal manner. If clea-
rance measured is found to exceed its limit,
replace connecting rod.
Item
Big-end side
clearance
StandardLimit
0.10 - 0.20 mm0.35 mm
(0.0039 - 0.0078 in.)(0.0137 in.)
Fig. 3-5-34 Measuring side clearance
3-27
Page 84 of 962
l Connecting rod alignment:
Mount connecting rod on aligner to check
it for bow and twist and, if either limit is
exceeded, replace it.
Limit on bow0.05 mm (0.0020 in.)
ILimit on twist) 0.10 mm (0.0039 in.) 1
Crank Pin and Connecting Rod Bearings
l Inspect crank pin for uneven wear or damage.
Measure crank pin for out-of-round or taper
with a micrometer. If crank pin is damaged,
or out-of-round or taper is out of limit,
replace crankshaft or regrind crank pin to
undersize and use undersize bearing.
I
Connecting
rod bearing sizeCrank pin diameterI
IStandard41.982 - 42.000 mm
(1.6529 - 1.6535 in.)I
0.25 mm (0.0098 in.)41.732 - 41.750 mm
undersize(1.6430 - 1.6437 in.)
Out-of-round and
taper limit0.01 mm (0.0004 in.)
l Rod bearing:
Inspect bearing shells for signs of fusion,
pitting, burn or flaking and observe contact
pattern. Bearing shells found in defective
condition must be replaced.
Two kinds of rod bearing are available;
standard size bearing and 0.25 mm under-
size bearing. To distinguish them, 0.25 mm
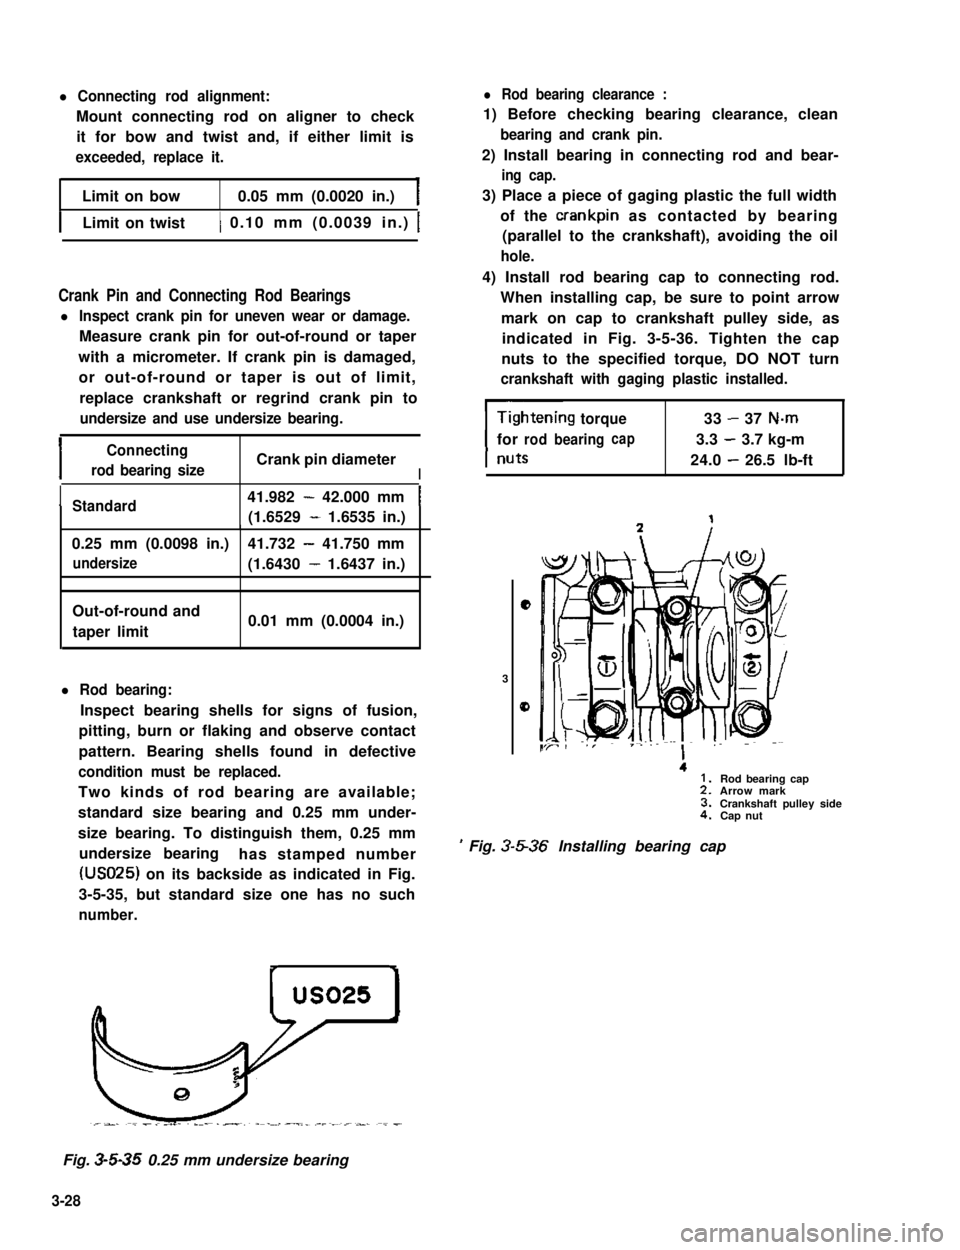
undersize bearinghas stamped number
(USO25) on its backside as indicated in Fig.
3-5-35, but standard size one has no such
number.
l Rod bearing clearance :
1) Before checking bearing clearance, clean
bearing and crank pin.
2) Install bearing in connecting rod and bear-
ing cap.
3) Place a piece of gaging plastic the full width
of the crankpin as contacted by bearing
(parallel to the crankshaft), avoiding the oil
hole.
4) Install rod bearing cap to connecting rod.
When installing cap, be sure to point arrow
mark on cap to crankshaft pulley side, as
indicated in Fig. 3-5-36. Tighten the cap
nuts to the specified torque, DO NOT turn
crankshaft with gaging plastic installed.
torque33-37 N-m
forrodbearingcap3.3-3.7 kg-m
24.0-26.5 lb-ft
e
3
0
.
’ Fig. 3-5-36 Installing bearing cap
Rod bearing capArrow markCrankshaft pulley sideCap nut
Fig. 3-5-35 0.25 mm undersize bearing
3-28
Page 87 of 962
Crankshaft Main (Journal) Bearings
General informations:
l Service main bearings are available in standard-
size and 0.25 mm (0.0098 in) undersize, and
each of them has 5 kinds of bearings differ-
ing in tolerance.
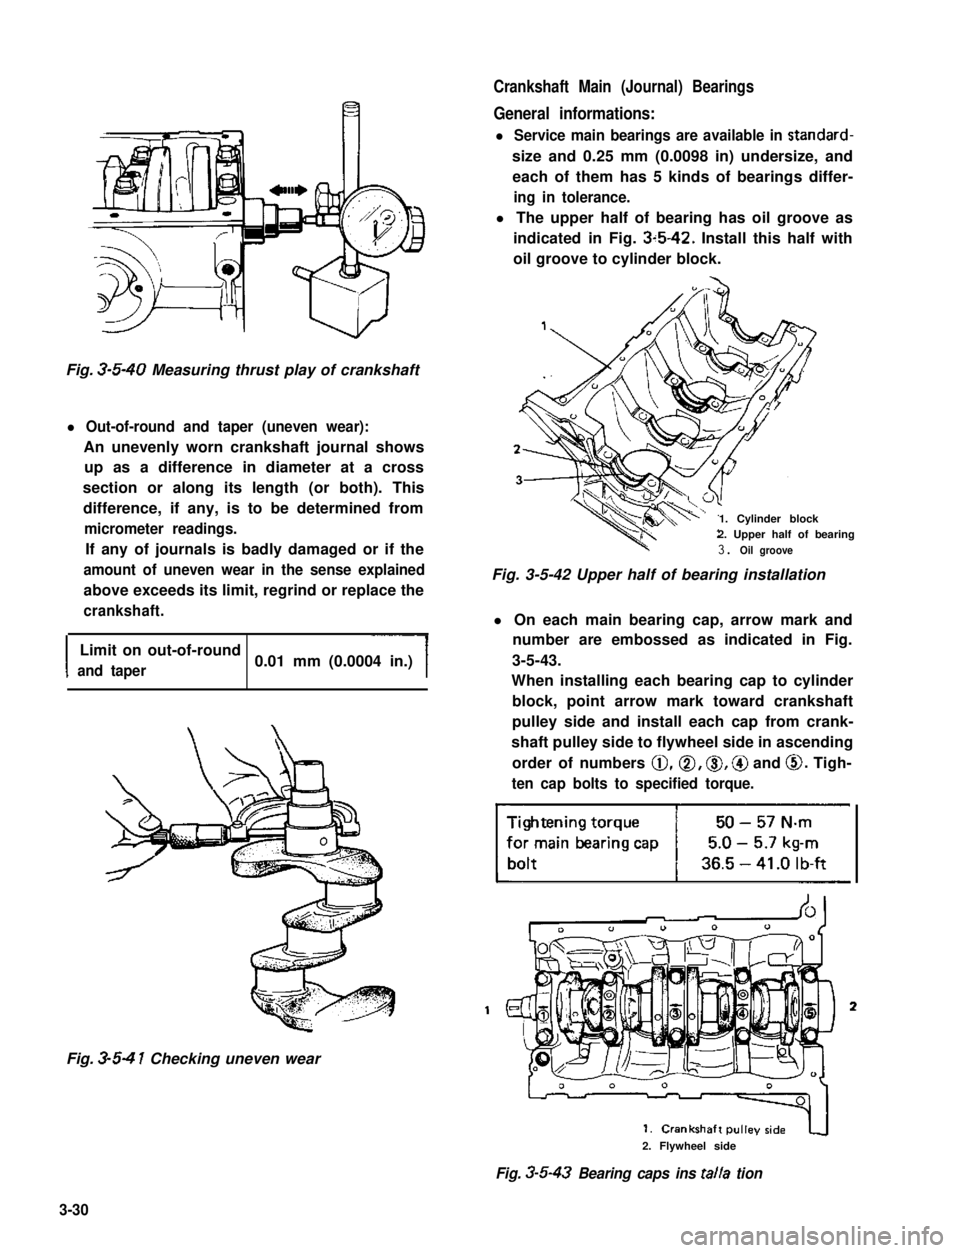
l The upper half of bearing has oil groove as
indicated in Fig. 3~5-42. Install this half with
oil groove to cylinder block.
Fig. 3-5-40 Measuring thrust play of crankshaft
l Out-of-round and taper (uneven wear):
An unevenly worn crankshaft journal shows
up as a difference in diameter at a cross
section or along its length (or both). This
difference, if any, is to be determined from
micrometer readings.
If any of journals is badly damaged or if the
amount of uneven wear in the sense explained
above exceeds its limit, regrind or replace the
crankshaft.
I
Limit on out-of-round
and taper0.01 mm (0.0004 in.)
Fig. 3-5-4 1 Checking uneven wear
1. Cylinder block2. Upper half of bearing
3. Oil groove
Fig. 3-5-42 Upper half of bearing installation
l On each main bearing cap, arrow mark and
number are embossed as indicated in Fig.
3-5-43.
When installing each bearing cap to cylinder
block, point arrow mark toward crankshaft
pulley side and install each cap from crank-
shaft pulley side to flywheel side in ascending
order of numbers @,a, 0, @ and 0. Tigh-
ten cap bolts to specified torque.
3
2. Flywheel side
Fig. 3-5-43 Bearing caps ins talla tion
3-30
Page 88 of 962
inspect:
Check bearings for pitting, scratches, wear or
damage. If any malcondition is found, replace
both upper and lower halves. Never replace one
half without replacing the other half.
Main bearing clearance:
Check clearance by using gaging plastic according
to following procedure.
1) Remove bearing caps.
2) Clean bearings and main journals.
3) Place a piece of gaging plastic the full width
of the bearing (parallel to the crankshaft) on
journal, avoiding oil hole.
4) Install bearing cap as previously outlined and
evenly torque cap bolts to specified torque.
Bearing cap MUST be torqued to specifica-
tion in order to assure proper reading.
NOTE:
Do not rotate crankshaft while gaging plastic
is installed.
5) Remove cap, and using scale on gaging plastic
envelop, measure gaging plastic width at its
Widest point. If clearance exceeds its limit,
replace bearing. Always replace both upper
and lower inserts as a unit.
A new standard bearing may produce proper
clearance. If not, it will be necessary to
regrind crankshaft journal for use of 0.25 mm
undersize bearing.
After selecting new bearing, recheck clearance.
kj
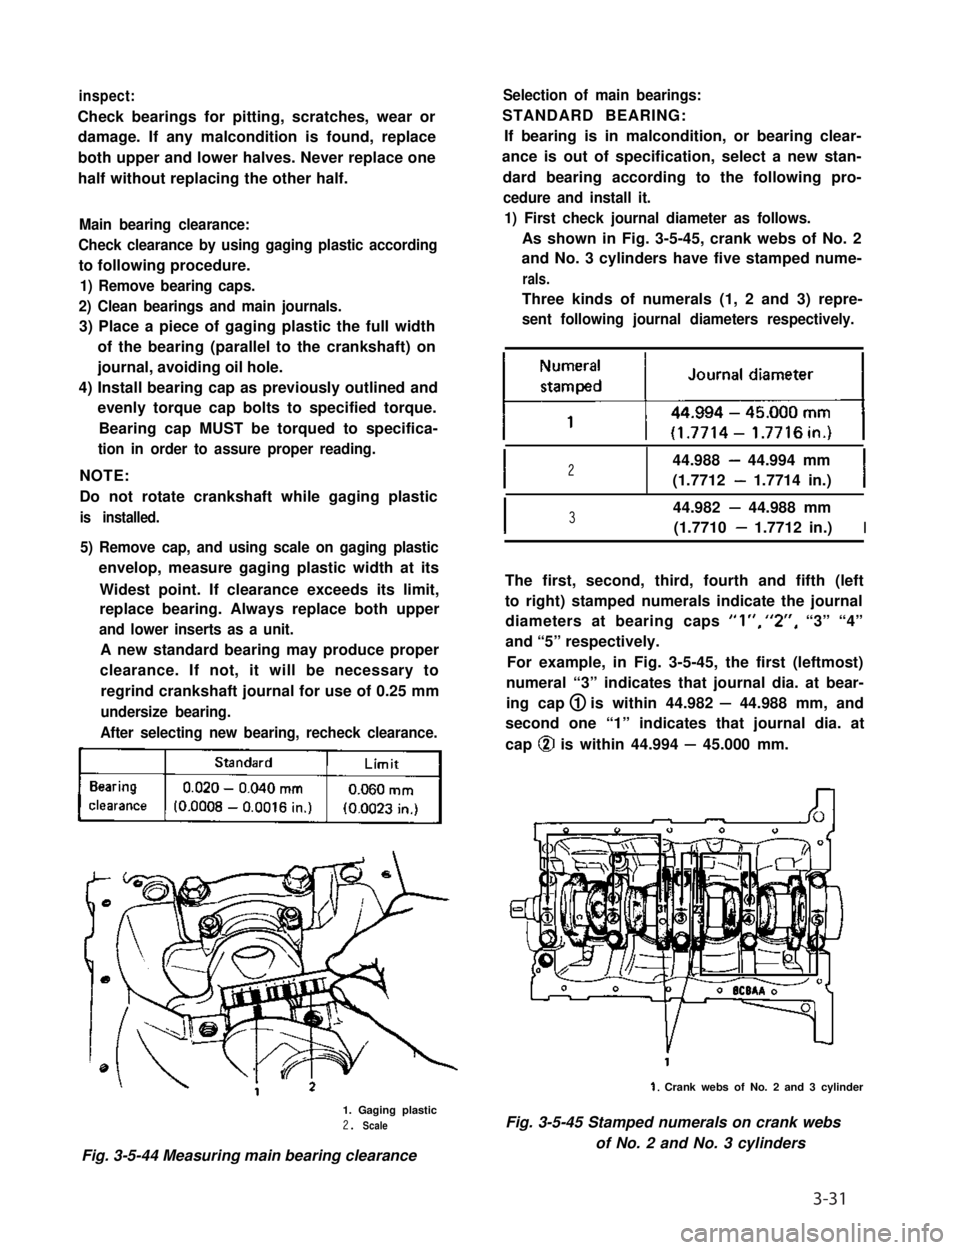
1. Gaging plastic2. Scale
Fig. 3-5-44 Measuring main bearing clearance
Selection of main bearings:
STANDARD BEARING:
If bearing is in malcondition, or bearing clear-
ance is out of specification, select a new stan-
dard bearing according to the following pro-
cedure and install it.
1) First check journal diameter as follows.
As shown in Fig. 3-5-45, crank webs of No. 2
and No. 3 cylinders have five stamped nume-
rals.
Three kinds of numerals (1, 2 and 3) repre-
sent following journal diameters respectively.
I244.988 - 44.994 mm
(1.7712 - 1.7714 in.)I
I344.982 - 44.988 mm
(1.7710 - 1.7712 in.)I
The first, second, third, fourth and fifth (left
to right) stamped numerals indicate the journal
diameters at bearing caps “l”, “2”, “3” “4”
and “5” respectively.
For example, in Fig. 3-5-45, the first (leftmost)
numeral “3” indicates that journal dia. at bear-
ing cap 1 is within 44.982 - 44.988 mm, and
second one “1” indicates that journal dia. at
cap @ is within 44.994 - 45.000 mm.
1. Crank webs of No. 2 and 3 cylinder
Fig. 3-5-45 Stamped numerals on crank webs
of No. 2 and No. 3 cylinders
3-31
Page 91 of 962
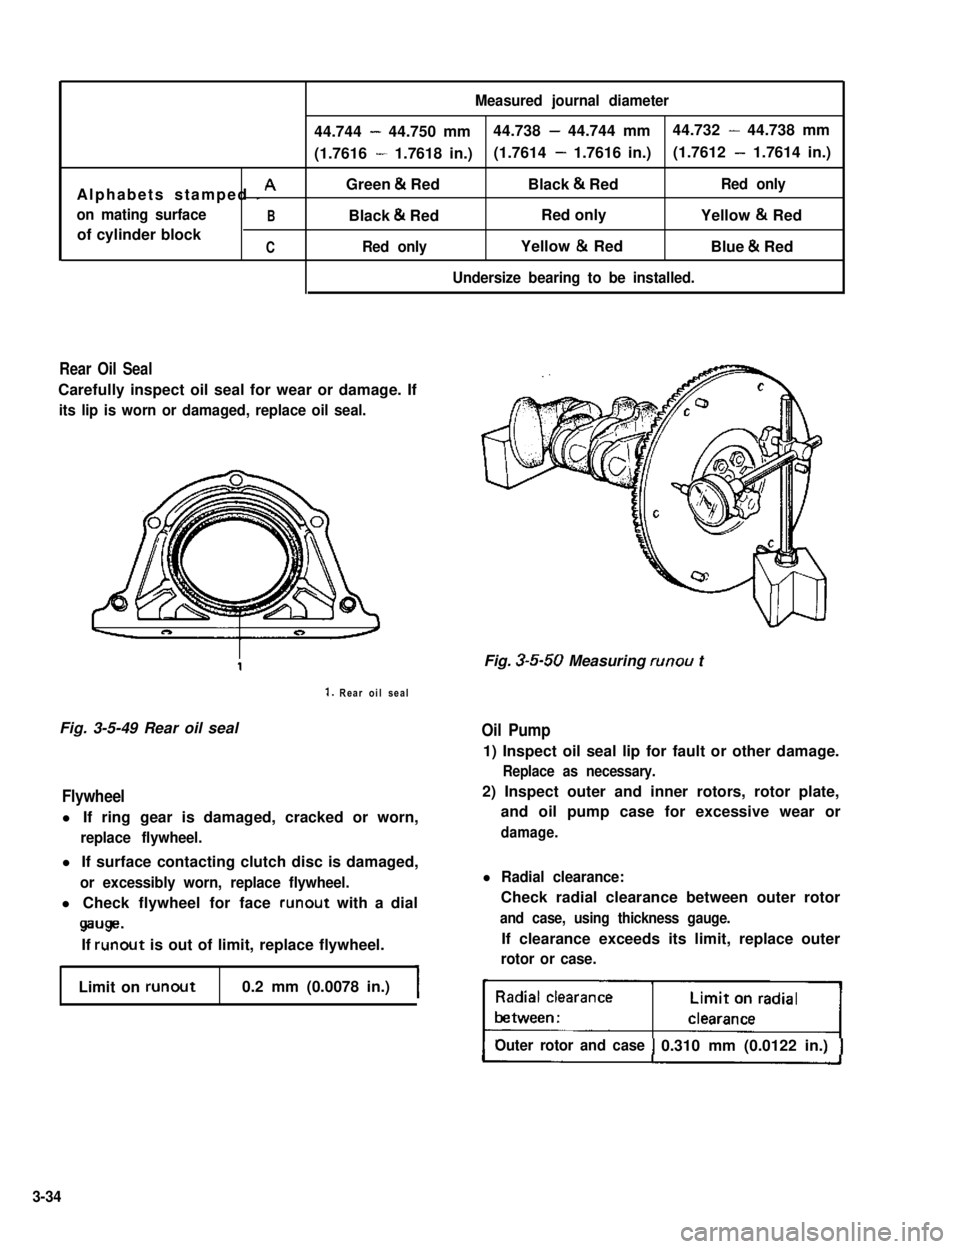
Measured journal diameter
44.744 - 44.750 mm44.738 - 44.744 mm44.732 - 44.738 mm
(1.7616 - 1.7618 in.)(1.7614 - 1.7616 in.)(1.7612 - 1.7614 in.)
Alphabets stamped I AGreen & RedBlack & RedRed only
on mating surfaceBBlack & RedRed onlyYellow & Red
of cylinder blockCRed onlyYellow & RedBlue & Red
Undersize bearing to be installed.
Rear Oil Seal
Carefully inspect oil seal for wear or damage. If
its lip is worn or damaged, replace oil seal.
1. Rear oil seal
Fig. 3-5-49 Rear oil sealOil Pump
Flywheel
l If ring gear is damaged, cracked or worn,
replace flywheel.
l If surface contacting clutch disc is damaged,
or excessibly worn, replace flywheel.
l Check flywheel for face runout with a dial
wge.
If runout is out of limit, replace flywheel.
Limit on runout0.2 mm (0.0078 in.)
Fig. 3-5-50 Measuring runou t
1) Inspect oil seal lip for fault or other damage.
Replace as necessary.
2) Inspect outer and inner rotors, rotor plate,
and oil pump case for excessive wear or
damage.
l Radial clearance:
Check radial clearance between outer rotor
and case, using thickness gauge.
If clearance exceeds its limit, replace outer
rotor or case.
Outer rotor and case0.310 mm (0.0122 in.)
3-34
Page 92 of 962
3-6. ENGINE REASSEMBLY
NOTE:
l All parts to be used in reassembly must be
perfectly clean.
l Oil sliding and rubbing surfaces of engine
parts just before using them in reassembly.
Use engine oil (Refer to page l-8).
l Have liquid packing ready for use. SUZUKI
BOND NO. 1215 is specified for it. Use it
wherever its use is specified in order to
ensure leak-free (oil and water) workmanship
of reassembly.
l There are many running clearances. During
the course of engine reassembly, be sure to
check these clearances, one after another,
as they form.
l Gaskets, “0” rings and similar sealing mem-
bers must be in perfect condition. For these
members, use replacement parts in stock.
l Tightening torque is specified for impor-
tant fasteners - mainly bolts and nuts -of
the engine and other components. Use torque
wrenches and constantly refer to the specified
values given on p. 3-58.
l Do not disregard match marks provided on
parts. Some of them are those given at the
time of disassembly.
l There are many sets of parts. Crankshaft
bearings, connecting rods, pistons, etc., are
in combination sets. Do not disturb such
combinations and make sure that each part
goes back to where it came from.
Engine reassembly is the reverse of engine disas-
sembly as far as sequence is concerned, but
there are many reassembling steps that involve
measures necessary for restoring engine as close
to factory-assembled condition as possible. Only
those steps will be dealt with here.
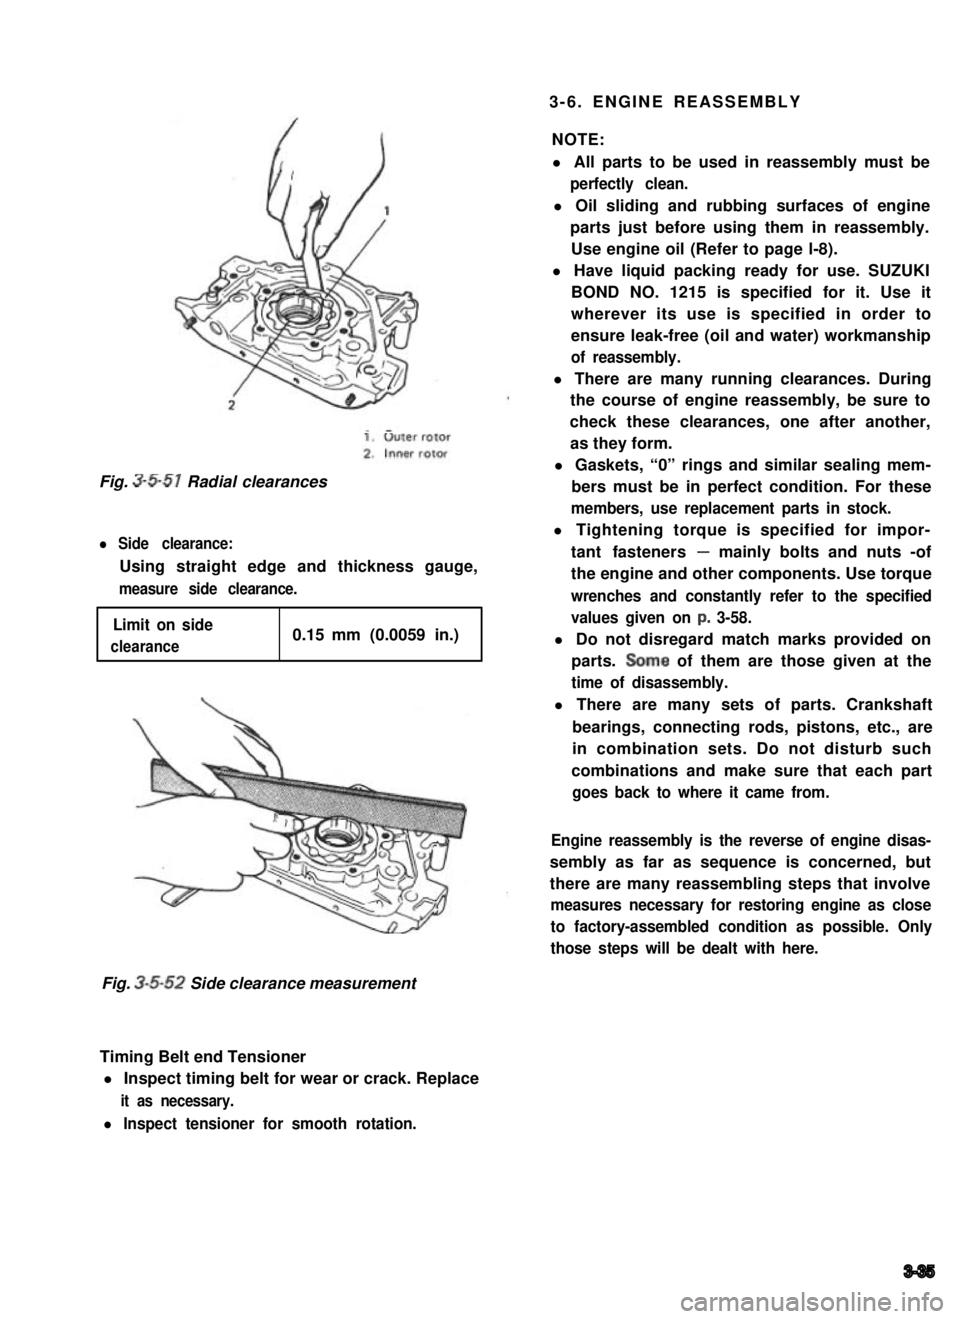
Fig. 3-5-51 Radial clearances
l Side clearance:
Using straight edge and thickness gauge,
measure side clearance.
Limit on side
clearance0.15 mm (0.0059 in.)
Fig. 3-5-52 Side clearance measurement
Timing Belt end Tensioner
l Inspect timing belt for wear or crack. Replace
it as necessary.
l Inspect tensioner for smooth rotation.
3-35
Page 93 of 962
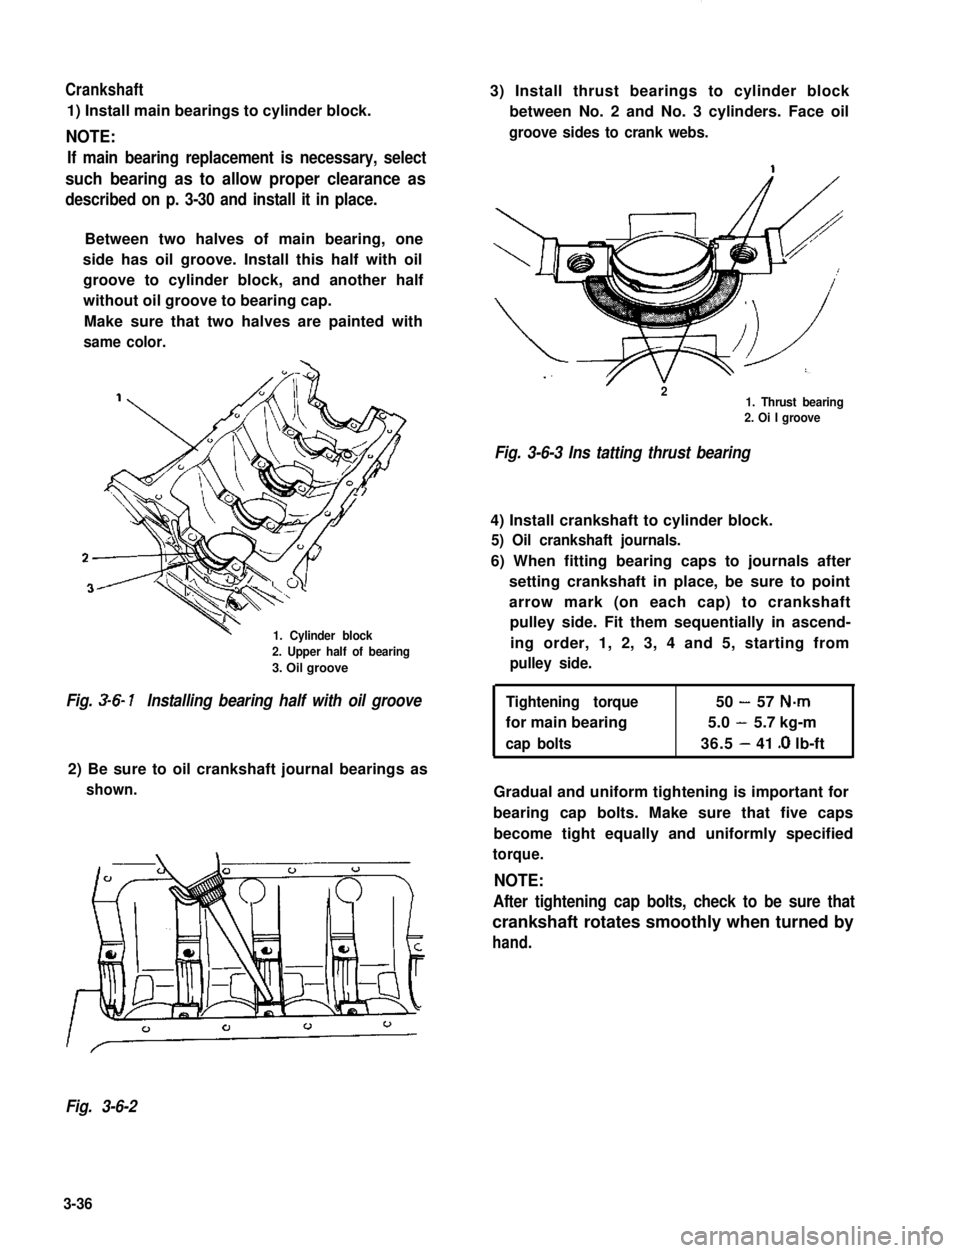
Crankshaft
1) Install main bearings to cylinder block.
NOTE:
If main bearing replacement is necessary, select
such bearing as to allow proper clearance as
described on p. 3-30 and install it in place.
Between two halves of main bearing, one
side has oil groove. Install this half with oil
groove to cylinder block, and another half
without oil groove to bearing cap.
Make sure that two halves are painted with
same color.
1. Cylinder block
2. Upper half of bearing
3. Oil groove
3) Install thrust bearings to cylinder block
between No. 2 and No. 3 cylinders. Face oil
groove sides to crank webs.
r21. Thrust bearing2. Oi I groove
Fig. 3-6-3 Ins tatting thrust bearing
4) Install crankshaft to cylinder block.
5) Oil crankshaft journals.
6) When fitting bearing caps to journals after
setting crankshaft in place, be sure to point
arrow mark (on each cap) to crankshaft
pulley side. Fit them sequentially in ascend-
ing order, 1, 2, 3, 4 and 5, starting from
pulley side.
Fig. 3-6- 1Installing bearing half with oil grooveTightening torque50-57 N-m
for main bearing5.0-5.7 kg-m
cap bolts36.5-41 .O lb-ft
2) Be sure to oil crankshaft journal bearings as
shown.Gradual and uniform tightening is important for
bearing cap bolts. Make sure that five caps
become tight equally and uniformly specified
torque.
NOTE:
After tightening cap bolts, check to be sure that
crankshaft rotates smoothly when turned by
hand.
Fig. 3-6-2
3-36
Page 94 of 962
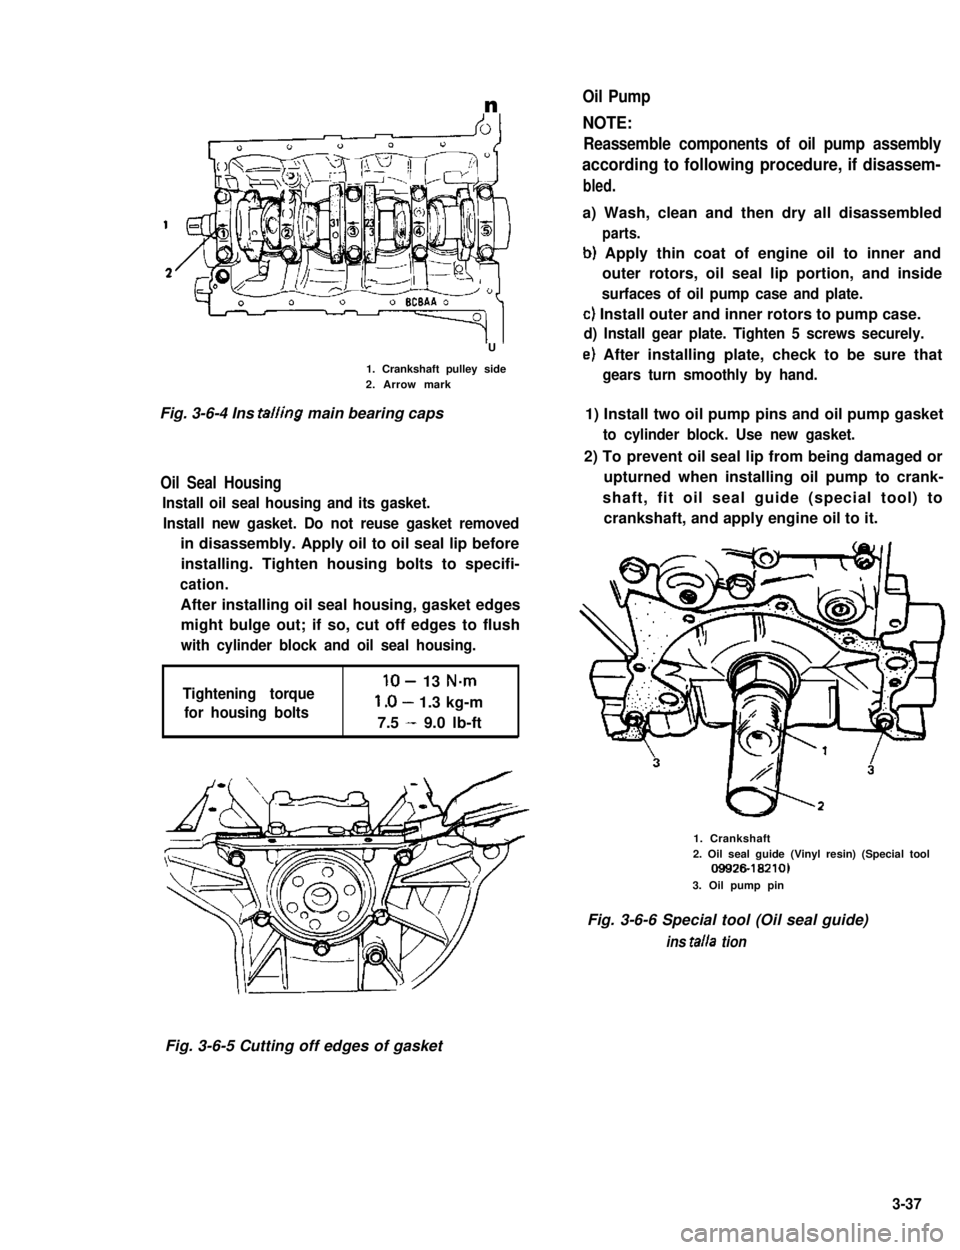
n
U
1. Crankshaft pulley side2. Arrow mark
Fig. 3-6-4 Ins tailing main bearing caps
Oil Seal Housing
Install oil seal housing and its gasket.
Install new gasket. Do not reuse gasket removed
in disassembly. Apply oil to oil seal lip before
installing. Tighten housing bolts to specifi-
cation.
After installing oil seal housing, gasket edges
might bulge out; if so, cut off edges to flush
with cylinder block and oil seal housing.
Tightening torque
for housing bolts
lo- 13 N-m
l.O- 1.3 kg-m
7.5 - 9.0 lb-ft
Oil Pump
NOTE:
Reassemble components of oil pump assembly
according to following procedure, if disassem-
bled.
a) Wash, clean and then dry all disassembled
parts.
b) Apply thin coat of engine oil to inner and
outer rotors, oil seal lip portion, and inside
surfaces of oil pump case and plate.
c) Install outer and inner rotors to pump case.
d) Install gear plate. Tighten 5 screws securely.
e) After installing plate, check to be sure that
gears turn smoothly by hand.
1) Install two oil pump pins and oil pump gasket
to cylinder block. Use new gasket.
2) To prevent oil seal lip from being damaged or
upturned when installing oil pump to crank-
shaft, fit oil seal guide (special tool) to
crankshaft, and apply engine oil to it.
1. Crankshaft2. Oil seal guide (Vinyl resin) (Special tool09926-18210)
3. Oil pump pin
Fig. 3-6-6 Special tool (Oil seal guide)
ins talla tion
Fig. 3-6-5 Cutting off edges of gasket
3-37