Page 430 of 962

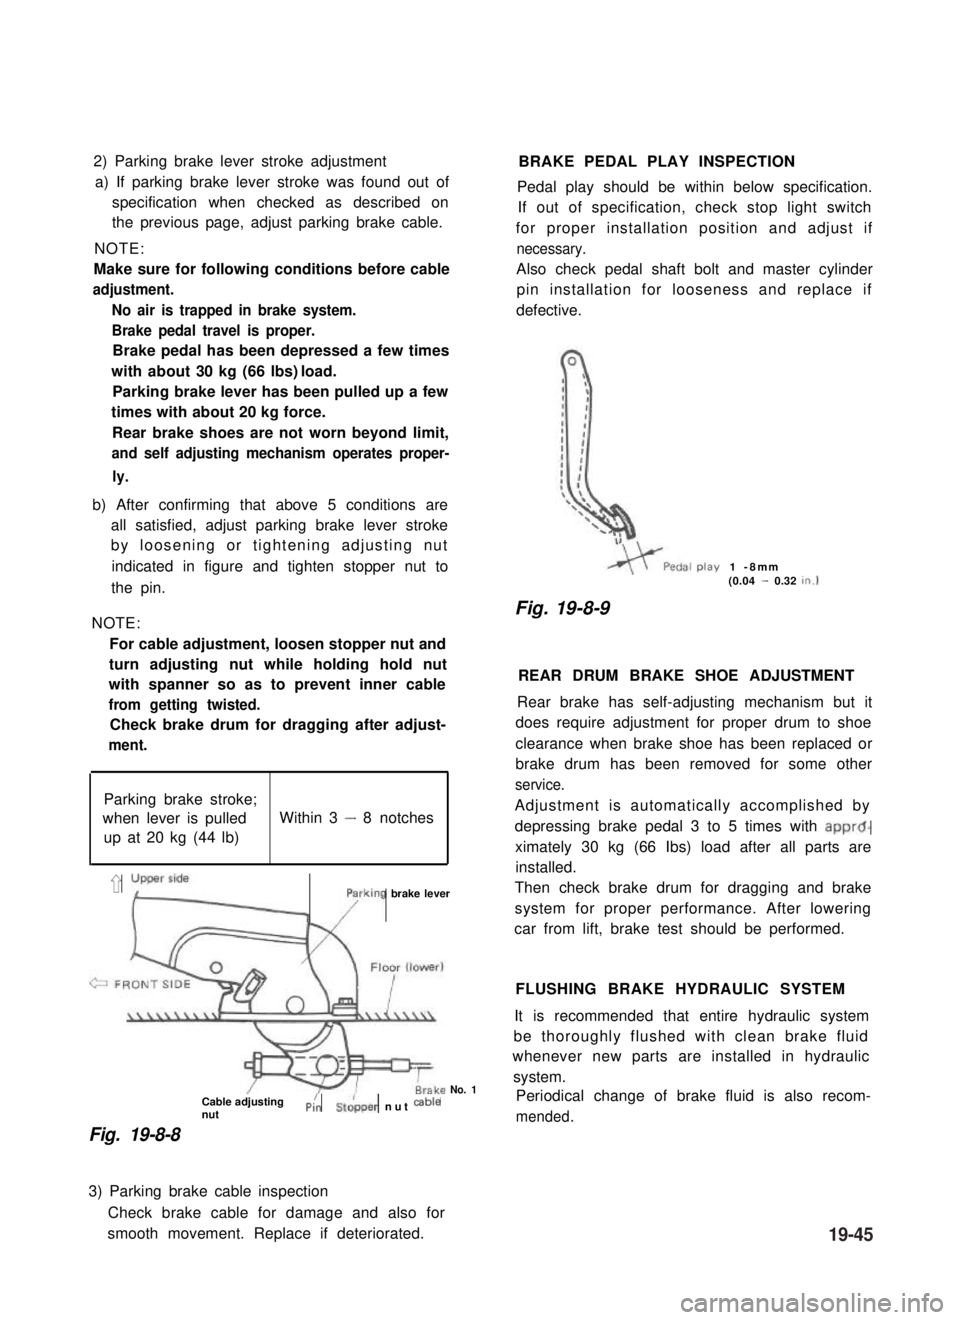
2) Parking brake lever stroke adjustment
a) If parking brake lever stroke was found out of
specification when checked as described on
the previous page, adjust parking brake cable.
NOTE:
Make sure for following conditions before cable
adjustment.
No air is trapped in brake system.
Brake pedal travel is proper.
Brake pedal has been depressed a few times
with about 30 kg (66 lbs) load.
Parking brake lever has been pulled up a few
times with about 20 kg force.
Rear brake shoes are not worn beyond limit,
and self adjusting mechanism operates proper-
ly.
b) After confirming that above 5 conditions are
all satisfied, adjust parking brake lever stroke
by loosening or tightening adjusting nut
indicated in figure and tighten stopper nut to
the pin.
NOTE:
For cable adjustment, loosen stopper nut and
turn adjusting nut while holding hold nut
with spanner so as to prevent inner cable
from getting twisted.
Check brake drum for dragging after adjust-
ment.
Parking brake stroke;
when lever is pulledWithin 3 - 8 notches
up at 20 kg (44 lb)
’ yLyFrking brake lever
Cable adjustingnutPi:St&per nut cab’e
Fig. 19-8-8
No. 1
BRAKE PEDAL PLAY INSPECTION
Pedal play should be within below specification.
If out of specification, check stop light switch
for proper installation position and adjust if
necessary.
Also check pedal shaft bolt and master cylinder
pin installation for looseness and replace if
defective.
play1 -8mm(0.04 - 0.32tn.1
Fig. 19-8-9
REAR DRUM BRAKE SHOE ADJUSTMENT
Rear brake has self-adjusting mechanism but it
does require adjustment for proper drum to shoe
clearance when brake shoe has been replaced or
brake drum has been removed for some other
service.
Adjustment is automatically accomplished by
depressing brake pedal 3 to 5 times with apprd-
ximately 30 kg (66 Ibs) load after all parts are
installed.
Then check brake drum for dragging and brake
system for proper performance. After lowering
car from lift, brake test should be performed.
FLUSHING BRAKE HYDRAULIC SYSTEM
It is recommended that entire hydraulic system
be thoroughly flushed with clean brake fluid
whenever new parts are installed in hydraulic
system.
Periodical change of brake fluid is also recom-
mended.
3) Parking brake cable inspection
Check brake cable for damage and also for
smooth movement. Replace if deteriorated.19-45
Page 433 of 962
4) If pedal travel doesn’t change, air tightness
isn’t obtained.
\1 St, 2nd. 3rd
NO GOOD
Fig. 19-8-17
NOTE:
If defective, inspect vacuum lines and sealing
parts, and replace any faulty part.
When this has been done, repeat the entire test!
Check Operation
1) With engine stopped, depress brake pedal
several times with the same load and make
sure that pedal travel doesn’t change.
Fig. 19-8-19 \
Check Air Tightness Under Load
1) With engine running, depress brake pedal.
Then stop engine while holding brake pedal
depressed.
-Hold
Fig. 19-8-20
2) Hold brake pedal depressed for 30 seconds.
If pedal height does n.ot change, condition
is good. But it isn’t if pedal rises.
Fig. 19-8-18
2) Start engine while depressing brake pedal. If
pedal travel increases a little, operation is
satisfactory. But no change in pedal travel
indicates malfunction.
Fig. 19-8-21Hold
19-48
Page 456 of 962

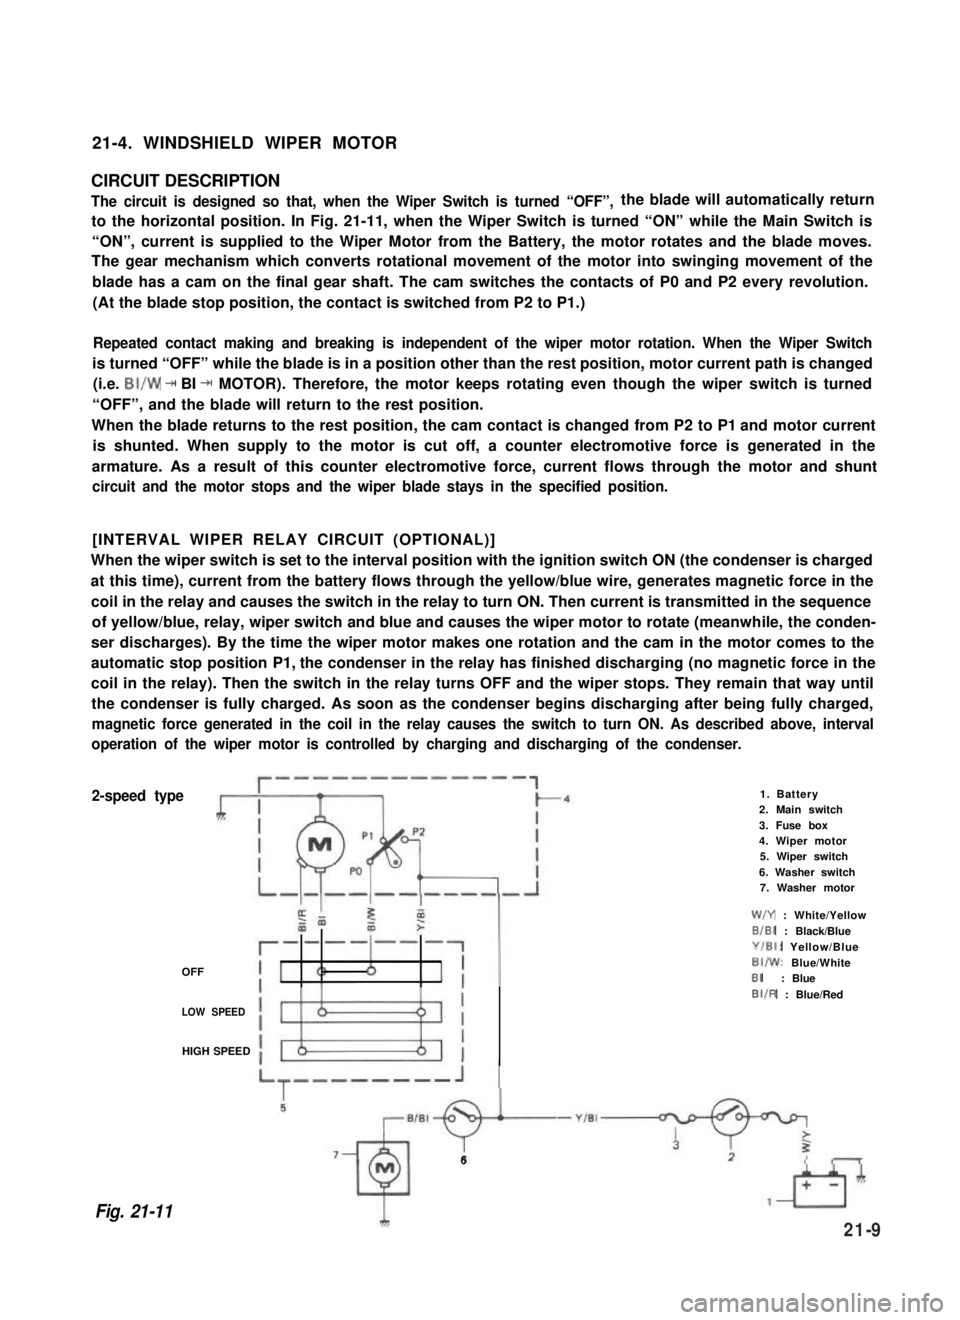
21-4. WINDSHIELD WIPER MOTOR
CIRCUIT DESCRIPTION
The circuit is designed so that, when the Wiper Switch is turned “OFF”,the blade will automatically return
to the horizontal position. In Fig. 21-11, when the Wiper Switch is turned “ON” while the Main Switch is
“ON”, current is supplied to the Wiper Motor from the Battery, the motor rotates and the blade moves.
The gear mechanism which converts rotational movement of the motor into swinging movement of the
blade has a cam on the final gear shaft. The cam switches the contacts of P0 and P2 every revolution.
(At the blade stop position, the contact is switched from P2 to P1.)
Repeated contact making and breaking is independent of the wiper motor rotation. When the Wiper Switch
is turned “OFF” while the blade is in a position other than the rest position, motor current path is changed
(i.e. BI/W + BI + MOTOR). Therefore, the motor keeps rotating even though the wiper switch is turned
“OFF”, and the blade will return to the rest position.
When the blade returns to the rest position, the cam contact is changed from P2 to P1 and motor current
is shunted. When supply to the motor is cut off, a counter electromotive force is generated in the
armature. As a result of this counter electromotive force, current flows through the motor and shunt
circuit and the motor stops and the wiper blade stays in the specified position.
[INTERVAL WIPER RELAY CIRCUIT (OPTIONAL)]
When the wiper switch is set to the interval position with the ignition switch ON (the condenser is charged
at this time), current from the battery flows through the yellow/blue wire, generates magnetic force in the
coil in the relay and causes the switch in the relay to turn ON. Then current is transmitted in the sequence
of yellow/blue, relay, wiper switch and blue and causes the wiper motor to rotate (meanwhile, the conden-
ser discharges). By the time the wiper motor makes one rotation and the cam in the motor comes to the
automatic stop position P1, the condenser in the relay has finished discharging (no magnetic force in the
coil in the relay). Then the switch in the relay turns OFF and the wiper stops. They remain that way until
the condenser is fully charged. As soon as the condenser begins discharging after being fully charged,
magnetic force generated in the coil in the relay causes the switch to turn ON. As described above, interval
operation of the wiper motor is controlled by charging and discharging of the condenser.
2-speed type
OFF
1. Battery2. Main switch
3. Fuse box4. Wiper motor5. Wiper switch
6. Washer switch7. Washer motor
W/Y : White/Yellow
B/BI : Black/Blue
Y/El: Yellow/Blue
BI/W: Blue/WhiteBI: Blue
LOW SPEED
BIIR : Blue/Red
HIGH SPEED
Fig. 21-11
6
21-9
Page 458 of 962

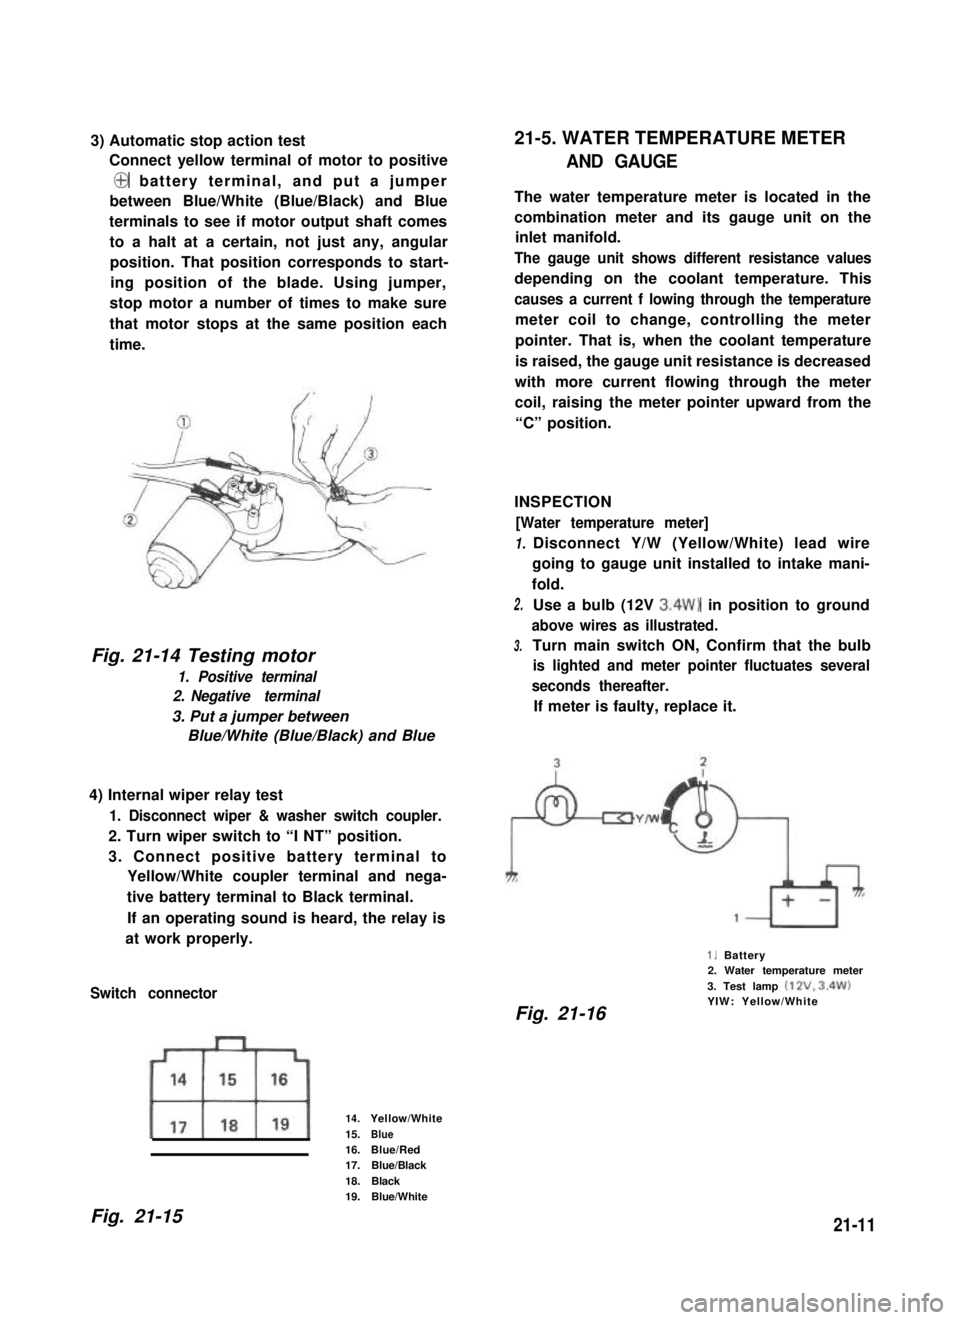
3) Automatic stop action test
Connect yellow terminal of motor to positive
@ battery terminal, and put a jumper
between Blue/White (Blue/Black) and Blue
terminals to see if motor output shaft comes
to a halt at a certain, not just any, angular
position. That position corresponds to start-
ing position of the blade. Using jumper,
stop motor a number of times to make sure
that motor stops at the same position each
time.
Fig. 21-14 Testing motor
1. Positive terminal
2. Negative terminal
3. Put a jumper between
Blue/White (Blue/Black) and Blue
4) Internal wiper relay test
1. Disconnect wiper & washer switch coupler.
2. Turn wiper switch to “I NT” position.
3. Connect positive battery terminal to
Yellow/White coupler terminal and nega-
tive battery terminal to Black terminal.
If an operating sound is heard, the relay is
at work properly.
Switch connector
14.Yellow/White
15.Blue16.Blue/Red17.Blue/Black
18.Black19.Blue/White
21-5. WATER TEMPERATURE METER
AND GAUGE
The water temperature meter is located in the
combination meter and its gauge unit on the
inlet manifold.
The gauge unit shows different resistance values
depending on the coolant temperature. This
causes a current f lowing through the temperature
meter coil to change, controlling the meter
pointer. That is, when the coolant temperature
is raised, the gauge unit resistance is decreased
with more current flowing through the meter
coil, raising the meter pointer upward from the
“C” position.
INSPECTION
[Water temperature meter]
1.
2.
3.
Disconnect Y/W (Yellow/White) lead wire
going to gauge unit installed to intake mani-
fold.
Use a bulb (12V 3.4W) in position to ground
above wires as illustrated.
Turn main switch ON, Confirm that the bulb
is lighted and meter pointer fluctuates several
seconds thereafter.
If meter is faulty, replace it.
1. Battery2. Water temperature meter
3. Test lamp (12V. 3.4W)YIW: Yellow/WhiteFig. 21-16
Fig. 21-1521-11