Page 1312 of 2389
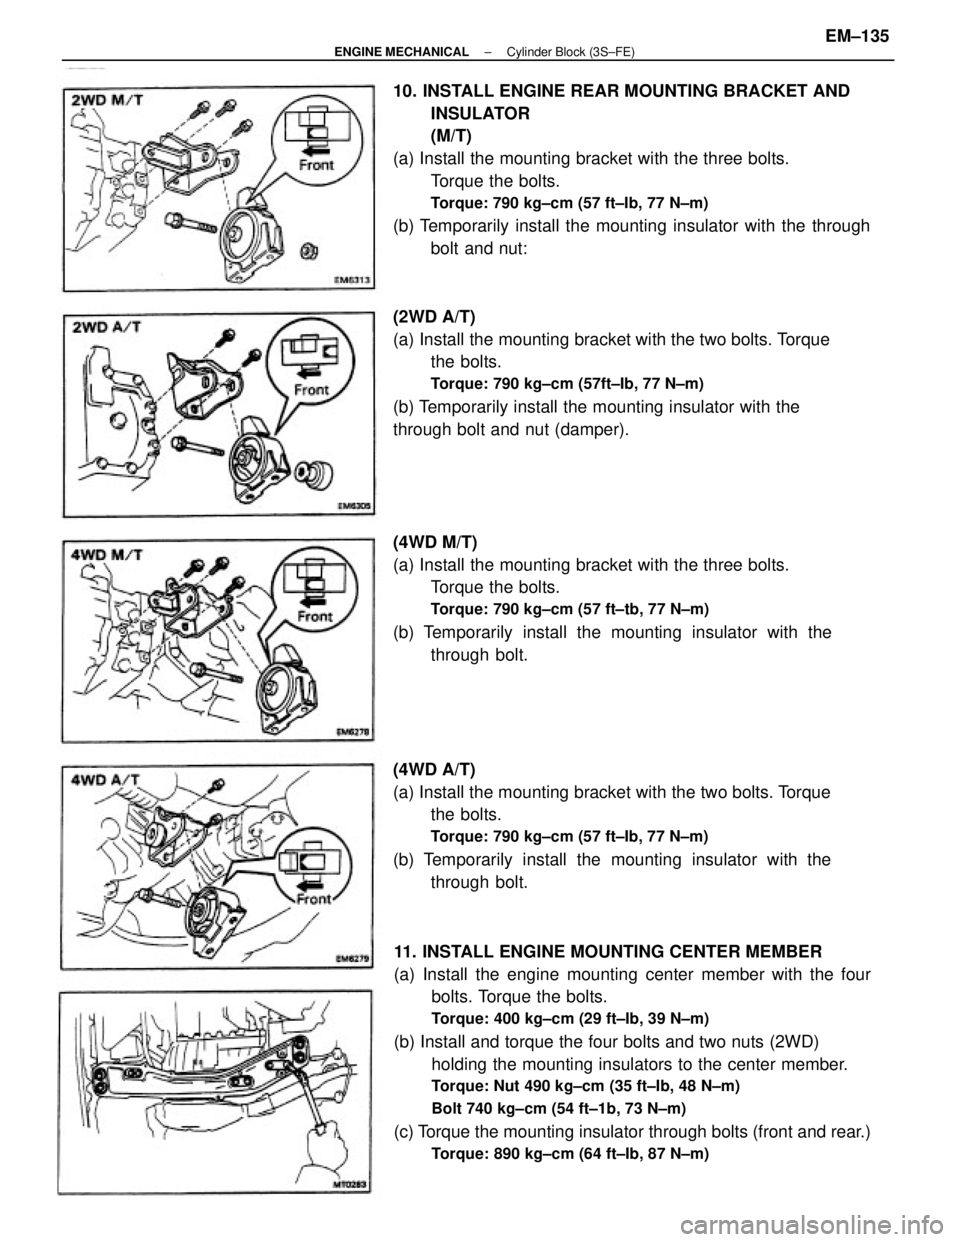
11. INSTALL ENGINE MOUNTING CENTER MEMBER
(a) Install the engine mounting center member with the four
bolts. Torque the bolts.
Torque: 400 kg±cm (29 ft±Ib, 39 N±m)
(b) Install and torque the four bolts and two nuts (2WD)
holding the mounting insulators to the center member.
Torque: Nut 490 kg±cm (35 ft±Ib, 48 N±m)
Bolt 740 kg±cm (54 ft±1b, 73 N±m)
(c) Torque the mounting insulator through bolts (front and rear.)
Torque: 890 kg±cm (64 ft±Ib, 87 N±m)
10. INSTALL ENGINE REAR MOUNTING BRACKET AND
INSULATOR
(M/T)
(a) Install the mounting bracket with the three bolts.
Torque the bolts.
Torque: 790 kg±cm (57 ft±Ib, 77 N±m)
(b) Temporarily install the mounting insulator with the through
bolt and nut:
(4WD M/T)
(a) Install the mounting bracket with the three bolts.
Torque the bolts.
Torque: 790 kg±cm (57 ft±tb, 77 N±m)
(b) Temporarily install the mounting insulator with the
through bolt. (2WD A/T)
(a) Install the mounting bracket with the two bolts. Torque
the bolts.
Torque: 790 kg±cm (57ft±Ib, 77 N±m)
(b) Temporarily install the mounting insulator with the
through bolt and nut (damper).
(4WD A/T)
(a) Install the mounting bracket with the two bolts. Torque
the bolts.
Torque: 790 kg±cm (57 ft±Ib, 77 N±m)
(b) Temporarily install the mounting insulator with the
through bolt.
± ENGINE MECHANICALCylinder Block (3S±FE)EM±135
Page 1313 of 2389
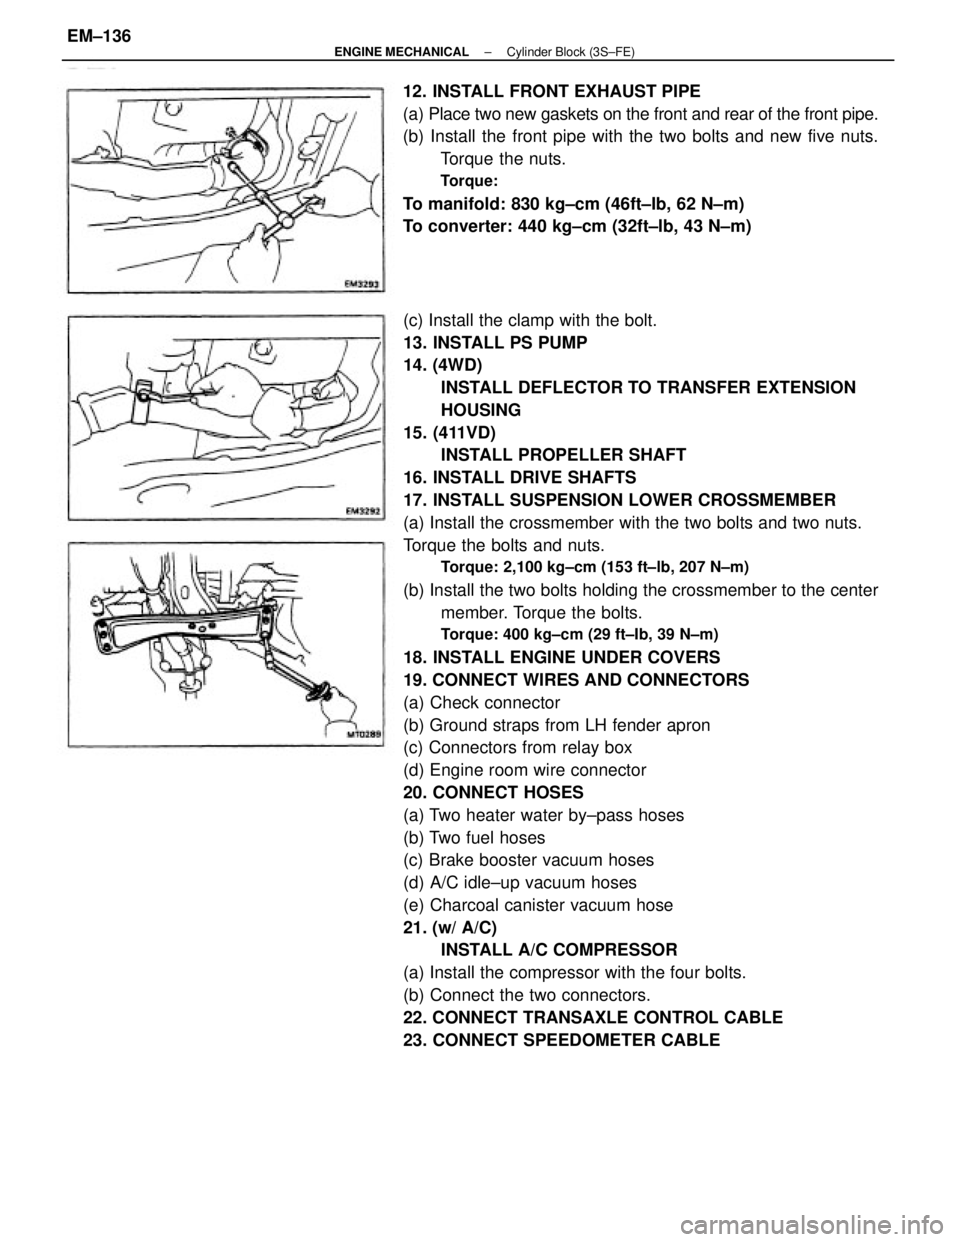
(c) Install the clamp with the bolt.
13. INSTALL PS PUMP
14. (4WD)
INSTALL DEFLECTOR TO TRANSFER EXTENSION
HOUSING
15. (411VD)
INSTALL PROPELLER SHAFT
16. INSTALL DRIVE SHAFTS
17. INSTALL SUSPENSION LOWER CROSSMEMBER
(a) Install the crossmember with the two bolts and two nuts.
Torque the bolts and nuts.
Torque: 2,100 kg±cm (153 ft±lb, 207 N±m)
(b) Install the two bolts holding the crossmember to the center
member. Torque the bolts.
Torque: 400 kg±cm (29 ft±Ib, 39 N±m)
18. INSTALL ENGINE UNDER COVERS
19. CONNECT WIRES AND CONNECTORS
(a) Check connector
(b) Ground straps from LH fender apron
(c) Connectors from relay box
(d) Engine room wire connector
20. CONNECT HOSES
(a) Two heater water by±pass hoses
(b) Two fuel hoses
(c) Brake booster vacuum hoses
(d) A/C idle±up vacuum hoses
(e) Charcoal canister vacuum hose
21. (w/ A/C)
INSTALL A/C COMPRESSOR
(a) Install the compressor with the four bolts.
(b) Connect the two connectors.
22. CONNECT TRANSAXLE CONTROL CABLE
23. CONNECT SPEEDOMETER CABLE 12. INSTALL FRONT EXHAUST PIPE
(a) Place two new gaskets on the front and rear of the front pipe.
(b) Install the front pipe with the two bolts and new five nuts.
Torque the nuts.
Torque:
To manifold: 830 kg±cm (46ft±Ib, 62 N±m)
To converter: 440 kg±cm (32ft±lb, 43 N±m)
± ENGINE MECHANICALCylinder Block (3S±FE)EM±136
Page 1325 of 2389
(i) Remove the connecting rod cap.
(j) Measure the Plastigage at widest point.
Standard oil clearance:
STD 0.028 ± 0.065 mm
(0.0011 ± 0.0026 in.)
U/S 0.25 0.027 ± 0.080 mm
(0.0011 ± 0.0031 in.)
Maximum oil clearance: 0.08 mm (0.0031 in.)
If the oil clearance is greater than maximum, replace
the bearings. If necessary, grind or replace the crank-
shaft. (e) Clean the crank pin and bearing.
(f) Check the crank pin and bearing for pitting and scratches.
If the crank pin or bearing is damaged, replace the bearing.
If necessary, grind or replace the crankshaft.
(h) Install the connecting rod cap.
(See step 6 on page EM±165)
Torque: 1st 250 kg±cm (18 ft±ib, 25 N±m)
2nd turns 90°
NOTICE: Do not turn the crankshaft
(d) Cover the connecting rod bolts with a short piece of
hose to protect the crankshaft from damage.
(g) Lay a strip of Plastigage across the crank pin.
± ENGINE MECHANICALCylinder Block (2VZ±FE)EM±148
Page 1327 of 2389
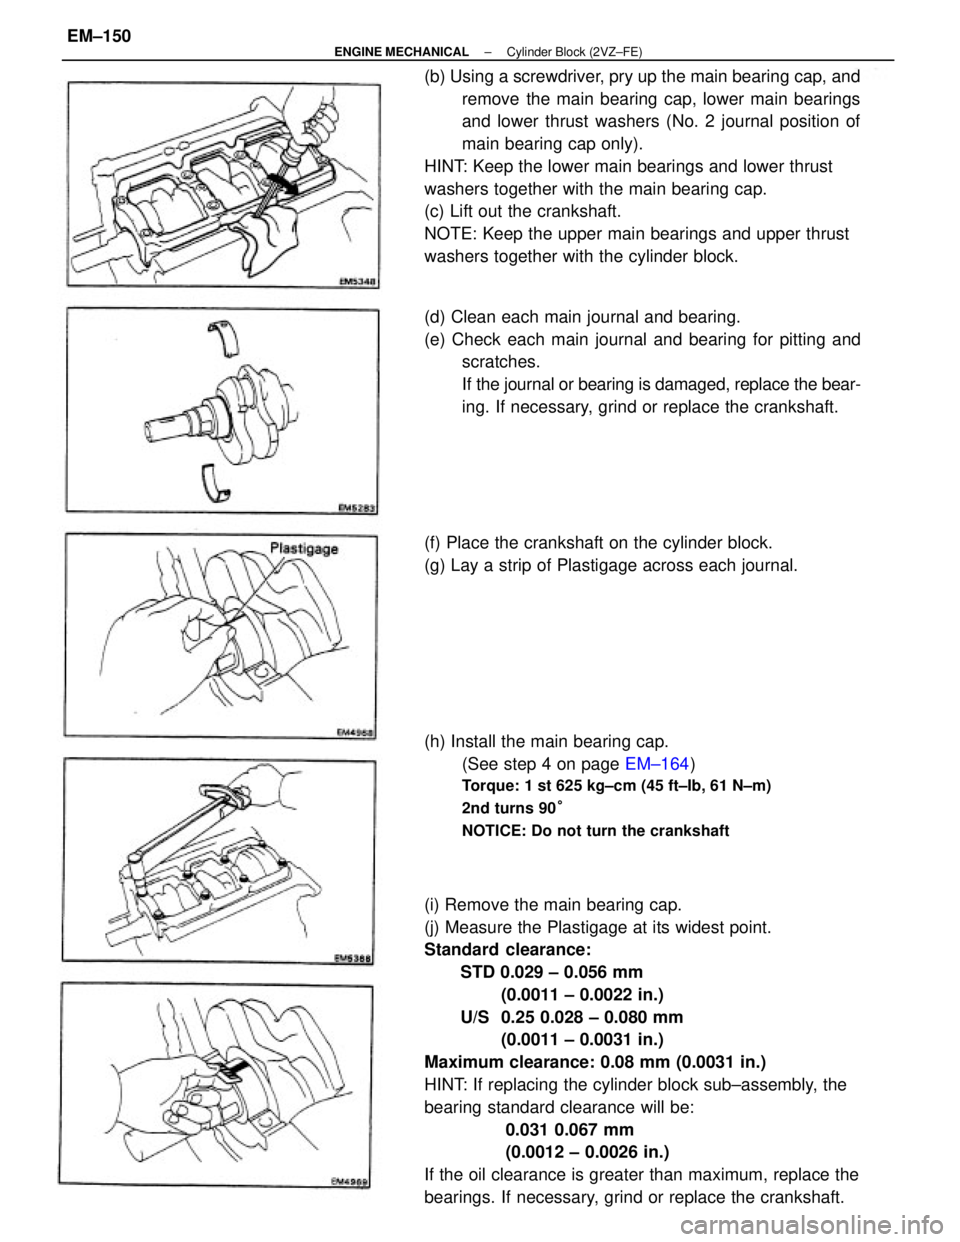
(i) Remove the main bearing cap.
(j) Measure the Plastigage at its widest point.
Standard clearance:
STD 0.029 ± 0.056 mm
(0.0011 ± 0.0022 in.)
U/S 0.25 0.028 ± 0.080 mm
(0.0011 ± 0.0031 in.)
Maximum clearance: 0.08 mm (0.0031 in.)
HINT: If replacing the cylinder block sub±assembly, the
bearing standard clearance will be:
0.031 0.067 mm
(0.0012 ± 0.0026 in.)
If the oil clearance is greater than maximum, replace the
bearings. If necessary, grind or replace the crankshaft. (b) Using a screwdriver, pry up the main bearing cap, and
remove the main bearing cap, lower main bearings
and lower thrust washers (No. 2 journal position of
main bearing cap only).
HINT: Keep the lower main bearings and lower thrust
washers together with the main bearing cap.
(c) Lift out the crankshaft.
NOTE: Keep the upper main bearings and upper thrust
washers together with the cylinder block.
(d) Clean each main journal and bearing.
(e) Check each main journal and bearing for pitting and
scratches.
If the journal or bearing is damaged, replace the bear-
ing. If necessary, grind or replace the crankshaft.
(h) Install the main bearing cap.
(See step 4 on page EM±164)
Torque: 1 st 625 kg±cm (45 ft±Ib, 61 N±m)
2nd turns 90°
NOTICE: Do not turn the crankshaft
(f) Place the crankshaft on the cylinder block.
(g) Lay a strip of Plastigage across each journal.
± ENGINE MECHANICALCylinder Block (2VZ±FE)EM±150
Page 1341 of 2389
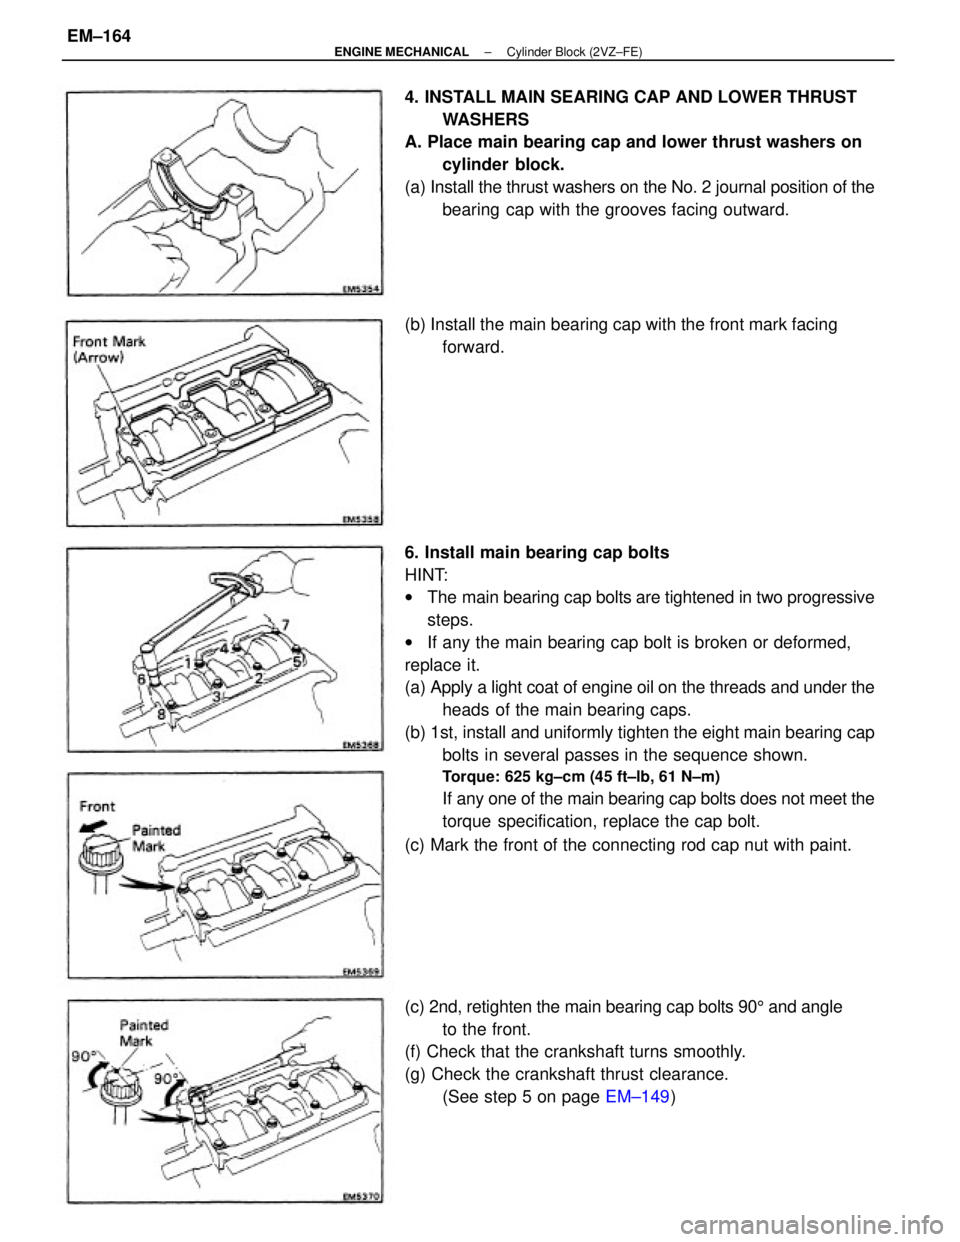
6. Install main bearing cap bolts
HINT:
wThe main bearing cap bolts are tightened in two progressive
steps.
wIf any the main bearing cap bolt is broken or deformed,
replace it.
(a) Apply a light coat of engine oil on the threads and under the
heads of the main bearing caps.
(b) 1st, install and uniformly tighten the eight main bearing cap
bolts in several passes in the sequence shown.
Torque: 625 kg±cm (45 ft±lb, 61 N±m)
If any one of the main bearing cap bolts does not meet the
torque specification, replace the cap bolt.
(c) Mark the front of the connecting rod cap nut with paint. 4. INSTALL MAIN SEARING CAP AND LOWER THRUST
WASHERS
A. Place main bearing cap and lower thrust washers on
cylinder block.
(a) Install the thrust washers on the No. 2 journal position of the
bearing cap with the grooves facing outward.
(c) 2nd, retighten the main bearing cap bolts 905 and angle
to the front.
(f) Check that the crankshaft turns smoothly.
(g) Check the crankshaft thrust clearance.
(See step 5 on page EM±149) (b) Install the main bearing cap with the front mark facing
forward.
± ENGINE MECHANICALCylinder Block (2VZ±FE)EM±164
Page 1342 of 2389
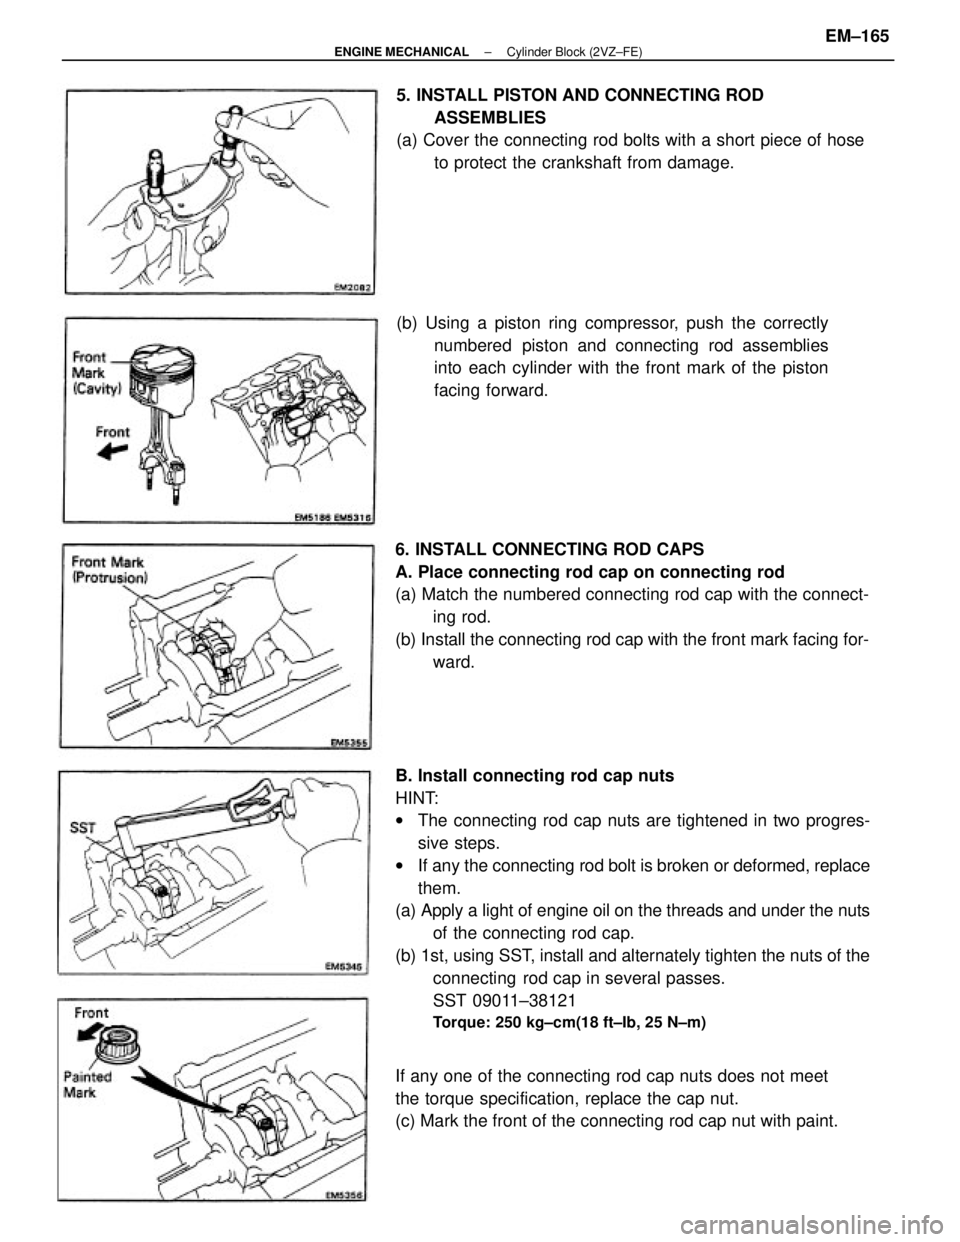
B. Install connecting rod cap nuts
HINT:
wThe connecting rod cap nuts are tightened in two progres-
sive steps.
wIf any the connecting rod bolt is broken or deformed, replace
them.
(a) Apply a light of engine oil on the threads and under the nuts
of the connecting rod cap.
(b) 1st, using SST, install and alternately tighten the nuts of the
connecting rod cap in several passes.
SST 09011±38121
Torque: 250 kg±cm(18 ft±Ib, 25 N±m)
6. INSTALL CONNECTING ROD CAPS
A. Place connecting rod cap on connecting rod
(a) Match the numbered connecting rod cap with the connect-
ing rod.
(b) Install the connecting rod cap with the front mark facing for-
ward. 5. INSTALL PISTON AND CONNECTING ROD
ASSEMBLIES
(a) Cover the connecting rod bolts with a short piece of hose
to protect the crankshaft from damage.
If any one of the connecting rod cap nuts does not meet
the torque specification, replace the cap nut.
(c) Mark the front of the connecting rod cap nut with paint.(b) Using a piston ring compressor, push the correctly
numbered piston and connecting rod assemblies
into each cylinder with the front mark of the piston
facing forward.
± ENGINE MECHANICALCylinder Block (2VZ±FE)EM±165
Page 1343 of 2389
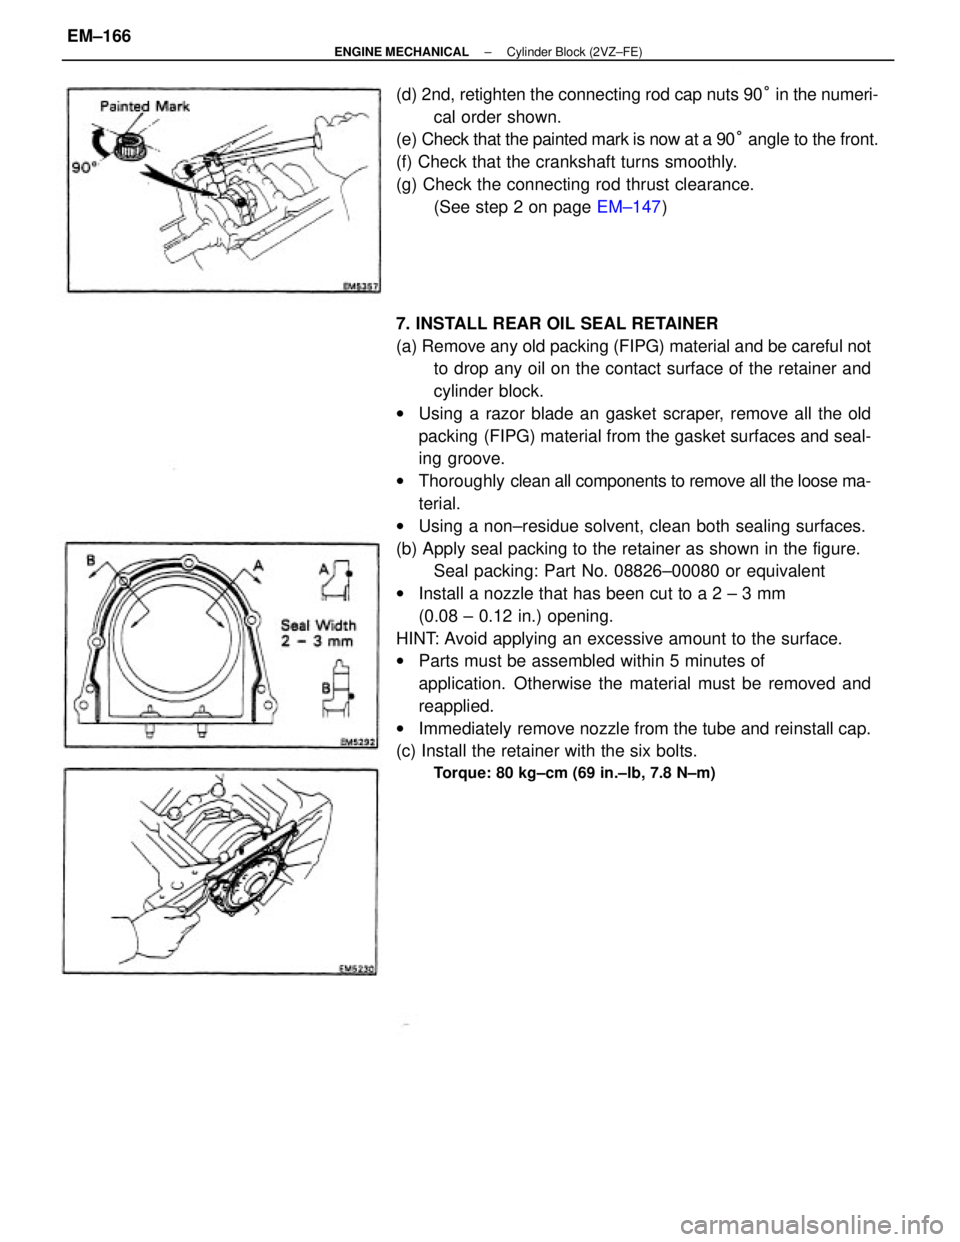
7. INSTALL REAR OIL SEAL RETAINER
(a) Remove any old packing (FIPG) material and be careful not
to drop any oil on the contact surface of the retainer and
cylinder block.
wUsing a razor blade an gasket scraper, remove all the old
packing (FIPG) material from the gasket surfaces and seal-
ing groove.
wThoroughly clean all components to remove all the loose ma-
terial.
wUsing a non±residue solvent, clean both sealing surfaces.
(b) Apply seal packing to the retainer as shown in the figure.
Seal packing: Part No. 08826±00080 or equivalent
wInstall a nozzle that has been cut to a 2 ± 3 mm
(0.08 ± 0.12 in.) opening.
HINT: Avoid applying an excessive amount to the surface.
wParts must be assembled within 5 minutes of
application. Otherwise the material must be removed and
reapplied.
wImmediately remove nozzle from the tube and reinstall cap.
(c) Install the retainer with the six bolts.
Torque: 80 kg±cm (69 in.±lb, 7.8 N±m)
(d) 2nd, retighten the connecting rod cap nuts 90° in the numeri-
cal order shown.
(e) Check that the painted mark is now at a 90° angle to the front.
(f) Check that the crankshaft turns smoothly.
(g) Check the connecting rod thrust clearance.
(See step 2 on page EM±147)
± ENGINE MECHANICALCylinder Block (2VZ±FE)EM±166
Page 1344 of 2389

2. INSTALL WATER BY±PASS PIPE
(a) Remove any old packing (FIPG) material and be careful not
to drop any oil on the contact surfaces of the bypass pipe
and cylinder block.
wUsing a razor blade and gasket scraper, remove all the old
packing (FIPG) material from the gasket surfaces and seal-
ing groove.
wThoroughly clean all components to remove all the loose
material.
wUsing a non±residue solvent, clean both sealing surfaces.
(b) Apply seal packing to the groove of the by±pass pipe.
Seal packing: Part No. 08826±00100 or equivalent
wInstall a nozzle that has been cut to a 2 ± 3 mm
(0.08 0.12 in.) opening.
HINT: Avoid applying an excessive amount to the surface.
wParts must be assembled within 5 minutes of application.
Otherwise the material must be removed and reapplied.
wImmediately remove nozzle from the tube and reinstall cap.
(c) Install the by±pass pipe with the two bolts and two nuts.
Torque: 85 kg±cm (74 in.±lb, 8.3 N±m)
POST ASSEMBLY
1. INSTALL NO. 2 IDLER PULLEY BRACKET
Install the pulley bracket with the three bolts. Torque the
bolts.
Torque: 380 kg±cm (27 ft±Ib, 37 N±m)
3. INSTALL KNOCK SENSOR
Using SST, install the knock sensor.
SST 09816±30010
Torque: 450 kg±cm (33 ft±lb, 44 N±m)
± ENGINE MECHANICALCylinder Block (2VZ±FE)EM±167