Page 1276 of 2389

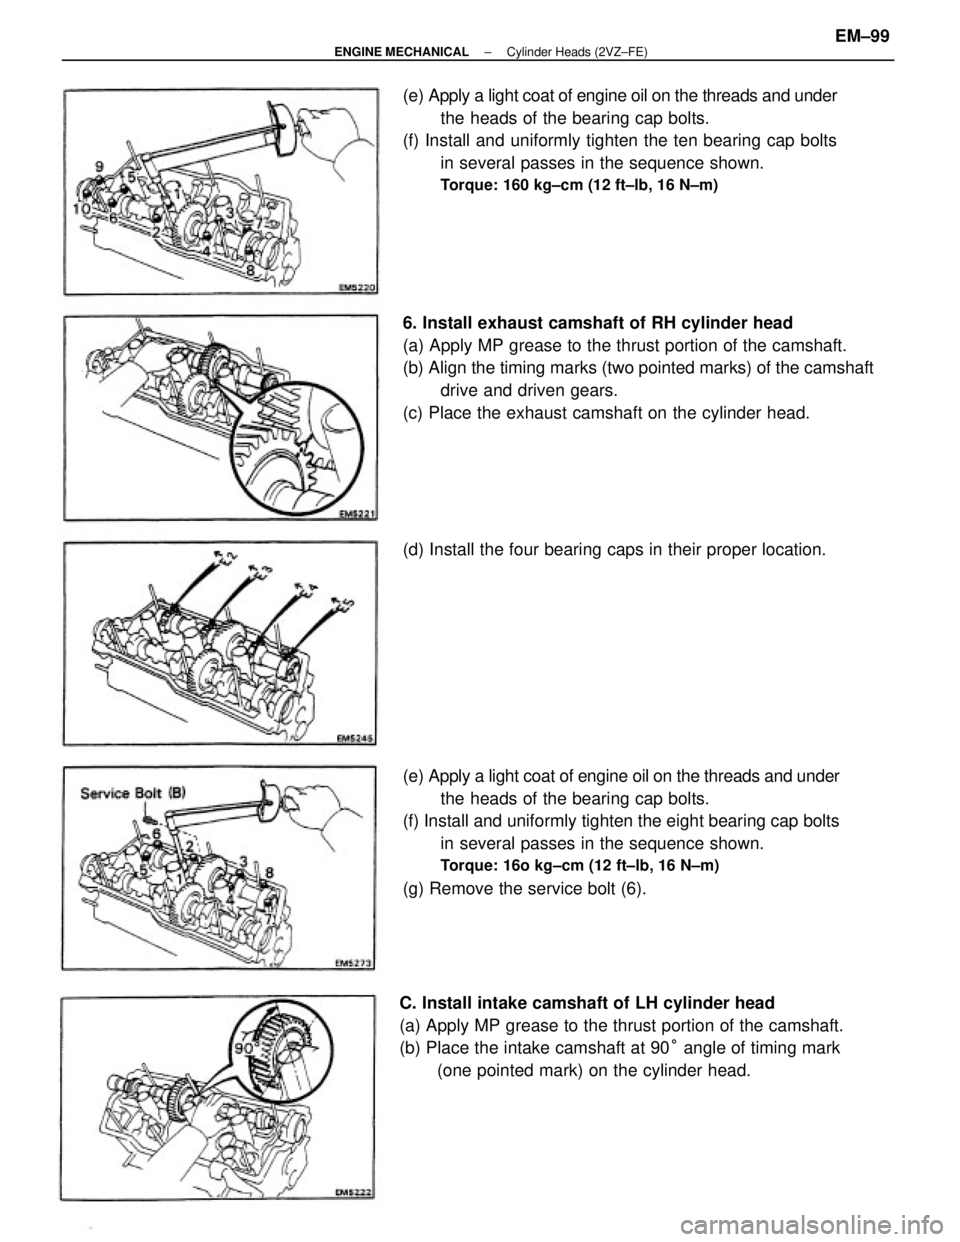
(e) Apply a light coat of engine oil on the threads and under
the heads of the bearing cap bolts.
(f) Install and uniformly tighten the eight bearing cap bolts
in several passes in the sequence shown.
Torque: 16o kg±cm (12 ft±lb, 16 N±m)
(g) Remove the service bolt (6). 6. Install exhaust camshaft of RH cylinder head
(a) Apply MP grease to the thrust portion of the camshaft.
(b) Align the timing marks (two pointed marks) of the camshaft
drive and driven gears.
(c) Place the exhaust camshaft on the cylinder head. (e) Apply a light coat of engine oil on the threads and under
the heads of the bearing cap bolts.
(f) Install and uniformly tighten the ten bearing cap bolts
in several passes in the sequence shown.
Torque: 160 kg±cm (12 ft±lb, 16 N±m)
C. Install intake camshaft of LH cylinder head
(a) Apply MP grease to the thrust portion of the camshaft.
(b) Place the intake camshaft at 90° angle of timing mark
(one pointed mark) on the cylinder head. (d) Install the four bearing caps in their proper location.
± ENGINE MECHANICALCylinder Heads (2VZ±FE)EM±99
Page 1277 of 2389
D. Install exhaust camshaft of LH cylinder head
(a) Apply MP grease to the thrust portion of the camshaft.
(b) Align the timing marks (one pointed mark) of the camshaft
drive and driven gears.
(c) Place the intake camshaft on the cylinder head. (e) Apply a light coat of engine oil on the threads and under
the heads of the bearing cap bolts.
M Install and uniformly tighten the ten bearing cap
bolts in several passes in the sequence shown.
Torque: 160 kg±cm (12 ft±Ib, 16 N±m)
(c) Apply seal packing to the No. 1 bearing cap as shown.
Seal packing: Part No. 08826±00080 or equivalent
(d) Install the four bearing caps in their proper location. (d) Install the five bearing caps in their proper locations.
± ENGINE MECHANICALCylinder Heads (2VZ±FE)EM±100
Page 1278 of 2389
5. CHECK AND ADJUST VALVE CLEARANCE
(See page EM±9)
Turn the camshaft and position the cam lobe upward, check
and adjust the valve clearance.
Valve clearance (Cold):
Intake 0.13 ± 0.23 mm (0.005 ± 0.009 in.)
Exhaust 0.27 ± 0.37 mm (0.011 ± 0.015 in.) (e) Apply a light coat of engine oil on the threads and un-
der the heads of bearing cap bolts.
(f) Install and uniformly tighten the eight bearing cap bolts
in several passes in the sequence shown.
Torque: 160 kg±cm (12 ft±Ib, 16 N±m)
Remove the service bolt (6).
6. INSTALL CAMSHAFT OIL SEALS
(a) Apply MP grease to a new oil seal lip.
7. INSTALL SPARK PLUG TUBE GASKETS
Install the six tube gaskets. (b) Using SST, tap in the oil seals.
SST 09223±46011
± ENGINE MECHANICALCylinder Heads (2VZ±FE)EM±101
Page 1279 of 2389
9. INSTALL NO.3 TIMING BELT COVER
Install the timing belt cover. with the six bolts.
Torque: 75 kg±cm (65 in.±lb, 7.4 N±m)
10. INSTALL NO.2 IDLER PULLEY, CAMSHAFT TIMING
PULLEYS AND TIMING BELT
(See steps 7 to 26 on pages EM±43 to 47)
11. INSTALL SPARK PLUGS (See page IG±11)
Torque: 180kg±cm (13 ft±Ib, 18 N±m)
8. INSTALL CYLINDER HEAD COVERS
(a) Apply seal packing to the cylinder heads as shown in the fig-
ure.
Seal packing: Part No.08826±00080 or equivalent
(b) Install the gasket to the cylinder head cover.
(c) Install the cylinder head cover with the six seal washers
and nuts. Install the two cylinder head covers.
Torque: 60 kg±cm (5Z in.±Ib, 5.9 N±m)
12. INSTALL RH EXHAUST MANIFOLD
(a) Install the inside heat insulator with the bolt.
± ENGINE MECHANICALCylinder Heads (2VZ±FE)EM±102
Page 1280 of 2389
13. INSTALL LH EXHAUST MANIFOLD
(a) Install a new gasket and the exhaust manifold with new six
nuts.
Torque: 400 kg±cm (29 ft±Ib, 39 N±m)
12. INSTALL INTAKE MANIFOLD
(a) Install two new gaskets and the intake manifold with the
eight bolts and four nuts.
Torque: 180 kg±cm (13 ft±Ib, 18 N±m)
(b) Install a new gasket and the exhaust manifold with new
six nuts.
Torque: 400 kg±cm (29 ft±Ib, 39 N±m)
(c) Install the outside heat insulator with the three nuts.
(d) Connect the oxygen sensor connector.
(b) Install the heat insulator with the two nuts.
± ENGINE MECHANICALCylinder Heads (2VZ±FE)EM±103
Page 1281 of 2389
16. INSTALL WATER OUTLET
(a) Connect the following hose and connector:
(1) Radiator upper hose
(2)Water temperature sensor connector
(b) Install a new gasket and the water outlet with the three nuts.
Torque: 85 kg±cm (73 in.±Ib, 8.3 N±m)
17. INSTALL INJECTORS AND DELIVERY PIPES
(See steps 1 to 5 on pages FI±98 and 99) (b) Install a new gasket and the water by±pass outlet with
the three nuts.
Torque: 200 kg±cm (14 ft±tb, 20 N±m)
(c) Connect the following connectors and hose:
(1) Heater water by±pass hose
(2) Cold start injector time switch connector
(3) Water temperature switch 15. INSTALL WATER BY±PASS OUTLET
(a) Install the crossover pipe heat insulator with the two bolts. (b) Install the No.2 idler pulley bracket stay with the two
bolts.
Torque: 185 kg±cm (13 ft±tb. 18 N±m)
14. INSTALL CYLINDER HEAD REAR PLATE
Install the rear plate with the two bolts.
± ENGINE MECHANICALCylinder Heads (2VZ±FE)EM±104
Page 1282 of 2389

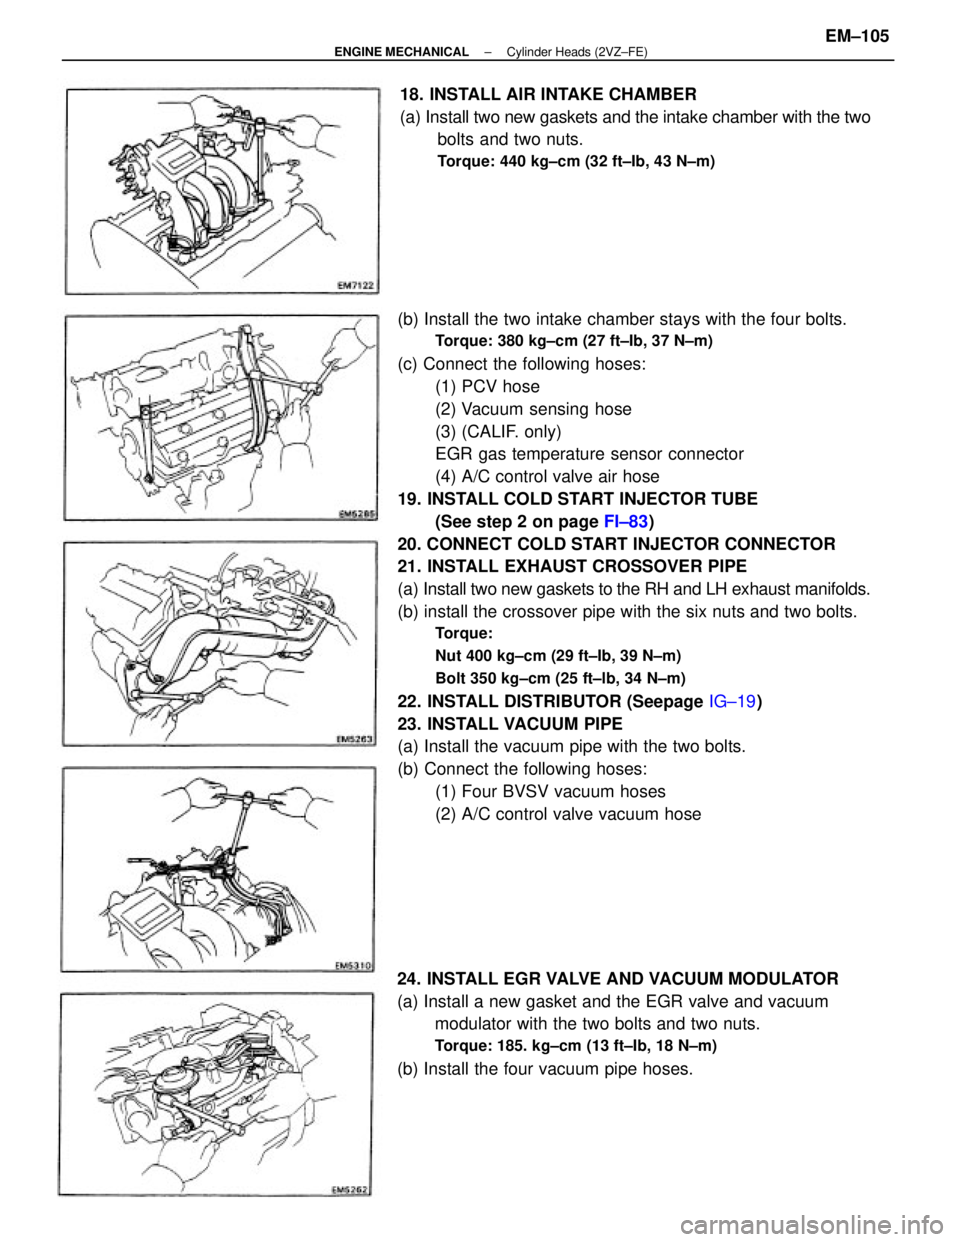
(b) Install the two intake chamber stays with the four bolts.
Torque: 380 kg±cm (27 ft±Ib, 37 N±m)
(c) Connect the following hoses:
(1) PCV hose
(2) Vacuum sensing hose
(3) (CALIF. only)
EGR gas temperature sensor connector
(4) A/C control valve air hose
19. INSTALL COLD START INJECTOR TUBE
(See step 2 on page FI±83)
20. CONNECT COLD START INJECTOR CONNECTOR
21. INSTALL EXHAUST CROSSOVER PIPE
(a) Install two new gaskets to the RH and LH exhaust manifolds.
(b) install the crossover pipe with the six nuts and two bolts.
Torque:
Nut 400 kg±cm (29 ft±Ib, 39 N±m)
Bolt 350 kg±cm (25 ft±lb, 34 N±m)
22. INSTALL DISTRIBUTOR (Seepage IG±19)
23. INSTALL VACUUM PIPE
(a) Install the vacuum pipe with the two bolts.
(b) Connect the following hoses:
(1) Four BVSV vacuum hoses
(2) A/C control valve vacuum hose
24. INSTALL EGR VALVE AND VACUUM MODULATOR
(a) Install a new gasket and the EGR valve and vacuum
modulator with the two bolts and two nuts.
Torque: 185. kg±cm (13 ft±Ib, 18 N±m)
(b) Install the four vacuum pipe hoses.18. INSTALL AIR INTAKE CHAMBER
(a) Install two new gaskets and the intake chamber with the two
bolts and two nuts.
Torque: 440 kg±cm (32 ft±Ib, 43 N±m)
± ENGINE MECHANICALCylinder Heads (2VZ±FE)EM±105
Page 1283 of 2389

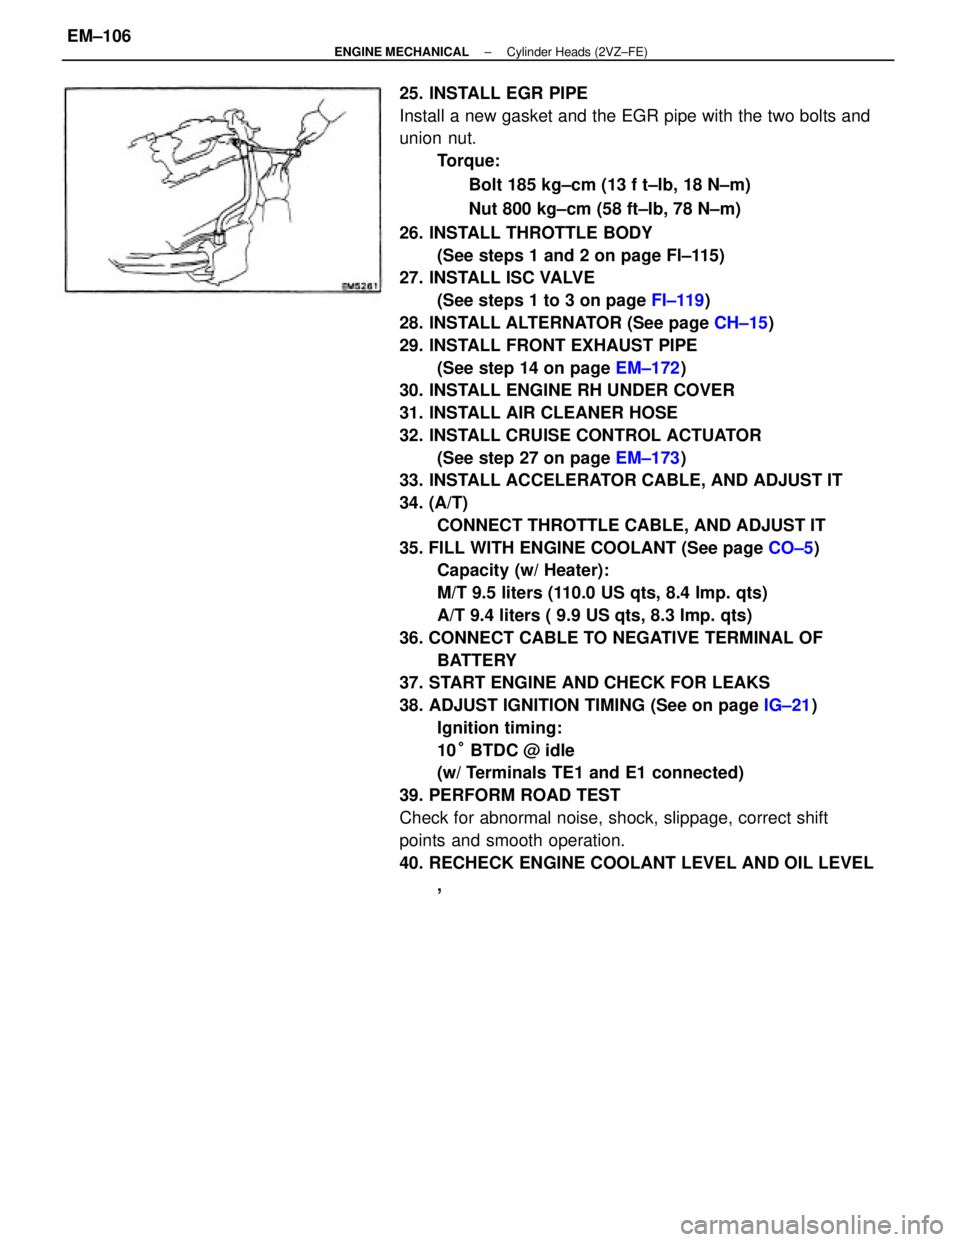
25. INSTALL EGR PIPE
Install a new gasket and the EGR pipe with the two bolts and
union nut.
Torque:
Bolt 185 kg±cm (13 f t±lb, 18 N±m)
Nut 800 kg±cm (58 ft±Ib, 78 N±m)
26. INSTALL THROTTLE BODY
(See steps 1 and 2 on page Fl±115)
27. INSTALL ISC VALVE
(See steps 1 to 3 on page FI±119)
28. INSTALL ALTERNATOR (See page CH±15)
29. INSTALL FRONT EXHAUST PIPE
(See step 14 on page EM±172)
30. INSTALL ENGINE RH UNDER COVER
31. INSTALL AIR CLEANER HOSE
32. INSTALL CRUISE CONTROL ACTUATOR
(See step 27 on page EM±173)
33. INSTALL ACCELERATOR CABLE, AND ADJUST IT
34. (A/T)
CONNECT THROTTLE CABLE, AND ADJUST IT
35. FILL WITH ENGINE COOLANT (See page CO±5)
Capacity (w/ Heater):
M/T 9.5 liters (110.0 US qts, 8.4 Imp. qts)
A/T 9.4 liters ( 9.9 US qts, 8.3 Imp. qts)
36. CONNECT CABLE TO NEGATIVE TERMINAL OF
BATTERY
37. START ENGINE AND CHECK FOR LEAKS
38. ADJUST IGNITION TIMING (See on page IG±21)
Ignition timing:
10° BTDC @ idle
(w/ Terminals TE1 and E1 connected)
39. PERFORM ROAD TEST
Check for abnormal noise, shock, slippage, correct shift
points and smooth operation.
40. RECHECK ENGINE COOLANT LEVEL AND OIL LEVEL
,
± ENGINE MECHANICALCylinder Heads (2VZ±FE)EM±106