Page 1247 of 2389
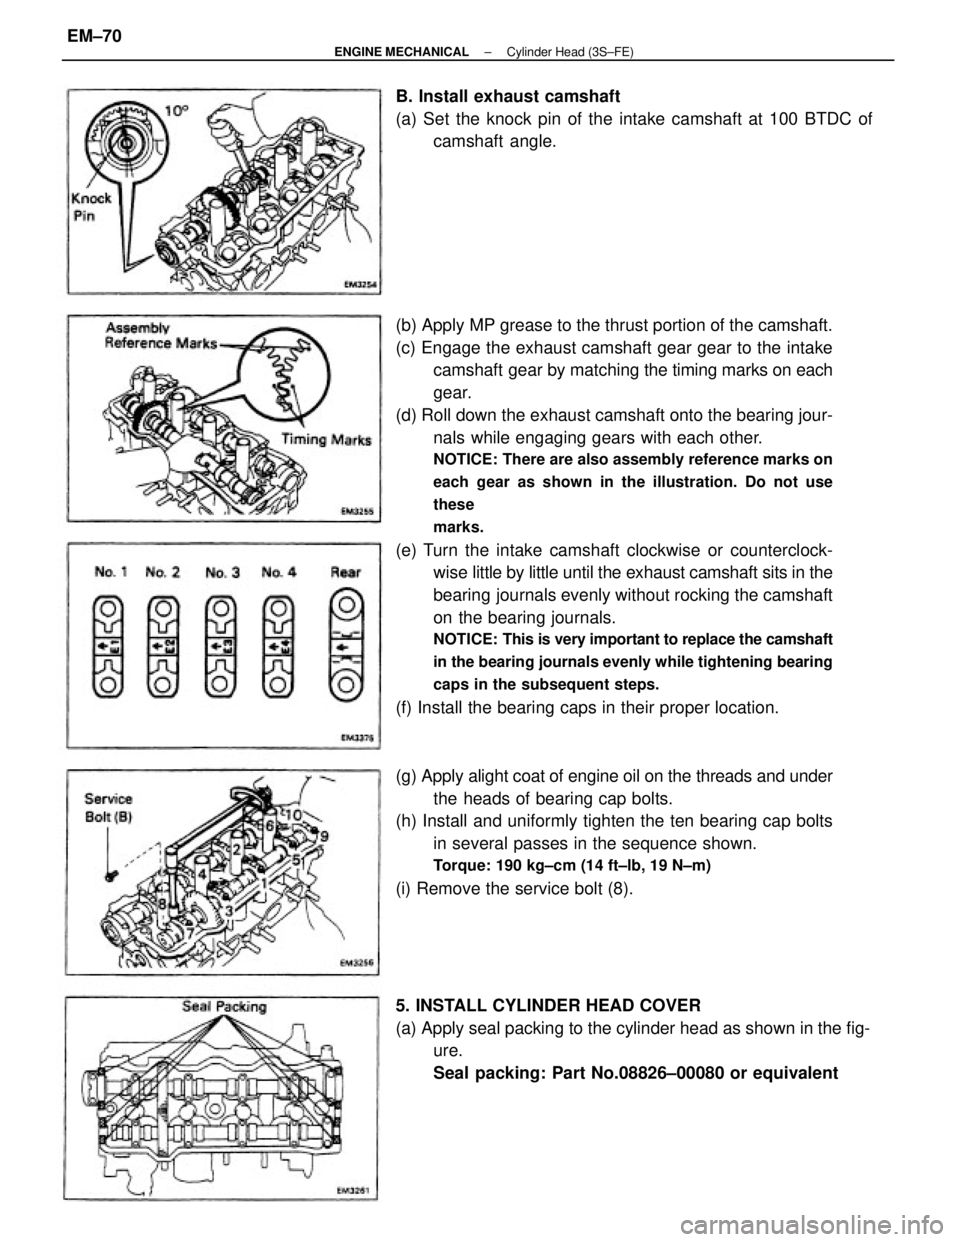
(b) Apply MP grease to the thrust portion of the camshaft.
(c) Engage the exhaust camshaft gear gear to the intake
camshaft gear by matching the timing marks on each
gear.
(d) Roll down the exhaust camshaft onto the bearing jour-
nals while engaging gears with each other.
NOTICE: There are also assembly reference marks on
each gear as shown in the illustration. Do not use
these
marks.
(e) Turn the intake camshaft clockwise or counterclock-
wise little by little until the exhaust camshaft sits in the
bearing journals evenly without rocking the camshaft
on the bearing journals.
NOTICE: This is very important to replace the camshaft
in the bearing journals evenly while tightening bearing
caps in the subsequent steps.
(f) Install the bearing caps in their proper location.
(g) Apply alight coat of engine oil on the threads and under
the heads of bearing cap bolts.
(h) Install and uniformly tighten the ten bearing cap bolts
in several passes in the sequence shown.
Torque: 190 kg±cm (14 ft±lb, 19 N±m)
(i) Remove the service bolt (8).
5. INSTALL CYLINDER HEAD COVER
(a) Apply seal packing to the cylinder head as shown in the fig-
ure.
Seal packing: Part No.08826±00080 or equivalent B. Install exhaust camshaft
(a) Set the knock pin of the intake camshaft at 100 BTDC of
camshaft angle.
± ENGINE MECHANICALCylinder Head (3S±FE)EM±70
Page 1248 of 2389
6. INSTALL N0.3 TIMING BELT COVER
Install the timing belt cover with the four bolts.
7. INSTALL NO.1 IDLER PULLEY AND TENSION SPRING
(See step 4 on page EM±29)
8. INSTALL CAMSHAFT TIMING PULLEY
(See steps 9 to 13 on pages EM±30 to 32)
9. INSTALL SPARK PLUGS (See page IG±7)
Torque: 180 kg±cm (13 ft±lb, 18 N±m)
10. INSTALL INJECTOR AND DELIVERY PIPE
(See steps 1 and 5 on pages FI±91 to 92)
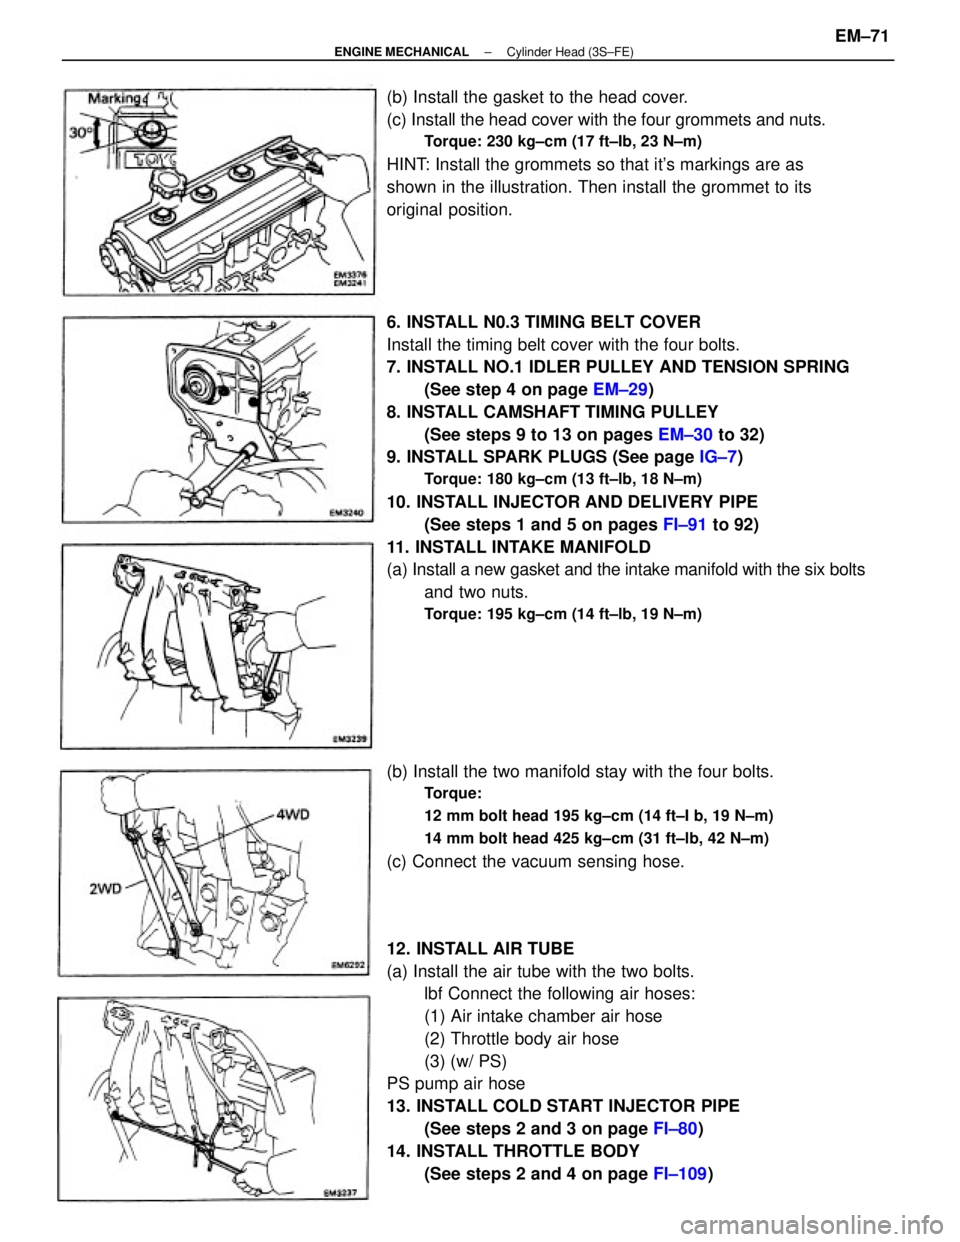
11. INSTALL INTAKE MANIFOLD
(a) Install a new gasket and the intake manifold with the six bolts
and two nuts.
Torque: 195 kg±cm (14 ft±lb, 19 N±m)
12. INSTALL AIR TUBE
(a) Install the air tube with the two bolts.
lbf Connect the following air hoses:
(1) Air intake chamber air hose
(2) Throttle body air hose
(3) (w/ PS)
PS pump air hose
13. INSTALL COLD START INJECTOR PIPE
(See steps 2 and 3 on page FI±80)
14. INSTALL THROTTLE BODY
(See steps 2 and 4 on page FI±109) (b) Install the gasket to the head cover.
(c) Install the head cover with the four grommets and nuts.
Torque: 230 kg±cm (17 ft±Ib, 23 N±m)
HINT: Install the grommets so that it's markings are as
shown in the illustration. Then install the grommet to its
original position.
(b) Install the two manifold stay with the four bolts.
Torque:
12 mm bolt head 195 kg±cm (14 ft±I b, 19 N±m)
14 mm bolt head 425 kg±cm (31 ft±lb, 42 N±m)
(c) Connect the vacuum sensing hose.
± ENGINE MECHANICALCylinder Head (3S±FE)EM±71
Page 1249 of 2389
17. INSTALL WATER OUTLET
(a) Install a new gasket and the water outlet with the two bolts.
Torque: 150 kg±cm (11 ft±lb, 15 N±m)
(b) Connect the following hoses and connectors:
(1) Radiator upper hose
(2) Water hose
(3) Emission control vacuum hoses
(4) Water temperature sender gauge connector
(5) Water temperature sensor connector
(6) Cold start injector time switch connector
18. INSTALL DISTRIBUTOR
(See steps 1 and 4 on page IG±16)
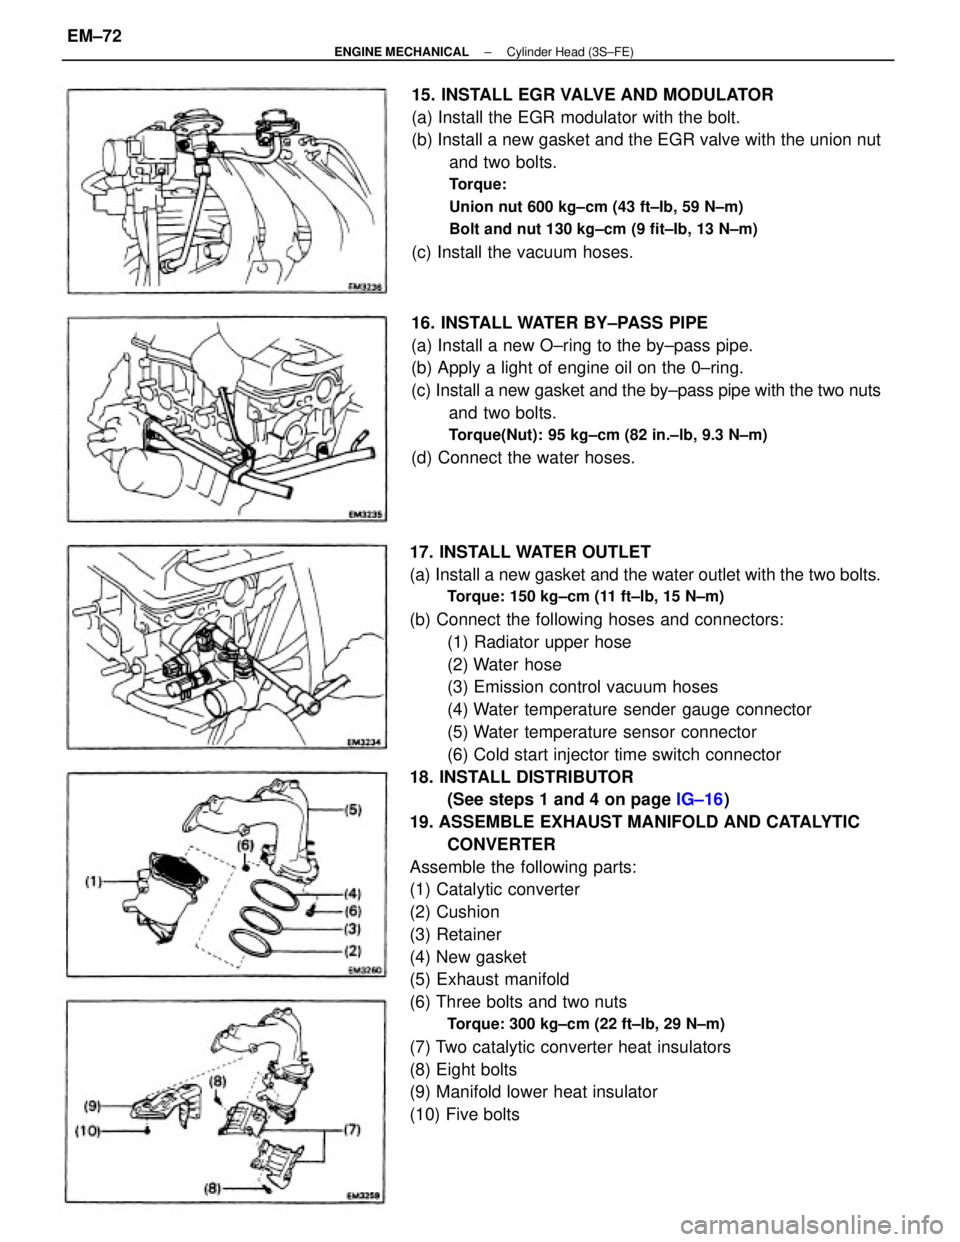
19. ASSEMBLE EXHAUST MANIFOLD AND CATALYTIC
CONVERTER
Assemble the following parts:
(1) Catalytic converter
(2) Cushion
(3) Retainer
(4) New gasket
(5) Exhaust manifold
(6) Three bolts and two nuts
Torque: 300 kg±cm (22 ft±Ib, 29 N±m)
(7) Two catalytic converter heat insulators
(8) Eight bolts
(9) Manifold lower heat insulator
(10) Five bolts15. INSTALL EGR VALVE AND MODULATOR
(a) Install the EGR modulator with the bolt.
(b) Install a new gasket and the EGR valve with the union nut
and two bolts.
Torque:
Union nut 600 kg±cm (43 ft±Ib, 59 N±m)
Bolt and nut 130 kg±cm (9 fit±Ib, 13 N±m)
(c) Install the vacuum hoses.
16. INSTALL WATER BY±PASS PIPE
(a) Install a new O±ring to the by±pass pipe.
(b) Apply a light of engine oil on the 0±ring.
(c) Install a new gasket and the by±pass pipe with the two nuts
and two bolts.
Torque(Nut): 95 kg±cm (82 in.±lb, 9.3 N±m)
(d) Connect the water hoses.
± ENGINE MECHANICALCylinder Head (3S±FE)EM±72
Page 1250 of 2389
21. CONNECT FRONT EXHAUST PIPE TO CATALYTIC
CONVERTER
(See step 12 on page EM±136)
22. INSTALL SUSPENSION LOWER CROSSMEMBER
(See step 17 on page EM±136)
23. INSTALL ENGINE RH UNDER COVER
24. INSTALL RH FRONT WHEEL
25. LOWER VEHICLE(d) Install the manifold lower heat insulator with the six
bolts.
(e) Connect the oxygen sensor connector(s). (b) Install the exhaust manifold and catalytic converter as-
sembly with new six nuts.
Torque: 500 kg±cm (37 ft±Ib, 48 N±m)
20. INSTALL EXHAUST MANIFOLD AND CATALYTIC
CONVERTER ASSEMBLY
(a) Install a gasket.
(c) Install the catalytic converter stay with the two bolts and
two nuts.
± ENGINE MECHANICALCylinder Head (3S±FE)EM±73
Page 1251 of 2389
26. INSTALL OIL PRESSURE SWITCH, ENGINE HANGERS
AND ALTERNATOR BRACKET
Torque the bolts.
Torque: 500 kg±cm (37 ft±Ib, 48 N±m)
27. INSTALL ALTERNATOR (See page CH±14)
28. INSTALL AIR CLEANER HOSE
29. INSTALL CRUISE CONTROL ACTUATOR
(See step 26 on page EM±137)
30. INSTALL RADIATOR RESERVOIR TANK
31. INSTALL ACCELERATOR CABLE, AND ADJUST IT
32. (A/T)
CONNECT THROTTLE CABLE, AND ADJUST IT
33. FILL WITH ENGINE COOLANT (See page CO±5)
Capacity (w/ Heater):
M/T 6.4 liters (6.8 US qts, 5.6 Imp. qts)
A/T (2WD) 6.3 liters (6.7 US qts, 5.5 Imp. qts)
A/T (4WD) 6.8 liters (7.2 US qts, 6.0 Imp. qts)
34. CONNECT CABLE TO NEGATIVE TERMINAL OF
BATTERY
35. START ENGINE AND CHECK FOR LEAKS
36. PERFORM ENGINE ADJUSTMENT
(a) Adjust the valve clearance. (See page EM±11)
Valve clearance (Cold):
Intake 0.19 ± 0.29 mm (0.007 ± 0.011 in.)
Exhaust 0.28 ± 0.38 mm (0.011 ± 0.015 in.)
(b) Adjust the ignition timing.
(See steps 7 to 10 on pages IG±16 and 17)
Ignition timing:
10° BTDC @ idle
(w/ Terminals TE 1 and E 1 connected)
37. CHECK TOE±IN (See page FA±5)
38. PERFORM ROAD TEST
Check for abnormal noise, shock, slippage, correct shift
points and smooth operation.
39. RECHECK ENGINE COOLANT LEVEL AND OIL LEVEL
± ENGINE MECHANICALCylinder Head (3S±FE)EM±74
Page 1269 of 2389
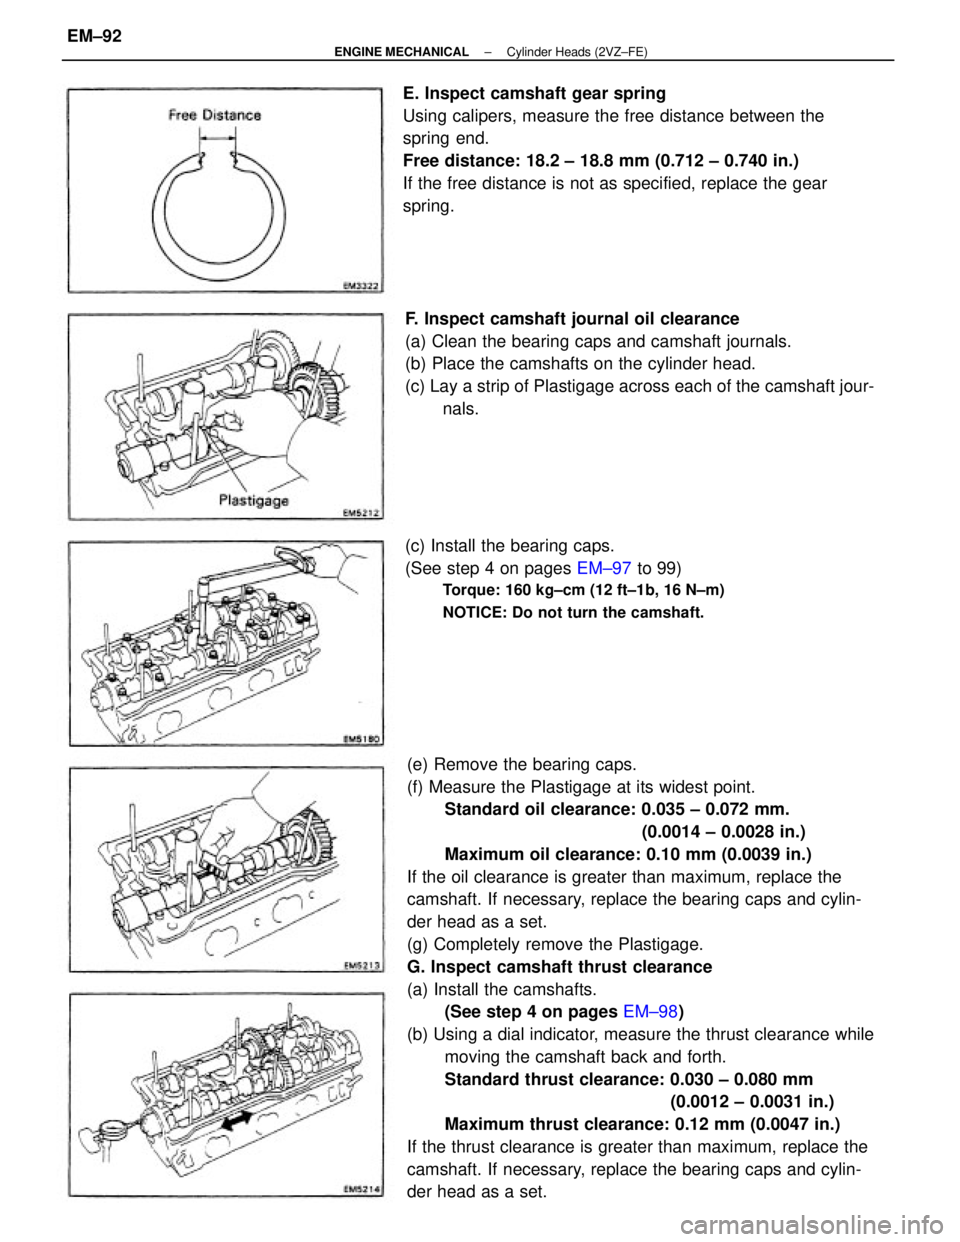
(e) Remove the bearing caps.
(f) Measure the Plastigage at its widest point.
Standard oil clearance: 0.035 ± 0.072 mm.
(0.0014 ± 0.0028 in.)
Maximum oil clearance: 0.10 mm (0.0039 in.)
If the oil clearance is greater than maximum, replace the
camshaft. If necessary, replace the bearing caps and cylin-
der head as a set.
(g) Completely remove the Plastigage.
G. Inspect camshaft thrust clearance
(a) Install the camshafts.
(See step 4 on pages EM±98)
(b) Using a dial indicator, measure the thrust clearance while
moving the camshaft back and forth.
Standard thrust clearance: 0.030 ± 0.080 mm
(0.0012 ± 0.0031 in.)
Maximum thrust clearance: 0.12 mm (0.0047 in.)
If the thrust clearance is greater than maximum, replace the
camshaft. If necessary, replace the bearing caps and cylin-
der head as a set. E. Inspect camshaft gear spring
Using calipers, measure the free distance between the
spring end.
Free distance: 18.2 ± 18.8 mm (0.712 ± 0.740 in.)
If the free distance is not as specified, replace the gear
spring.
F. Inspect camshaft journal oil clearance
(a) Clean the bearing caps and camshaft journals.
(b) Place the camshafts on the cylinder head.
(c) Lay a strip of Plastigage across each of the camshaft jour-
nals.
(c) Install the bearing caps.
(See step 4 on pages EM±97 to 99)
Torque: 160 kg±cm (12 ft±1b, 16 N±m)
NOTICE: Do not turn the camshaft.
± ENGINE MECHANICALCylinder Heads (2VZ±FE)EM±92
Page 1273 of 2389
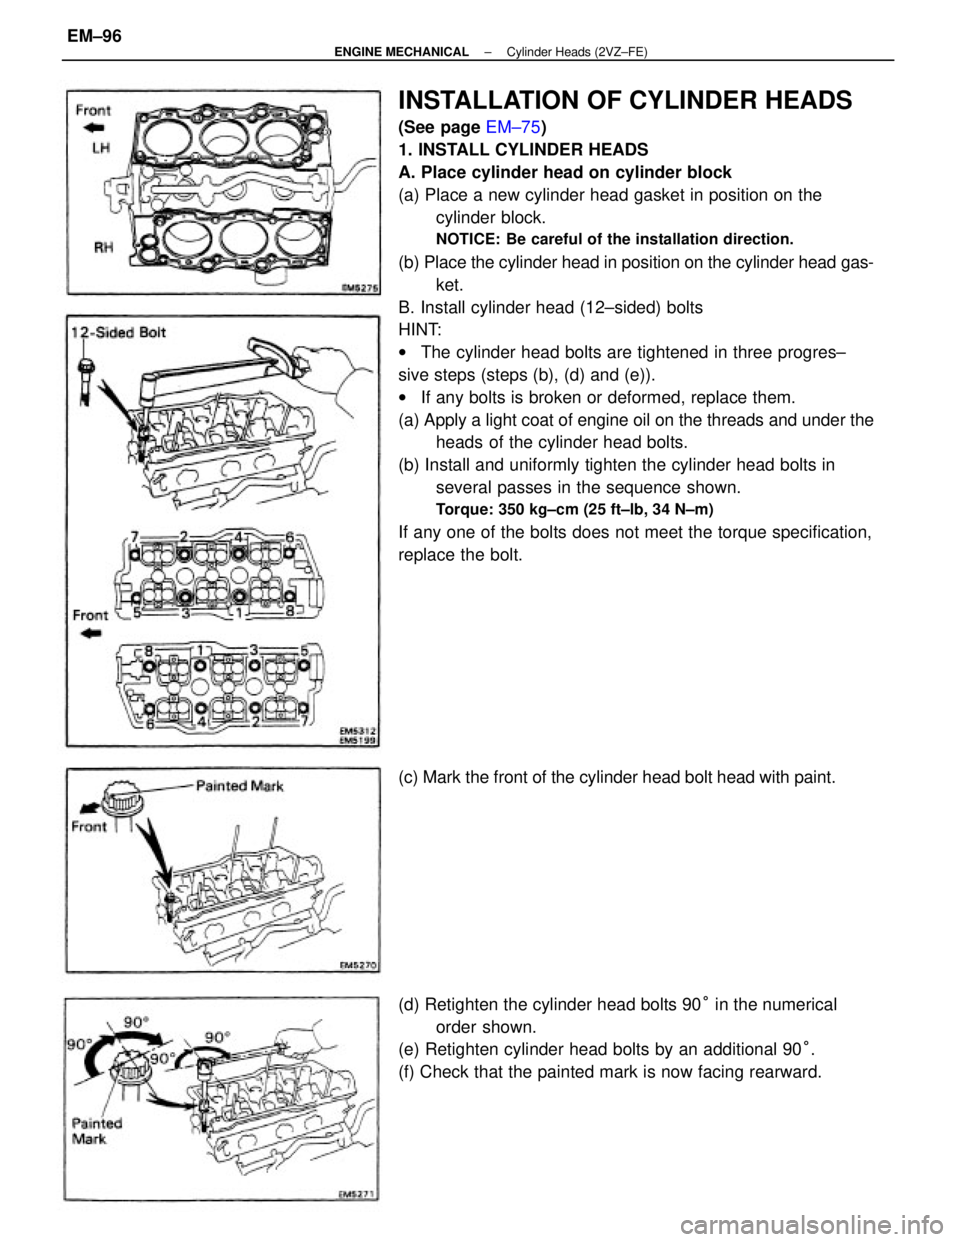
INSTALLATION OF CYLINDER HEADS
(See page EM±75)
1. INSTALL CYLINDER HEADS
A. Place cylinder head on cylinder block
(a) Place a new cylinder head gasket in position on the
cylinder block.
NOTICE: Be careful of the installation direction.
(b) Place the cylinder head in position on the cylinder head gas-
ket.
B. Install cylinder head (12±sided) bolts
HINT:
wThe cylinder head bolts are tightened in three progres±
sive steps (steps (b), (d) and (e)).
wIf any bolts is broken or deformed, replace them.
(a) Apply a light coat of engine oil on the threads and under the
heads of the cylinder head bolts.
(b) Install and uniformly tighten the cylinder head bolts in
several passes in the sequence shown.
Torque: 350 kg±cm (25 ft±lb, 34 N±m)
If any one of the bolts does not meet the torque specification,
replace the bolt.
(d) Retighten the cylinder head bolts 90° in the numerical
order shown.
(e) Retighten cylinder head bolts by an additional 90°.
(f) Check that the painted mark is now facing rearward. (c) Mark the front of the cylinder head bolt head with paint.
± ENGINE MECHANICALCylinder Heads (2VZ±FE)EM±96
Page 1274 of 2389
c. Install cylinder head (recessed head) bolts
(a) Apply a light coat of engine oil on the threads and under the
heads of the cylinder head bolts.
(b) Using a 8 mm hexagon wrench, install the cylinder head
bolts.
Torque: 185 kg±cm (13 ft±Ib, 18 N±m)
2. INSTALL LH ENGINE HANGER
Torque: 380 kg±cm (27 ft±Ib, 37 N±m)
3. ASSEMBLE EXHAUST CAMSHAFTS
(a) Install the following parts:
(1) Camshaft gear spring
(2) Camshaft sub±gear
(3) Wave washer
(c) Mount the hexagonal wrench head portion of the cam-
shaft in a vise.
NOTICE: Be careful not to damage the camshaft.
(b) Using snap ring pliers, install the snap ring.
± ENGINE MECHANICALCylinder Heads (2VZ±FE)EM±97