Page 826 of 2389
1. INSPECT ALLOWABLE ERROR OF CLOCK
Check the allowable error of the clock.
Allowable error (per day):
+ 1.5 seconds
2. ADJUSTMENT OF CLOCK
Adjustment of the quartz clock requires a precise digital
counter. Adjustment must be made in shop specified by-
the manufacturer.
3. SETTING OF CLOCK
(a) Connect the battery terminal.
(b) Check the clock to see that it is running, and then set
it to the correct time.
HINT: Whenever the battery terminal is disconnected,
make sure to set the clock to the correct time after reco
necting the battery.
± BODY ELECTRICAL SYSTEMClockBE±104
Page 1123 of 2389
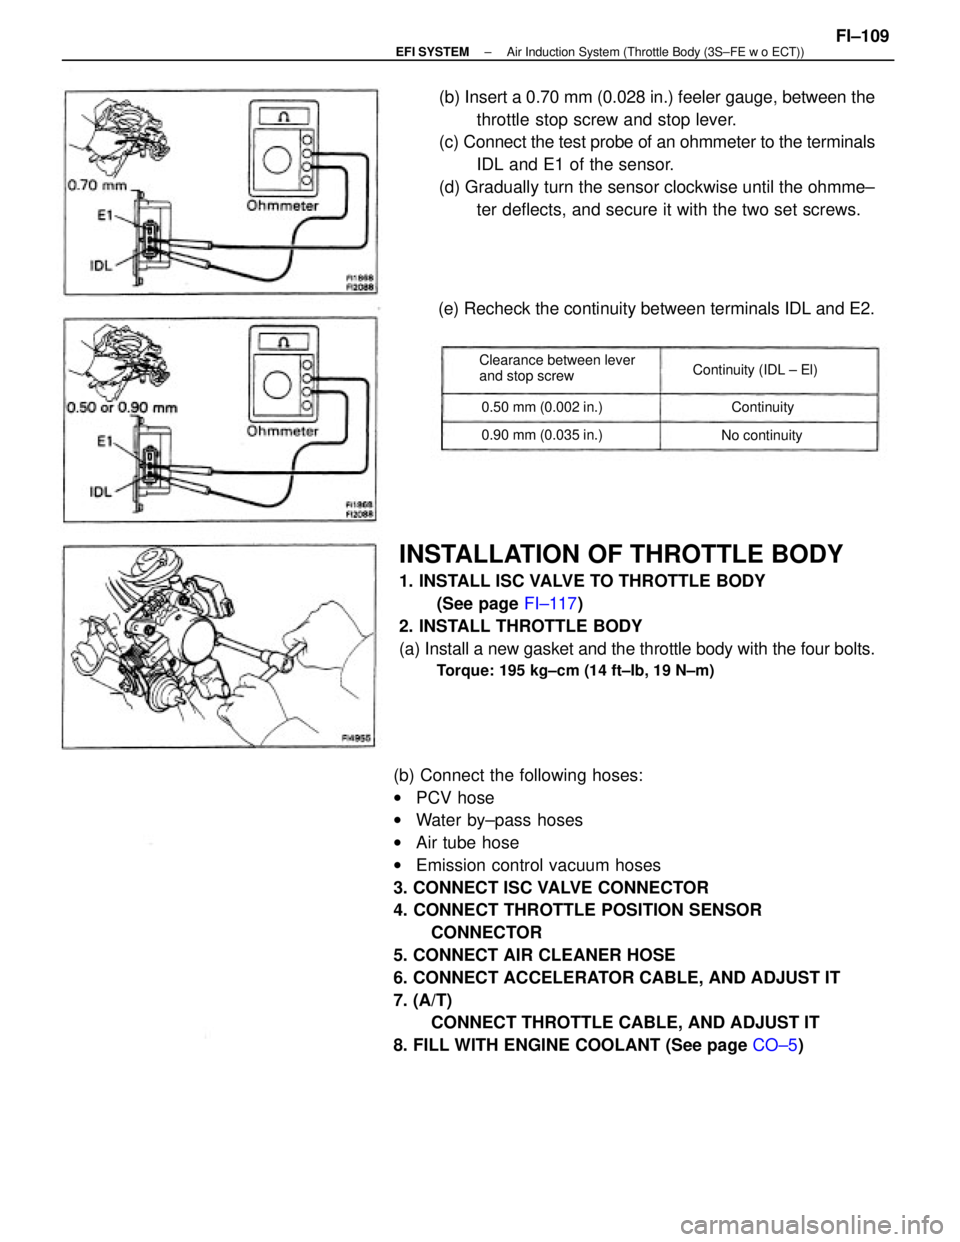
(b) Connect the following hoses:
wPCV hose
wWater by±pass hoses
wAir tube hose
wEmission control vacuum hoses
3. CONNECT ISC VALVE CONNECTOR
4. CONNECT THROTTLE POSITION SENSOR
CONNECTOR
5. CONNECT AIR CLEANER HOSE
6. CONNECT ACCELERATOR CABLE, AND ADJUST IT
7. (A/T)
CONNECT THROTTLE CABLE, AND ADJUST IT
8. FILL WITH ENGINE COOLANT (See page CO±5)
INSTALLATION OF THROTTLE BODY
1. INSTALL ISC VALVE TO THROTTLE BODY
(See page FI±117)
2. INSTALL THROTTLE BODY
(a) Install a new gasket and the throttle body with the four bolts.
Torque: 195 kg±cm (14 ft±Ib, 19 N±m)
(b) Insert a 0.70 mm (0.028 in.) feeler gauge, between the
throttle stop screw and stop lever.
(c) Connect the test probe of an ohmmeter to the terminals
IDL and E1 of the sensor.
(d) Gradually turn the sensor clockwise until the ohmme±
ter deflects, and secure it with the two set screws.
(e) Recheck the continuity between terminals IDL and E2.
Clearance between lever
and stop screwContinuity (IDL ± El)
0.90 mm (0.035 in.) 0.50 mm (0.002 in.)
No continuityContinuity
± EFI SYSTEMAir Induction System (Throttle Body (3S±FE w o ECT))FI±109
Page 1125 of 2389
REMOVAL OF THROTTLE BODY
(See page FI±107)
INSPECTION OF THROTTLE BODY
1. CLEAN THROTTLE BODY
(See step 1 on page FI±107)
2. INSPECT THROTTLE VALVE
(See step 2 on page FI±108)
3. INSPECT THROTTLE POSITION SENSOR
(See step 2 on page FI±110)
4. IF NECESSARY, ADJUST THROTTLE POSITION
SENSOR
(a) Loosen the two set screws of the sensor.
(b) Insert a 0.60 mm (0.024 in.) feeler gauge, between the
throttle stop screw and stop lever.
(c) Connect the test probe of an ohmmeter to the terminals
IDL and E2 of the sensor.
(d) Gradually turn the sensor clockwise until the ohmme±
ter deflects, and secure it with the two set screws.
INSTALLATION OF THROTTLE BODY
(See page Fl ±109)(e) Recheck the continuity between terminals IDL and E2.
Clearance between fever
and stop screwContinuity (IDL ± E2)
± EFI SYSTEMAir Induction System (Throttle Body (3S±FE w ECT))FI±111
Page 1128 of 2389
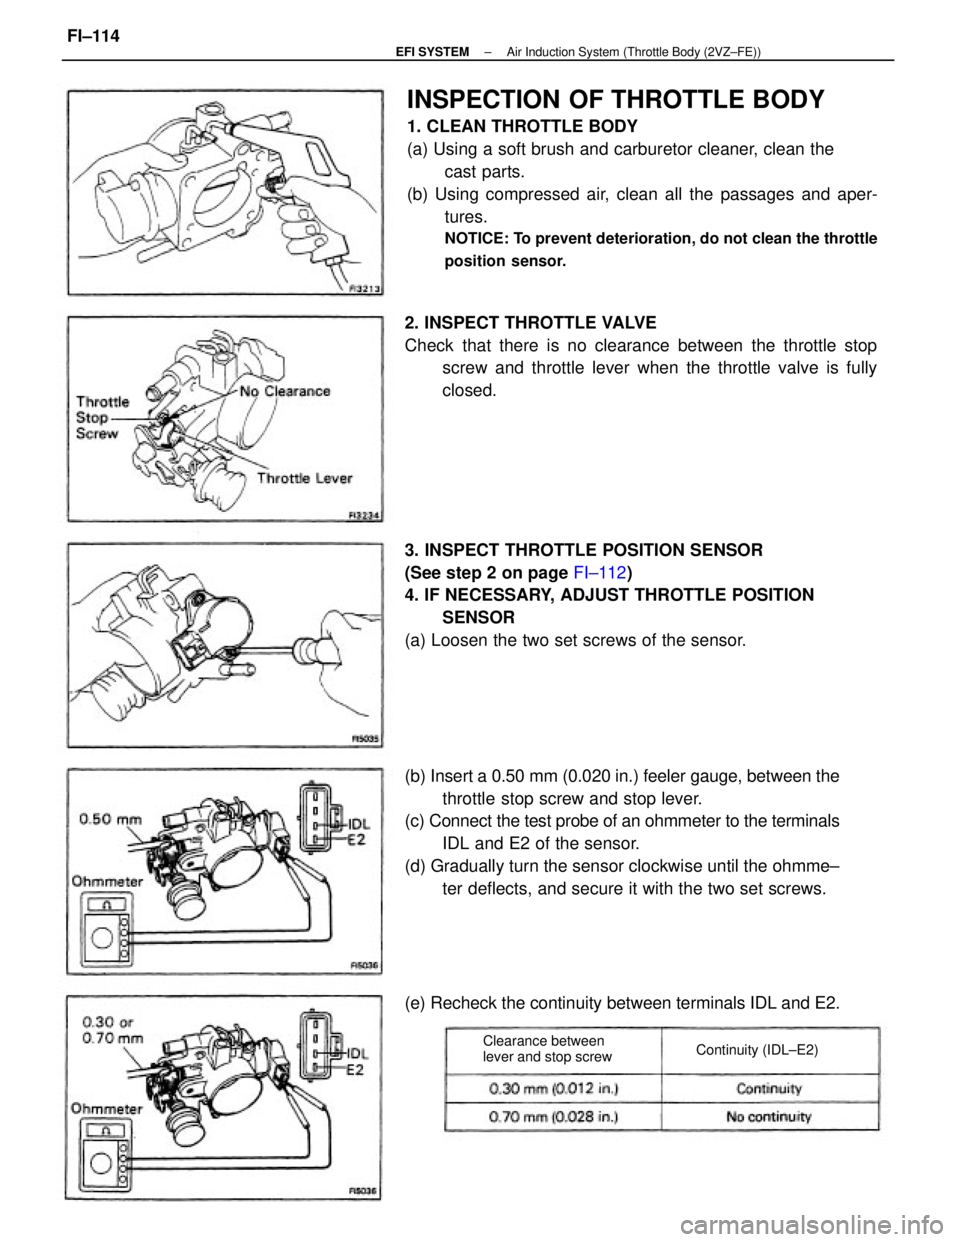
INSPECTION OF THROTTLE BODY
1. CLEAN THROTTLE BODY
(a) Using a soft brush and carburetor cleaner, clean the
cast parts.
(b) Using compressed air, clean all the passages and aper-
tures.
NOTICE: To prevent deterioration, do not clean the throttle
position sensor.
(b) Insert a 0.50 mm (0.020 in.) feeler gauge, between the
throttle stop screw and stop lever.
(c) Connect the test probe of an ohmmeter to the terminals
IDL and E2 of the sensor.
(d) Gradually turn the sensor clockwise until the ohmme±
ter deflects, and secure it with the two set screws. 3. INSPECT THROTTLE POSITION SENSOR
(See step 2 on page FI±112)
4. IF NECESSARY, ADJUST THROTTLE POSITION
SENSOR
(a) Loosen the two set screws of the sensor. 2. INSPECT THROTTLE VALVE
Check that there is no clearance between the throttle stop
screw and throttle lever when the throttle valve is fully
closed.
(e) Recheck the continuity between terminals IDL and E2.
Clearance between
lever and stop screwContinuity (IDL±E2)
± EFI SYSTEMAir Induction System (Throttle Body (2VZ±FE))FI±114
Page 1213 of 2389
17. REMOVE TIMING BELT FROM CAMSHAFT TIMING
PULLEY
HINT (Re±using timing belt): If the installation marks have
disappeared, before removing the timing belt, place new
instillation marks on the timing belt to match the timing marks
of the camshaft timing pulleys.
(a) Using SST, loosen± the tension between the LH and
RH camshaft timing pulleys by slightly turning the RH
camshaft timing pulley clockwise.
SST 09278±54012 15. SET NO.1 CYLINDER TO TDCI COMPRESSION
(a) Turn the crankshaft pulley and align its groove with the timing
mark º0º of the No.1 timing belt cover.
(b) Check that timing marks of the camshaft timing
pulleys and No±3 timing belt cover are aligned.
If not, turn the crankshaft one revolution (360
°).
16. REMOVE TIMING BELT TENSIONER
Remove the two bolts, tensioner and dust boot.
± ENGINE MECHANICALTiming Belt (2VZ±FE)EM±36
Page 1231 of 2389
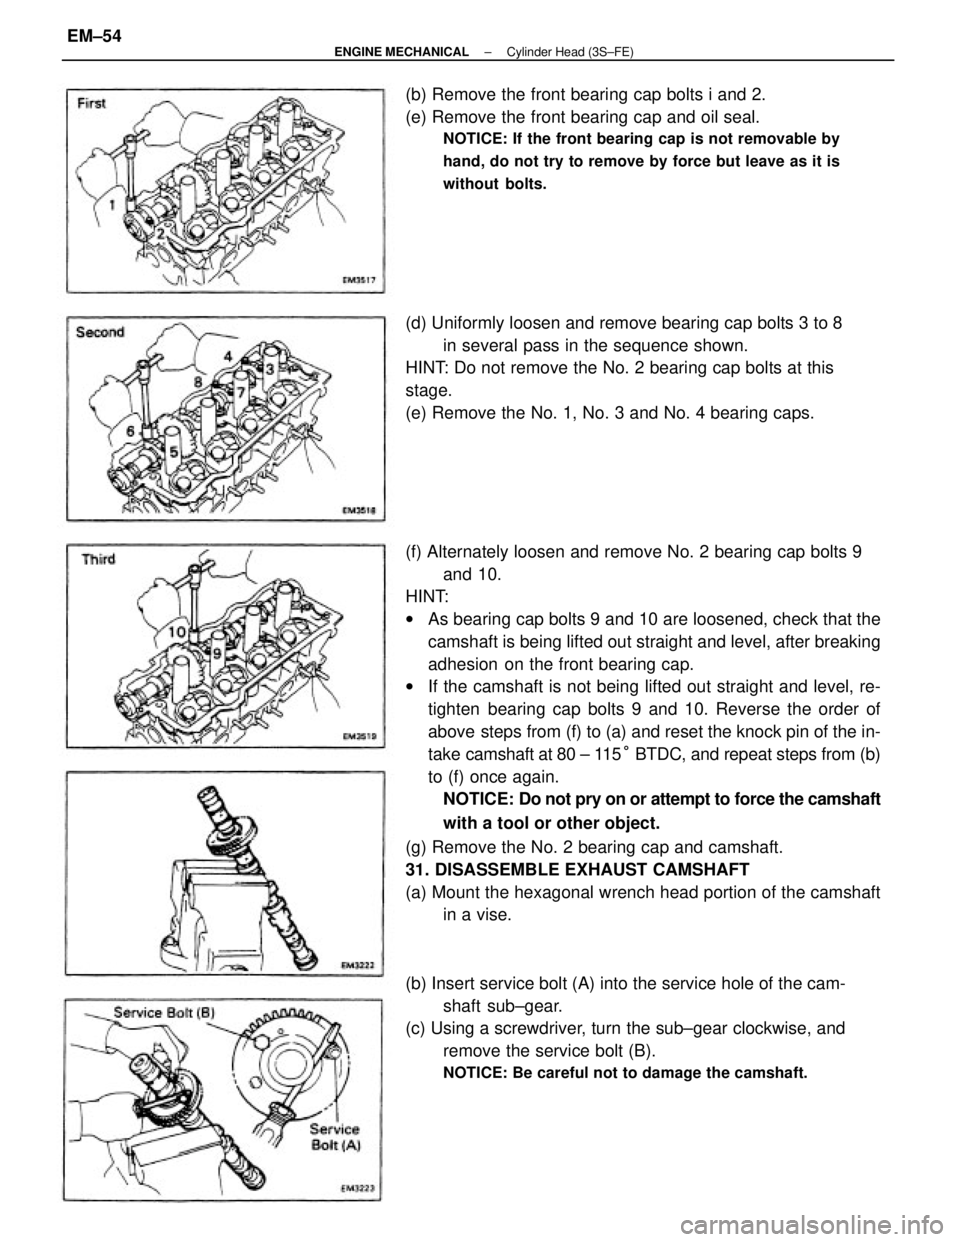
(f) Alternately loosen and remove No. 2 bearing cap bolts 9
and 10.
HINT:
wAs bearing cap bolts 9 and 10 are loosened, check that the
camshaft is being lifted out straight and level, after breaking
adhesion on the front bearing cap.
wIf the camshaft is not being lifted out straight and level, re-
tighten bearing cap bolts 9 and 10. Reverse the order of
above steps from (f) to (a) and reset the knock pin of the in-
take camshaft at 80 ± 115° BTDC, and repeat steps from (b)
to (f) once again.
NOTICE: Do not pry on or attempt to force the camshaft
with a tool or other object.
(g) Remove the No. 2 bearing cap and camshaft.
31. DISASSEMBLE EXHAUST CAMSHAFT
(a) Mount the hexagonal wrench head portion of the camshaft
in a vise.
(b) Insert service bolt (A) into the service hole of the cam-
shaft sub±gear.
(c) Using a screwdriver, turn the sub±gear clockwise, and
remove the service bolt (B).
NOTICE: Be careful not to damage the camshaft.
(d) Uniformly loosen and remove bearing cap bolts 3 to 8
in several pass in the sequence shown.
HINT: Do not remove the No. 2 bearing cap bolts at this
stage.
(e) Remove the No. 1, No. 3 and No. 4 bearing caps. (b) Remove the front bearing cap bolts i and 2.
(e) Remove the front bearing cap and oil seal.
NOTICE: If the front bearing cap is not removable by
hand, do not try to remove by force but leave as it is
without bolts.
± ENGINE MECHANICALCylinder Head (3S±FE)EM±54
Page 1247 of 2389
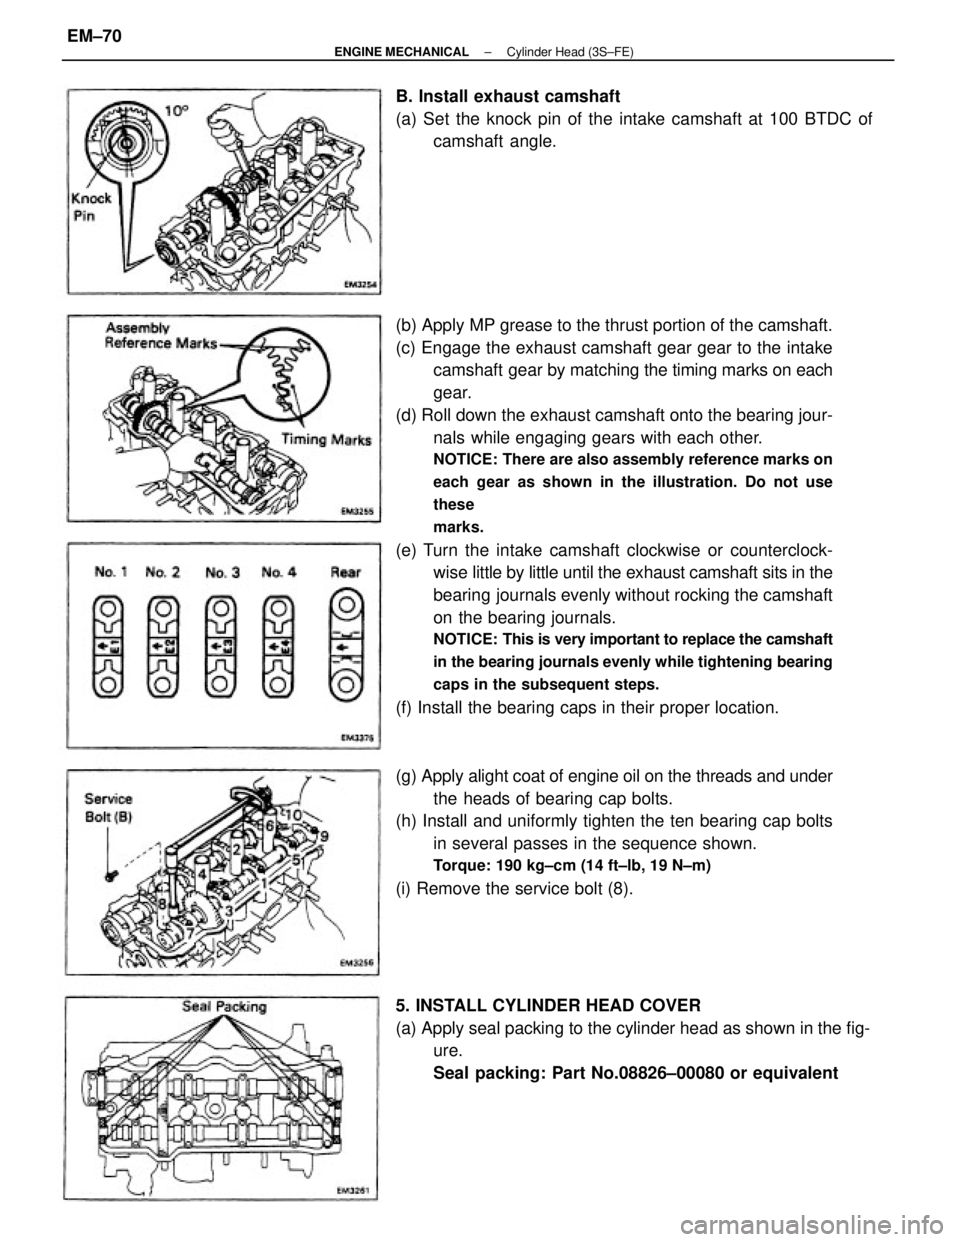
(b) Apply MP grease to the thrust portion of the camshaft.
(c) Engage the exhaust camshaft gear gear to the intake
camshaft gear by matching the timing marks on each
gear.
(d) Roll down the exhaust camshaft onto the bearing jour-
nals while engaging gears with each other.
NOTICE: There are also assembly reference marks on
each gear as shown in the illustration. Do not use
these
marks.
(e) Turn the intake camshaft clockwise or counterclock-
wise little by little until the exhaust camshaft sits in the
bearing journals evenly without rocking the camshaft
on the bearing journals.
NOTICE: This is very important to replace the camshaft
in the bearing journals evenly while tightening bearing
caps in the subsequent steps.
(f) Install the bearing caps in their proper location.
(g) Apply alight coat of engine oil on the threads and under
the heads of bearing cap bolts.
(h) Install and uniformly tighten the ten bearing cap bolts
in several passes in the sequence shown.
Torque: 190 kg±cm (14 ft±lb, 19 N±m)
(i) Remove the service bolt (8).
5. INSTALL CYLINDER HEAD COVER
(a) Apply seal packing to the cylinder head as shown in the fig-
ure.
Seal packing: Part No.08826±00080 or equivalent B. Install exhaust camshaft
(a) Set the knock pin of the intake camshaft at 100 BTDC of
camshaft angle.
± ENGINE MECHANICALCylinder Head (3S±FE)EM±70
Page 1849 of 2389
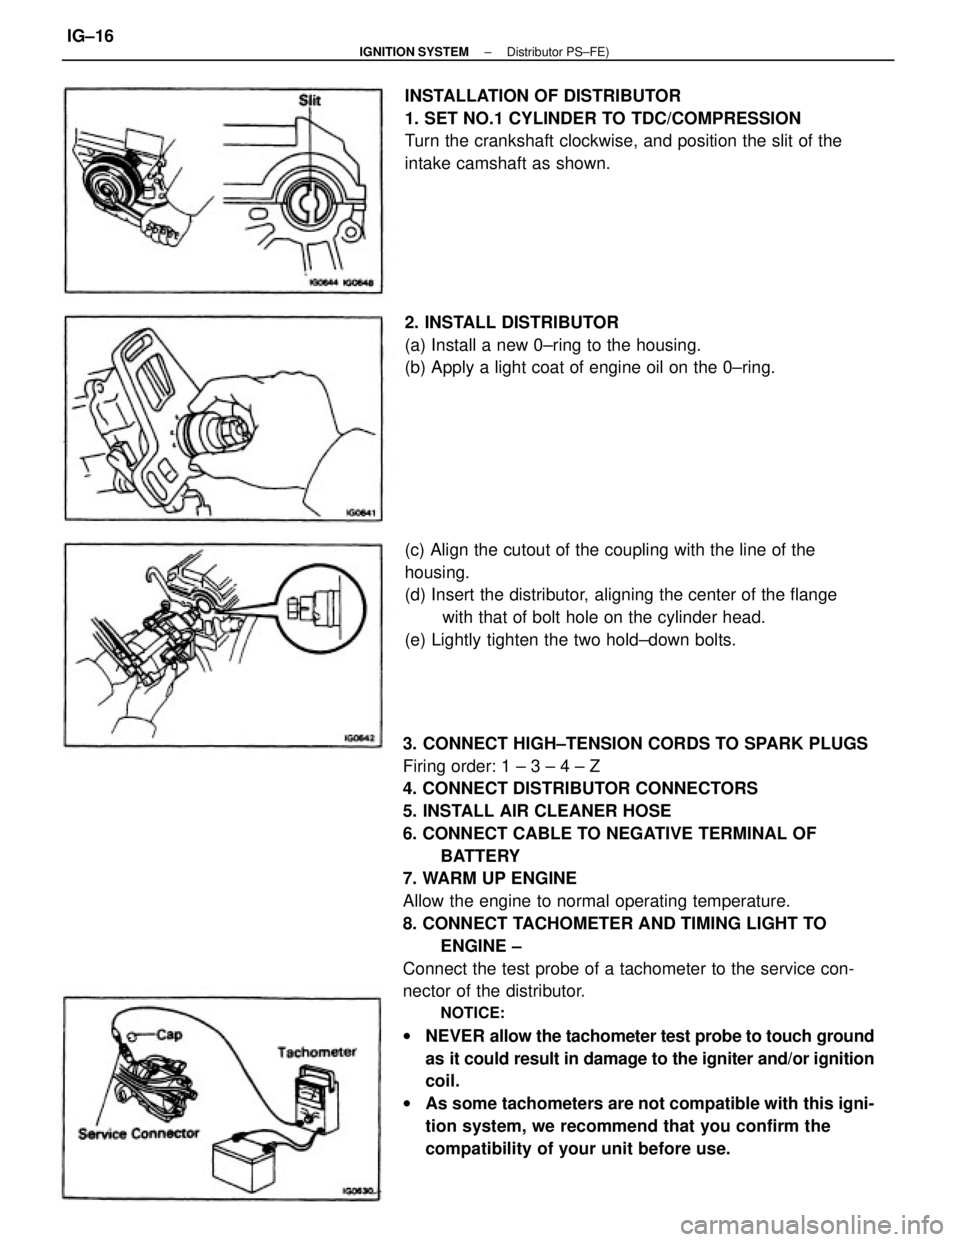
3. CONNECT HIGH±TENSION CORDS TO SPARK PLUGS
Firing order: 1 ± 3 ± 4 ± Z
4. CONNECT DISTRIBUTOR CONNECTORS
5. INSTALL AIR CLEANER HOSE
6. CONNECT CABLE TO NEGATIVE TERMINAL OF
BATTERY
7. WARM UP ENGINE
Allow the engine to normal operating temperature.
8. CONNECT TACHOMETER AND TIMING LIGHT TO
ENGINE ±
Connect the test probe of a tachometer to the service con-
nector of the distributor.
NOTICE:
wNEVER allow the tachometer test probe to touch ground
as it could result in damage to the igniter and/or ignition
coil.
wAs some tachometers are not compatible with this igni-
tion system, we recommend that you confirm the
compatibility of your unit before use. (c) Align the cutout of the coupling with the line of the
housing.
(d) Insert the distributor, aligning the center of the flange
with that of bolt hole on the cylinder head.
(e) Lightly tighten the two hold±down bolts. INSTALLATION OF DISTRIBUTOR
1. SET NO.1 CYLINDER TO TDC/COMPRESSION
Turn the crankshaft clockwise, and position the slit of the
intake camshaft as shown.
2. INSTALL DISTRIBUTOR
(a) Install a new 0±ring to the housing.
(b) Apply a light coat of engine oil on the 0±ring.
± IGNITION SYSTEMDistributor PS±FE)IG±16