Page 772 of 2389

Front Wiper and Washer Switch
INSPECTION OF SWITCH
1. INSPECT SWITCH CONTINUITY
Inspect the switch continuity between terminals.
WIPERS AND WASHERS
Troubleshooting
Replace fuse and check for short
Check motor
Check switch
Repair as necessary
Washer hose or nozzle clogged
Washer motor faulty
Washer switch faulty
Wiring faultyWIPER fuse blown
Wiper motor faulty
Wiper switch faulty
Wiring or ground faulty
Wiper relay faulty
Wiper switch faulty
Wiper motor faulty
Wiring or ground faulty
Repair as necessary
Replace motor
Check switch
Repair as necessaryCheck relay
Check switch
Check motor
Repair as necessary
If continuity is not as specified, replace the switch.
Wipers do not
operate or return
to off position
Wipers do not operate i n I
NT position
Washers do not
operateBE±29
BE±29
BE±29BE±3
BE±29
BE±29 BE±3
BE±28
BE±26 Possible cause
BE±26
BE±28
Switch
positionMIST
position Terminal Remedy Problem
Washer
Switch
WiperBE±26BE±29 Page
FrontRear
± BODY ELECTRICAL SYSTEMWipers and WashersBE±26
Page 773 of 2389

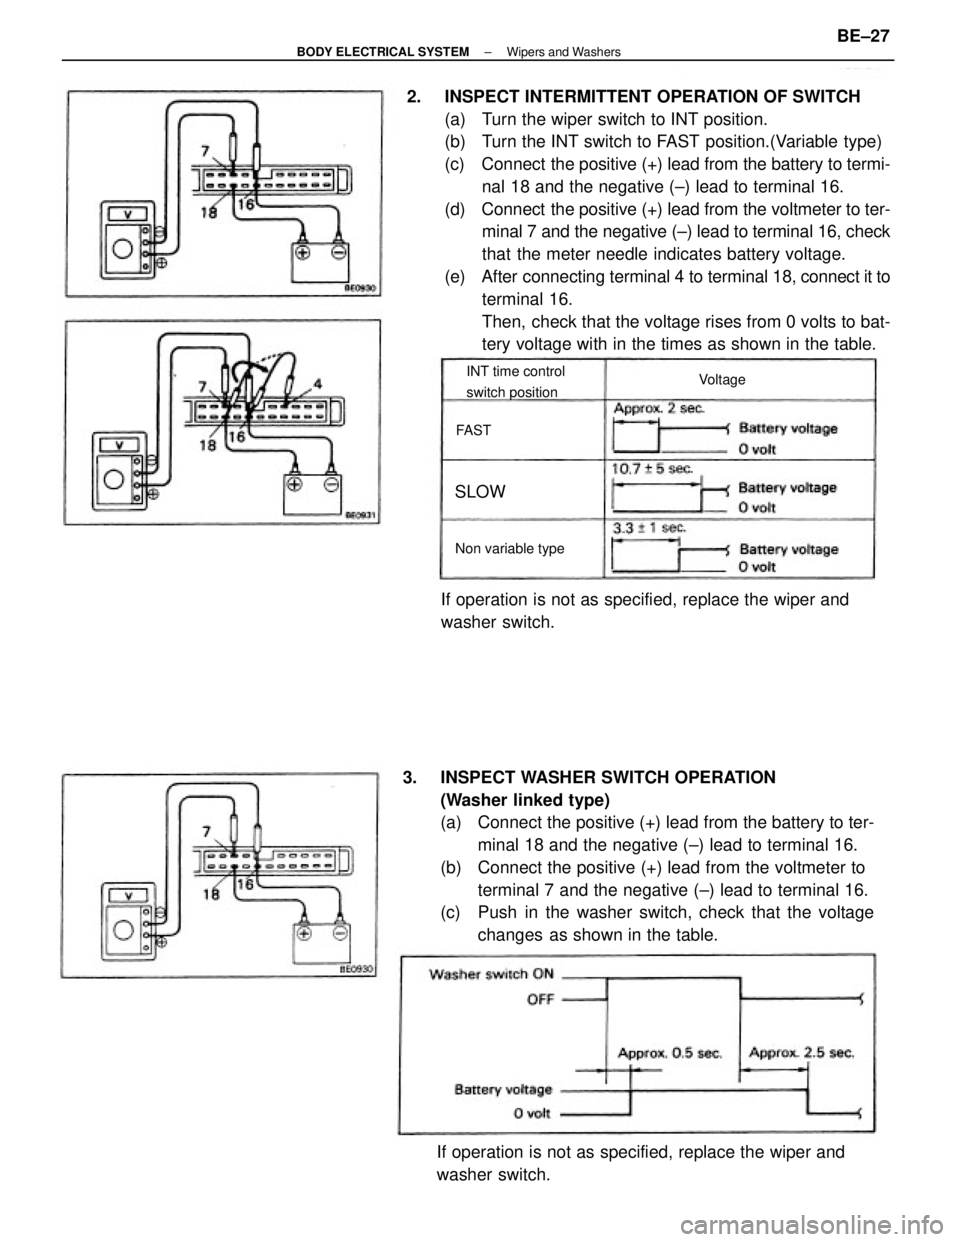
2. INSPECT INTERMITTENT OPERATION OF SWITCH
(a) Turn the wiper switch to INT position.
(b) Turn the INT switch to FAST position.(Variable type)
(c) Connect the positive (+) lead from the battery to termi-
nal 18 and the negative (±) lead to terminal 16.
(d) Connect the positive (+) lead from the voltmeter to ter-
minal 7 and the negative (±) lead to terminal 16, check
that the meter needle indicates battery voltage.
(e) After connecting terminal 4 to terminal 18, connect it to
terminal 16.
Then, check that the voltage rises from 0 volts to bat-
tery voltage with in the times as shown in the table.
3. INSPECT WASHER SWITCH OPERATION
(Washer linked type)
(a) Connect the positive (+) lead from the battery to ter-
minal 18 and the negative (±) lead to terminal 16.
(b) Connect the positive (+) lead from the voltmeter to
terminal 7 and the negative (±) lead to terminal 16.
(c) Push in the washer switch, check that the voltage
changes as shown in the table.
If operation is not as specified, replace the wiper and
washer switch.If operation is not as specified, replace the wiper and
washer switch.
INT time control
switch position
Non variable typeVoltage
SLOW
FAST
± BODY ELECTRICAL SYSTEMWipers and WashersBE±27
Page 774 of 2389

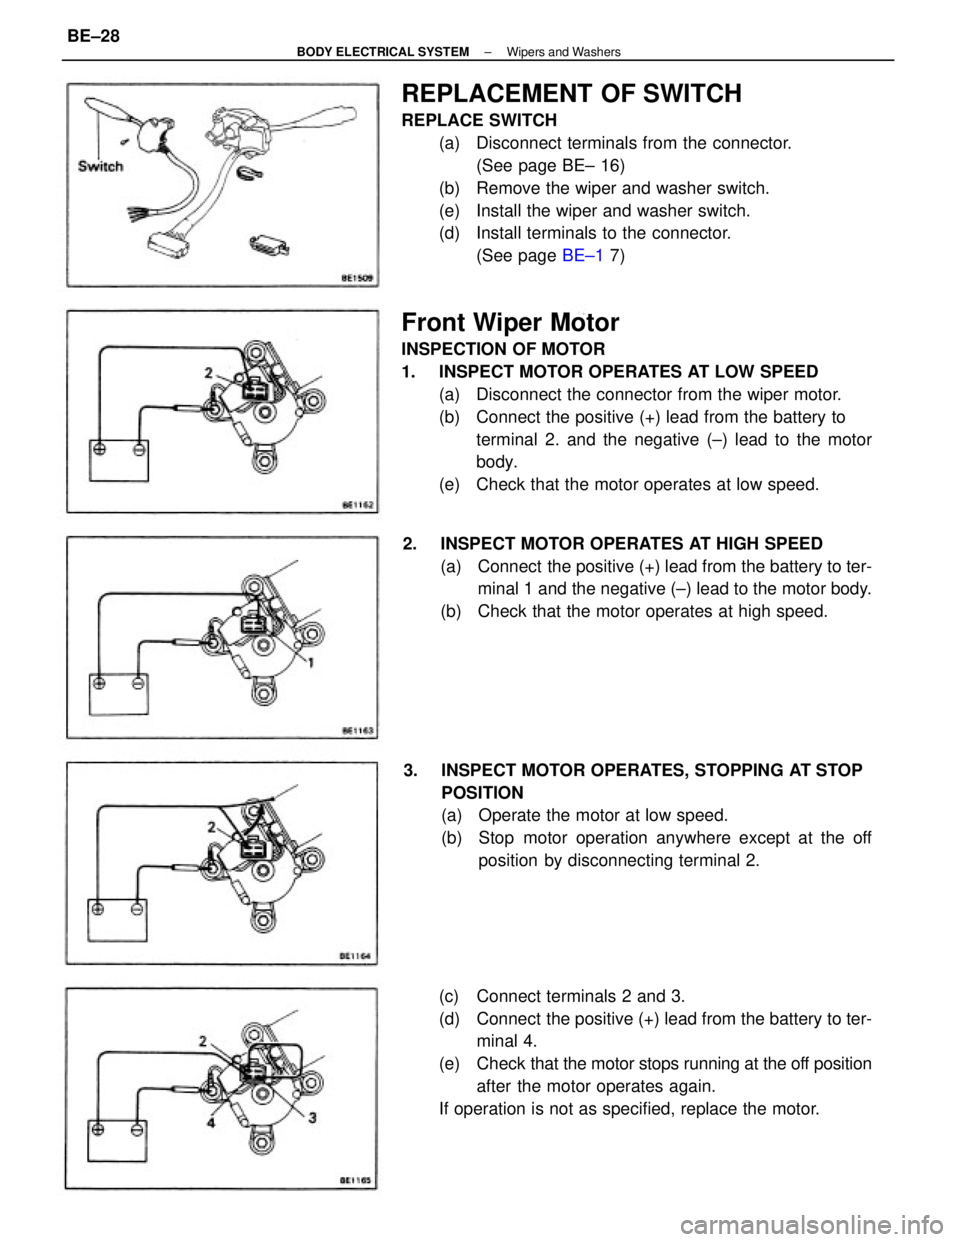
Front Wiper Motor
INSPECTION OF MOTOR
1. INSPECT MOTOR OPERATES AT LOW SPEED
(a) Disconnect the connector from the wiper motor.
(b) Connect the positive (+) lead from the battery to
terminal 2. and the negative (±) lead to the motor
body.
(e) Check that the motor operates at low speed.
REPLACEMENT OF SWITCH
REPLACE SWITCH
(a) Disconnect terminals from the connector.
(See page BE± 16)
(b) Remove the wiper and washer switch.
(e) Install the wiper and washer switch.
(d) Install terminals to the connector.
(See page BE±1 7)
(c) Connect terminals 2 and 3.
(d) Connect the positive (+) lead from the battery to ter-
minal 4.
(e) Check that the motor stops running at the off position
after the motor operates again.
If operation is not as specified, replace the motor. 3. INSPECT MOTOR OPERATES, STOPPING AT STOP
POSITION
(a) Operate the motor at low speed.
(b) Stop motor operation anywhere except at the off
position by disconnecting terminal 2. 2. INSPECT MOTOR OPERATES AT HIGH SPEED
(a) Connect the positive (+) lead from the battery to ter-
minal 1 and the negative (±) lead to the motor body.
(b) Check that the motor operates at high speed.
± BODY ELECTRICAL SYSTEMWipers and WashersBE±28
Page 775 of 2389

Rear Wiper Motor and Relay
INSPECTION OF MOTOR AND RELAY
1. INSPECT RELAY AND MOTOR OPERATES
(a) Connect the positive (+) lead from the battery to terminal
1 and negative (±) leads to both terminal 3 and
motor body.
(b) Check that the motor operates.
2. INSPECT INTERMITTENT OPERATION OF RELAY
(a) Connect the positive 1+y lead from the battery to ter-
minal 1 and negative t±) leads to both terminal 2 and
motor body.
(b) Check that the motor operates intermittently for 9
15 seconds.
If operation is not as specified, replace the relay.
3. INSPECT MOTOR OPERATES, STOPPING AT STOP
POSITION
(a) Start motor operation by connecting the positive (+j
lead from the battery to terminal 1 and the negative (±
lead to both terminal 3 and motor body.
Rear Wiper and Washer Switch
INSPECTION OF SWITCH
INSPECT SWITCH CONTINUITY
Inspect the switch continuity between terminals.
If continuity is not as specified, replace the switch.
Switch position
Terminal
Wash ll
Wash IOFF INT
± BODY ELECTRICAL SYSTEMWipers and WashersBE±29
Page 776 of 2389
(e) Connect the positive (+) lead from the battery to ter-
minal 1 and the negative (±) lead to the motor body.
(d) Check that the motor stops running at the stop posi-
tion after the motor operates again.
If operation is not as specified, replace the motor.
± BODY ELECTRICAL SYSTEMWipers and WashersBE±30
Page 1914 of 2389

GENERAL MAINTENANCE
These are the maintenance and inspection items
which are considered to be the owner's responsibility,
They can be performed by the owner or he
can have then done at a service shop. These items
include those which should be checked on a daily ba-
sis, those which, in most cases, do not require
(special) tools and those which are considered to be
reasonable for the owner to perform.
Items and procedures for general maintenance are as
follows:
OUTSIDE VEHICLE
1. TIRES
(a) Check the pressure with a gauge. Adjust
if necessary.
(b) Check for cuts, damage or excessive wear.
2. WHEEL NUTS
When checking the tires, check the nuts for looseness
or for missing nuts. If necessary,
tighten them.
3. TIRE ROTATION
It is recommended that tires be rotated every
7,500 miles (12,000 km).
4. WINDSHIELD WIPER BLADES
Check for wear or cracks whenever they do not wipe
clean. Replace if necessary.
5. FLUID LEAKS
(a) Check underneath for leaking fuel, oil, water or
other fluid.
(b) If you smell gasoline fumes or notice any leak,
have the cause found and corrected.
6. DOORS AND ENGINE HOOD
(a) Check that all doors including the trunk lid and
back door operate smoothly, and that all
latches lock securely.
(b) Check that the engine hood secondary latch se-
cures the hood from opening when the prima-
ry latch is released.
INSIDE VEHICLE
7. LIGHTS
(a) Check that the headlights, stop lights, taillights,
turn signal lights, and other
lights are all working.
(b) Check the headlight aiming.8. WARNING LIGHTS AND BUZZERS
Check that all warning lights and buzzers func-
tion properly.
9. HORN
Check that it is working.
10. WINDSHIELD GLASS
Check for scratches, pits or abrasions.
11. WINDSHIELD WIPER AND WASHER
(a) Check operation of the wipers and washer.
(b) Check that the wipers do not streak.
12. WINDSHIELD DEFROSTER
Check that air comes out from the defroster out-
let when operating the heater or air conditioner
at defroster mode.
13. REAR VIEW MIRROR
Check that it is mounted securely.
14. SUN VISORS
Check that they move freely and are mounted
securely.
15. STEERING WHEEL
Check that it has the specified freeplay. Be alert
for changes in steering condition, such as hard
steering, excessive freeplay or strange noise.
16. SEATS
(a) Check that all front seat controls such as
seat adjusters, seatback recliner, etc.
operate smoothly.
(b) Check that a11 latches lock securely in
any position.
(c) Check that the locks hold securely in any
latched position.
(d) Check that the head restraints move up
and down smoothly and that the locks
hold securely in any latched position.
(e) For folding±down rear seat backs, check
that the latches lock securely.
17. SEAT BELTS
(a) Check that the seat belt system such as
buckles, retractors and anchors operate
properly and smoothly.
(b) Check that the belt webbing is not cut,
frayed, worn or damaged.
± MAINTENANCEGeneral MaintenanceMA±16