1986 TOYOTA CAMRY V20 oil reset
[x] Cancel search: oil resetPage 217 of 2389

Discharging of Refrigeration System
Evacuating and Charging of
Refrigeration System
(See Air Conditioning Fundamentals and Repairs Pub. No.
36950E)
Condenser clogged
Drive belt slipping
Magnetic clutch faulty
Compressor faulty
Expansion valve faulty
Thermistor faulty
A/C amplifier faulty
Insufficient or too much refrigerant
Air or excessive compressor oil in
system
Receiver clogged
Water valve cable set faultyCheck condenser .
Check or replace drive belt
Check magnetic clutch
Check compressor
Check expansion valve
Check thermistor
Check amplifier
Check refrigerant volume
Evacuate and charge system
Evaporator clogged or frosted
Air leakage from cooling unit or air duct
Air inlet blocked
Blower motor faulty
A/C amplifier faulty
Drive belt slipping
Revolution detecting sensor faulty
(w/Power steering)
A/C amplifier faultyAC±33
AC±21
AC±23
AC±23
AC±39
AC±43
AC±45 to 47
AC±22
Repair as necessary
Replace blower motor
Check amplifierClean evaporator fins or filters
Repair as necessary
Check or replace drive belt
Check sensor
Check receiver
Reset water valve cable
A/C switch
indicator
flashingInsufficient
velocity of cool
airAC±41
AC±39 to 42 Insufficient
cooling
Check amplifier Possible cause
AC±21
AC±24AC±32
BE±79
AC±39 to 42
AC±45 to 47
AC±45 to 47 Remedy ProblemPage
± AIR CONDITIONING SYSTEMTroubleshooting Refrigeration SystemAC±17
Page 990 of 2389

3. (3S±FE)
REPLACE ENGINE COOLANT
(a) Remove the radiator cap.
CAUTION: To avoid the danger of being burned, do not re-
move it while the engine and radiator are still hot
as fluid and steam can be blown out under pressure.
(b) Drain the coolant from the .radiator and engine drain cocks.
(Engine drain cock at the right rear of engine block.)
(c) Close the drain cocks.
Torque (Engine drain cock):
130 kg±cm (9 ft±Ib, 13 N±m) HINT: If the engine tends to overheat, removal of the
thermostat will adversely effect cooling efficiency.
CHECK AND REPLACEMENT OF
ENGINE COOLANT
1. CHECK ENGINE COOLANT LEVEL AT RESERVE TANK
The coolant level should be between the ºLOWº and
ºFULLº lines.
If low, check for leaks and add coolant up to the ºFULLº
line.
Dirt, leaves or insects on radiator or condenser
Hoses, Water pump, thermostat housing, radiator,
heater, core, plugs or head gasket leakage
Thermostat faulty
Incorrect ignition timing
Electric cooling system faulty
Radiator hose plugged or rotted
Water pump faulty
Radiator plugged or cap faulty
Cylinder head or block cracked or water passage
clogged
2. CHECK ENGINE COOLANT QUALITY
There should not be any excessive deposits of rust or scales
around the radiator cap or radiator filler hole, and the cool-
ant should be free from oil.
If excessively dirty, replace the coolant.
Check thermostat
Reset tinning
Inspect electric cooling system
Replace hose
Replace water pump
Check radiator and cap
Repair as necessary
TROUBLESHOOTING
CO±12, 13
IG±17, 20
CO±20, 22 Clean radiator or condenser
Repair as necessary Engine overheats
Possible causeRemedy Problem
CO±6, 9 Page
± COOLING SYSTEM
TroubleshootingCO±4
Page 991 of 2389

3. (3S±FE)
REPLACE ENGINE COOLANT
(a) Remove the radiator cap.
CAUTION: To avoid the danger of being burned, do not re-
move it while the engine and radiator are still hot
as fluid and steam can be blown out under pressure.
(b) Drain the coolant from the .radiator and engine drain cocks.
(Engine drain cock at the right rear of engine block.)
(c) Close the drain cocks.
Torque (Engine drain cock):
130 kg±cm (9 ft±Ib, 13 N±m) HINT: If the engine tends to overheat, removal of the
thermostat will adversely effect cooling efficiency.
CHECK AND REPLACEMENT OF
ENGINE COOLANT
1. CHECK ENGINE COOLANT LEVEL AT RESERVE TANK
The coolant level should be between the ºLOWº and
ºFULLº lines.
If low, check for leaks and add coolant up to the ºFULLº
line.
Dirt, leaves or insects on radiator or condenser
Hoses, Water pump, thermostat housing, radiator,
heater, core, plugs or head gasket leakage
Thermostat faulty
Incorrect ignition timing
Electric cooling system faulty
Radiator hose plugged or rotted
Water pump faulty
Radiator plugged or cap faulty
Cylinder head or block cracked or water passage
clogged
2. CHECK ENGINE COOLANT QUALITY
There should not be any excessive deposits of rust or scales
around the radiator cap or radiator filler hole, and the cool-
ant should be free from oil.
If excessively dirty, replace the coolant.
Check thermostat
Reset tinning
Inspect electric cooling system
Replace hose
Replace water pump
Check radiator and cap
Repair as necessary
TROUBLESHOOTING
CO±12, 13
IG±17, 20
CO±20, 22 Clean radiator or condenser
Repair as necessary Engine overheats
Possible causeRemedy Problem
CO±6, 9 Page
± COOLING SYSTEMCheck and Replacement of Engine CoolantCO±4
Page 1183 of 2389

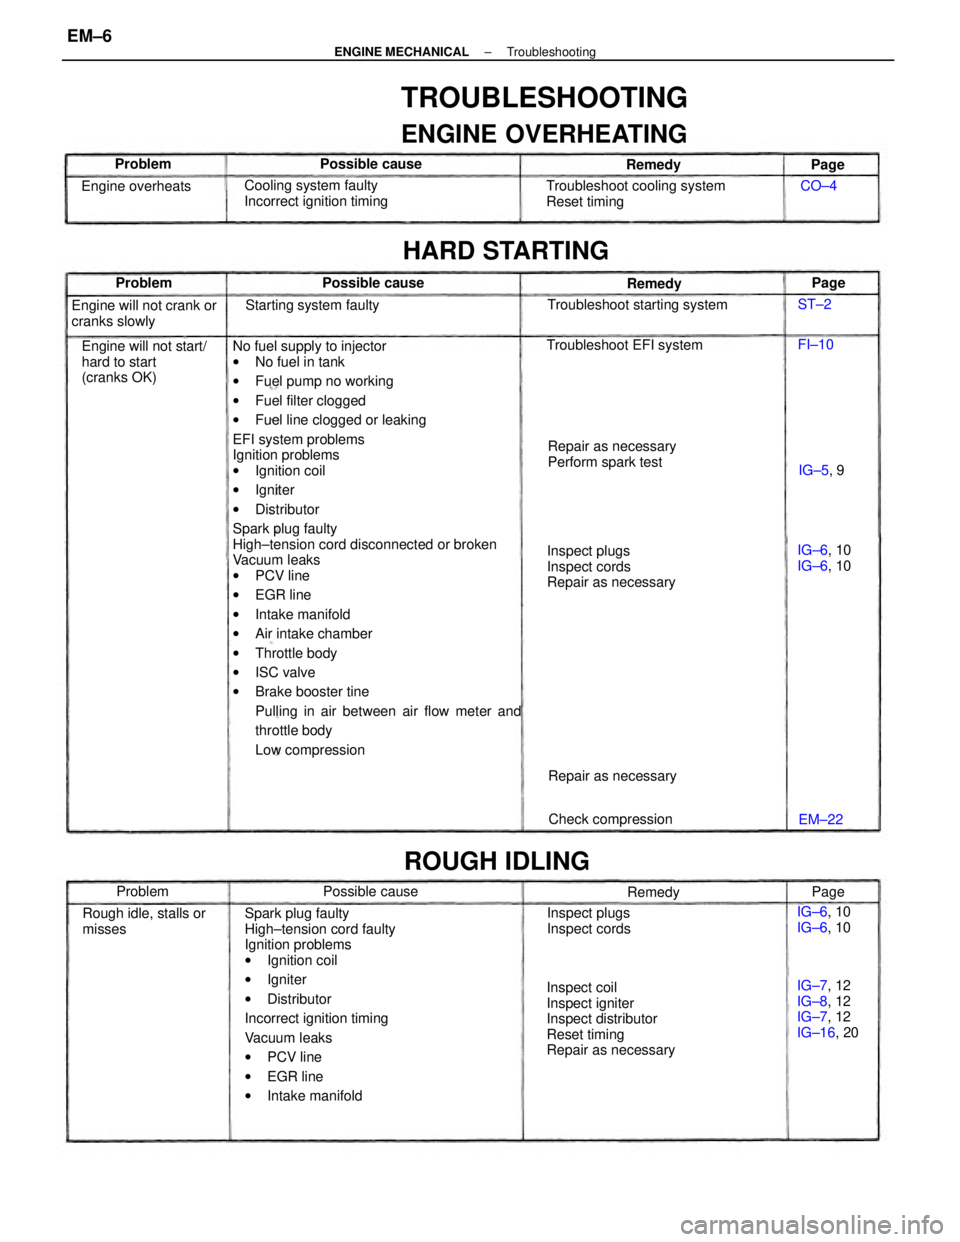
No fuel supply to injector
wNo fuel in tank
wFuel pump no working
wFuel filter clogged
wFuel line clogged or leaking
EFI system problems
Ignition problems
wIgnition coil
wIgniter
wDistributor
Spark plug faulty
High±tension cord disconnected or broken
Vacuum leaks
wPCV line
wEGR line
wIntake manifold
wAir intake chamber
wThrottle body
wISC valve
wBrake booster tine
Pulling in air between air flow meter and
throttle body
Low compression
Spark plug faulty
High±tension cord faulty
Ignition problems
wIgnition coil
wIgniter
wDistributor
Incorrect ignition timing
Vacuum leaks
wPCV line
wEGR line
wIntake manifold
TROUBLESHOOTING
ENGINE OVERHEATING
Inspect coil
Inspect igniter
Inspect distributor
Reset timing
Repair as necessaryInspect plugs
Inspect cords
Repair as necessary Troubleshoot cooling system
Reset timing
Engine will not start/
hard to start
(cranks OK)Cooling system faulty
Incorrect ignition timing
Repair as necessary
Perform spark test Engine will not crank or
cranks slowly
IG±7, 12
IG±8, 12
IG±7, 12
IG±16, 20 Rough idle, stalls or
misses
HARD STARTING
Troubleshoot starting system
Inspect plugs
Inspect cords Troubleshoot EFI system
ROUGH IDLING
Starting system faulty
Check compression Repair as necessary Engine overheats
IG±6, 10
IG±6, 10 IG±6, 10
IG±6, 10 Possible cause
Possible cause Possible cause
Remedy Remedy
Problem
Remedy Problem Problem
IG±5, 9
EM±22Page
Page
Page CO±4
FI±10 ST±2
± ENGINE MECHANICALTroubleshootingEM±6
Page 1185 of 2389

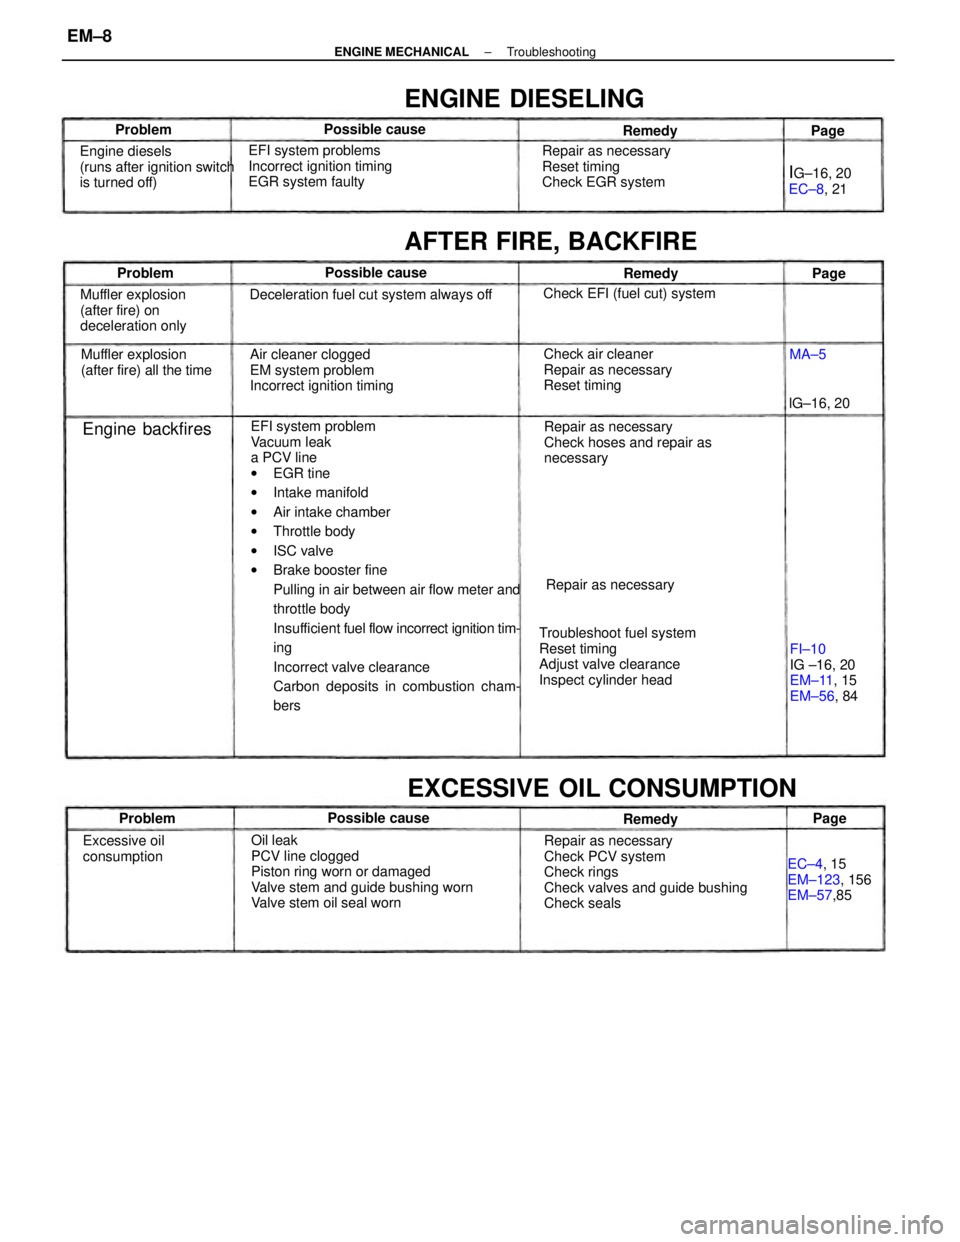
EFI system problem
Vacuum leak
a PCV line
wEGR tine
wIntake manifold
wAir intake chamber
wThrottle body
wISC valve
wBrake booster fine
Pulling in air between air flow meter and
throttle body
Insufficient fuel flow incorrect ignition tim-
ing
Incorrect valve clearance
Carbon deposits in combustion cham-
bers
Oil leak
PCV line clogged
Piston ring worn or damaged
Valve stem and guide bushing worn
Valve stem oil seal wornRepair as necessary
Check PCV system
Check rings
Check valves and guide bushing
Check seals Troubleshoot fuel system
Reset timing
Adjust valve clearance
Inspect cylinder headRepair as necessary
Check hoses and repair as
necessary Air cleaner clogged
EM system problem
Incorrect ignition timing EFI system problems
Incorrect ignition timing
EGR system faulty
Deceleration fuel cut system always off
Check air cleaner
Repair as necessary
Reset timing Repair as necessary
Reset timing
Check EGR system
EXCESSIVE OIL CONSUMPTION
Engine diesels
(runs after ignition switch
is turned off)
Muffler explosion
(after fire) on
deceleration only
FI±10
IG ±16, 20
EM±11, 15
EM±56, 84 Muffler explosion
(after fire) all the time
AFTER FIRE, BACKFIRE
EC±4, 15
EM±123, 156
EM±57,85
ENGINE DIESELING
Check EFI (fuel cut) system
Excessive oil
consumptionRepair as necessary
IG±16, 20
EC±8, 21
Engine backfires
Possible cause Possible cause
Possible causelG±16, 20 Problem
Problem
RemedyRemedy
ProblemRemedy
Page Page
MA±5Page
± ENGINE MECHANICALTroubleshootingEM±8
Page 1231 of 2389

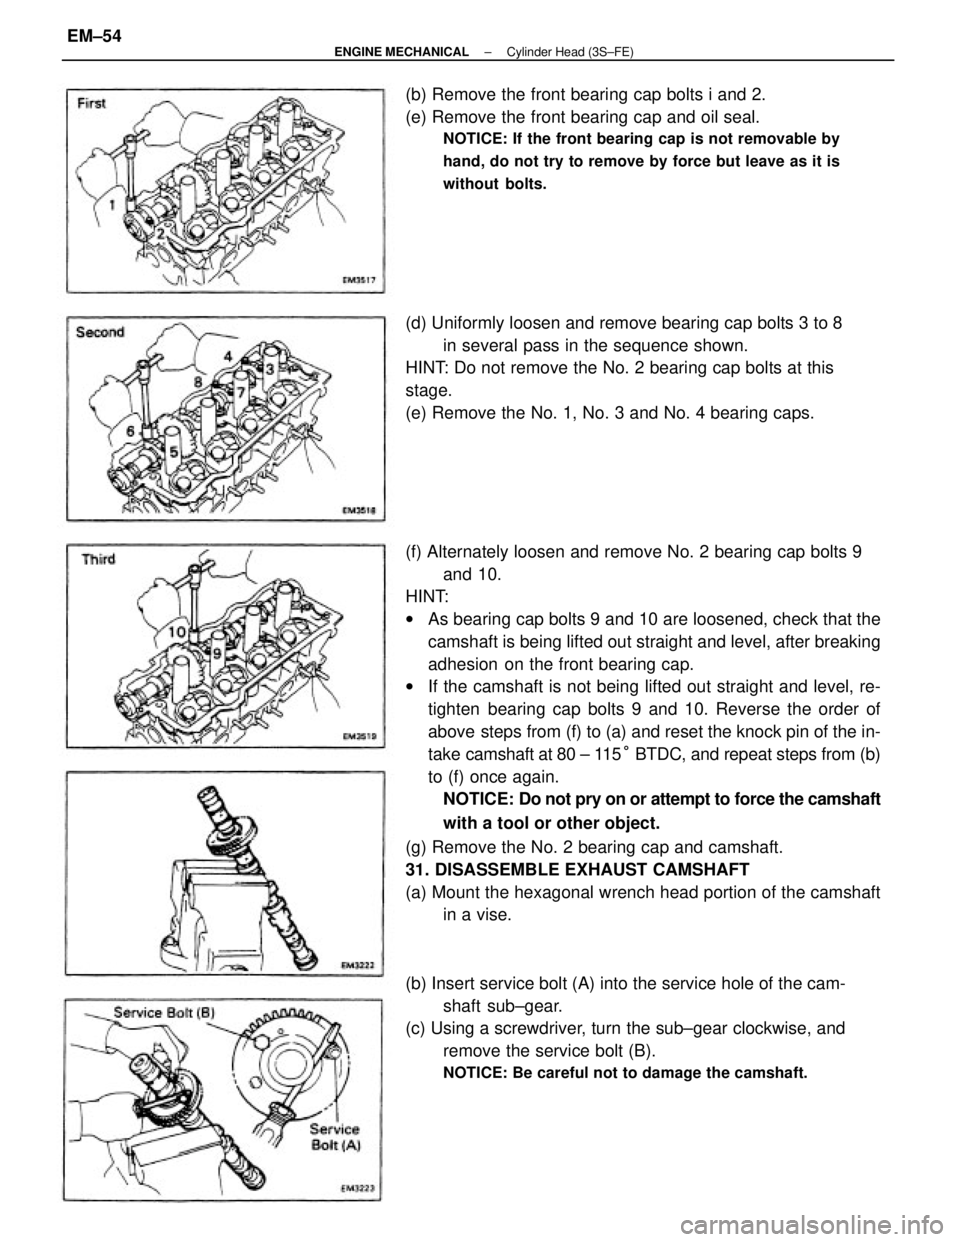
(f) Alternately loosen and remove No. 2 bearing cap bolts 9
and 10.
HINT:
wAs bearing cap bolts 9 and 10 are loosened, check that the
camshaft is being lifted out straight and level, after breaking
adhesion on the front bearing cap.
wIf the camshaft is not being lifted out straight and level, re-
tighten bearing cap bolts 9 and 10. Reverse the order of
above steps from (f) to (a) and reset the knock pin of the in-
take camshaft at 80 ± 115° BTDC, and repeat steps from (b)
to (f) once again.
NOTICE: Do not pry on or attempt to force the camshaft
with a tool or other object.
(g) Remove the No. 2 bearing cap and camshaft.
31. DISASSEMBLE EXHAUST CAMSHAFT
(a) Mount the hexagonal wrench head portion of the camshaft
in a vise.
(b) Insert service bolt (A) into the service hole of the cam-
shaft sub±gear.
(c) Using a screwdriver, turn the sub±gear clockwise, and
remove the service bolt (B).
NOTICE: Be careful not to damage the camshaft.
(d) Uniformly loosen and remove bearing cap bolts 3 to 8
in several pass in the sequence shown.
HINT: Do not remove the No. 2 bearing cap bolts at this
stage.
(e) Remove the No. 1, No. 3 and No. 4 bearing caps. (b) Remove the front bearing cap bolts i and 2.
(e) Remove the front bearing cap and oil seal.
NOTICE: If the front bearing cap is not removable by
hand, do not try to remove by force but leave as it is
without bolts.
± ENGINE MECHANICALCylinder Head (3S±FE)EM±54
Page 1836 of 2389

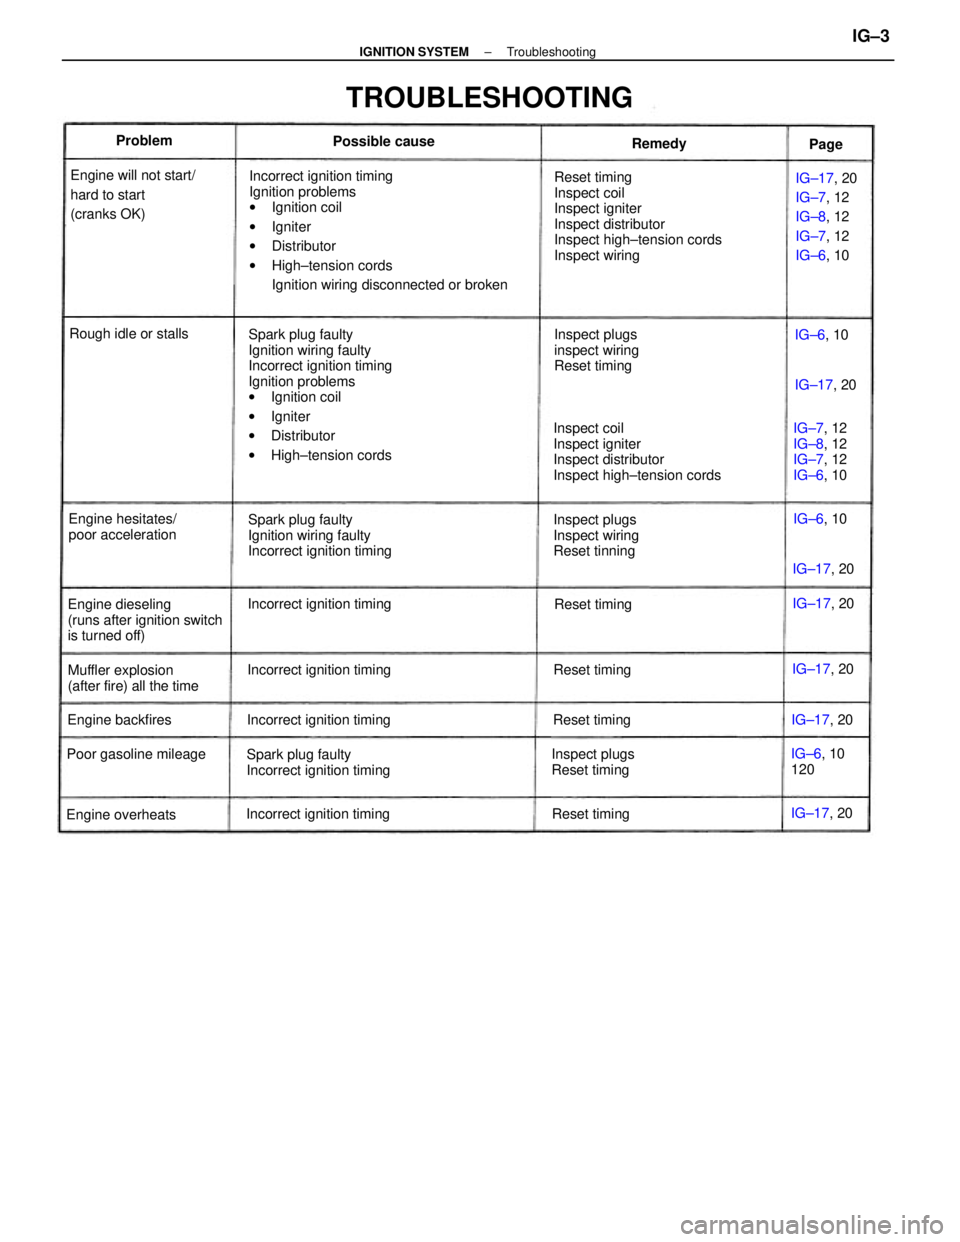
Incorrect ignition timing
Ignition problems
wIgnition coil
wIgniter
wDistributor
wHigh±tension cords
Ignition wiring disconnected or broken
Spark plug faulty
Ignition wiring faulty
Incorrect ignition timing
Ignition problems
wIgnition coil
wIgniter
wDistributor
wHigh±tension cordsReset timing
Inspect coil
Inspect igniter
Inspect distributor
Inspect high±tension cords
Inspect wiring
Inspect coil
Inspect igniter
Inspect distributor
Inspect high±tension cords
Spark plug faulty
Ignition wiring faulty
Incorrect ignition timingIG±17, 20
IG±7, 12
IG±8, 12
IG±7, 12
IG±6, 10
Spark plug faulty
Incorrect ignition timing Engine will not start/
hard to start
(cranks OK)
TROUBLESHOOTING
Engine dieseling
(runs after ignition switch
is turned off)Inspect plugs
Inspect wiring
Reset tinningInspect plugs
inspect wiring
Reset timing
Muffler explosion
(after fire) all the timeEngine hesitates/
poor accelerationIG±7, 12
IG±8, 12
IG±7, 12
IG±6, 10
Inspect plugs
Reset timing Incorrect ignition timing
Incorrect ignition timing
Incorrect ignition timing
Incorrect ignition timing Poor gasoline mileageRough idle or stalls
IG±6, 10
120
Engine overheatsEngine backfiresPossible cause
Reset timing
Reset timingReset timingReset timingIG±17, 20 IG±17, 20
IG±17, 20
IG±17, 20 IG±17, 20
IG±17, 20 Problem
IG±6, 10
IG±6, 10 Remedy
Page
± IGNITION SYSTEMTroubleshootingIG±3