Page 630 of 2389

4. ADJUST TOTAL PRELOAD
(a) Install the transfer right case.
(b) Install and torque the ten bolts.
Torque: 450 kg±cm (33 ft±Ib, 44 N±m)
HINT: Do not apply seal packing and do not install gas-
ket. Each bolt length (mm (in.) is indicated in the figure.
(c) Using SST and a spring tension gauge, mea-
sure the total preload.
SST 09326±20011
Preload (at starting):
Add driven pinion preload
0.5±0.9kg (1.1 ±2.0lb,4.9±8.8N)
HINT: Turn the drive pinion counterclockwise and
clockwise several times.
5. CHECK RING GEAR BACKLASH
(a) Using a dial indicator, measure the ring gear backlash.
Backlash: 0.13 ± 0.18 mm (0.0051 ± 0.0071 in.)
(b) When the backlash is outside the standard value, select
a different plate washer to the one selected in step 3.
Again adjust the backlash and total preload. (d) Adjust the total preload by tightening the adjust-
ing nut with SST.
SST 09318±12010
HINT: Measure the preload while tightening the
bearing adjusting nut a little at a time.
6. CHECK TOOTH CONTACT
(a) Coat 3 or 4 teeth at four different positions on the
ring gear with red lead.
(b) Rotate the ring gear, inspect the teeth pattern.
± AUTOMATIC TRANSAXLEComponent Parts (Transfer Transfer Lower Valve Body
A540H)AT±374
Page 633 of 2389

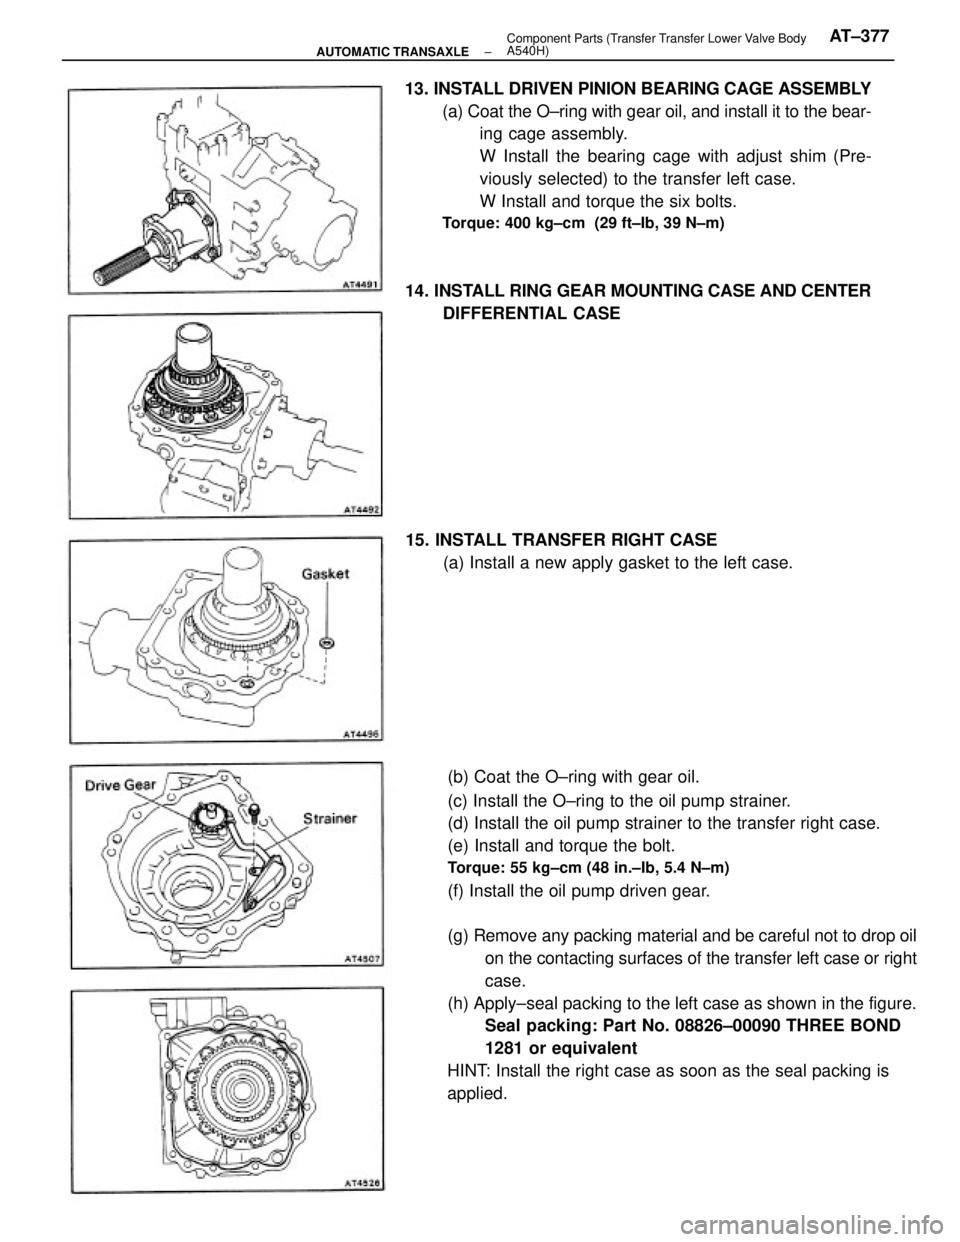
(b) Coat the O±ring with gear oil.
(c) Install the O±ring to the oil pump strainer.
(d) Install the oil pump strainer to the transfer right case.
(e) Install and torque the bolt.
Torque: 55 kg±cm (48 in.±Ib, 5.4 N±m)
(f) Install the oil pump driven gear.
(g) Remove any packing material and be careful not to drop oil
on the contacting surfaces of the transfer left case or right
case.
(h) Apply±seal packing to the left case as shown in the figure.
Seal packing: Part No. 08826±00090 THREE BOND
1281 or equivalent
HINT: Install the right case as soon as the seal packing is
applied. 13. INSTALL DRIVEN PINION BEARING CAGE ASSEMBLY
(a) Coat the O±ring with gear oil, and install it to the bear-
ing cage assembly.
W Install the bearing cage with adjust shim (Pre-
viously selected) to the transfer left case.
W Install and torque the six bolts.
Torque: 400 kg±cm (29 ft±Ib, 39 N±m)
14. INSTALL RING GEAR MOUNTING CASE AND CENTER
DIFFERENTIAL CASE
15. INSTALL TRANSFER RIGHT CASE
(a) Install a new apply gasket to the left case.
± AUTOMATIC TRANSAXLEComponent Parts (Transfer Transfer Lower Valve Body
A540H)AT±377
Page 634 of 2389

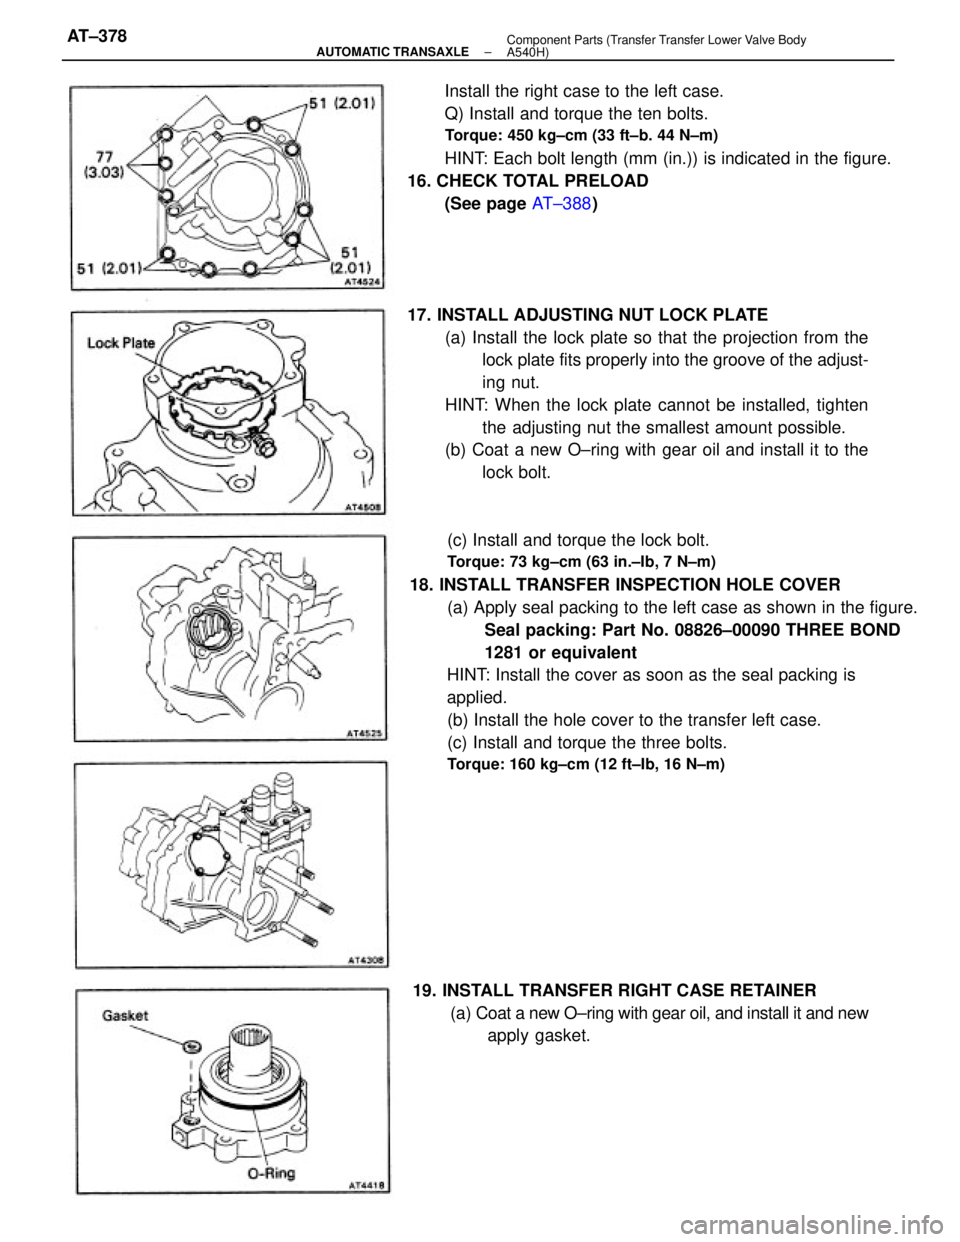
(c) Install and torque the lock bolt.
Torque: 73 kg±cm (63 in.±Ib, 7 N±m)
18. INSTALL TRANSFER INSPECTION HOLE COVER
(a) Apply seal packing to the left case as shown in the figure.
Seal packing: Part No. 08826±00090 THREE BOND
1281 or equivalent
HINT: Install the cover as soon as the seal packing is
applied.
(b) Install the hole cover to the transfer left case.
(c) Install and torque the three bolts.
Torque: 160 kg±cm (12 ft±Ib, 16 N±m)
17. INSTALL ADJUSTING NUT LOCK PLATE
(a) Install the lock plate so that the projection from the
lock plate fits properly into the groove of the adjust-
ing nut.
HINT: When the lock plate cannot be installed, tighten
the adjusting nut the smallest amount possible.
(b) Coat a new O±ring with gear oil and install it to the
lock bolt. Install the right case to the left case.
Q) Install and torque the ten bolts.
Torque: 450 kg±cm (33 ft±b. 44 N±m)
HINT: Each bolt length (mm (in.)) is indicated in the figure.
16. CHECK TOTAL PRELOAD
(See page AT±388)
19. INSTALL TRANSFER RIGHT CASE RETAINER
(a) Coat a new O±ring with gear oil, and install it and new
apply gasket.
± AUTOMATIC TRANSAXLEComponent Parts (Transfer Transfer Lower Valve Body
A540H)AT±378
Page 635 of 2389
(c) Coat a new O±ring with gear oil and install it to the
extension housing.
(d) Install the extension housing to the driven pinion
bearing cage.
(e) Install and torque the four bolts.
Torque: 260 kg±cm (19 ft±Ib, 25 N±m)
(f) Using a plastic hammer, install the dust deflector. 20. INSTALL EXTENSION HOUSING
(a) Using SST and a hammer, drive in a new oil seal as shown.
SST 09325±20010
(b) Coat the lip of the oil seal with MP grease.
22. INSTALL REAR WHEEL SPEED SENSOR
(a) Install a new O±ring to the speed sensor.
(b) Install the speed sensor to the transfer left case.
(c) Install and torque a bolt.
Torque: 55 kg±cm (48 in.±Ib, 5.4 N±m)
(b) Install the right case retainer to the transfer right
case.
(c) Install and torque the five bolts.
Torque: 300 kg±cm (22 ft±lb, 29 N±m)
21. INSTALL DYNAMIC DAMPER
Install and torque the four bolts.
Torque: 260 kg±cm (19 ft±lb, 25 N±m)
± AUTOMATIC TRANSAXLEComponent Parts (Transfer Transfer Lower Valve Body
A540H)AT±379
Page 636 of 2389
23. INSTALL TRANSFER MODE SELECT LEVER AND ROD
(a) Install the lever, rod and lever guide.
1bI Install and torque the two bolts.
Torque: (A) 55 kg±cm (48 in.±Ib, 5.4 N±m)
115 kg±cm (8 ft±Ib, 11 N±m)
(c) Install the bolt while setting the lever as shown.
Torque: 115 kg±cm (8 ft±Ib, 11 N±m)
± AUTOMATIC TRANSAXLEComponent Parts (Transfer Transfer Lower Valve Body
A540H)AT±380
Page 643 of 2389
6. INSTALL COUNTER DRIVEN GEAR
(a) Place SST into the transaxle hole to hold the drive pinion
shaft.
SST (a) 09350±32014 (09351±32130, 09351±32150)
(b) Using SST, press in the counter driven gear until slightly
thickness between the counter driven gear bearing and
outer race.
SST (b) 09350±32014 (09351±32140)
7. INSTALL NEW LOCK NUT AND ADJUST DRIVE
PINION PRELOAD
(a) Install the new lock nut.
(b) Using SST to hold the gear, tighten the nut.
Torque: 2,100 kg±cm (152 ft±Ib, 206 N±m)
SST 09330±00021, 09350±32014 (09351±32032) 5. INSTALL OUTER RACE TO TRANSAXLE CASE
Using SST, press in the outer race.
SST 09350±32014 (09351±32100, 09351±32140) 4. PLACE OIL SLINGER AND NEW SPACER
HINT: Install the spacer with the small end downward. 3.(A540H)
INSTALL DRIVE PINION BEARING NO. 2 SPACER
± AUTOMATIC TRANSAXLEInstallation of Component Parts (A540E and A540H)AT±385
Page 644 of 2389

Turn the gear counterclockwise and clockwise several
times.
(d) Using a torque meter, measure the preload of the drive
pinion.
Drive pinion preload (at starting):
New bearing
10 ± 16 kg±cm
(8.7 ± 13.9 in.±Ib, 1.0 ± 1.6 N±m)
Reused bearing
5 ± 8 kg±cm
(4.3 ± 6.9 in.±Ib, 0.5 ± 0.8 N±m)
wIf the preload is greater than specified, replace the
bearing spacer.
wIf the preload is less than specified, retighten the nut
130 kg±cm (9 ft±Ib, 13 N±m) at a time until the specified
preload is reached.
If the maximum torque is exceeded while retightening the
nut, replace the bearing spacer and repeat the preload
procedure.
Do not back off the nut to reduce the preload.
Maximum torque: 3,640 kg±cm (260ft±Ib, 353 N±m)
(e) If the preload is adjusted within specification, make a
note of it.
M Stake the lock nut.
9. PLACE DIFFERENTIAL CASE INTO TRANSAXLE CASE
(A540E) Be sure to install the shim and outer rece into
place. 8. (AS40E)
PLACE OUTER RACE AND SHIM ONTO RH SIDE
BEARING
± AUTOMATIC TRANSAXLEInstallation of Component Parts (A540E and A540H)AT±386
Page 645 of 2389
10. INSTALL CARRIER COVER
(a) Remove any packing material and be careful not to drop oil on
the contacting surfaces of the carrier cover and transaxle
case.
(b) Apply seat packing to the carrier cover as shown.
Seal packing: Part No. 08826±00090, THREE BOND
1281 or equivalent
HINT: Install the carrier cover within ten minutes after applying
seal packing.
(d) Install and torque the eleven bolts.
Torque: 400 kg±cm (29 ft±lb, 39 N±m)
HINT: Each bolt length (mm (in)) is indicated in the
figure. (A540H)
Be sure to install the ring gear mount case sleeve
and outer race into place.
(e) Install the two apply gaskets.
± AUTOMATIC TRANSAXLEInstallation of Component Parts (A540E and A540H)AT±387