1986 TOYOTA CAMRY V20 brake pads
[x] Cancel search: brake padsPage 852 of 2389

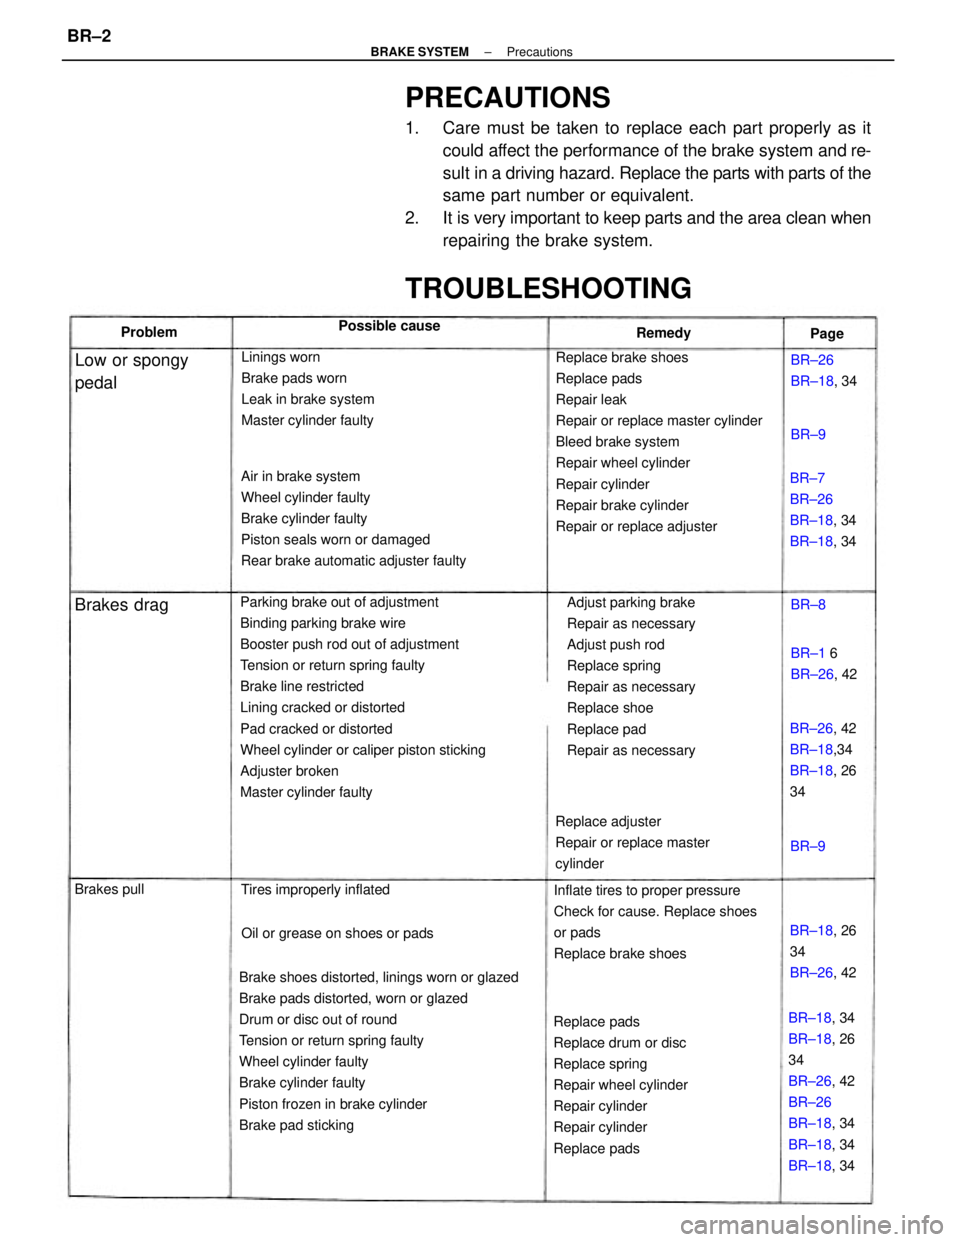
PRECAUTIONS
1. Care must be taken to replace each part properly as it
could affect the performance of the brake system and re-
sult in a driving hazard. Replace the parts with parts of the
same part number or equivalent.
2. It is very important to keep parts and the area clean when
repairing the brake system.
Parking brake out of adjustment
Binding parking brake wire
Booster push rod out of adjustment
Tension or return spring faulty
Brake line restricted
Lining cracked or distorted
Pad cracked or distorted
Wheel cylinder or caliper piston sticking
Adjuster broken
Master cylinder faulty
Brake shoes distorted, linings worn or glazed
Brake pads distorted, worn or glazed
Drum or disc out of round
Tension or return spring faulty
Wheel cylinder faulty
Brake cylinder faulty
Piston frozen in brake cylinder
Brake pad stickingReplace brake shoes
Replace pads
Repair leak
Repair or replace master cylinder
Bleed brake system
Repair wheel cylinder
Repair cylinder
Repair brake cylinder
Repair or replace adjuster Air in brake system
Wheel cylinder faulty
Brake cylinder faulty
Piston seals worn or damaged
Rear brake automatic adjuster faulty
Adjust parking brake
Repair as necessary
Adjust push rod
Replace spring
Repair as necessary
Replace shoe
Replace pad
Repair as necessary
Replace pads
Replace drum or disc
Replace spring
Repair wheel cylinder
Repair cylinder
Repair cylinder
Replace padsInflate tires to proper pressure
Check for cause. Replace shoes
or pads
Replace brake shoes Linings worn
Brake pads worn
Leak in brake system
Master cylinder faulty
BR±18, 34
BR±18, 26
34
BR±26, 42
BR±26
BR±18, 34
BR±18, 34
BR±18, 34 Replace adjuster
Repair or replace master
cylinder
TROUBLESHOOTING
BR±7
BR±26
BR±18, 34
BR±18, 34
BR±26, 42
BR±18,34
BR±18, 26
34
Oil or grease on shoes or pads Tires improperly inflated
BR±18, 26
34
BR±26, 42
Low or spongy
pedalBR±26
BR±18, 34
BR±1 6
BR±26, 42 Possible cause
Brakes drag
Brakes pullRemedy Problem
Page
BR±8
BR±9BR±9
± BRAKE SYSTEMPrecautionsBR±2
Page 853 of 2389

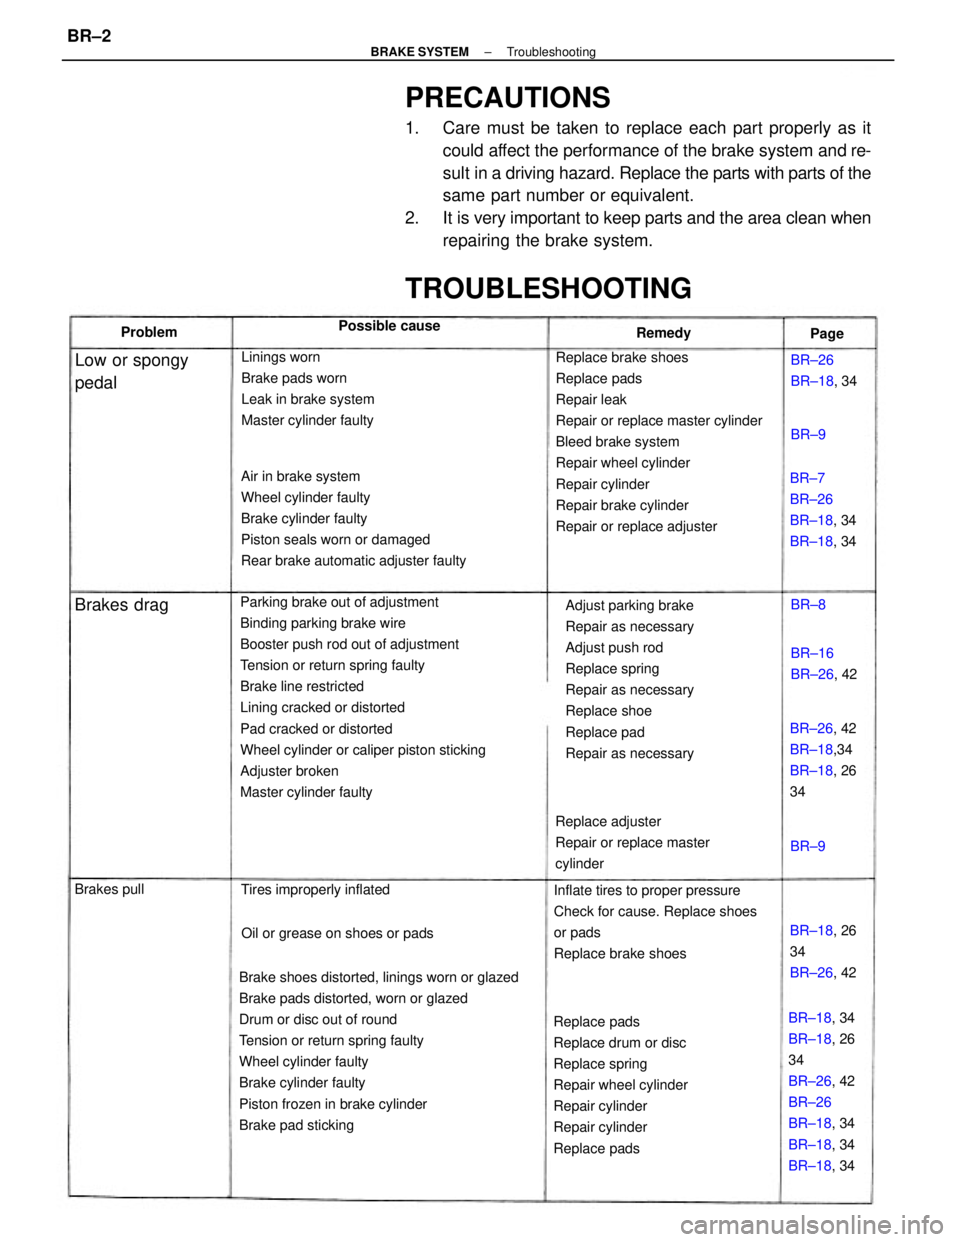
PRECAUTIONS
1. Care must be taken to replace each part properly as it
could affect the performance of the brake system and re-
sult in a driving hazard. Replace the parts with parts of the
same part number or equivalent.
2. It is very important to keep parts and the area clean when
repairing the brake system.
Parking brake out of adjustment
Binding parking brake wire
Booster push rod out of adjustment
Tension or return spring faulty
Brake line restricted
Lining cracked or distorted
Pad cracked or distorted
Wheel cylinder or caliper piston sticking
Adjuster broken
Master cylinder faulty
Brake shoes distorted, linings worn or glazed
Brake pads distorted, worn or glazed
Drum or disc out of round
Tension or return spring faulty
Wheel cylinder faulty
Brake cylinder faulty
Piston frozen in brake cylinder
Brake pad stickingReplace brake shoes
Replace pads
Repair leak
Repair or replace master cylinder
Bleed brake system
Repair wheel cylinder
Repair cylinder
Repair brake cylinder
Repair or replace adjuster Air in brake system
Wheel cylinder faulty
Brake cylinder faulty
Piston seals worn or damaged
Rear brake automatic adjuster faulty
Adjust parking brake
Repair as necessary
Adjust push rod
Replace spring
Repair as necessary
Replace shoe
Replace pad
Repair as necessary
Replace pads
Replace drum or disc
Replace spring
Repair wheel cylinder
Repair cylinder
Repair cylinder
Replace padsInflate tires to proper pressure
Check for cause. Replace shoes
or pads
Replace brake shoes Linings worn
Brake pads worn
Leak in brake system
Master cylinder faulty
BR±18, 34
BR±18, 26
34
BR±26, 42
BR±26
BR±18, 34
BR±18, 34
BR±18, 34 Replace adjuster
Repair or replace master
cylinder
TROUBLESHOOTING
BR±7
BR±26
BR±18, 34
BR±18, 34
BR±26, 42
BR±18,34
BR±18, 26
34
Oil or grease on shoes or pads Tires improperly inflated
BR±18, 26
34
BR±26, 42
Low or spongy
pedalBR±26
BR±18, 34
BR±16
BR±26, 42 Possible cause
Brakes drag
Brakes pullRemedy Problem
Page
BR±8
BR±9BR±9
± BRAKE SYSTEMTroubleshootingBR±2
Page 854 of 2389

(Drum brake)
Brake shoes binding at backing plate ledges
Backing plate ledges worn
Loose or missing shoe hold±down spring
Loose set bolt at backing plate
(Disc brake)
Loose or missing pad support plate
Loose installation bolt
Wear on slide bushingBrake shoes distorted, linings worn or glazed,
drums worn
Brake pads distorted, worn or glazed
Piston frozen in brake cylinder
Brake booster faulty
Vacuum leaks
Brake line restricted
Caliper to wheel or rotor interference
Dust cover to rotor or backing plate to drum
interference
Other brake system components faultyReplace and lubricate ledges
Replace shoe hold±down spring
TightenReplace pads
Repair cylinder
Repair booster
Repair as necessary
Repair as necessary
Replace pad support plate
Tighten
Replace slide bushing
Replace or refinish drums or rotors if
heavily scored
Replace as required
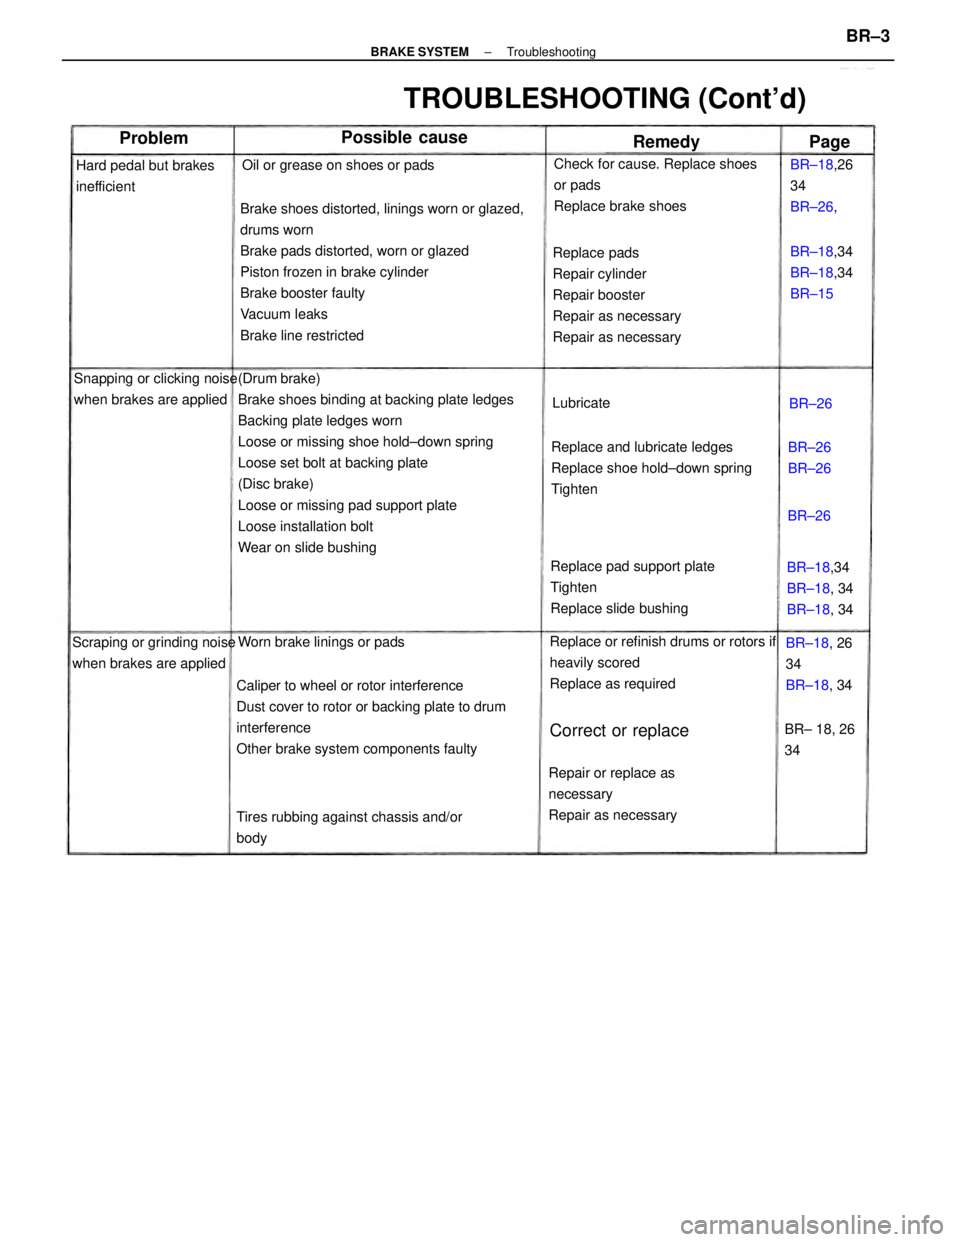
TROUBLESHOOTING (Cont'd)
Check for cause. Replace shoes
or pads
Replace brake shoes
Repair or replace as
necessary
Repair as necessary
Tires rubbing against chassis and/or
body Snapping or clicking noise
when brakes are applied
Scraping or grinding noise
when brakes are appliedOil or grease on shoes or pads
Hard pedal but brakes
inefficient
Worn brake linings or padsBR±18,34
BR±18, 34
BR±18, 34 BR±18,34
BR±18,34
BR±15 BR±18,26
34
BR±26,
BR±18, 26
34
BR±18, 34
Correct or replaceBR± 18, 26
34
Possible cause
BR±26
BR±26 Lubricate
Problem
Remedy
BR±26
Page
BR±26
± BRAKE SYSTEMTroubleshootingBR±3
Page 855 of 2389

Maladjustment of brake pedal or booster push
rod
Poor return of brake booster or master cylinder or
wheel cylinder
(Disc brake)
Rusted or stuck piston
Improper positioning of pad in caliper
Rotor rubbing against caliper housing
Improper installation of disc brake pad support
plate
Pad wear and pad wear indicator making contact
with the rotor
(Drum brake)
Weak, damaged or incorrect shoe hold±down
springs
Grooved backing plate ledges
Bent or warped backing plate causing
interference with drum
Improper machining of drum causing interference
with backing plate or shoe
Other brake system components:
Loose or extra parts in brakes
Rear drum adjustment too tight causing lining to
glaze
Worn, damaged or insufficiently lubricated wheel
bearings Brake drums and linings, rotors and pads
worn or scored
Dirty, greased, contaminated or glazed
linings or pads
Improper linings or pads using
Maladjustment of brake pedal or booster
push rod
(Disc brake)
Missing or damaged brake pad
anti±squeal shim
Pad wear and pad wear indicator making
contact with the rotor
Burred or rusted calipers
(Drum brake)
Weak damaged or incorrect shoe
hold±down springs, loose or damaged
shoe hold±down spring pins and springs
and grooved backing plate ledges Squeaking, squealing
groaning or chattering
noise when brakes are
applied
Note: Brake friction
materials inherently
generate noise and heat in
order to dissipate eniergy.
As a result, occasional
squeal is normal and is
aggravated by severe
environmental conditions
such as cold,' heat,
wetness, snow, salt, mud,
etc. This occasional squeal
is not a functional problem
and does not indicate any
loss of brake effectivenessInspect, repair or replace
Clean or replace
Inspect for correct usage or
replace
Inspect and adjust
Inspect and lubricate as
necessary
Repair or replace
Repair or replace
Repair or replace
Replace
Replace
Repair or replace
Repair or replace
Replace drum
TROUBLESHOOTING (Cont'd)
Replace
Replace
Clean or deburr
Inspect and adjust
Inspect, repair or replace Squealing and
squeaking noise when
brakes are not applied
BR±26, 42
BR±26, 42
BR±26, 42
BR±26, 42 BR±18,34
BR±18, 34
BR±18, 34
BR±18, 34
Inspect, repair or replace as
necessaryBR±18, 34
BR±18, 34
BR±18, 34 BR±18, 26,
34
BR±18, 26
34
±Inspect, repair or replace
BR±9,15
26 Possible cause
BR± 18, 34 BR±6,16 . Page Remedy
BR±6, 16 Problem
BR±26
± BRAKE SYSTEMTroubleshootingBR±4
Page 869 of 2389

REPLACEMENT OF BRAKE PADS
HINT: If a squealing noise occurs from the front brakes
while driving, check the pad wear indicator. If there are
traces of the indicator contacting the rotor disc, the brake
pad should be replaced.
FRONT BRAKE
COMPONENTS
± BRAKE SYSTEMFront BrakeBR±18
Page 870 of 2389

2. INSPECT PAD LINING THICKNESS
Check the pad thickness through the cylinder inspection
hole and replace pads if not within specification.
Minimum thickness: 1.0 mm (0.039 in.)
4. REMOVE FOLLOWING PARTS:
(a) Two anti±squeal springs.
(b) Two brake pads
(c) Two or four anti±squeal shims
(d) Two pad wear indicator plates
(e) Four pad support plates 1. REMOVE FRONT WHEEL
Remove the wheel and temporarily fasten the rotor disc
with the hub nuts.
(b) Remove the brake cylinder and suspend it so the hose
is not stretched.
HINT: Do not disconnect the brake hose. 3. REMOVE CYLINDER FROM TORQUE PLATE
(a) Remove two installation bolts from the torque plate.
± BRAKE SYSTEMFront BrakeBR±19
Page 871 of 2389

8. INSTALL NEW PADS
(a) Install new pad wear indicator plate to inner pad.
NINT: Be sure the arrow on the pad wear indicator
plate is pointing i n the direction of the disc rotation.
(b) (Except 2VZ±FE Engine of w/ A.B.S.)
Install the one anti±squeal shim to the each pad.
(c) (For 2VZ±FE Engine of w/ A.B.S.)
Install the two anti±squeal shims to the each pad.
HINT: Apply disc brake grease to both side of the inner
anti±squeal shim of the outside pad.
(d) Install the pads onto each support plate.
NOTICE: Do not allow oil or grease to get on the
rubbing face.
(e) Install the two anti±squeal springs.
9. INSTALL CYLINDER
(a) Draw out a small amount of brake fluid from the reser-
voir.
(b) Press in piston with a hammer handle or an equiva-
lent.
HINT: Always change the pad on one wheel at a time as
there is a possibility of the opposite piston flying out.
(c) Insert the brake cylinder carefully ±so the boot is not
wedged. 5. CHECK ROTOR DISC THICKNESS
(See step 2 on page BR±23)
6. CHECK ROTOR DISC RUNOUT
(See step 3 on page BR±23)
7. INSTALL PAD SUPPORT PLATES
± BRAKE SYSTEMFront BrakeBR±20
Page 872 of 2389

REMOVAL OF CYLINDER
(See page BR±18)
1. DISCONNECT BRAKE LINE
Remove the union bolt and disconnect the brake line. Use
a container to catch the brake fluid.(d) Install and torque two installation bolts.
Torque: 400 kg±cm (29 ft±Ib, 39 N¿m)
10. INSTALL FRONT WHEEL
11. CHECK THAT FLUID LEVEL IS MAX LINE
2. REMOVE CYLINDER FROM TORQUE PLATE
Remove the two installation bolts and cylinder.
3. REMOVE PADS
(See step 4 on page BR±19)
± BRAKE SYSTEMFront BrakeBR±21