1973 DATSUN B110 check engine
[x] Cancel search: check enginePage 357 of 513
ENGINE
MECHANICAL
5
M
co
El
co
I
ED
I
UNIT
mm
in
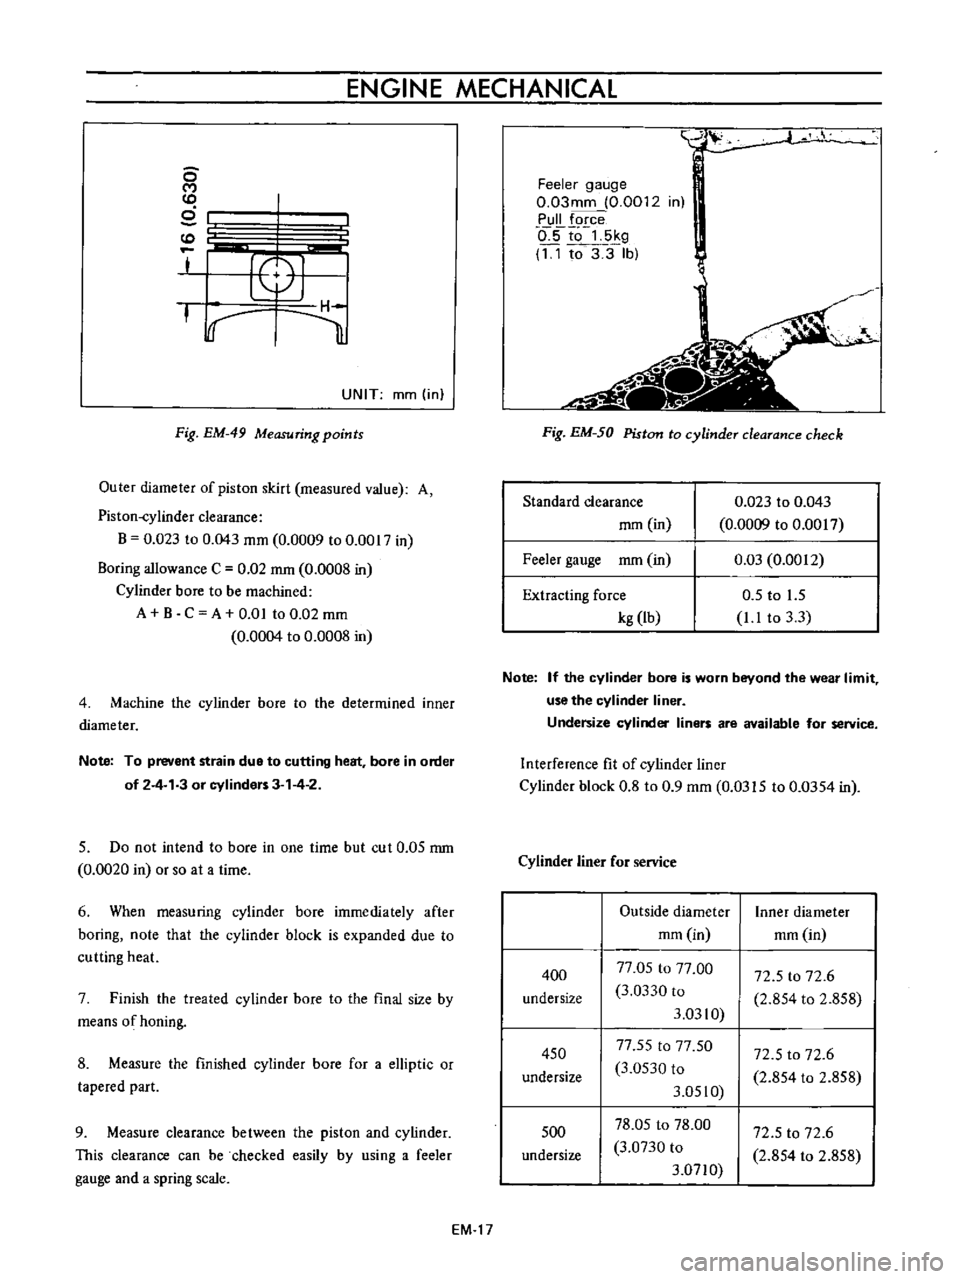
Fig
EM
49
Measuring
points
Outer
diameter
of
piston
skirt
measured
value
A
Piston
eylinder
clearance
B
0
023
to
0
043
mm
0
0009
to
0
0017
in
Boring
allowance
C
0
02
rom
0
0008
in
Cylinder
bore
to
be
machined
A
B
C
A
om
to
0
02
mm
0
0004
to
0
0008
in
4
Machine
the
cylinder
bore
to
the
determined
inner
diameter
Note
To
prevent
strain
due
to
cutting
heat
bore
in
order
of
2
4
3
or
cylinders
3
4
2
5
Do
not
intend
to
bore
in
one
time
but
cut
0
05
rom
0
0020
in
or
so
at
a
time
6
When
measuring
cylinder
bore
immediately
after
boring
note
that
the
cylinder
block
is
expanded
due
to
cutting
heat
7
Finish
the
treated
cylinder
bore
to
the
final
size
by
means
of
honing
8
Measure
the
finished
cylinder
bore
for
a
elliptic
or
tapered
part
9
Measure
clearance
between
the
piston
and
cylinder
This
clearance
can
be
checked
easily
by
using
a
feeler
gauge
and
a
spring
scale
EM
17
Feeler
gauge
0
03mm
0
0012
in
Pull
force
o
5to
5kg
11
to3
3
lb
i
Fig
EM
50
Piston
to
cylinder
clearance
check
Standard
clearance
rom
in
0
023
to
0
043
0
0009
to
0
0017
0
03
0
0012
Feeler
gauge
mm
in
Extracting
force
kg
Ib
0
5
to
1
5
1
1
to
3
3
Note
If
the
cylinder
bore
is
worn
beyond
the
wear
limit
use
the
cylinder
liner
Undersize
cylinder
liners
are
available
for
service
Interference
fit
of
cylinder
liner
Cylinder
block
0
8
to
0
9
mm
0
0315
to
0
0354
in
Cylinder
liner
for
service
400
undersize
Outside
diameter
mm
in
77
05
to
77
00
3
0330
to
3
0310
77
55
to
77
50
3
0530
to
3
0510
78
05
to
78
00
3
0730
to
3
0710
72
5
to
72
6
2
854
to
2
858
Inner
diameter
mm
in
72
5
to
72
6
2
854
to
2
858
450
undersize
72
5
to
72
6
2
854
to
2
858
500
undersize
Page 358 of 513
ENGINE
PISTON
PISTON
PIN
AND
PISTON
RING
Check
for
seizure
scratch
and
wear
Replace
as
required
o
10
e
O
I
l
Fig
EM
51
Piston
and
connecting
rod
assembly
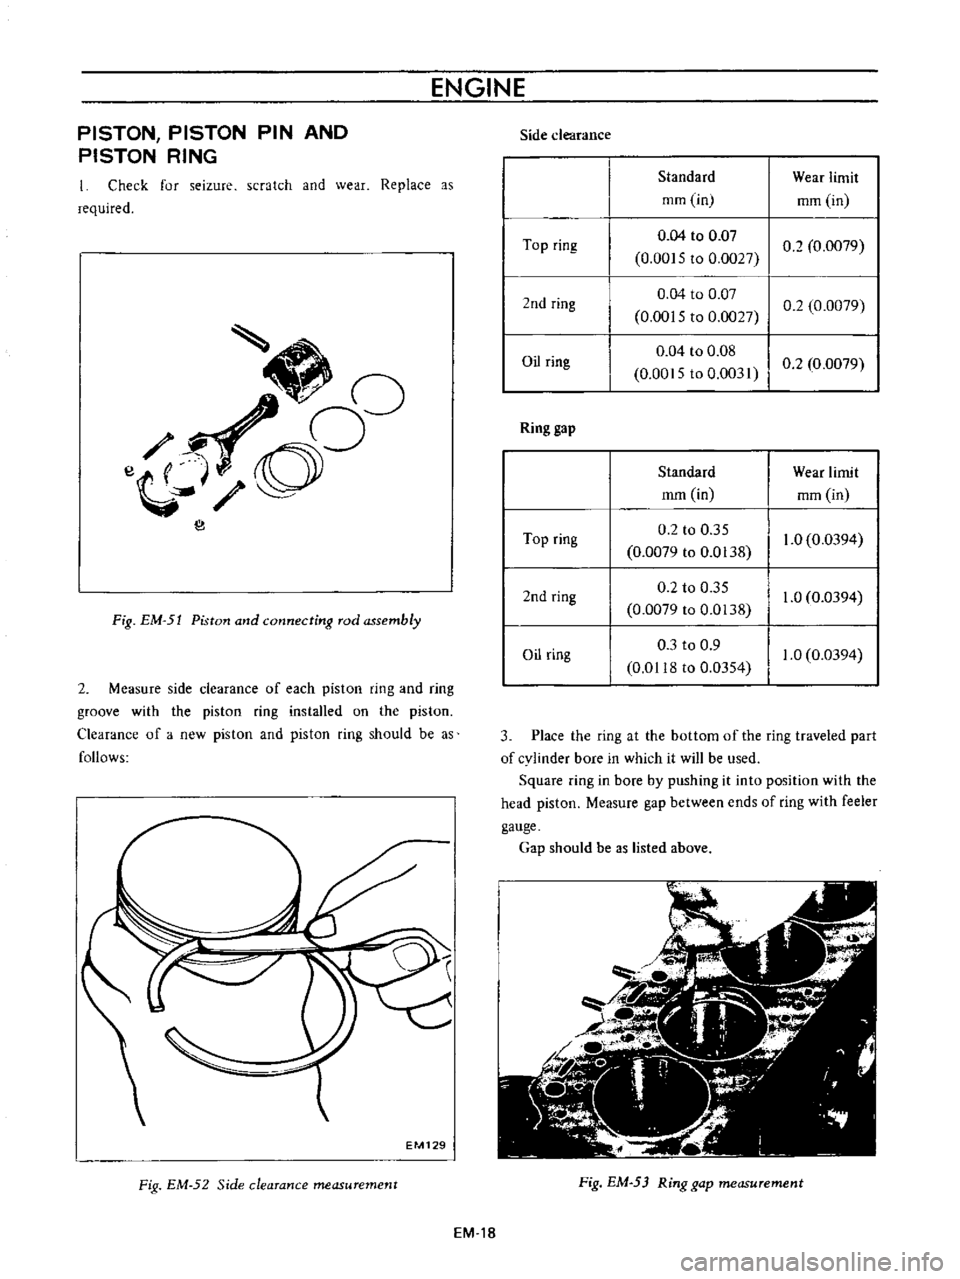
2
Measure
side
clearance
of
each
piston
ring
and
ring
groove
with
the
piston
ring
installed
on
the
piston
Clearance
of
a
new
piston
and
piston
ring
should
be
as
follows
EM129
Fig
EM
52
Side
clearance
measurement
EM
18
Side
clearance
Standard
Wear
limit
mm
in
mm
in
Top
ring
0
04
to
0
Q7
02
0
0079
0
00
5
to
0
0027
2nd
ring
0
04
to
0
07
0
0015
to
0
027
0
2
0
0079
Oil
ring
0
04
to
0
08
0
0015
to
0
0031
I
0
2
0
0079
Ring
gap
Standard
Wear
limit
mm
in
mm
in
Top
ring
0
2
to
0
35
1
0
0
0394
0
0079
to
0
0138
2nd
ring
0
2
to
0
35
1
0
0
0394
0
0079
to
0
0138
Oil
ring
0
3
to
0
9
1
0
0
0394
0
01
8
to
0
0354
3
Place
the
ring
at
the
bottom
of
the
ring
traveled
part
of
cylinder
bore
in
which
it
will
be
used
Square
ring
in
bore
by
pushing
it
into
position
with
the
head
piston
Measure
gap
between
ends
of
ring
with
feeler
gauge
Gap
should
be
as
listed
above
Fig
EM
53
Ring
gap
measurement
Page 359 of 513
ENGINE
MECHANICAL
Note
8
When
the
piston
ring
only
is
to
be
replaced
without
the
cylinder
bore
being
corrected
measure
gap
at
the
bottom
of
the
cylinder
where
the
wear
is
minor
b
Oversize
piston
rings
are
available
for
service
50
100
150
oversize
4
Measure
the
piston
pin
hole
in
relation
to
the
outer
diameter
of
the
pin
If
wear
exceeds
the
limit
replace
such
piston
pin
together
with
the
piston
on
which
it
is
installed
Piston
pin
diameter
mm
in
17447
to
17452
0
6869
to
0
6871
65
23
to
65
48
2
5681
to
5
779
Piston
pin
length
mm
in
Piston
pin
hole
dia
meter
mm
in
17460
to
17453
0
6874
to
0
6871
5
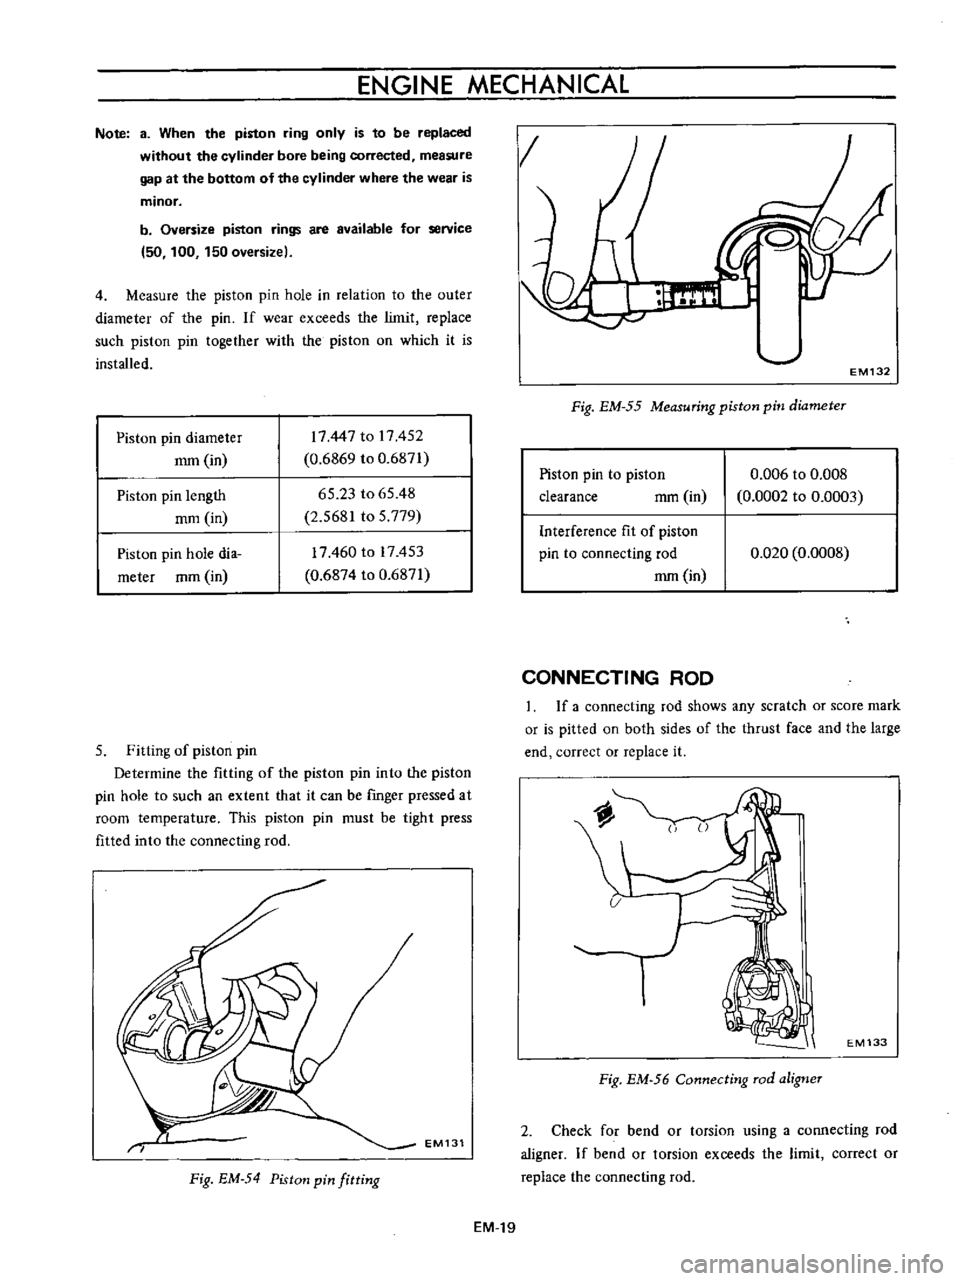
Fitting
of
piston
pin
Determine
the
fitting
of
the
piston
pin
into
the
piston
pin
hole
to
such
an
extent
that
it
can
be
rmger
pressed
at
room
temperature
This
piston
pin
must
be
tight
press
fitted
into
the
connecting
rod
EM131
Fig
EM
54
Piston
pin
fitting
EM
19
g
1
EM132
Fig
EM
55
Measuring
piston
pin
diameter
Piston
pin
to
piston
clearance
mm
in
0
006
to
0
008
0
0002
to
0
0003
Interference
fit
of
piston
pin
to
connecting
rod
mm
in
0
020
0
0008
CONNECTING
ROD
If
a
connecting
rod
shows
any
scratch
or
score
mark
or
is
pitted
on
both
sides
of
the
thrust
face
and
the
large
end
correct
or
replace
it
EM133
Fig
EM
56
Connecting
rod
aligner
2
Check
for
bend
or
torsion
using
a
connecting
rod
aligner
If
bend
or
torsion
exceeds
the
limit
correct
or
replace
the
connecting
rod
Page 360 of 513
ENGINE
Standard
IMaXimum
Connecting
rod
bend
or
torsion
per
100
mm
or
3
94
in
length
mm
in
o
os
0
0020
0
07
0
0028
0
1
0
0039
bend
torsion
3
When
replacing
the
connecting
rod
select
the
rod
so
that
weight
difference
between
new
and
old
rods
is
within
S
gr
0
18
oz
in
unit
weight
4
Install
connecting
rods
with
bearings
on
to
the
corresponding
crank
pins
and
measure
the
thrust
clear
ance
If
the
measured
value
exceeds
the
limit
replace
such
connecting
rod
Stan
dard
Maximum
Big
end
play
mm
in
0
2
to
0
3
0
0079
to
0
Ql18
0
4
0
0IS7
l
8ig
end
plav
A
t
f
L
Fig
EM
57
Big
end
play
check
CRANKSHAFT
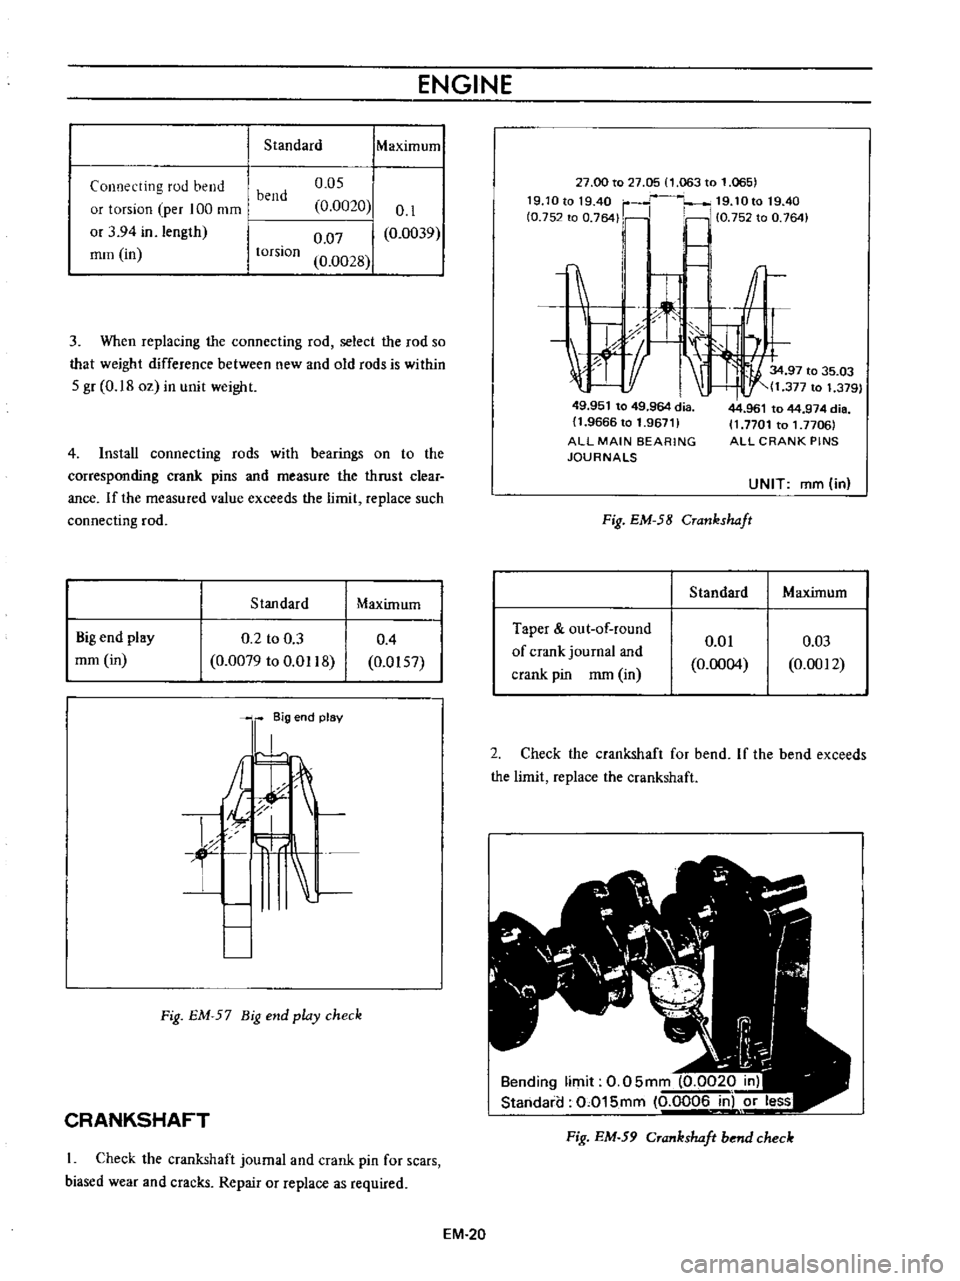
Check
the
crankshaft
journal
and
crank
pin
for
scars
biased
wear
and
cracks
Repair
or
replace
as
required
EM
20
27
00
to
27
05
1
063
to
1
065
19
1Ot01940
r
19
10t019
40
fO
752
to
0
764
Ii
10
75Z
to
0
764
I
c
1
r
1tf
1
I
J
X
I
34
97
to
35
03
t
11
377
to
1
379
49
951
to
49
964
dia
11
9666
to
1
96711
ALL
MAIN
BEARING
JOURNALS
Fig
EM
58
Crankshaft
Standard
Taper
out
of
round
of
crank
journal
and
crank
pin
mm
in
0
01
0
0004
44
961
to
44
974
die
11
7701
to
1
7706
ALL
CRANK
PINS
UNIT
ffim
in
Maximum
0
03
0
0012
2
Check
the
crankshaft
for
bend
If
the
bend
exceeds
the
limit
replace
the
crankshaft
Bending
limit
0
05mm
0
0020
in
Standaia
0
015mm
0
0006
in
or
less
Fig
EM
59
Crankshaft
bend
check
Page 361 of 513
ENGINE
MECHANICAL
Standard
Maximum
Crankshaft
bend
mm
in
0
05
0
0020
0
015
0
0006
Note
When
measuring
bend
use
a
dial
gauge
Bend
value
is
a
half
of
the
reading
obtained
when
the
crankshaft
is
turned
once
with
the
dial
gauge
applied
to
its
center
journal
3
After
regrinding
the
crankshaft
fmish
it
to
the
necessary
size
indicated
in
the
lists
on
pages
EM
25
by
using
an
adequate
undersize
bearing
according
to
the
extent
of
required
repair
4
Install
the
crankshaft
in
the
cylinder
block
and
measure
the
thrust
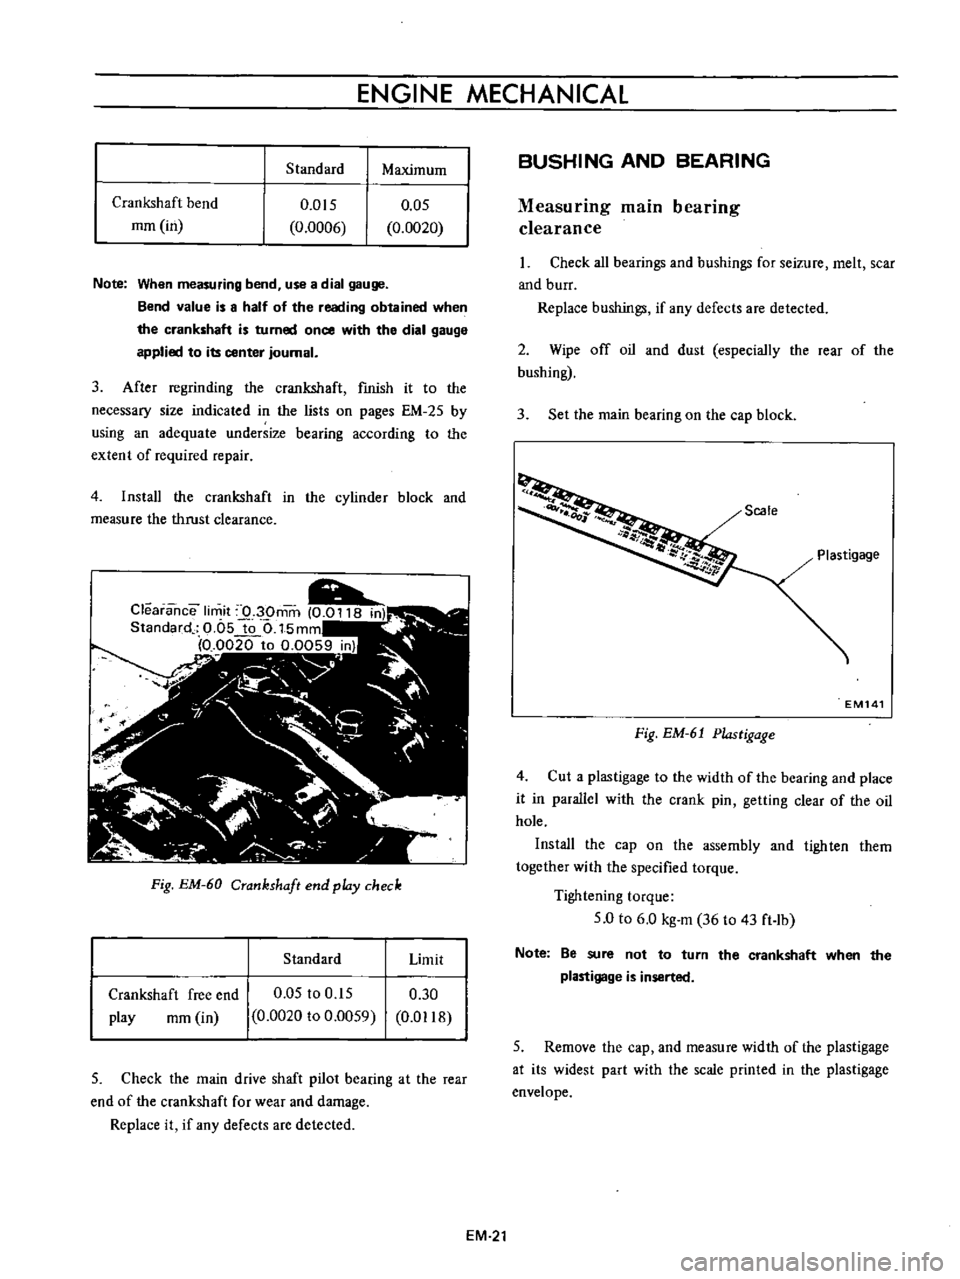
clearance
Fig
EM
60
Crankshaft
end
pldy
check
Standard
Limit
Crankshaft
free
end
play
rom
in
0
05
to
0
15
0
0020
to
0
0059
0
30
0
D118
5
Check
the
main
drive
shaft
pilot
bearing
at
the
rear
end
of
the
crankshaft
for
wear
and
damage
Replace
it
if
any
defects
are
detected
BUSHING
AND
BEARING
Measuring
main
bearing
clearance
Check
all
bearings
and
bushings
for
seizure
melt
scar
and
burr
Replace
bushings
if
any
defects
are
detected
2
Wipe
off
oil
and
dust
especially
the
rear
of
the
bushing
3
Set
the
main
bearing
on
the
cap
block
Scale
Plastigage
EM141
Fig
EM
61
Plastigage
4
Cut
a
plastigage
to
the
width
of
the
bearing
and
place
it
in
parallel
with
the
crank
pin
getting
clear
of
the
oil
hole
Install
the
cap
on
the
assembly
and
tighten
them
together
with
the
specified
torque
Tightening
torque
5
0
to
6
0
kg
m
36
to
43
ft
lb
Note
Be
sure
not
to
turn
the
crankshaft
when
the
plastigage
is
inserted
5
Remove
the
cap
and
measure
width
of
the
plastigage
at
its
widest
part
with
the
scale
printed
in
the
plastigage
envelope
EM
21
Page 362 of 513
ENGINE
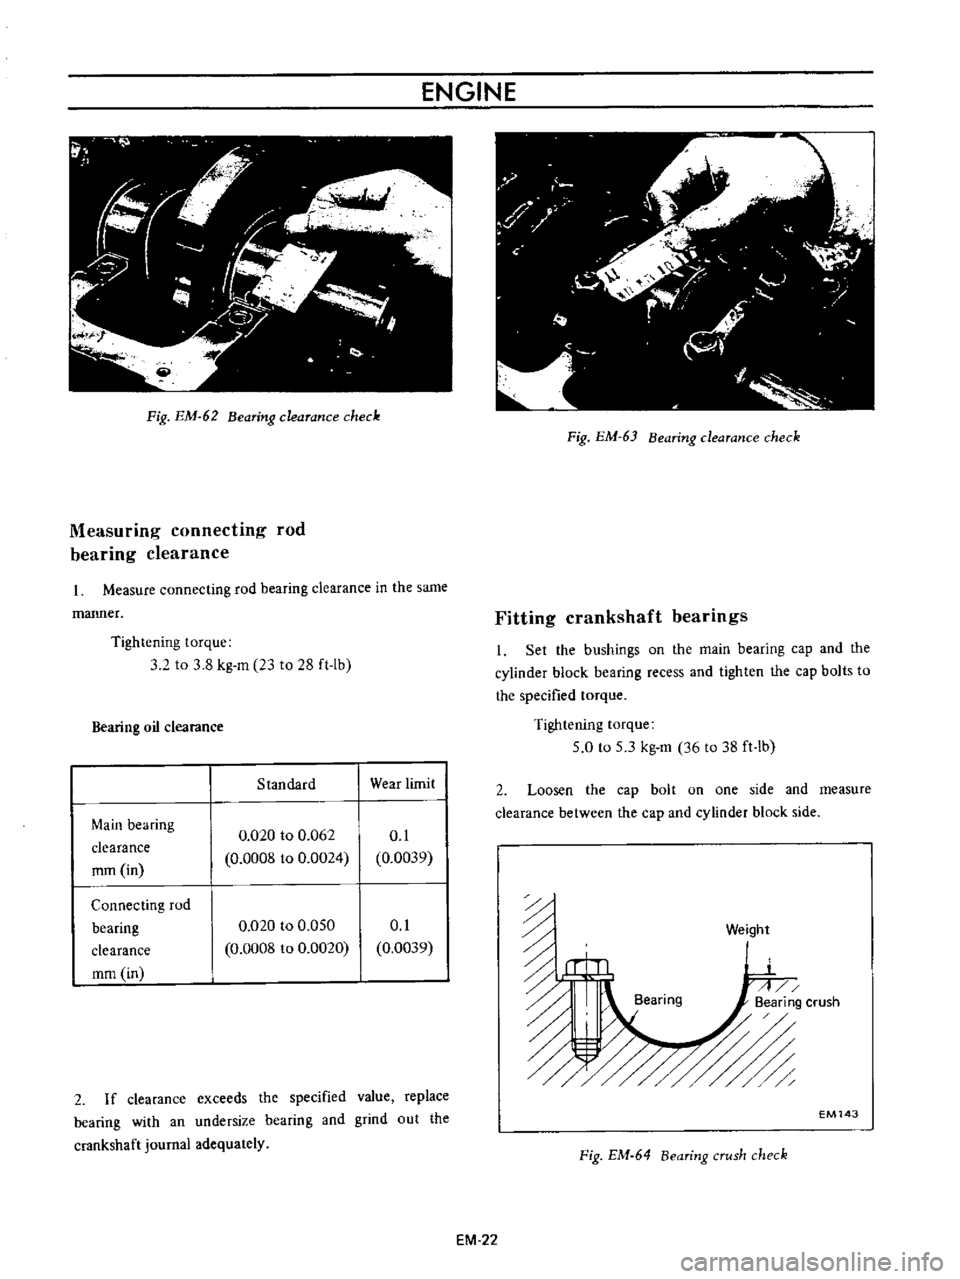
Pig
EM
62
Bearing
clearance
check
Measuring
connecting
rod
bearing
clearance
Measure
connecting
rod
bearing
clearance
in
the
same
manner
Tightening
torque
3
2
to
3
8
kg
m
23
to
28
ft
Ib
Bearing
oil
clearance
Standard
Wear
limit
Main
bearing
clearance
rom
in
0
020
to
0
062
0
0008
to
0
0024
0
1
0
0039
Connecting
rod
bearing
clearance
mm
in
0
020
to
0
050
0
0008
to
0
0020
0
1
0
0039
2
If
clearance
exceeds
the
specified
value
replace
bearing
with
an
undersize
bearing
and
grind
out
the
crankshaft
journal
adequately
Fig
EM
63
Bearing
clearance
check
Fitting
crankshaft
bearings
I
Set
the
bushings
on
the
main
bearing
cap
and
the
cylinder
block
bearing
recess
and
tighten
the
cap
bolts
to
the
specified
torque
Tightening
torque
5
0
to
5
3
kg
m
36
to
38
ft
lb
2
Loosen
the
cap
bolt
on
one
side
and
measure
clearance
between
the
cap
and
cylinder
block
side
n
n
u
ii
Bearing
6
Weight
EM143
Fig
EM
64
Bearing
crush
check
EM
22
Page 364 of 513
Bearing
thickness
mm
in
STD
I
No
1
I
No
2
I
I
I
1
585
to
1
565
No
3
0
0624
to
0
0616
I
No
4
I
No
5
I
NO
11
0
25
I
1
710
to
1
690
undersize
No
3
0
0673
to
0
0665
I
No
4
I
No
5
I
No
1
I
I
No
2
I
0
50
I
1
835
to
1
815
undersize
No
3
0
0722
to
0
0715
No
4
No
5
I
I
No
1
I
No
2
I
0
75
I
11
960
to
1
940
undersize
No
3
0
0772
to
0
0764
I
No
4
I
I
No
5
I
ENGINE
Camshaft
journal
diameter
mm
in
D
783
to
43
796
1
7237
to
1
7242
43
283
to
43
296
1
7041
to
1
7046
42
783
to
42
796
1
6844
to
1
6849
42
283
to
42
296
1
6647
to
1
6652
41
208
to
41
221
1
6224
to
1
6229
43
533
to
43
546
11
7139
to
1
7144
43
023
to
43
036
1
6983
to
1
6943
42
523
to
42
536
1
6741
to
1
6746
42
023
to
42
036
1
6544
to
1
6550
40
958
to
40
971
1
6t25
to
1
6
30
43
283
to
43
296
1
7041
to
1
7046
42
773
to
42
786
1
6840
to
1
6845
42
273
to
42
286
11
6643
to
1
6648
41
773
to
41
786
1
6446
to
1
6451
40
708
to
40
721
1
6027
to
1
6023
43
033
to
43
046
1
6942
to
1
6947
42
523
to
42
536
1
674t
to
1
6746
42
023
to
42
036
1
6554
to
1
6550
41
523
to
41
536
1
6348
to
1
6353
40
458
to
40
471
1
5928
to
1
5933
EM
24
MISCELLANEOUS
COMPONENTS
Crankshaft
sprocket
and
camshaft
sprocket
I
Check
tooth
surfaces
for
flaws
and
wears
Replace
defective
sprocket
2
Install
the
camshaft
sprocket
in
position
and
check
for
run
out
If
it
exceeds
0
1
mm
0
0039
in
replace
the
camshaft
sprocket
Check
the
camshaft
thrust
deviation
If
it
is
deviated
replace
the
camshaft
locating
plate
f
EMl48
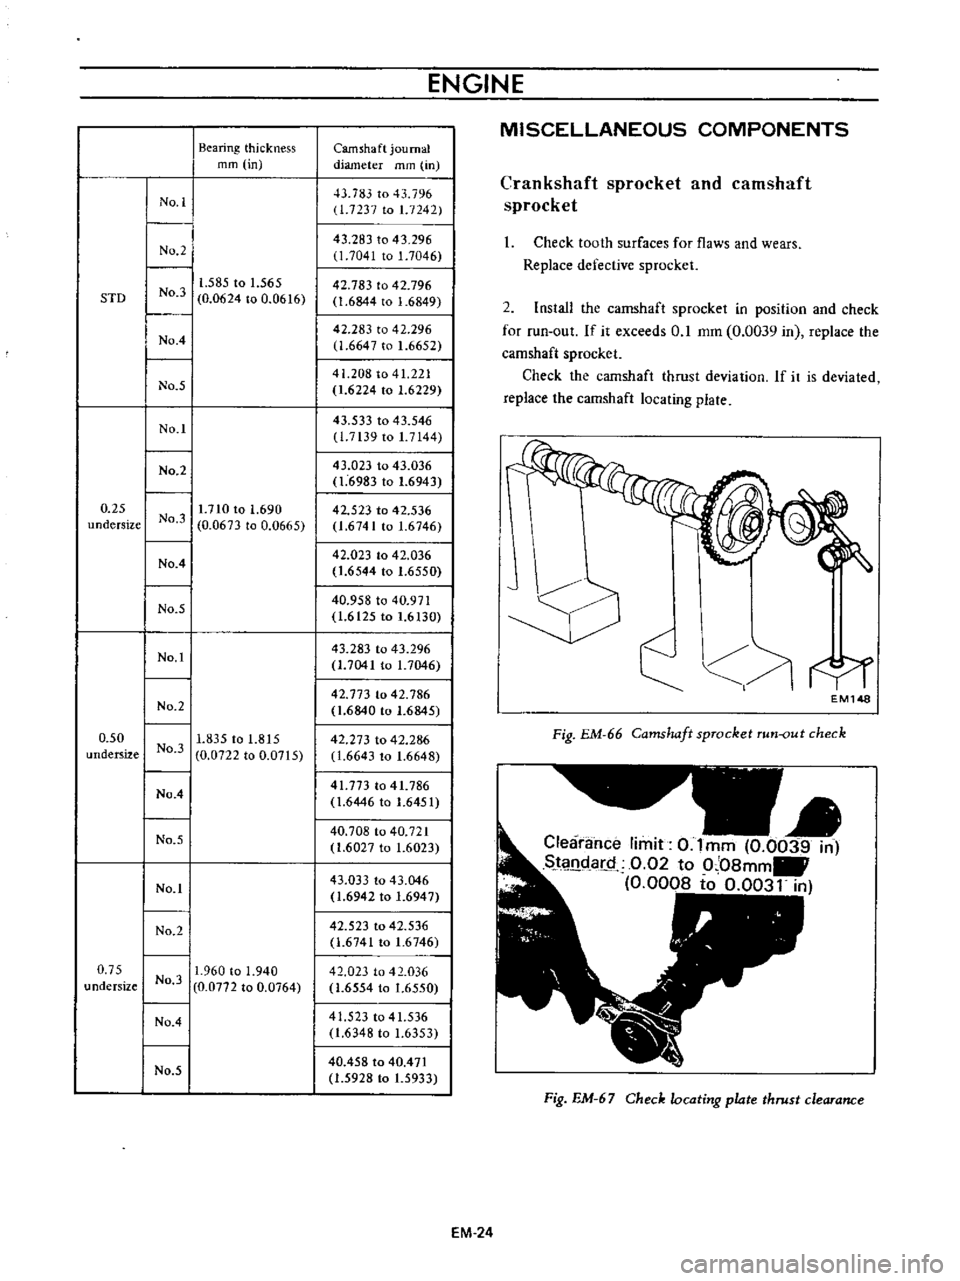
Fig
EM
66
Camshaft
sprocket
run
out
check
Clearance
limit
0
Imm
0
0039
in
SJ
l
ldar
Q
0
02
to
0
08mm
0
0008
to
0
0031
in
Fig
EM
67
Check
locating
plate
thrust
clearance
Page 365 of 513
ENGINE
MECHANICAL
Standard
mm
in
Camshaft
sprocket
run
out
Thrust
deviation
O
OIS
0
0006
Locating
plate
thrust
clearance
0
02
to
0
08
0
0008
to
0
003
Wear
limit
mm
in
less
than
0
0
0039
O
OS
0
0020
0
1
0
0039
3
Check
the
chain
for
damage
excessive
wear
and
stretch
at
its
roller
links
Replace
chain
if
defective
Flyw
heel
I
Check
the
clutch
disc
contact
surface
of
the
flywheel
for
damage
and
wear
Repair
or
replace
if
necessary
2
Measure
deviation
of
the
clutch
disc
contact
surface
with
a
dial
gauge
If
it
exceeds
0
2
mm
0
0079
in
replace
it
3
Check
tooth
surfaces
of
the
ring
gear
for
flaw
and
wear
Replace
if
necessary
Note
Replace
the
ring
gear
at
about
180
to
2000C
356
to
3920
Fl
ENGINE
ASSEMBLY
PRECAUTION
CYLINDER
HEAD
PRECAUTION
CONTENTS
EM
25
EM
25
Use
thoroughly
cleaned
parts
Particularly
make
sure
that
oil
holes
are
clear
of
foreign
matter
2
When
installing
sliding
parts
such
as
bearings
be
sure
to
apply
engine
oil
to
them
3
Use
new
packings
and
oil
seals
4
Keep
tools
and
work
benches
clean
S
Keep
the
necessary
parts
and
tools
near
at
hand
6
Be
sure
to
follow
specified
tightening
torque
and
orders
CYLINDER
HEAD
Assembly
of
valve
and
valve
spring
Set
the
valve
spring
seat
in
position
and
fit
the
valve
guide
with
the
oil
lip
seal
Assemble
the
parts
in
order
valve
spring
spring
retainer
valve
collet
and
valve
rocker
guide
PISTON
AND
CONNECTING
ROO
ASSEMBLING
ENGINE
EM
25
EM
26
I
I
11
00
I
I
I
t
I
J
ftr
J
J
1
l
J
r
N
1
n
r
VI
I
I
C
I
L
I
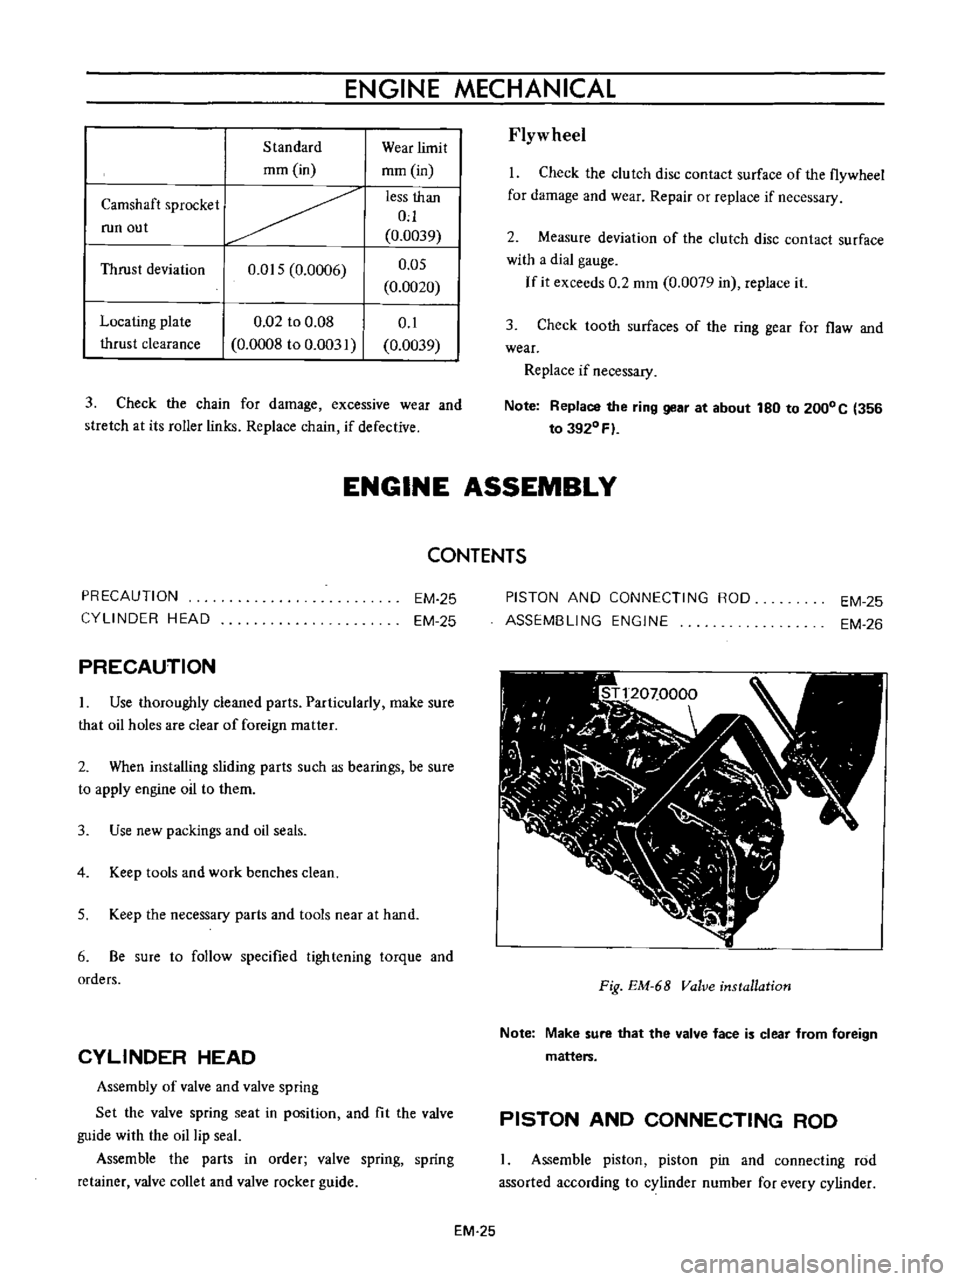
Fig
EM
68
Valve
installation
Note
Make
sure
that
the
valve
face
is
clear
from
foreign
matters
PISTON
AND
CONNECTING
ROD
Assemble
piston
piston
pin
and
connecting
rod
assorted
according
to
cylinder
number
for
every
cylinder
EM
25