2024 FORD F650/750 lock
[x] Cancel search: lockPage 109 of 386
ENGINE IDLE SHUTDOWN (IF
EQUIPPED)
WARNING: In the event of engineshutdown, make sure your vehicle issafely off the road and the problem isresolved before returning to the road.Failure to do so may result in a crash,serious injury or death.
This feature automatically shuts down theengine when it has been idling in park (P)or neutral (N) for an extended period,depending on the setting.
When the engine idle shutdown processhas started:
•A chime sounds and a messageappears in the information displayshowing a timer counting down from30 seconds.
•You can reset the timer by pressing thebrake pedal, accelerator pedal, or byshifting into another gear.
•If you do not intervene within 30seconds, the engine shuts down and amessage appears in the informationdisplay alerting you that the engine hasshut down.
•Shortly after the engine has shut down,the electrical system simulates a keyoff and even though the ignition is stillon, the electrical system simulates anormal accessory delay period beforeshutting down.
•You must switch the ignition off toreset the system before restarting yourvehicle.
The engine idle shutdown timer does notstart if:
•The engine is operating in batterycharge protect or power take-off mode.
•The exhaust emission control device isregenerating.
ENGINE BLOCK HEATER (IF
EQUIPPED)
WARNING: Failure to follow engineblock heater instructions could result inproperty damage or serious personalinjury.
WARNING: Do not use your heaterwith ungrounded electrical systems ortwo-pronged adapters. There is a risk ofelectrical shock.
WARNING: Do not fully close thehood, or allow it to drop under its ownweight when using the engine blockheater. This could damage the powercable and may cause an electrical shortresulting in fire, injury and propertydamage.
Note:The heater is most effective whenoutdoor temperatures are below 0°F(-18°C).
The heater acts as a starting aid bywarming the engine coolant. This allowsthe climate control system to respondquickly. The equipment includes a heaterelement (installed in the engine block) anda wire harness. You can connect thesystem to a grounded 120-volt ACelectrical source.
105
2024 F-650/750 (TBC) , enUSA, Edition date: 202210, First-PrintingStarting and Stopping the Engine
Page 110 of 386
We recommend that you do the followingfor a safe and correct operation:
•Use a 16-gauge outdoor extension cordthat is product certified byUnderwriter’s Laboratory (UL) orCanadian Standards Association(CSA). This extension cord must besuitable for use outdoors, in coldtemperatures, and be clearly markedSuitable for Use with OutdoorAppliances. Do not use an indoorextension cord outdoors. This couldresult in an electric shock or become afire hazard.
•Use as short an extension cord aspossible.
•Do not use multiple extension cords.
•Make sure that when in operation, theextension cord plug and heater cordplug connections are free and clear ofwater. This could cause an electricshock or fire.
•Make sure your vehicle is parked in aclean area, clear of combustibles.
•Make sure the heater, heater cord andextension cord are firmly connected.
•Check for heat anywhere in theelectrical hookup once the system hasbeen operating for approximately 30minutes.
•Make sure the system is unplugged andproperly stowed before starting anddriving your vehicle. Make sure theprotective cover seals the prongs of theblock heater cord plug when not in use.
•Make sure the heater system ischecked for proper operation beforewinter.
Using the Engine Block Heater
Make sure the receptacle terminals areclean and dry prior to use. Clean them witha dry cloth if necessary.
The heater uses 0.4 to 1.0 kilowatt-hoursof energy per hour of use. The system doesnot have a thermostat. It achievesmaximum temperature afterapproximately three hours of operation.Using the heater longer than three hoursdoes not improve system performance andunnecessarily uses electricity.
106
2024 F-650/750 (TBC) , enUSA, Edition date: 202210, First-PrintingStarting and Stopping the Engine
Page 117 of 386
WARNING: Wait at least fiveseconds before removing the fuel pumpnozzle to allow any residual fuel to draininto the fuel tank.
WARNING: Stop refueling after thefuel pump nozzle automatically shutsoff for the second time. Failure to followthis will fill the expansion space in thefuel tank and could lead to fueloverflowing.
WARNING: Do not remove the fuelpump nozzle from its fully insertedposition when refueling.
An engine that suddenly becomes noisy oroperates poorly after a fuel fill could beusing substandard fuel. We recommendthat you purchase diesel fuel from areputable fuel station.
Use only clean, approved containers thatprevent the entry of dirt or water wheneveryou store diesel fuel.
Do not store diesel fuel in a galvanizedcontainer. The fuel dissolves the zinc in thegalvanized container. The zinc will thenremain in the fuel. If you run thecontaminated fuel through the engine, thezinc damages the fuel injectors. Enginedamage caused may not be covered bythe vehicle warranty.
Use the following guidelines to avoidelectrostatic charge build-up when fillingan ungrounded fuel container:
•Place the approved fuel container onthe ground.
•Do not fill a fuel container while it is inthe vehicle (including the cargo area).
•Keep the fuel pump nozzle in contactwith the fuel container when filling.
•Do not use a device that would holdthe fuel pump handle in the fill position.
Fuel Filler Cap
WARNING: The fuel system maybe under pressure. If you hear a hissingsound near the fuel filler inlet, do notrefuel until the sound stops. Otherwise,fuel may spray out, which could causeserious personal injury.
Note:If you do not use the correct fuel fillercap, excessive pressure or vacuum in thefuel tank may damage the fuel system orcause the fuel cap to disengage in a crash.
The fuel tank has a threaded fuel filler cap.
Note:If you must replace the fuel filler cap,replace it with a fuel filler cap that isdesigned for your vehicle. The vehiclewarranty may be void for any damage to thefuel tank or fuel system if the correctgenuine Ford, Motorcraft or other certifiedfuel filler cap is not used.
When refueling the vehicle fuel tank do thefollowing:
1.Bring your vehicle to a complete stopand shift into neutral (N) or park (P).
2.Apply the parking brake and switch theignition off.
3.Turn the fuel filler capcounterclockwise and remove it.
4.Refuel your vehicle as required.
5.Replace the fuel filler cap, turn itclockwise until you feel a strongresistance.
Fuel Fill Rate
Your vehicle has a fuel fill inlet that is ableto accept fuel up to 20 gal (75 L) perminute from a fuel-dispensing nozzle.Pumping fuel at greater flow rates mayresult in premature nozzle shut off or spitback.
113
2024 F-650/750 (TBC) , enUSA, Edition date: 202210, First-PrintingFuel and Refueling
Page 119 of 386

1.When your vehicle has stopped, shiftinto neutral (N) or park (P).
2.Apply the parking brake and switch theignition off.
3.Turn the fuel filler capcounterclockwise and remove it.
4.Refuel your vehicle as required.
5.Replace the fuel filler cap, turn itclockwise until you feel a strongresistance.
If the fuel cap warning lamp or a warningmessage appears in the instrument cluster,you may not have installed the fuel fillercap correctly.
If the fuel cap warning lamp remains on,at the next opportunity, safely pull off ofthe road, remove the fuel filler cap, alignthe cap properly and reinstall it. The checkfuel cap warning lamp or warning messagemay not reset immediately. It may takeseveral driving cycles for the indicators toturn off. A driving cycle consists of anengine start-up (after four or more hourswith the engine off) followed by normalcity and highway driving.
FUEL CONSUMPTION
The advertised capacity is the maximumamount of fuel that you can add to the fueltank after running out of fuel. Included inthe advertised capacity is an emptyreserve. The empty reserve is anunspecified amount of fuel that remainsin the fuel tank when the fuel gaugeindicates empty.
Note:The amount of fuel in the emptyreserve varies and should not be relied uponto increase driving range.
Filling the Fuel Tank
For consistent results when refueling:
•Turn the ignition off before fueling; aninaccurate reading results if the engineis left running.
•Use the same fill rate(low-medium-high) each time the tankis filled.
•Allow no more than one automaticshut-off when refueling.
Results are most accurate when the fillingmethod is consistent.
Calculating Fuel Economy
Do not measure fuel economy during thefirst 1,000 mi (1,600 km) of driving (this isyour engine’s break-in period). A moreaccurate measurement is obtained after2,000 mi (3,200 km) to 3,000 mi(4,800 km). Also, fuel expense, frequencyof fill ups or fuel gauge readings are notaccurate ways to measure fuel economy.
1.Fill the fuel tank completely and recordthe initial odometer reading.
2.Each time you fill the fuel tank, recordthe amount of fuel added.
3.After at least three fill ups, fill the fueltank and record the current odometerreading.
4.Subtract your initial odometer readingfrom the current odometer reading.
To calculate L/100 km (liters per 100kilometers) fuel consumption, multiply theliters used by 100, then divide by kilometerstraveled. To calculate MPG (miles pergallon) fuel consumption, divide milestraveled by gallons used.
115
2024 F-650/750 (TBC) , enUSA, Edition date: 202210, First-PrintingFuel and Refueling
Page 134 of 386

AUTOMATIC TRANSMISSION
WARNING: Apply the parkingbrake, shift into park (P), switch theignition off and remove the key beforeyou leave your vehicle. Failure to followthis instruction could result in personalinjury or death.
WARNING: Do not apply the brakepedal and accelerator pedalsimultaneously. Applying both pedalssimultaneously for more than a fewseconds limits vehicle performance,which may result in difficulty maintainingspeed in traffic and could lead to seriousinjury.
Understanding the Shift Positionsof Your Automatic Transmission
6-Speed Transmissions
10-Speed Transmissions
Putting your vehicle in or out of gear:
1.Fully press the brake pedal.
2.Move the gearshift lever into thepreferred gear.
3.When you finish driving, come to acomplete stop.
4.Move the gearshift lever and securelylatch it in park (P) or neutral (N).
The instrument cluster displays the currentgear.
Park (P)
If your transmission has a park (P) position,this position locks the transmission andprevents the rear wheels from turning.
Reverse (R)
With the gearshift lever in reverse (R), yourvehicle moves backward. Always come toa complete stop before shifting into andout of reverse (R).
Neutral (N)
With the gearshift lever in neutral (N), youcan start your vehicle and it is free to roll.Hold the brake pedal down when in thisposition.
Drive (D)
Drive (D) is the normal driving position forthe best fuel economy. The overdrivefunction allows automatic upshifts anddownshifts through gears one through six.
Manual (M)
With the gearshift lever in manual (M), thedriver can change gears up or down aspreferred. By moving the gearshift leverfrom drive (D) to manual (M), you nowhave control of selecting the gear youprefer using the buttons on the shift lever.See Understanding Your SelectShiftAutomatic™ Transmission later in thissection.
130
2024 F-650/750 (TBC) , enUSA, Edition date: 202210, First-PrintingTransmissionE163183 E308145
Page 136 of 386
Understanding Your SelectShift™Automatic Transmission
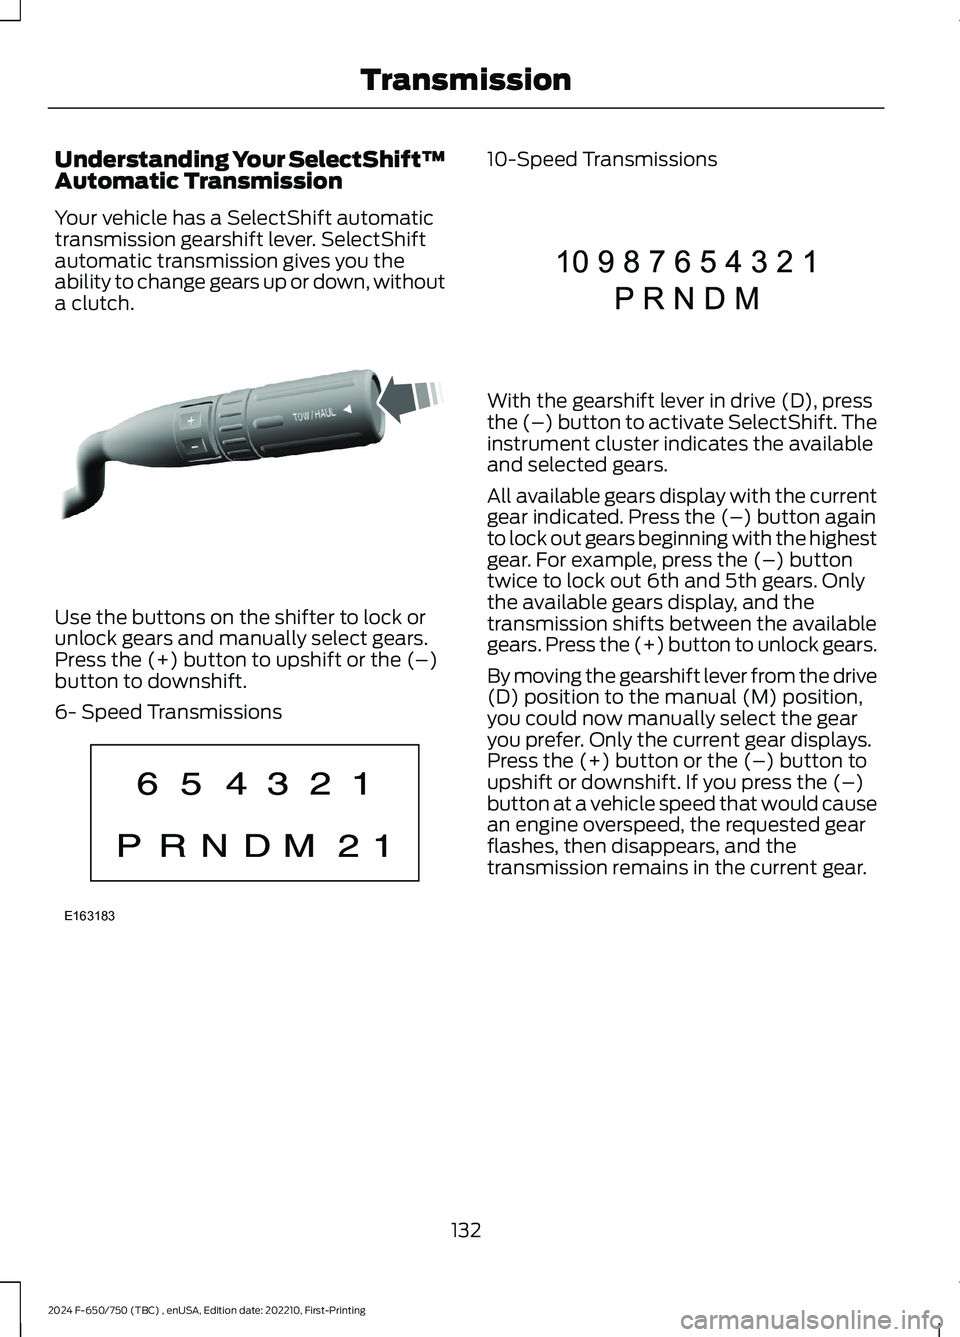
Your vehicle has a SelectShift automatictransmission gearshift lever. SelectShiftautomatic transmission gives you theability to change gears up or down, withouta clutch.
Use the buttons on the shifter to lock orunlock gears and manually select gears.Press the (+) button to upshift or the (–)button to downshift.
6- Speed Transmissions
10-Speed Transmissions
With the gearshift lever in drive (D), pressthe (–) button to activate SelectShift. Theinstrument cluster indicates the availableand selected gears.
All available gears display with the currentgear indicated. Press the (–) button againto lock out gears beginning with the highestgear. For example, press the (–) buttontwice to lock out 6th and 5th gears. Onlythe available gears display, and thetransmission shifts between the availablegears. Press the (+) button to unlock gears.
By moving the gearshift lever from the drive(D) position to the manual (M) position,you could now manually select the gearyou prefer. Only the current gear displays.Press the (+) button or the (–) button toupshift or downshift. If you press the (–)button at a vehicle speed that would causean engine overspeed, the requested gearflashes, then disappears, and thetransmission remains in the current gear.
132
2024 F-650/750 (TBC) , enUSA, Edition date: 202210, First-PrintingTransmissionE318028 E163183 E308145
Page 137 of 386
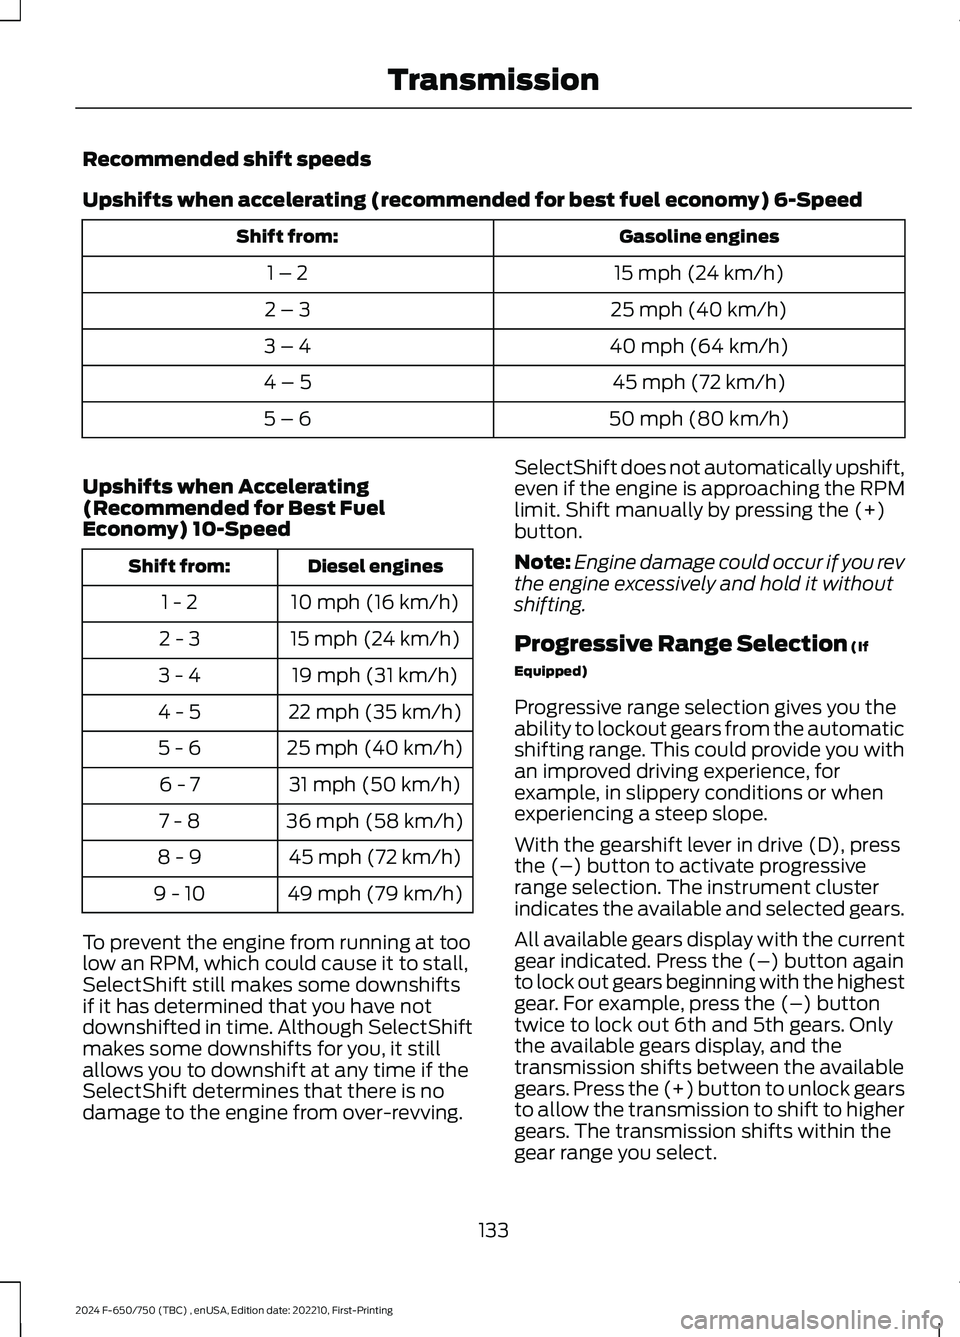
Recommended shift speeds
Upshifts when accelerating (recommended for best fuel economy) 6-Speed
Gasoline enginesShift from:
15 mph (24 km/h)1 – 2
25 mph (40 km/h)2 – 3
40 mph (64 km/h)3 – 4
45 mph (72 km/h)4 – 5
50 mph (80 km/h)5 – 6
Upshifts when Accelerating(Recommended for Best FuelEconomy) 10-Speed
Diesel enginesShift from:
10 mph (16 km/h)1 - 2
15 mph (24 km/h)2 - 3
19 mph (31 km/h)3 - 4
22 mph (35 km/h)4 - 5
25 mph (40 km/h)5 - 6
31 mph (50 km/h)6 - 7
36 mph (58 km/h)7 - 8
45 mph (72 km/h)8 - 9
49 mph (79 km/h)9 - 10
To prevent the engine from running at toolow an RPM, which could cause it to stall,SelectShift still makes some downshiftsif it has determined that you have notdownshifted in time. Although SelectShiftmakes some downshifts for you, it stillallows you to downshift at any time if theSelectShift determines that there is nodamage to the engine from over-revving.
SelectShift does not automatically upshift,even if the engine is approaching the RPMlimit. Shift manually by pressing the (+)button.
Note:Engine damage could occur if you revthe engine excessively and hold it withoutshifting.
Progressive Range Selection (If
Equipped)
Progressive range selection gives you theability to lockout gears from the automaticshifting range. This could provide you withan improved driving experience, forexample, in slippery conditions or whenexperiencing a steep slope.
With the gearshift lever in drive (D), pressthe (–) button to activate progressiverange selection. The instrument clusterindicates the available and selected gears.
All available gears display with the currentgear indicated. Press the (–) button againto lock out gears beginning with the highestgear. For example, press the (–) buttontwice to lock out 6th and 5th gears. Onlythe available gears display, and thetransmission shifts between the availablegears. Press the (+) button to unlock gearsto allow the transmission to shift to highergears. The transmission shifts within thegear range you select.
133
2024 F-650/750 (TBC) , enUSA, Edition date: 202210, First-PrintingTransmission
Page 138 of 386

Automatic Transmission AdaptiveLearning
This feature could increase durability andprovide consistent shift feel over the lifeof your vehicle. A new vehicle ortransmission may have firm shifts, softshifts, or both. This is normal and does notaffect the function or durability of thetransmission. Over time, the adaptivelearning process fully updates transmissionoperation.
Brake-Shift Interlock
WARNING: Do not drive yourvehicle until you verify that thestoplamps are working.
WARNING: When doing thisprocedure, you need to take thetransmission out of park (P) whichmeans your vehicle can roll freely. Toavoid unwanted vehicle movement,apply the parking brake prior to doingthis procedure. Use wheel chocks ifappropriate.
WARNING: If the parking brake isfully released, but the brake warninglamp remains illuminated, the brakesmay not be working properly. Have yourvehicle checked as soon as possible.
Your vehicle has a brake-shift interlockfeature that prevents the gearshift leverfrom moving from park (P) when youswitch the ignition on but have not pressedthe brake pedal.
If you cannot move the gearshift lever outof the park (P) position with the ignition inthe on position and the brake pedalpressed, a malfunction could haveoccurred. It is possible that a fuse hasblown, or your vehicle’s brake lamps arenot operating properly. See FuseSpecification Chart (page 202).
If you do not have a blown fuse and thebrake lamps are working properly, thefollowing procedure allows you to movethe gearshift lever from park (P):
1.Apply the parking brake. Switch theignition key to off, then remove the key.
2.Move the steering column to the fulldown and full rearward position,toward the driver seat.
3.Remove the gearshift lever boot.
4.Place your fingers into the hole whereyou removed the gearshift lever bootand pull the top half of the shroud upand forward to separate it from thelower half of the shroud. There is ahinge at the forward edge of the top ofthe shroud. Roll the top half of theshroud upward on the hinge point, thenpull straight rearward toward the driverseat to remove.
5.Remove the top half of the shroud.
6.Remove the three fasteners under thecolumn that secure the lower shroudhalf to the column.
7.Pull the lock lever into the full unlockedposition and remove the lower shroudcover by pulling the lever handlethrough the slot in the cover.
8.Apply the brake. Gently lift the overridedisk and move the gearshift lever intoneutral (N).
134
2024 F-650/750 (TBC) , enUSA, Edition date: 202210, First-PrintingTransmissionE163185