Page 97 of 492

Cadillac Escalade Owner Manual (GMNA-Localizing-U.S./Canada/Mexico-
13690472) - 2021 - CRC - 8/10/21
96 SEATS AND RESTRAINTS
6. To tighten the belt, push down onthe child restraint, pull the
shoulder portion of the belt to
tighten the lap portion of the belt,
and feed the shoulder belt back
into the retractor. When installing
a forward-facing child restraint, it
may be helpful to use your knee to
push down on the child restraint as
you tighten the belt.
Try to pull the belt out of the
retractor to make sure the retractor
is locked. If the retractor is not
locked, repeat Steps 5 and 6.
7. Before placing a child in the child restraint, make sure it is securely
held in place. To check, grasp the child restraint at the seat belt path
and attempt to move it side to side
and back and forth. When the child
restraint is properly installed, there
should be no more than
2.5 cm (1 in) of movement.
If the airbag is off, the OFF indicator
in the passenger airbag status
indicator will come on and stay on
when the vehicle is started.
If a child restraint has been installed
and the ON indicator is lit, see “If the
On Indicator Is Lit for a Child
Restraint ”under Passenger Sensing
System 071.
To remove the child restraint,
unbuckle the vehicle seat belt and let
it return to the stowed position.
Page 98 of 492

Cadillac Escalade Owner Manual (GMNA-Localizing-U.S./Canada/Mexico-
13690472) - 2021 - CRC - 8/10/21
STORAGE 97
Storage
Storage Compartments
Storage Compartments . . . . . . . . . . . . 97
Glove Box . . . . . . . . . . . . . . . . . . . . . . . . . . 97
Cupholders . . . . . . . . . . . . . . . . . . . . . . . . . 97
Armrest Storage . . . . . . . . . . . . . . . . . . . 98
Rear Storage . . . . . . . . . . . . . . . . . . . . . . . 98
Center Console Storage . . . . . . . . . . . . 99
Additional Storage Features
Cargo Tie-Downs . . . . . . . . . . . . . . . . . 100
Convenience Net . . . . . . . . . . . . . . . . . 101
Roof Rack System
Roof Rack System . . . . . . . . . . . . . . . . 101
Storage Compartments{
Warning
Do not store heavy or sharp objects
in storage compartments. In a
crash, these objects may cause the
cover to open and could result in
injury.
Glove Box
To open, pull the handle to the left.
To close, push the glove box up until
it latches. Use the vehicle key to lock
or unlock.
Cupholders
To access the cupholders, press the
cover and release.
There is storage in front of the
cupholders.
Page 99 of 492
Cadillac Escalade Owner Manual (GMNA-Localizing-U.S./Canada/Mexico-
13690472) - 2021 - CRC - 8/10/21
98 STORAGE
Rear Cupholders
If equipped with cupholders in the
back center console, press the cover
and release to access. There may be
two USB ports, two HDMI ports, and a
power outlet on the back of the center
console.
If equipped, the second row seat
armrest may have cupholders. Pull the
armrest down to access the
cupholders.
Armrest Storage
For vehicles with a rear seat armrest,
pull the loop at the top of the armrest
down to access the cupholders.
Rear Storage
There is storage in the floor of the
rear cargo area. Lift the handle to
access.
Page 100 of 492

Cadillac Escalade Owner Manual (GMNA-Localizing-U.S./Canada/Mexico-
13690472) - 2021 - CRC - 8/10/21
STORAGE 99
Center Console Storage
Press the button and lift to open.
There is an auxiliary jack, USB ports,
an accessory power outlet, a tote
compartment, and a device holder
inside.
On the rear of the console there are
auxiliary jacks, a power outlet, and a
storage area.
SeePower Outlets 0108 and the
infotainment section. Center Console Refrigerator/FreezerIf equipped with a center console
refrigerator/freezer, lift the armrest to
access. A light will turn on when the
armrest is up.
The refrigerator/freezer mode can only
be used while the engine is running.
If the vehicle is turned off and turned
back on again, the last operating
mode will be resumed.
{Warning
Do not store glass and aluminum
containers inside the bin when in
freezer mode. Glass and aluminum
(Continued)
Warning (Continued)
containers can break when their
contents are frozen. Use caution
removing broken containers to
avoid personal injury.
{Warning
Do not touch bin surfaces with wet
or damp hands while the freezer is
on. Skin could stick to the bin
surface.
Caution
Do not put any objects between the
front seats and the center console
side walls. The air path could be
blocked and cause the unit to stop
working.
To use in refrigerator mode, press the
button once. One light on the button
will be lit. The operating temperature
is 5°C (41°F).
Page 101 of 492

Cadillac Escalade Owner Manual (GMNA-Localizing-U.S./Canada/Mexico-
13690472) - 2021 - CRC - 8/10/21
100 STORAGE
To use in freezer mode, press the
button twice. Two lights on the button
will be lit. The operating temperature
is -5°C (23°F).
To turn off the refrigerator or freezer,
press the button until its lights are off.
The bin light can turn on when the
refrigerator/freezer is off.
The bottom mat is removable. Clean
with water and mild soap.
Clean the refrigerator/freezer bin while
the vehicle and the feature are turned
off. Use a damp, soft rag and wipe the
bin carefully. Do not scratch or
puncture the bin surfaces.Rear Console Storage
If equipped with storage in the back
center console, press the cover and
release to access. There may be two
USB ports, two HDMI ports, and a
power outlet on the back of the center
console.
Additional Storage
Features
Cargo Tie-Downs
There are two cargo tie-downs in the
rear cargo area. These can be used to
strap cargo down and keep it from
moving inside the vehicle.
Page 102 of 492

Cadillac Escalade Owner Manual (GMNA-Localizing-U.S./Canada/Mexico-
13690472) - 2021 - CRC - 8/10/21
STORAGE 101
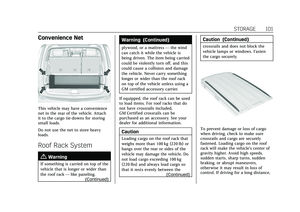
Convenience Net
This vehicle may have a convenience
net in the rear of the vehicle. Attach
it to the cargo tie-downs for storing
small loads.
Do not use the net to store heavy
loads.
Roof Rack System{
Warning
If something is carried on top of the
vehicle that is longer or wider than
the roof rack —like paneling,
(Continued)
Warning (Continued)
plywood, or a mattress —the wind
can catch it while the vehicle is
being driven. The item being carried
could be violently torn off, and this
could cause a collision and damage
the vehicle. Never carry something
longer or wider than the roof rack
on top of the vehicle unless using a
GM certified accessory carrier.
If equipped, the roof rack can be used
to load items. For roof racks that do
not have crossrails included,
GM Certified crossrails can be
purchased as an accessory. See your
dealer for additional information.
Caution
Loading cargo on the roof rack that
weighs more than 100 kg (220 lb) or
hangs over the rear or sides of the
vehicle may damage the vehicle. Do
not load cargo exceeding 100 kg
(220 lbs) and always load cargo so
that it rests evenly between the (Continued)
Caution (Continued)
crossrails and does not block the
vehicle lamps or windows. Fasten
the cargo securely.
To prevent damage or loss of cargo
when driving, check to make sure
crossrails and cargo are securely
fastened. Loading cargo on the roof
rack will make the vehicle’s center of
gravity higher. Avoid high speeds,
sudden starts, sharp turns, sudden
braking, or abrupt maneuvers,
otherwise it may result in loss of
control. If driving for a long distance,
Page 103 of 492
Cadillac Escalade Owner Manual (GMNA-Localizing-U.S./Canada/Mexico-
13690472) - 2021 - CRC - 8/10/21
102 STORAGE
on rough roads, or at high speeds,
occasionally stop the vehicle to make
sure the cargo remains in its place.
Do not exceed the maximum vehicle
capacity when loading the vehicle. For
more information on vehicle capacity
and loading, seeVehicle Load Limits
0 240.
Page 104 of 492

Cadillac Escalade Owner Manual (GMNA-Localizing-U.S./Canada/Mexico-
13690472) - 2021 - CRC - 8/10/21
INSTRUMENTS AND CONTROLS 103
Instruments and
Controls
Controls
Steering Wheel Adjustment . . . . . 104
Steering Wheel Controls . . . . . . . . . 104
Heated Steering Wheel . . . . . . . . . . 104
Horn . . . . . . . . . . . . . . . . . . . . . . . . . . . . . . . 104
Windshield Wiper/Washer . . . . . . . 105
Rear Window Wiper/Washer . . . . 107
Compass . . . . . . . . . . . . . . . . . . . . . . . . . . 108
Clock . . . . . . . . . . . . . . . . . . . . . . . . . . . . . . 108
Power Outlets . . . . . . . . . . . . . . . . . . . . . 108
Wireless Charging . . . . . . . . . . . . . . . . 111
Warning Lights, Gauges, and
Indicators
Warning Lights, Gauges, andIndicators . . . . . . . . . . . . . . . . . . . . . . . 113
Instrument Cluster . . . . . . . . . . . . . . . 114
Speedometer . . . . . . . . . . . . . . . . . . . . . . 115
Odometer . . . . . . . . . . . . . . . . . . . . . . . . . 116
Trip Odometer . . . . . . . . . . . . . . . . . . . . 116
Tachometer . . . . . . . . . . . . . . . . . . . . . . . 116
Fuel Gauge . . . . . . . . . . . . . . . . . . . . . . . . 116
Engine Oil Pressure Gauge . . . . . . . 116
Engine Coolant Temperature Gauge . . . . . . . . . . . . . . . . . . . . . . . . . . . . 117 Transmission Temperature
Gauge . . . . . . . . . . . . . . . . . . . . . . . . . . . . 118
Voltmeter Gauge . . . . . . . . . . . . . . . . . 119
Seat Belt Reminders . . . . . . . . . . . . . . 119
Airbag Readiness Light . . . . . . . . . . 120
Passenger Airbag Status Indicator . . . . . . . . . . . . . . . . . . . . . . . . . 121
Charging System Light . . . . . . . . . . . 122
Malfunction Indicator Lamp (Check Engine Light) . . . . . . . . . . . 122
Brake System Warning Light . . . . 124
Electric Parking Brake Light . . . . . 124
Service Electric Parking Brake Light . . . . . . . . . . . . . . . . . . . . . . . . . . . . . 125
Antilock Brake System (ABS) Warning Light . . . . . . . . . . . . . . . . . . 125
Automatic Vehicle Hold (AVH) Light . . . . . . . . . . . . . . . . . . . . . . . . . . . . . 125
Lane Keep Assist (LKA) Light . . . 125
Automatic Emergency Braking (AEB) Disabled Light . . . . . . . . . . . 126
Vehicle Ahead Indicator . . . . . . . . . 126
Pedestrian Ahead Indicator . . . . . . 126
Traction Off Light . . . . . . . . . . . . . . . . 127
StabiliTrak OFF Light . . . . . . . . . . . . 127
Traction Control System (TCS)/ StabiliTrak Light . . . . . . . . . . . . . . . . 127
Engine Coolant Temperature Warning Light . . . . . . . . . . . . . . . . . . 128
Driver Mode Control Light . . . . . . . 128 Four Corner Air Suspension
Light . . . . . . . . . . . . . . . . . . . . . . . . . . . . . 128
Tire Pressure Light . . . . . . . . . . . . . . . 129
Engine Oil Pressure Light . . . . . . . . 130
Low Fuel Warning Light . . . . . . . . . 130
Security Light . . . . . . . . . . . . . . . . . . . . . 130
High-Beam On Light . . . . . . . . . . . . . 130
Lamps On Reminder . . . . . . . . . . . . . 131
Cruise Control Light . . . . . . . . . . . . . . 131
Door Ajar Light . . . . . . . . . . . . . . . . . . . 132
Information Displays
Driver Information Center (DIC) . . . . . . . . . . . . . . . . . . . . . 132
Vehicle Information . . . . . . . . . . . . . . 134
Head-Up Display (HUD) . . . . . . . . . 135
Vehicle Messages
Vehicle Messages . . . . . . . . . . . . . . . . . 138
Engine Power Messages . . . . . . . . . . 138
Vehicle Speed Messages . . . . . . . . . 138
Vehicle Personalization
Vehicle Personalization . . . . . . . . . . 138
Universal Remote System
Universal Remote System . . . . . . . . 145
Universal Remote System Programming . . . . . . . . . . . . . . . . . . . 146
Universal Remote System Operation . . . . . . . . . . . . . . . . . . . . . . . . 148