Page 137 of 280

Depending on the mobile device being used and
the mobile network contract, yo")
8S1012721BE
Telephone
Messages
Text messages
Applies to: cell phones with Bluetooth Message Access Profile
(MAP)
Depending on the mobile device being used and
the mobile network contract, you may be able to
receive and send text messages using the MMI.
Requirement: your mobile device must be con-
nected to the MMI via Bluetooth Message Access
Profile (Bluetooth MAP) > page 128.
> Select: [MENU] button > Telephone > left con-
trol button > text message (myPhone)/text
message (secondary phone)*.
Inbox
Displays all received text messages.
Sent
Displays all sent text messages.
Outbox
Displays all text messages to be sent.
Drafts
Displays all text messages that have not yet been
sent and stored text messages.
Deleted
Displays all deleted text messages.
Write text message
Applies to: cell phones with Bluetooth Message Access Profile
(MAP)
> Select: [MENU] button > Telephone > left con-
trol button > text message (myPhone)/text
message (secondary phone)*.
Write new text message
Select and confirm the desired template from the
list. Enter a recipient. Select and confirm Send.
Reply*
Select and confirm the desired template from the
list. Select and confirm Send.
1) Not available in all languages.
Message options
Applies to: cell phones with Bluetooth Message Access Profile
(MAP)
> Select: [MENU] button > Telephone > left con-
trol button > text message (MyPhone)/text
message (secondary phone)* > Inbox/Sent/
Outbox > right control button.
The following options may be available depend-
ing on the selected menu.
Reply*
A reply can be sent for the selected message in
the Inbox.
Forward
The selected text message can be forwarded to a
different recipient.
Send again*
The selected text message can be resent.
Delete this text message*
The selected text message can be deleted.
Read out!)
You can have the MMI read an open text mes-
sage.
Text messaging settings*
To display when a new text message is received,
enable the Text message notifications. New text
messages are indicated with an envelope Min
the Infotainment system display status line.
Connection manager
See > page 190.
Bluetooth settings
See > page 192.
Online settings*
See > page 192.
Wi-Fi settings*
See > page 146.
135
Page 138 of 280
 Tips
Messages that are deleted in the MMI are also
deleted in the mobile device automatically.
Applies to: cell phones with Bluetooth Message A")
Telephone
Telephone settings
See > page 139.
@) Tips
Messages that are deleted in the MMI are also
deleted in the mobile device automatically.
Applies to: cell phones with Bluetooth Message Access Profile
(MAP)
Depending on the type of mobile device being
used, you may be able to receive and send e-
mails through the MMI.
Requirement: your mobile device must be con-
nected to the MMI via Bluetooth Message Access
Profile (Bluetooth MAP) > page 128.
> Select: [MENU] button > Telephone > left con-
trol button > e-mail (myPhone)/e-mail (secon-
dary phone)*.
Write new e-mail
— Using a template: select and confirm the de-
sired template from the list.
— Enter one or more recipients.
— Select and confirm Send.
Inbox
All received e-mails are displayed.
Sent
All sent e-mails are displayed.
Outbox
All e-mails that will be sent are displayed.
Drafts
All saved e-mails that have not been sent yet are
displayed.
©) Note
Read the information about Audi connect, and
be sure to note the connectivity costs section
=> page 1417.
136
G) Tips
To ensure that your sent e-mails are received,
connect your cell phone to the Wi-Fi hotspot*
in the vehicle so that the e-mail app on your
cell phone continues to have Internet access.
If you are still not receiving e-mails even
though you have a successful connection,
then contact your e-mail service provider or
your cell phone service provider.
Message options
Applies to: cell phones with Bluetooth Message Access Profile
(MAP)
> Select: [MENU] button > Telephone > left con-
trol button > e-mail (myPhone)/e-mail (secon-
dary phone)* > Inbox/Sent/Outbox > right con-
trol button.
The following options may be available depend-
ing on the selected menu.
Store as template
Ten e-mail templates are stored in the MMI. You
can save up to 10 additional templates of your
own.
— Create an e-mail.
— Select and confirm Store as template.
Resume last edited e-mail
The last e-mail in progress can be resumed.
Reply*
A reply can be sent for the selected e-mail in the
Inbox.
Reply all*
A reply can be sent for the selected e-mail in the
Inbox and it will be sent to all of the entered re-
cipients.
Forward
The selected e-mail can be forwarded to a differ-
ent recipient.
Page 139 of 280

You can have the MMI read an open e-mail.
E-mail settings*
To display when a new e-mail is received,")
8S1012721BE
Telephone
Delete this message*
The selected e-mail can be deleted.
Read out!)
You can have the MMI read an open e-mail.
E-mail settings*
To display when a new e-mail is received, activate
the E-mail notifications. New e-mails are indicat-
ed with an envelope & in the Infotainment sys-
tem display status line.
Connection manager
See > page 190.
Bluetooth settings
See > page 192.
Online settings*
See > page 192.
Wi-Fi settings*
See > page 146.
Telephone settings
See > page 139.
@) Tips
Messages that are deleted in the MMI are also
automatically deleted in the connected cell
phone.
Listening to voicemail
Applies to: vehicles with telephone
> Select: [MENU] button > Telephone > left con-
trol button. Select and confirm Call list/Direc-
tory/Favorites > Voicemail.
Requirement: there must be no voicemail num-
ber stored.
> Entering the voicemail number: enter the de-
sired number. Select and confirm OK.
Requirement: a voicemail number must be stor-
ed.
1) Not available in all languages.
> Dialing the voicemail number: select and con-
firm Voicemail.
@) Tips
This service must be set up and activated in
advance by the cell phone service provider.
Directory
Coy oYTal rem an Meleacelaly
Applies to: vehicles with telephone
After connecting the cell phone, the contacts in it
are automatically imported into the MMI.
Requirement: you must have at least one contact
stored in your cell phone.
> Select: [MENU] button > Telephone > left con-
trol button > Directory.
> Calling a contact: select and confirm a contact
from the directory. The phone numbers for your
selected contact are displayed. Select and con-
firm a phone number to start a call.
> Free text search for a contact: see > page 138.
The contacts will be displayed. You can change
the sort order > page 139, Sort order.
Gi) Tips
— Check for a possible request to synchronize
on your cell phone. Requests to synchronize
the directory must be confirmed so that
your cell phone contacts can be loaded into
the MMI.
—The directory from the cell phone with the
active connection will always be displayed.
— The contacts from the mobile device may
not be transferred in alphabetical order. If
there are too many entries, contacts with
different first letters may be missing in the
MMI.
—The contacts in the local MMI memory are
always visible and can be accessed by other
users.
137
Page 140 of 280
![AUDI TT 2021 Owner´s Manual Telephone
Free text search for contacts
Applies to: vehicles with telephone
> Select: [MENU] button > Telephone > left con-
trol button > Directory.
> To limit the search, enter the in](/manual-img/6/40287/w960_40287-139.png "AUDI TT 2021 Owner´s Manual Telephone
Free text search for contacts
Applies to: vehicles with telephone
> Select: [MENU] button > Telephone > left con-
trol button > Directory.
> To limit the search, enter the in")
Telephone
Free text search for contacts
Applies to: vehicles with telephone
> Select: [MENU] button > Telephone > left con-
trol button > Directory.
> To limit the search, enter the initials of the con-
tact being searched with each initial separated
by a space in the input field. Enter additional
letters if necessary.
> Select and confirm a contact from the directo-
ry. The phone numbers for your selected con-
tact are displayed.
> To make the call, select and confirm a phone
number.
@) Tips
— You can scroll through long lists quickly by
turning the control knob quickly. The scroll-
ing speed depends on the number of list en-
tries.
— Additional information on free text searches
can be found under = page 178.
Showing contact details*
Applies to: vehicles with telephone
You may be able to show contact details depend-
ing on the vehicle equipment:
> Select: [MENU] button > Telephone > left con-
trol button.
» Select and confirm Directory > a contact from
the directory.
> Select: right control button > Show contact de-
tails.
— Calling: select and confirm the desired tele-
phone number.
— Adding a destination*: to start navigation, se-
lect and confirm the desired address. Select
and confirm Start route guidance.
Press the right control button to open additional
options
for the contact details.
— Read out contact”): the MMI automatically cre-
ates a name tag that can be read aloud for each
entry in the directory.
1) Not available in all languages.
138
— Store as favorite: see > page 134.
— Send text message”: you can send a text mes-
sage to the selected contact > page 135.
— Delete contact: the selected contact can be de-
leted.
G) Tips
— Contacts edited in the MMI directory cannot
be automatically updated in the connected
cell phone. Audi recommends editing cell
phone contacts directly in the cell phone.
— Only the contacts in the local MMI memory
can be edited or deleted.
Importing and exporting contacts
Applies to: vehicles with telephone
Contacts in vCard format (.vcf) can be imported
into the directory or exported.
Requirement: an SD card must be in the SD card
reader > page 7170 or a USB storage device must
be connected to the Audi music interface*
=>page 175.
> Select: [MENU] button > Telephone > left con-
trol button > Directory.
> Select: right control button > Contact settings.
> Importing contacts from a storage device: se-
lect and confirm Import contacts > SD card
1/SD card 2 or USB device 1/USB device 2 >
desired contacts > Start import.
> Exporting contacts to a storage device: select
and confirm Export contacts > SD card 1/SD
card 2 or USB device 1/USB device 2 > desired
contacts > Start export.
> Selecting all contacts at once to import or ex-
port: select and confirm: Import contacts/Ex-
port contacts > SD card 1/SD card 2 or USB de-
vice 1/USB device 2 > All > Start import/Start
export.
(1) Note
Read the information about Audi connect, and
be sure to note the connectivity costs section
=> page 1417.
Page 141 of 280
 Tips
— For more information about the myAudi ac-
count, visit my.audi.com.
—The imported contacts are stored in the lo-
cal memory of the directory.
—A maximum")
8S1012721BE
Telephone
@) Tips
— For more information about the myAudi ac-
count, visit my.audi.com.
—The imported contacts are stored in the lo-
cal memory of the directory.
—A maximum of 1,000 contacts can be im-
ported. You can check the directory memory
capacity at any time > page 139.
— Contacts that were downloaded from a mo-
bile device cannot be exported.
— There should be no other files or folders on
the storage medium containing the contacts
to be imported.
Additional settings
Telephone settings
Applies to: vehicles with telephone
> Select: [MENU] button > Telephone > right con-
trol button > Telephone settings.
Call options*
Multi-party calling: can be switched on or off.
Ringtone and volume settings!)
Using the Mute telephone function, you can
switch the ringtone playback through the MMI
speaker on and off. You can play the ringtones us-
ing the Ringtone function. Select and confirm an
entry from the list. For the Ringtone volume/
Message volume settings, see > page 193. The
Microphone input level can be adjusted during a
phone call using the control knob.
@ Tips
— Several mobile devices can be paired with
the MMI, but only two* mobile devices can
be actively connected.
—To delete all paired Bluetooth devices, the
Bluetooth function can be reset to the fac-
tory default settings > page 190.
1) Depends on the connected cell phone.
Additional options
Applies to: vehicles with telephone
> Select: [MENU] button > Telephone > right con-
trol button.
— Connection manager: see > page 190.
— Bluetooth settings: see > page 192.
— Online settings*: see > page 192.
— Wi-Fi settings*: see > page 146.
Contact settings
Applies to: vehicles with telephone
> Select: [MENU] button > Telephone > left con-
trol button > Directory > right control button >
Contact settings.
Memory capacity
Shows the Memory capacity for the directory.
You can manage up to 17000 contacts with the
directory. You can load up to 4000 contacts from
your cell phone into each directory. You can also
import up to 1000 contacts from a storage de-
vice.
Sort order
You can sort the contacts in your directory alpha-
betically according to Last name or First name.
Import contacts/Export contacts
See > page 138.
Download directory
To update the contacts in the MMI, you can man-
ually download your mobile device contacts. De-
pending on the mobile device, you may need to
disconnect and reconnect the Bluetooth connec-
tion to update the contacts.
Hide contacts without phone number
When this function is switched on, grayed-out
contacts that have no phone numbers stored for
them will be hidden in the directory.
139
Page 142 of 280

Telephone
Safety belt microphone
Applies to: vehicles with safety belt microphone
z 8 8 | z| | |
Fig. 134 Driver's seat: safety belt microphone
The safety belt microphone is positioned in the
ideal
location to provide the best hands-free call
quality regardless of body size and seat position.
The safety belt microphone activates when you
buckle the safety belt. Make sure that the micro-
phone is on the side of the safety belt that is fac-
ing outward > fig. 134.
If you unbuckle the driver's safety belt, the sys-
tem switches from the safety belt microphone to
the roof microphone.
@ Tips
A dirty microphone opening can affect hands-
free call quality. If this happens, clean the
safety belt microphone using a brush.
Troubleshooting
Applies to: vehicles with telephone
Problem Solution
Pairing the mobile device to the
MMI failed.
Make sure the requirements for connecting a mobile phone have
been met > page 7128, or
make sure you did not accidentally decline the PIN for establishing
a connection on your mobile phone. If necessary, repeat the pair-
ing process > page 128.
After pairing, not all contacts or
no contacts have been loaded into
the MMI.
Avoid using special characters in names.
Avoid using contact groups on your mobile device.
Certain telephone functions are
grayed out or not available.
The telephone functions depend on the mobile device service pro-
vider and the mobile device you are using.
Some telephone functions may
be switched off or not available,
even though the mobile device is
supported.
Check if the Bluetooth settings on your cell phone are limited or
individual Bluetooth settings are deactivated. This may be the
case with business cell phones.
Applies to: vehicles with Audi
phone box: Wireless charging of
your mobile device is not working
or has been interrupted.
Applies to: vehicles with Audi phone box: Check if your mobile de-
vice is Qi-capable.
Check if your mobile device is centered on the phone symbol in the
Audi phone box and make sure there are no other objects in the
Audi phone box.
Do not place your remote control key in the Audi phone box with
your cell phone.
140
Page 143 of 280

8S1012721BE
Audi connect
Audi connect
General information
Applies to: vehicles with Audi connect
Depending on the country and the vehicle equip-
ment, the following functions may be available:
— Audi connect Infotainment
ZA WARNING
—To reduce the risk of an accident, only use
Audi connect services and the Wi-Fi hotspot
only if the traffic situation permits it. Read
and follow the guidelines provided in
=> page 110, Traffic safety information.
— It is only safe to use tablets, laptops, mobile
devices and other similar devices when the
vehicle is stationary because, like all loose
objects, they could be thrown around the in-
side of the vehicle in a crash and cause seri-
ous injuries. Store these types of devices se-
curely while driving. Also read the warnings
in the chapter > page 52.
@) Note
— Applies to: use of separate SIM card in the
SIM card reader or SIM card in the Wi-Fi de-
vice via personal hotspot: If you use your
own SIM card, all data connections for all
Audi connect Infotainment services will run
through your SIM card. This could result in
additional costs, depending on your cell
phone service provider and especially when
using in other countries. A flat rate data
plan is strongly recommended. You can ob-
tain more information from your cell phone
service provider.
— In certain situations, the Wi-Fi hotspot data
connection may be established as a replace-
ment for the SIM card on your Wi-Fi device.
This feature depends on the configuration
of your Wi-Fi device and operating system.
This could result in fees depending on your
cell phone service provider, especially if you
are using this feature while abroad. A flat
rate data plan is strongly recommended.
For more information, contact your cell
phone service provider or refer to the own-
er's manual for your Wi-Fi device.
— You are responsible for all precautions tak-
en for data protection, anti-virus protection,
and protection against loss of data on mo-
bile devices that are used, for example, to
access the Internet through the Wi-Fi hot-
spot.
— In areas with poor GPS reception or outside
the coverage range of the respective cell
phone service provider, some functions
and/or services may not be available, it may
not be possible to send or receive data, or
functionality may be limited.
@) Tips
— The availability of services depends on the
subscription.
— Audi merely provides access to third party
services through the MMI and does not as-
sume any responsibility for the content and
availability of these services.
— Use of the most up-to-date mobile network
standard is not available in every country.
Contact an authorized Audi dealer or au-
thorized Audi Service Facility or your cell
phone service provider for additional infor-
mation.
— Availability, scope, providers, screen dis-
play, and costs of services may vary depend-
ing on the country, model, model year, end
device and rates.
— All services can be modified, activated/deac-
tivated, renamed, and enhanced without
further notification.
Audi connect
Infotainment
Applies to: vehicles with Audi connect Infotainment
With Audi connect Infotainment services, online
information is transmitted directly to the vehicle.
An Internet connection is required to use Audi
connect Infotainment. Depending on the country
and the vehicle equipment, the following options
may be available:
141
>
Page 144 of 280
 Note
Always follow the inform")
Audi connect
— SIM card reader
— Personal Wi-Fi hotspot
ZA\ WARNING
Always follow the information found in > AV
in General information on page 1417.
©) Note
Always follow the information found in >@ in
General information on page 147.
SIM card reader
Applies to: vehicles with Audi connect Infotainment and a SIM
card reader
All data connections will be made through the
SIM card in the card reader, if a SIM card is insert-
ed >@) in General information on page 141.
Requirement: the vehicle must be stationary and
the ignition must be switched on. A data connec-
tion must be configured for Audi connect Info-
tainment services. Your personal SIM card must
be a mini SIM card >@) and have a data option.
Inserting a SIM card
The SIM card reader is located in the glove com-
partment.
> The angled corner of the SIM card must face to-
ward the left front side when being inserted.
> Slide the SIM card into the SIM card reader slot
until you feel the SIM card click into place.
> Select and confirm Enter PIN on the MMI. Enter
the PIN for your SIM card.
> Select and confirm OK.
> To connect to the Internet automatically in the
future, select and confirm Yes; see also
=> page 145.
After connecting successfully, the signal strength
@ and connection type @) will be displayed in
the MMI status bar > page 779, fig. 128.
Removing a SIM card
> Press on the SIM card briefly.
@) Note
— Always follow the information found in >®
in General information on page 141.
142
—To reduce the risk of damaging the SIM card
reader, only use mini SIM cards (25 mmx 15
mm). Contact your cell phone service pro-
vider for more information on mini SIM
cards.
— If a SIM card of a different size is inserted in
the SIM card reader, do not under any cir-
cumstances remove this card yourself due
to the risk of damaging the SIM card reader.
Contact an authorized Audi dealer or au-
thorized Audi Service Facility.
— There is a risk of damaging the SIM card
reader if you use a SIM card adapter, be-
cause vibrations can cause the SIM card to
fall out of the adapter while driving. Contact
an authorized Audi dealer or authorized
Audi Service Facility.
@) Tips
— Additional Internet connection settings can
be found under > page 7145.
— Do not remove the SIM card from the SIM
card reader when using the Audi connect In-
fotainment services.
Using personal Wi-Fi hotspot
Applies to: vehicles with Audi connect Infotainment and a per-
sonal Wi-Fi hotspot
Depending on the country and the vehicle equip-
ment, the MMI can use the established Internet
connection on your mobile device through a Wi-Fi
connection.
Requirement: the vehicle must be stationary and
the ignition must be switched on. Your mobile
device and your cell phone service provider must
support the personal Wi-Fi hotspot function. The
personal Wi-Fi hotspot must be activated on your
mobile device. Access by other devices must be
permitted on the personal hotspot. Your own SIM
card in the mobile device must have a data op-
tion. No SIM card is inserted in the SIM card read-
er.
Connecting the MMI with the personal
hotspot
> Select: [MENU] button > Telephone > right con-
trol button > Wi-Fi settings > Wi-Fi > On.
 1
1 2
2 3
3 4
4 5
5 6
6 7
7 8
8 9
9 10
10 11
11 12
12 13
13 14
14 15
15 16
16 17
17 18
18 19
19 20
20 21
21 22
22 23
23 24
24 25
25 26
26 27
27 28
28 29
29 30
30 31
31 32
32 33
33 34
34 35
35 36
36 37
37 38
38 39
39 40
40 41
41 42
42 43
43 44
44 45
45 46
46 47
47 48
48 49
49 50
50 51
51 52
52 53
53 54
54 55
55 56
56 57
57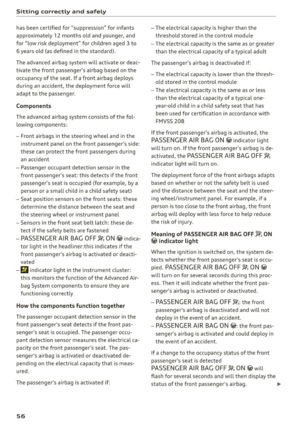 58
58 59
59 60
60 61
61 62
62 63
63 64
64 65
65 66
66 67
67 68
68 69
69 70
70 71
71 72
72 73
73 74
74 75
75 76
76 77
77 78
78 79
79 80
80 81
81 82
82 83
83 84
84 85
85 86
86 87
87 88
88 89
89 90
90 91
91 92
92 93
93 94
94 95
95 96
96 97
97 98
98 99
99 100
100 101
101 102
102 103
103 104
104 105
105 106
106 107
107 108
108 109
109 110
110 111
111 112
112 113
113 114
114 115
115 116
116 117
117 118
118 119
119 120
120 121
121 122
122 123
123 124
124 125
125 126
126 127
127 128
128 129
129 130
130 131
131 132
132 133
133 134
134 135
135 136
136 137
137 138
138 139
139 140
140 141
141 142
142 143
143 144
144 145
145 146
146 147
147 148
148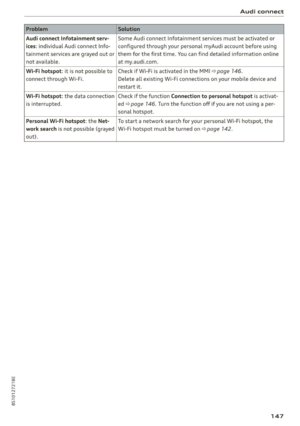 149
149 150
150 151
151 152
152 153
153 154
154 155
155 156
156 157
157 158
158 159
159 160
160 161
161 162
162 163
163 164
164 165
165 166
166 167
167 168
168 169
169 170
170 171
171 172
172 173
173 174
174 175
175 176
176 177
177 178
178 179
179 180
180 181
181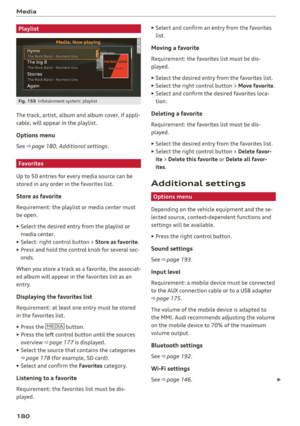 182
182 183
183 184
184 185
185 186
186 187
187 188
188 189
189 190
190 191
191 192
192 193
193 194
194 195
195 196
196 197
197 198
198 199
199 200
200 201
201 202
202 203
203 204
204 205
205 206
206 207
207 208
208 209
209 210
210 211
211 212
212 213
213 214
214 215
215 216
216 217
217 218
218 219
219 220
220 221
221 222
222 223
223 224
224 225
225 226
226 227
227 228
228 229
229 230
230 231
231 232
232 233
233 234
234 235
235 236
236 237
237 238
238 239
239 240
240 241
241 242
242 243
243 244
244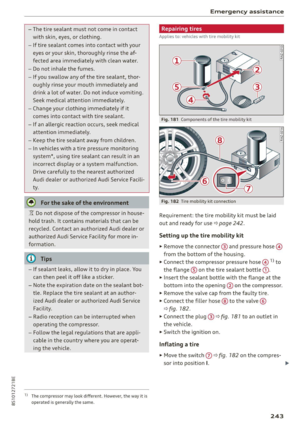 245
245 246
246 247
247 248
248 249
249 250
250 251
251 252
252 253
253 254
254 255
255 256
256 257
257 258
258 259
259 260
260 261
261 262
262 263
263 264
264 265
265 266
266 267
267 268
268 269
269 270
270 271
271 272
272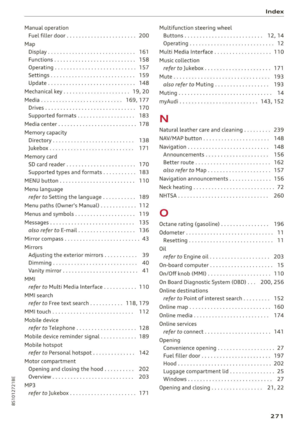 273
273 274
274 275
275 276
276 277
277 278
278 279
279