Page 169 of 280
![AUDI TT 2021 Owner´s Manual 8S1012721BE
Radio
Opening a menu
> Select: the [RADIO] button > left control button
> Presets.
Store as preset
Requirement: the presets list must be displayed.
> Select and confir](/manual-img/6/40287/w960_40287-168.png "AUDI TT 2021 Owner´s Manual 8S1012721BE
Radio
Opening a menu
> Select: the [RADIO] button > left control button
> Presets.
Store as preset
Requirement: the presets list must be displayed.
> Select and confir")
8S1012721BE
Radio
Opening a menu
> Select: the [RADIO] button > left control button
> Presets.
Store as preset
Requirement: the presets list must be displayed.
> Select and confirm a free preset space. Follow
the system instructions.
> Select and confirm a station from the list if nec-
essary.
Store as preset
Requirement: a station list must be displayed.
> Select: a station from the list > right control
button > Store as preset.
> Press and hold the control knob for several sec-
onds.
Listening to a preset
Requirement: the presets list must be displayed.
> Select and confirm a preset from the list.
Moving a preset
Requirement: the presets list must be displayed.
> Select a preset from the list > right control but-
ton > Move preset, or
> Press and hold the control knob for several sec-
onds.
> Select and confirm the location of the selected
preset.
Deleting a preset
Requirement: the presets list must be displayed.
> Select a preset from the list > right control but-
ton > Delete preset > Delete this preset or De-
lete all presets.
Additional settings
> Select: [RADIO] button > right control button >
Radio settings.
The following settings can be selected, depend-
ing on the band that is selected:
Station names (FM)
Variable: scrolling text transmitted by the FM
stations is shown in the Infotainment system dis-
play.
Fixed: scrolling text transmitted by the FM sta-
tions is not shown in the Infotainment system
display. Only the current section of the scrolling
text is displayed.
FM HD Radio/AM HD Radio*
You can switch HD Radio reception on or off.
Channel sorting (SiriusXM*)
You can set the channel sorting for SiriusXM sta-
tion lists* by:
— Channel number: the channels are sorted in as-
cending order according to their channel num-
ber.
— Channel name: the channels are listed in alpha-
betical order.
— First category, then channel number: the
channels are sorted by their category and then
by their channel numbers.
— First category, then channel name: the sta-
tions are sorted by their category and then by
their channel names.
Category filter (SiriusXM*)
The stations shown in the station list can be fil-
tered by your personal preferences and by pro-
gram type. The program categories that you can
select depend on what is offered by your provid-
er. Select the All categories option to deactivate
all filter options and display all available stations
in the satellite station list.
Show “Now Playing" screen
When the function is switched on ¥ and the sta-
tions or presets list is open, the display will
switch to the Show "Now Playing" screen view
after approximately five seconds > page 166. De-
pending on availability, information about the
set station (such as station name, artist and sta-
tion logo) may be displayed in this view.
167
>
Page 170 of 280

Radio
Preferred picture view
You can set your preferred screen view for the
Show "Now Playing" screen > page 766.
— Station logo: the station logo is displayed, de-
pending on availability.
— Cover art: the album cover or genre cover is dis-
played, depending on availability.
Gracenote online database*
Requirement: the MMI must be connected to the
Internet. The Cover art option must be selected
=> page 168, Preferred picture view.
Troubleshooting
When the function is switched on M, the album
cover or genre cover for the song that is playing
is loaded from the Gracenote online database,
depending on availability.
Subscription status (SiriusXM)*
This option is available when your subscription is
about to expire or has already expired. The expi-
ration date for your license is displayed.
Call to SiriusXM*: the contact information for
your satellite radio provider is displayed. To call
your satellite radio provider using the MMI, press
Call to SiriusXM”*.
Problem Solution
A station with poor reception is no longer
displayed in the station list once you
switch to a different station.
Store the station as a preset in advance. Access the pre-
sets using the presets list > page 166.
168
Page 171 of 280

8S1012721BE
Media
Media
Introduction
There are various media sources and connections
available in the MMI. For example, you can play
audio/video* files from the Jukebox* or connect
your mobile device to the Audi music interface*
and operate it through the MMI.
Notes
Media and format restrictions: the MMI (includ-
ing the SD card reader and the USB storage de-
vice connection*) was tested with a variety of
products and media available in the market.
However, there may be cases where individual de-
vices or media and audio/video” files may not be
recognized, may play only with restrictions or
may not play at all.
Digital Rights Management: please note that
the audio/video* files are subject to copyright
protection.
The media sources do not play files that are pro-
tected by DRM and are identified with the symbol
&.
Data security: never store important data on SD
cards, the Jukebox*, CDs/DVDs* or mobile devi-
ces. Audi is not responsible for damaged or lost
files and media.
Loading times: the more files/folders/playlists
that are on a storage medium, the longer it will
take to load the audio/video* files. Audi recom-
mends using storage media that only contain au-
dio/video files*. To decrease the time it takes to
load audio/video files*, create subfolders (for ex-
ample, for the artist or album). The loading time
will also increase when importing files.
Additional information: when playing, audio
files are automatically displayed with any addi-
tional information that is stored (such as the ar-
tist, track and album cover). If this information is
not available on the storage medium, the MMI
will check the Gracenote metadata database.
However, in some cases, the additional informa-
tion may not be displayed.
Restricted functionality: reset the Media set-
tings to the factory default settings if functional-
ity is restricted > page 190.
If functionality is restricted, reset the Jukebox* to
the factory default settings > page 190.
For information about the properties of support-
ed media and file formats, see > page 783.
CG) Note
Always follow the information found in S@ in
General information on page 141.
CD/DVD operation
Applies to: vehicles with a CD/DVD drive
CD/DVD and format restrictions: the functionali-
ty of individual storage media may be limited due
to the variety of blank CDs/DVDs available and
the various capacities. Audio CDs or video DVDs
with copy protection, CDs/DVDs that do not con-
form to the standard, and multisession CDs may
have limited playback or may not play at all. Audi
recommends finalizing the recording process
when creating multisession CDs. Multisession
DVDs are not supported.
Using CDs/DVDs, the CD drive or the DVD drive:
to ensure correct, high-quality playback and to
prevent damage to the drive or disc reading er-
rors, always store CDs/DVDs in a protective
sleeve and do not expose them to direct sunlight.
Do not use:
— Damaged, dirty or scratched CDs/DVDs
— Single CDs/DVDs with 3 inch (8 cm) diameter
— CD/DVDs that are not round
— CDs/DVDs with labels
— Protective rings
— Cleaning CDs
Thermal protection switch: CD/DVD playback
may be temporarily unavailable if outside tem-
peratures are extremely high or low. A thermal
protection switch is installed to protect the
CD/DVD and the laser.
169
Page 172 of 280
 6/VDE 0837. The optical readers that are in-
stalled conform to safety class 1. La")
Media
Laser devices: laser devices are divided into safe-
ty classes 1 to 4 in accordance with DIN IEC 76
(CO) 6/VDE 0837. The optical readers that are in-
stalled conform to safety class 1. Lasers in this
class are very weak and well-shielded, so there is
no danger if used correctly.
Media drives
SD card reader
2] |
Fe Ea < a
Fig. 149 Glove compartment: inserting the SD card
Inserting the SD card
Requirement: the vehicle must be stationary.
> The angled corner of the SD card must face to-
ward the right front side when being inserted.
Slide the SD card into the card reader slot @)
until the SD card clicks into place.
Automatic playback
Playback will start automatically if the inserted
SD card contains supported audio/video files*
=> page 183.
Removing the SD card
> Press briefly on the SD card.
The SD card reader is accessed and operated
through the MMI @) > page 177, fig. 154.
© Note
Only use one-piece SD cards. If adapter cards
(SD cards with more than one piece) are used,
the card could fall out of the adapter when
driving because of vibrations. Individual
pieces could then become stuck in the drive
and impair the functionality.
170
G) Tips
Always keep the SD card in a suitable case to
protect it from dirt, dust particles, and other
damage.
Applies to: vehicles with a DVD drive
ee
RAH-8828
Fig. 150 Glove compartment: DVD drive
Loading a CD/DVD
> The CD/DVD will be automatically pulled in.
Slide the CD/DVD straight into the DVD slot @)
with the label facing up.
Automatic playback
Playback will start automatically if the inserted
CD/DVD contains supported audio/video files
=> page 183.
Ejecting a CD/DVD
> Press the button (A).
The CD/DVD is pulled in again automatically if it
is not removed from the DVD slot within approxi-
mately ten seconds after ejecting it.
The DVD drive is accessed and operated through
the MMI @) > page 177, fig. 154.
@) Note
— Never force a CD/DVD into the drive. The
CD/DVD is pulled in automatically.
— Do not insert CDs/DVDs with labels into the
drive. Labels can come loose from the
CD/DVD and damage the drive.
Page 173 of 280
 Tips
CDs/DVDs that contain audio files with a high
data rate may not play.
Applies to: vehicles with a CD drive
ar
\"RAH-8826|
Fig. 151 Glove compar")
8S1012721BE
Media
@) Tips
CDs/DVDs that contain audio files with a high
data rate may not play.
Applies to: vehicles with a CD drive
ar
"RAH-8826|
Fig. 151 Glove compartment: CD drive
Loading a CD
> The CD will be automatically pulled in. Slide the
CD straight into the slot @) with the label fac-
ing up.
Automatic playback
Playback will start automatically if the inserted
CD contains supported audio files > page 184.
Ejecting a CD
> Press the button ().
The CD is pulled in again automatically if it is not
removed from the slot within ten seconds of
ejecting it.
The CD drive is accessed and operated through
the MMI > page 177.
@) Note
— Never force a CD into the drive. The CD is
pulled in automatically.
— Do not insert CDs with labels into the drive.
Labels can come loose from the CD and
damage the drive.
@ Tips
CD playback cannot be guaranteed with audio
files that have a high data rate.
Applies to: vehicles with Jukebox
After you have filled the Jukebox with music
and/or videos*, for example from your SD card,
you can play these files directly from the Jukebox.
The Jukebox memory capacity is approximately
10 GB.
Opening the Jukebox
>» Press the [MEDIA] button.
> Press the left control button until the sources
overview > page 177 is displayed.
> Select and confirm Jukebox.
Adding files to the Jukebox
> Press the [MEDIA] button.
> Press the left control button until the sources
overview > page 177 is displayed.
> Select and confirm one of the following sources
to copy to the Jukebox: SD card, CD-ROM, DVD-
ROM*, USB storage device*.
Selecting an entry
Requirement: the media center (for example,
tracks, albums) must be open.
> Select an entry from the media center.
> Select: right control button > Copy to jukebox >
This entry or Entire list.
Selecting a track
Requirement: the playlist must be open
=> page 180.
> Select the track that is currently playing.
> Select: right control button > Copy to jukebox >
This track or Entire album or This artist.
Requirement: a video file* must be playing.
> Select: right control button > Copy to jukebox.
The copying process begins. The status of the
copying process is shown in the MMI.
> Hiding the importing process: select and con-
firm
Continue copying in background. The im-
porting process is hidden.
> Canceling the importing process: select and
confirm Cancel copying, or remove the source
that is currently being imported. Files already
copied remain. >
171
Page 174 of 280

Media
Requirement: the copying process must be active
in the background.
> Showing the copying process: select: right
control button > Copying in progress.
When importing, the audio files are automatical-
ly sorted into the media center categories based
on the stored additional information > page 178.
The copied video files* are stored in the media
center under the Videos* category.
Playing the Jukebox
Requirement: the Jukebox must contain audio/
video* files > page 171, Adding files to the Juke-
box.
The Jukebox is accessed and operated through
the MMI@) & page 177, fig. 154.
Displaying Jukebox memory capacity
> Select: right control button > Jukebox memory
capacity. Information about the Jukebox mem-
ory capacity and the number of stored tracks is
displayed.
Deleting tracks from the Jukebox!)
Requirement: the Jukebox must contain audio/
video files*.
> Select an entry from the Jukebox media center.
> Select: right control button > Delete from juke-
box > This entry or Entire list.
The status of the deleting process is shown in the
MMI. Jukebox playback stops during the deleting
Process and starts again automatically once the
deletion is complete.
@) Note
Do not import audio/video files* when the en-
gine is turned off because this will drain the
vehicle battery.
@ Tips
— Tracks from audio CDs cannot be imported
to the Jukebox for legal reasons.
1) Not in the Playback view.
172
— Files that have already been imported are
automatically recognized and cannot be
copied to the Jukebox again.
— It is not possible to play audio/video* files in
the CD/DVD* drive while importing them.
— The Jukebox does not provide an export
function due to legal reasons.
— Files or tracks without additional stored in-
formation are listed as Unknown. Audi rec-
ommends adding additional information
(such as ID3 tags) to audio files.
— Reset the Jukebox to the factory default set-
tings when selling your vehicle > page 190.
Bluetooth audio player
Applies to: vehicles with Bluetooth audio player
With the Bluetooth audio player, you can play
music wirelessly from your Bluetooth-capable de-
vice (such as a cell phone) through the MMI.
Requirement: the vehicle must be stationary and
the ignition must be switched on. The Bluetooth
settings will open on your mobile device during
the connection setup. The Bluetooth function
and visibility of the MMI > page 192 and mobile
device must be switched on. The Bluetooth audio
player > page 192 must be switched on in the
MMI.
Connecting a Bluetooth device
> Press the [MEDIA] button.
> Press the left control button until the sources
overview is displayed.
> Select and confirm Bluetooth audio player @)
=> page 177, fig. 155.
> If necessary, select and confirm: Not connected
> Connect Bluetooth audio player. The Blue-
tooth device search starts. Follow the instruc-
tions in the MMI.
> Select and confirm the desired Bluetooth de-
vice from the list. The MMI generates a PIN for
the connection.
> Select and confirm Yes.
>» Enter the PIN for connecting on your Bluetooth
device, or if the PIN is already displayed on your
Bluetooth device, confirm it on the Bluetooth
>
Page 175 of 280

8S1012721BE
Media
device. The time allowed for entering the PIN is
limited to approximately 30 seconds.
The media is started and operated through the
mobile device or the MMI, depending on the de-
vice being used.
G) Tips
— Check for any connection requests on your
Bluetooth device.
— Multiple Bluetooth audio players can be
connected to the MMI, but only one mobile
device can be active.
— Bluetooth protocols AVRCP (1.0/1.3/1.4)
and A2DP are supported.
— Note the volume setting on your Bluetooth
device. Audi recommends setting your mo-
bile device to the maximum volume when
using it as a Bluetooth audio player.
— The supported media functions (such as
shuffle) depend on the Bluetooth device be-
ing used.
—Aselection of supported Bluetooth devices
can be found in the database for tested mo-
bile devices at www.audi.com/bluetooth.
Wi-Fi audio player
Applies to: vehicles with Wi-Fi audio player
Using the Wi-Fi audio player media source on the
MMI, you can connect and operate your Wi-Fi-ca-
pable media player (such as a smartphone) to
wirelessly play music from your media player Li-
brary. The media player is connected through the
vehicle's Wi-Fi hotspot. A UPnP Server app or an
integrated UPnP/DLNA server on your media
player is required to access your media player li-
brary.
Requirement: the Wi-Fi function on your media
player must be switched on. The myAudi app or a
UPnP server app is installed on your media player,
or your media player has an integrated UPnP/
DLNA server.
Connecting a media player
> Press the [MEDIA] button.
> Press the left control button until the sources
overview > page 177 is displayed.
> Select and confirm Wi-Fi audio player (7)
=> page 177, fig. 155.
> If necessary, select and confirm Wi-Fi turned
off > Turn on Wi-Fi to activate Wi-Fi in the
MMI.
> If necessary, select and confirm Wi-Fi settings.
> Select the same settings on the wireless media
player that are used for the Wi-Fi hotspot.
Starting the Wi-Fi audio player
> Start the myAudi app or an UPnP server app, or
allow media sharing on your device.
Operating a media player
The media player is operated through the MMI.
> Press the left control button repeatedly until
the Folders menu item appears.
> Select and confirm Folders.
Playing music from a media player
> Select and confirm Media center.
Internet radio: see > page 174.
ZA\ WARNING
—As the driver, do not allow usage of the Wi-
Fi hotspot to distract you from driving, as
this could increase the risk of an accident.
—To reduce the risk of an accident, only use
Audi connect services and the Wi-Fi hotspot
only if the traffic situation permits it. Read
and follow the guidelines provided in
=> page 710, Traffic safety information.
— It is only safe to use tablets, laptops, mobile
devices and other similar devices when the
vehicle is stationary because, like all loose
objects, they could be thrown around the in-
side of the vehicle in a crash and cause seri-
ous injuries. Store these types of devices se-
curely while driving. Also read the warnings
in the chapter > page 52.
@) Note
Always follow the information found in @ in
General information on page 141.
173
>
Page 176 of 280

— The Wi-Fi connection is reconfigured when
inserting or removing the mini SIM card in
the SIM card reader*. There may be a tem-
porary interruption in audio playback, de-
pending on the media player.
— Please note that a Wi-Fi connection does
not automatically make it possible to use
the Internet. For additional information, see
=> page 1417.
— To avoid interruptions during playback, de-
activate the power saving function on the
media player or connect it to a charger.
— The loading times for the audio data depend
on the media player used and the number of
files
that it contains.
—A maximum of 2,000 entries per directory
are displayed in the MMI.
— Songs downloaded for offline use using mu-
sic streaming services are stored on your
mobile device (such as a smartphone) and
may be DRM protected. The Wi-Fi audio
player will not play DRM protected files.
— Contact an authorized Audi dealer or au-
thorized Audi Service Facility for additional
information on the Wi-Fi audio player.
Online media and
Internet radio
Applies to: vehicles with Audi connect
You can playback and operate various online me-
dia services and Internet radio using the MMI.
> Press the [MEDIA] button.
> Press the left control button until the sources
overview > page 177, fig. 155 is displayed.
Applies to: using online media and Internet radio
Requirement
— The myAudi app must be installed and open on
your mobile device.
— You must be logged into your myAudi account
in the myAudi app and you must have selected
your vehicle.
— The Wi-Fi function on the mobile device and on
the MMI must be switched on.
174
—If necessary, check in the connection manager
=> page 190 if the mobile device you connected
is selected under the MMI connect app M.
—The MMI must be connected to the network.
— The symbol for the Online media source
=> page 177, fig. 155 is shown in the MMI.
Applies to: using online media
Additional requirement
— A supported online media service must be avail-
able in the country where the vehicle is being
operated.
— You must have an account with a supported on-
line media service.
— Depending on the online media service, you
may need to install and open an app on your
mobile device.
Starting Online media
— Press the [MEDIA] button.
— Press the left control button until the sources
overview > page 177 is displayed.
— Select and confirm an online media service.
Starting Internet radio
— Press the [MEDIA] button.
— Press the left control button until the sources
overview > page 177 is displayed.
— Select and confirm Internet radio. The Internet
radio browser or the last station that was play-
ing is shown.
— Selecting the station: if necessary, select and
confirm a category in the Internet radio Brows-
er > a station.
Online media and Internet radio:: additional op-
tions
— Press the right control button.
The following options may be available, depend-
ing on the information shown (such as the sta-
tion/track that is currently playing):
— Sound settings: see > page 193.
— Wi-Fi settings: see > page 146.
— Connection manager: see > page 190.
— Additional options may be available, depending
on the active online media service or Internet
radio.
 1
1 2
2 3
3 4
4 5
5 6
6 7
7 8
8 9
9 10
10 11
11 12
12 13
13 14
14 15
15 16
16 17
17 18
18 19
19 20
20 21
21 22
22 23
23 24
24 25
25 26
26 27
27 28
28 29
29 30
30 31
31 32
32 33
33 34
34 35
35 36
36 37
37 38
38 39
39 40
40 41
41 42
42 43
43 44
44 45
45 46
46 47
47 48
48 49
49 50
50 51
51 52
52 53
53 54
54 55
55 56
56 57
57 58
58 59
59 60
60 61
61 62
62 63
63 64
64 65
65 66
66 67
67 68
68 69
69 70
70 71
71 72
72 73
73 74
74 75
75 76
76 77
77 78
78 79
79 80
80 81
81 82
82 83
83 84
84 85
85 86
86 87
87 88
88 89
89 90
90 91
91 92
92 93
93 94
94 95
95 96
96 97
97 98
98 99
99 100
100 101
101 102
102 103
103 104
104 105
105 106
106 107
107 108
108 109
109 110
110 111
111 112
112 113
113 114
114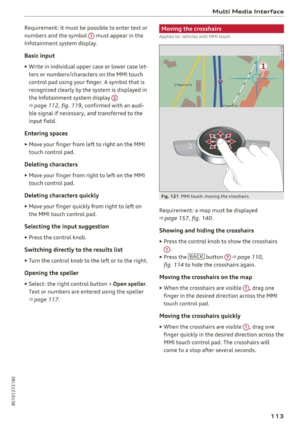 115
115 116
116 117
117 118
118 119
119 120
120 121
121 122
122 123
123 124
124 125
125 126
126 127
127 128
128 129
129 130
130 131
131 132
132 133
133 134
134 135
135 136
136 137
137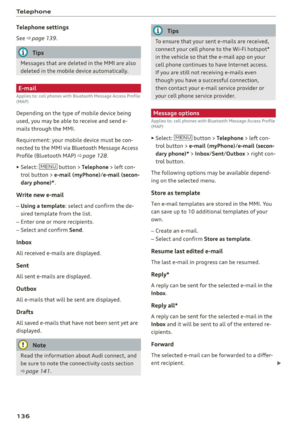 138
138 139
139 140
140 141
141 142
142 143
143 144
144 145
145 146
146 147
147 148
148 149
149 150
150 151
151 152
152 153
153 154
154 155
155 156
156 157
157 158
158 159
159 160
160 161
161 162
162 163
163 164
164 165
165 166
166 167
167 168
168 169
169 170
170 171
171 172
172 173
173 174
174 175
175 176
176 177
177 178
178 179
179 180
180 181
181 182
182 183
183 184
184 185
185 186
186 187
187 188
188 189
189 190
190 191
191 192
192 193
193 194
194 195
195 196
196 197
197 198
198 199
199 200
200 201
201 202
202 203
203 204
204 205
205 206
206 207
207 208
208 209
209 210
210 211
211 212
212 213
213 214
214 215
215 216
216 217
217 218
218 219
219 220
220 221
221 222
222 223
223 224
224 225
225 226
226 227
227 228
228 229
229 230
230 231
231 232
232 233
233 234
234 235
235 236
236 237
237 238
238 239
239 240
240 241
241 242
242 243
243 244
244 245
245 246
246 247
247 248
248 249
249 250
250 251
251 252
252 253
253 254
254 255
255 256
256 257
257 258
258 259
259 260
260 261
261 262
262 263
263 264
264 265
265 266
266 267
267 268
268 269
269 270
270 271
271 272
272 273
273 274
274 275
275 276
276 277
277 278
278 279
279