Page 89 of 280

8S1012721BE
Driving
driving and the vehicle's acceleration. The
driving wheels could spin and the vehicle
could swerve, especially on slick or slippery
road surfaces, which increases the risk of an
accident.
@) Note
When accelerating using Launch Control, all
vehicle components are subject to heavy
loads. This can result in increased wear.
G) Tips
After accelerating using the Launch Control,
the temperature of some vehicle components
may increase greatly. If that happens, the
function will not be available for a few mi-
nutes to reduce the risk of damage. After a
cool-down period, Launch Control will be
available again.
Peeler ias tea)
os] Transmission: malfunction! Safely stop vehi-
cle
Do not continue driving. Stop the vehicle as soon
as possible in a safe location and secure it so it
does not roll. See an authorized Audi dealer or
authorized Audi Service Facility for assistance.
[i Transmission: too hot. Please stop vehicle
The transmission is too hot and can become dam-
aged. Stop and let the transmission cool with the
engine running (at idle) in the "P" selector lever
position. Then the indicator light and the mes-
sage turn off, drive to an authorized Audi dealer
or authorized Audi Service Facility immediately to
have the malfunction corrected. If the indicator
light and the driver message do not turn off, do
not continue driving. See an authorized Audi
dealer or authorized Audi Service Facility for as-
sistance.
[GJ Transmission: malfunction! You can contin-
ue driving. See owner's manual
Drive immediately to an authorized Audi dealer
or authorized Audi Service Facility to have the
malfunction repaired.
fs] Transmission: malfunction! You can contin-
ue driving with limited function. No reverse
gear
There is a system malfunction in the transmis-
sion. The transmission is switching to emergency
mode. This mode only shifts into certain gears or
may no longer shift at all. The engine may stall.
You cannot engage the reverse gear. Drive to an
authorized Audi dealer or authorized Audi Service
Facility immediately to have the malfunction cor-
rected.
1} Transmission: malfunction! You can contin-
ue driving in D until engine is off
There is a system malfunction in the transmis-
sion. The transmission is switching to emergency
mode. If you turn the engine off, you will not be
able to select any other selector lever positions
after starting the engine again. Drive to an au-
thorized Audi dealer or authorized Audi Service
Facility immediately to have the malfunction cor-
rected.
isl Transmission: too hot. Please adapt driving
style
The transmission temperature has increased sig-
nificantly. Drive very cautiously or take a break
from driving until the temperature returns to the
normal range and the indicator light turns off.
Transmission: please press brake pedal and
select gear again
Press the brake pedal and select the desired se-
lector lever position again. You can then continue
driving.
87
Page 90 of 280
![AUDI TT 2021 Owner´s Manual Driving
Selector lever emergency release
|
BFV-0266]
Fig. 93 Selector lever: using the emergency release to
move out of the Park position
The emergency release mechanism is located in](/manual-img/6/40287/w960_40287-89.png "AUDI TT 2021 Owner´s Manual Driving
Selector lever emergency release
|
BFV-0266]
Fig. 93 Selector lever: using the emergency release to
move out of the Park position
The emergency release mechanism is located in")
Driving
Selector lever emergency release
|
BFV-0266]
Fig. 93 Selector lever: using the emergency release to
move out of the Park position
The emergency release mechanism is located in
the right area under the selector lever shift gate.
Using the emergency release can be complicated.
See an authorized Audi dealer or authorized Audi
Service Facility for assistance.
You will need the screwdriver from the vehicle
tool kit to release it > page 242. Use the flat side
of the reversible screwdriver blade.
Removing the cover
> Set the parking brake to secure your vehicle
from rolling away. If this is not possible, secure
your vehicle from rolling using another meth-
od.
> Switch the ignition off.
> To loosen the shifter boot, carefully insert the
flat side of the screwdriver sideways into the
slit near the shifter boot > fig. 92.
> Carefully pry the shifter boot out with the
screwdriver while gripping the boot at the fold
and pulling it upward and out of the opening
> fig. 93.
> Fold the shifter boot up around the shifter
knob.
88
Selector lever emergency release
> Press and hold the yellow release button with
the screwdriver.
> At the same time, press the release button on
the selector lever (1) and move the selector lev-
er to the “N” position.
Reattaching the cover
> Clip the shift cover back into the shift gate.
ZX WARNING
— The parking lock may only be released using
the emergency release if the parking brake
is set. If it is not working, secure the vehicle
from rolling using the brake pedal or other
suitable means, such as blocking a front and
a rear wheel. An unsecured vehicle may roll,
which increases the risk of an accident.
— Only activate the emergency release while
ona level surface or a slight slope.
—To reduce the risk of an accident, you must
not drive when the emergency release is ac-
tivated.
Page 91 of 280

8S1012721BE
Assist systems
Assist systems
Speed warning system
Applies to: vehicles with speed warning system
The speed warning system helps the driver to
stay below a specified maximum speed. A warn-
ing threshold can be set in the Infotainment sys-
tem for this purpose.
Once the speed slightly exceeds the stored
threshold, the speed warning system will alert
the driver with an indicator in the instrument
cluster and a warning tone. Once the speed drops
below the stored maximum speed, the indicator
will turn off.
Setting a threshold is recommended if you would
like to be reminded when you reach a certain
maximum speed. Situations where you may want
to do so include driving in a country with a gener-
al speed limit or if there is a specified maximum
speed for winter tires.
@) Tips
Regardless of the speed warning system, you
should always monitor your speed using the
speedometer and make sure you are adhering
to the legal speed limit.
Setting the warning threshold
Applies to: vehicles with speed warning system
> Select in the Infotainment system: [MENU] but-
ton > Vehicle > left control button > Driver as-
sistance > Speed warning > Manual.
Messages
Applies to: vehicles with speed warning system
ol Manually set speed limit XX mph
(km/h) exceeded
The stored speed was exceeded.
Cruise control system
Applies to: vehicles with cruise control system
The cruise control system assists the driver in
maintaining a constant speed above approxi-
mately 15 mph (20 km/h). The system maintains
the desired speed by braking and accelerating.
ZA WARNING
— Always pay attention to the traffic around
your vehicle when the cruise control system
is in operation. As the driver, you are always
responsible for controlling your vehicle
speed and the distance between your vehicle
and
other vehicles.
— For safety reasons, cruise control should not
be used in the city, in stop-and-go traffic, on
winding roads, and when road conditions
are poor (such as ice, fog, gravel, heavy rain,
and conditions that could lead to hydroplan-
ing), because this increases the risk of an ac-
cident.
— Switch the cruise control off temporarily
when driving in turning lanes, highway exits,
or in construction zones.
—To reduce the risk of an accident, you should
only resume the stored speed if it is suitable
for the current traffic conditions.
@) Note
Before driving downhill a long distance ona
steep hill, decrease your speed and select a
lower gear. This makes use of the engine
braking effect and reduces the load placed on
the brakes.
@) Tips
The brake lights turn on when the brakes are
applied automatically.
89
Page 92 of 280

Assist systems
Switching the system on
Applies to: vehicles with cruise control system
BFV-0220
Fig. 94 Operating lever: switching the system on
Requirement: the ignition must be switched on.
> To switch the system on, pull the lever toward
you to position (4).
The (a or (8) indicator light and the corre-
sponding message will appear in the instrument
cluster.
ZA\ WARNING
If the brakes are malfunctioning (for example,
overheating) while the cruise control system
is switched on, the regulating functions may
shut off automatically.
Preselecting or activating a cruise co
speed
Applies to: vehicles with cruise control system
When the vehicle is stationary, you can preselect
the cruise control speed or activate the speed
while driving.
Requirement: the system must be switched on.
> To preselect a cruise control speed when the ve-
hicle is stationary, tap the lever toward @)/G)
=> page 90, fig. 94.
> To activate the cruise control speed, pull the
lever toward position (@) while driving.
> To set the current driving speed as the cruise
control speed, press the button @) on the lever.
The active cruise control speed is indicated with
the Gs or =) indicator light in the instrument
cluster.
90
Changing the cruise control speed
Applies to: vehicles with cruise control system
Requirement: the system must be switched on.
> To increase or decrease the cruise control speed
in small increments, tap the lever up to the
first level toward @/C) > page 90, fig. 94.
> To increase or decrease the cruise control speed
in larger increments, tap the lever up to the
second level toward @)/C).
> To increase or decrease the cruise control speed
continuously, tap and hold the lever at the first
or second level toward (+)/G).
Overriding or deactivating the cruise
control speed
Applies to: vehicles with cruise control system
You can override or deactivate the cruise control
system. When you deactivate the system, your
cruise control speed will be stored and you can
resume that speed.
Requirement: the system must be switched on
and activated.
Overriding
> To temporarily override the cruise control
speed, press the accelerator pedal.
> Once you release the accelerator pedal, the sys-
tem will adjust back to the stored cruise control
speed.
If you override the cruise control system for a
long period of time, the cruise control system
will be deactivated. The [M4 or RSM indicator
light will be displayed and the cruise control
speed will be saved.
Deactivating
> To deactivate the cruise control speed, press
the lever toward (2) (not locked into place)
=> page 90, fig. 94, or
» Press the brake pedal.
ZA WARNING
Resting your foot on the accelerator pedal
could override the cruise control. This will pre-
vent braking interventions by the system.
Page 93 of 280

8S1012721BE
Assist systems
Seem ea
Applies to: vehicles with cruise control system
When you switch the system off, the cruise con-
trol speed will be erased.
Requirement: the system must be switched on.
> To switch the system off, press the lever toward
@ (locked into place) > page 90, fig. 94, or
> Switch the ignition off.
Applies to: vehicles with cruise control system
ICRUISE| / 3) Speed control system: currently un-
available. See owner's manual
If the indicator light turns on and this message
appears, the cruise control system has been de-
activated. There is a temporary malfunction, for
example the brakes are overheating. Switch the
cruise control system on again later.
Lap timer
Introduction
Applies to: vehicles with lap timer
You can measure and analyze lap times with the
lap timer in the display. The time is measured in
minutes, seconds and 1/10 seconds. With lap
times longer than 60 minutes, the hour is also
shown and the display of 1/10 seconds is re-
moved.
The time measurement on an individual lap ends
after 99 hours 59 minutes and 59 seconds. A new
lap starts automatically after that.
You can control the lap timer using the controls
on the multifunction steering wheel > page 72.
ZA WARNING
Your focus should always be on driving your
vehicle safely. As the driver, you have com-
plete responsibility for safety in traffic. To re-
duce the risk of an accident, only use the lap
timer functions in such a way that you always
maintain complete control over your vehicle in
all traffic situations.
@) Tips
You can retrieve information from the trip
computer while the lap timer stopwatch is
running.
Caer mi ra Opening the lap
Applies to: vehicles with lap timer
Fig. 95 Multifunction steering wheel: controls
[RAH-£493]
@—» 0:07.2——_@
Best lap 0:29.0
0:30.5 ETO)
New Lap
Fig. 96 Instrument cluster: lap timer
Opening the lap timer
> Select in the Infotainment system: [MENU] but-
ton > Vehicle > left control button > Lap times
> Turn the left thumbwheel @) © fig. 95 until
Start lap 1 by driving off or Start by driving
off appears.
> Press the left thumbwheel to confirm the selec-
tion.
Timing laps
> To measure the lap time, press the left thumb-
wheel again to confirm the New lap menu item.
This starts timing the next lap at the same
time. The last time measurement moves up to
the top line @). The current lap time is in the
center line in area @).
As long as the [@J symbol is green during the cur-
rent lap time measurement, the current timeis >
91
Page 94 of 280
.
Displaying split time and pausing timing
> To display a split time @, turn the left")
Assist systems
faster than your best time to date. If the sym-
bol @ is red, the current time is slower (2).
Displaying split time and pausing timing
> To display a split time @, turn the left thumb-
wheel until Split time appears in line @). Press
the left thumbwheel to confirm the selection.
The split time appears for approximately
10 seconds in area @). The current lap timing
will continue running.
> To insert a pause oi immediately after the split
time, first press the left thumbwheel to con-
firm
the menu item Back to lap time.
> To insert a pause, turn the left thumbwheel un-
til Pause appears in line @). Press the left
thumbwheel to confirm the selection. The
pause symbol Oi appears in area @).
> To resume timing, press the left thumbwheel
again.
Meaning of the indicator in the Infotainment sys-
tem display > fig. 96:
@ __ | Display of last recorded time
@_ |Symbols:
- fo): start of time recording
fe @.: slowest recorded time
- @: fastest recorded time
F él: split time
- pause
Current time measurement
®©|© Menu:
- Start lap 1 by driving off
- Start by driving off
- New lap
- Split time
- Pause
- Cancel lap
Evaluating or resetting times
Applies to: vehicles with lap timer
= Ss
3
z
ss
Fig. 97 Instrument cluster: lap timer
You can evaluate the fastest, slowest and average
lap times.
After evaluating the lap times, you can continue
the current timing round or start over, meaning
start lap 1 again.
> Select in the Infotainment system: [MENU] but-
ton > Vehicle > left control button > Lap statis-
tics. The display shows the fastest lap fe), the
slowest lap ] and the average lap time @.
> Turn the thumbwheel down or up to display the
individual lap times.
> To resume the timing that was started, press
the left thumbwheel again.
> To reset the timing to zero, press the left con-
trol button on the multifunction steering
wheel. Turn the left thumbwheel and select the
desired setting by moving the cursor (red
frame). Press the left thumbwheel to confirm
the selection.
> Press the left thumbwheel to restart the lap
timer for a new lap timing, if needed.
> Press the [MENU] button to exit the lap timer.
Evaluation legend 9 fig. 97:
- Reset times
92
: total number of laps
@ |BL fastest lap time
@ |B slowest lap time
@ |f@ average lap time
Gi) Tips
—A maximum of 30 lap times can be meas-
ured.
Page 95 of 280

8S1012721BE
Assist systems
— If timing is paused, you can continue it later
even if you switch the ignition off.
— Saved lap times cannot be individually de-
leted from the total results.
— The saved lap timer values will remain after
switching the ignition off.
Audi side assist
Applies to: vehicles with Audi side assist
BFV-0079
Fig. 98 Diagram: coverage area of the sensors
BFV-0080
Fig. 99 Exterior mirror: display
Side assist helps you monitor your blind spot and
traffic behind your vehicle. Within the limits of
the system, it warns you about vehicles that are
coming closer or that are traveling with you with-
in sensor range @) > fig. 98: if a lane change is
classified as critical, the display @ in the exterior
mirror © fig. 99 turns on.
The display in the left exterior mirror provides as-
sistance when making a lane change to the left,
while the display in the right exterior mirror pro-
vides assistance when making a lane change to
the right.
Information stage
As long as you do not activate the turn signal,
side assist informs you about vehicles that are
detected and classified as critical. The display in
the mirror turns on, but is dim.
The display remains dim in the information stage
so that your view toward the front is not distur-
bed.
Warning stage
If you activate the turn signal, side assist warns
you about vehicles that are detected and classi-
fied as critical. The display in the respective mir-
ror blinks brightly. If this happens, check traffic
by glancing in the exterior mirrors and over your
shoulder > A\ in General information on
page 94.
You can adjust the brightness on of the dis-
play on the rearview mirror > page 95.
93
Page 96 of 280

Side assi")
Assist systems
General information
Applies to: vehicles with Audi side assist
BFV-0260
BFV-0082
Fig. 101 Rear of the vehicle: position of the sensors (exam-
ple)
Side assist functions at speeds above approxi-
mately 19 mph (30 km/h).
@ Approaching vehicles
In certain cases, a vehicle will be classified as crit-
ical for a lane change even if it is still somewhat
far away. The faster a vehicle approaches, the
sooner the display in the outside mirror will turn
on.
@ Vehicles traveling in the same direction as
your vehicle
Vehicles traveling in the same direction as your
vehicle are indicated in the exterior mirror if they
94
are classified as critical for a lane change. All
vehicles detected by side assist are indicated by
the time they enter your “blind spot”, at the lat-
est.
@ Vehicles you are passing
If you slowly pass a vehicle that side assist has
detected (the difference in speed between the ve-
hicle and your vehicle is less than 9 mph (15 km/
h)), the display in the exterior mirror turns on as
soon as the vehicle enters your blind spot.
The display will not turn on if you quickly pass a
vehicle that side assist has detected (the differ-
ence in speed is greater than 9 mph (15 km/h)).
Functional limitations
The radar sensors are designed to detect the left
and right adjacent lanes when the road lanes are
the normal width. In some situations, the display
in the exterior mirror may turn on even though
there is no vehicle located in the area that is criti-
cal for a lane change. For example:
— If the lanes are narrow or if you are driving on
the edge of your lane. If this is the case, the
system may have detected a vehicle in another
lane that is not adjacent to your current lane.
— If you are driving through a curve. Side assist
may react to a vehicle that is one lane over from
the adjacent lane.
—If side assist reacts to other objects (such as
high or displaced guard rails).
— In poor weather conditions. The side assist
functions are limited.
Do not cover the radar sensors > fig. 7107 with
stickers, deposits, bicycle wheels or other ob-
jects, because they will impair the function. For
information on cleaning, see > page 236.
ZA\ WARNING
— Always pay attention to traffic and to the
area around your vehicle. Side assist cannot
replace a driver's attention. The driver alone
is always responsible for lane changes and
similar driving maneuvers.
— In some situations, the system may not
function or its function may be limited. For
example: >
 1
1 2
2 3
3 4
4 5
5 6
6 7
7 8
8 9
9 10
10 11
11 12
12 13
13 14
14 15
15 16
16 17
17 18
18 19
19 20
20 21
21 22
22 23
23 24
24 25
25 26
26 27
27 28
28 29
29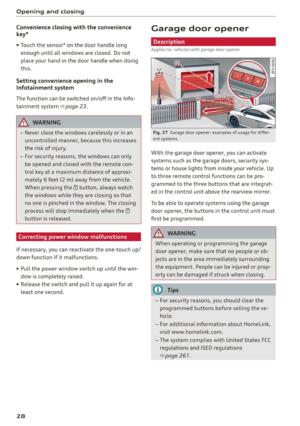 30
30 31
31 32
32 33
33 34
34 35
35 36
36 37
37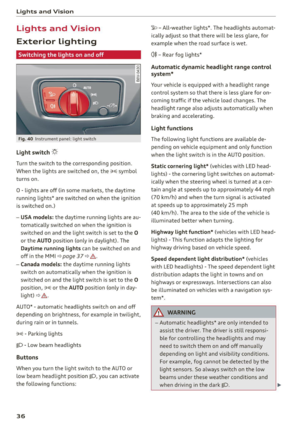 38
38 39
39 40
40 41
41 42
42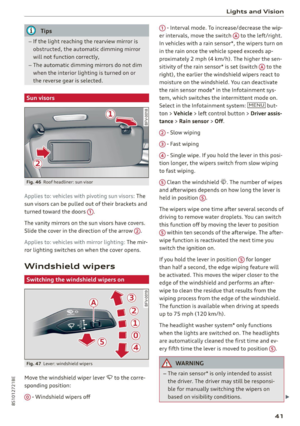 43
43 44
44 45
45 46
46 47
47 48
48 49
49 50
50 51
51 52
52 53
53 54
54 55
55 56
56 57
57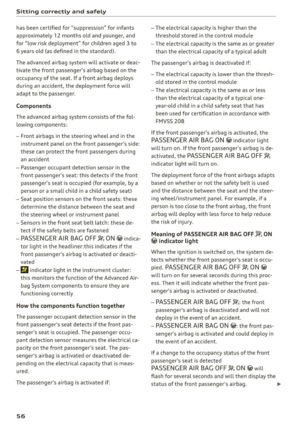 58
58 59
59 60
60 61
61 62
62 63
63 64
64 65
65 66
66 67
67 68
68 69
69 70
70 71
71 72
72 73
73 74
74 75
75 76
76 77
77 78
78 79
79 80
80 81
81 82
82 83
83 84
84 85
85 86
86 87
87 88
88 89
89 90
90 91
91 92
92 93
93 94
94 95
95 96
96 97
97 98
98 99
99 100
100 101
101 102
102 103
103 104
104 105
105 106
106 107
107 108
108 109
109 110
110 111
111 112
112 113
113 114
114 115
115 116
116 117
117 118
118 119
119 120
120 121
121 122
122 123
123 124
124 125
125 126
126 127
127 128
128 129
129 130
130 131
131 132
132 133
133 134
134 135
135 136
136 137
137 138
138 139
139 140
140 141
141 142
142 143
143 144
144 145
145 146
146 147
147 148
148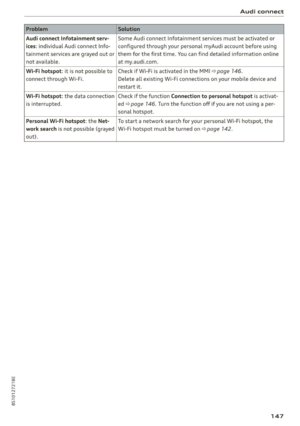 149
149 150
150 151
151 152
152 153
153 154
154 155
155 156
156 157
157 158
158 159
159 160
160 161
161 162
162 163
163 164
164 165
165 166
166 167
167 168
168 169
169 170
170 171
171 172
172 173
173 174
174 175
175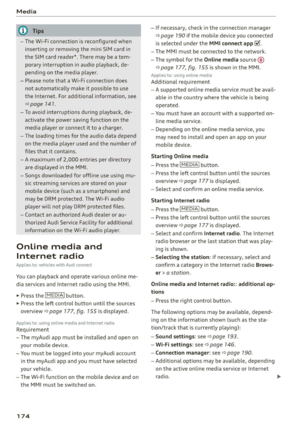 176
176 177
177 178
178 179
179 180
180 181
181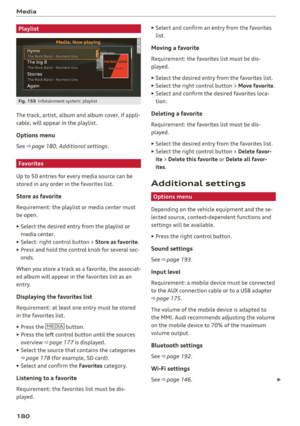 182
182 183
183 184
184 185
185 186
186 187
187 188
188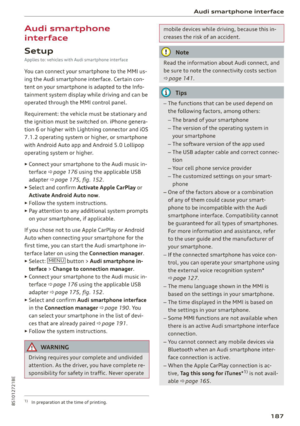 189
189 190
190 191
191 192
192 193
193 194
194 195
195 196
196 197
197 198
198 199
199 200
200 201
201 202
202 203
203 204
204 205
205 206
206 207
207 208
208 209
209 210
210 211
211 212
212 213
213 214
214 215
215 216
216 217
217 218
218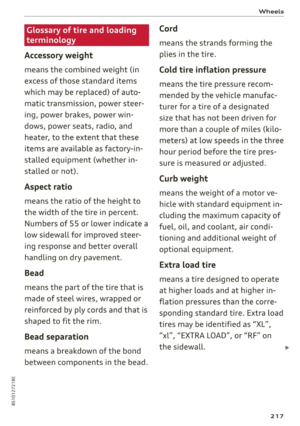 219
219 220
220 221
221 222
222 223
223 224
224 225
225 226
226 227
227 228
228 229
229 230
230 231
231 232
232 233
233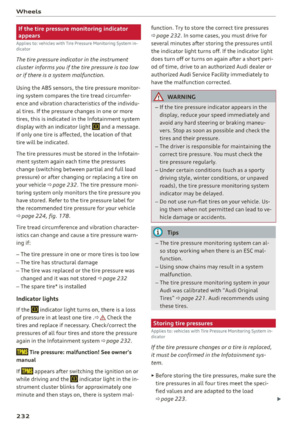 234
234 235
235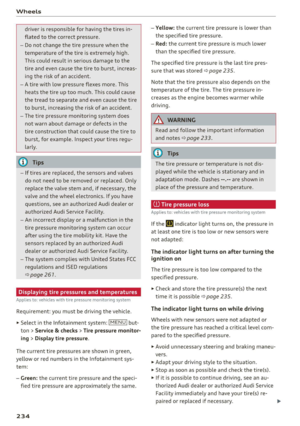 236
236 237
237 238
238 239
239 240
240 241
241 242
242 243
243 244
244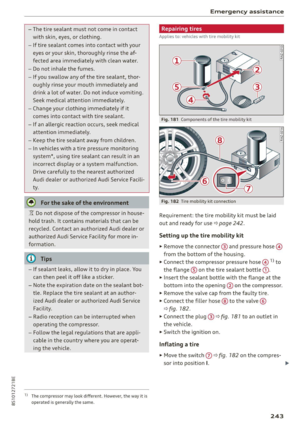 245
245 246
246 247
247 248
248 249
249 250
250 251
251 252
252 253
253 254
254 255
255 256
256 257
257 258
258 259
259 260
260 261
261 262
262 263
263 264
264 265
265 266
266 267
267 268
268 269
269 270
270 271
271 272
272 273
273 274
274 275
275 276
276 277
277 278
278 279
279