Page 113 of 280

8S1012721BE
Multi Media Interface
A WARNING Opening a main menu/menu
To reduce the risk of an accident, adjust the
volume of the audio systems so that signals EJ Vehicle
outside of the vehicle, such as police and fire
sirens, can be heard easily at all times.
}) NI cl
6) Tips = J édia
The MMI switches off automatically if the en-
gine is not running and the vehicle battery is
low.
Fig. 117 Infotainment system: main menu
Opening the main menu
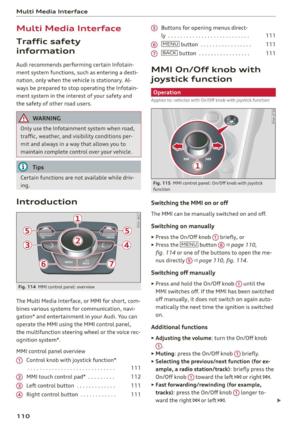
> Press the [MENU] button ©) > page 770,
fig. 114. The MMI menu (such as Radio) is dis-
played. Then you can select and confirm a func-
tion using the control knob.
MMI operation
Ya ate) rming a func
RAH-8500.
Opening a menu directly
> Press the applicable button to directly open the
eras menus (5) > page 110, fig. 174 in the direction
sare ‘ ' of the desired menu (such as [RADIO}), Then you
— can select and confirm a function using the
control knob.
Opening the selection menu/options menu
with the control buttons
RAH-8542
Fig. 116 Control knob: operation
Selecting and confirming a function ina
menu/List
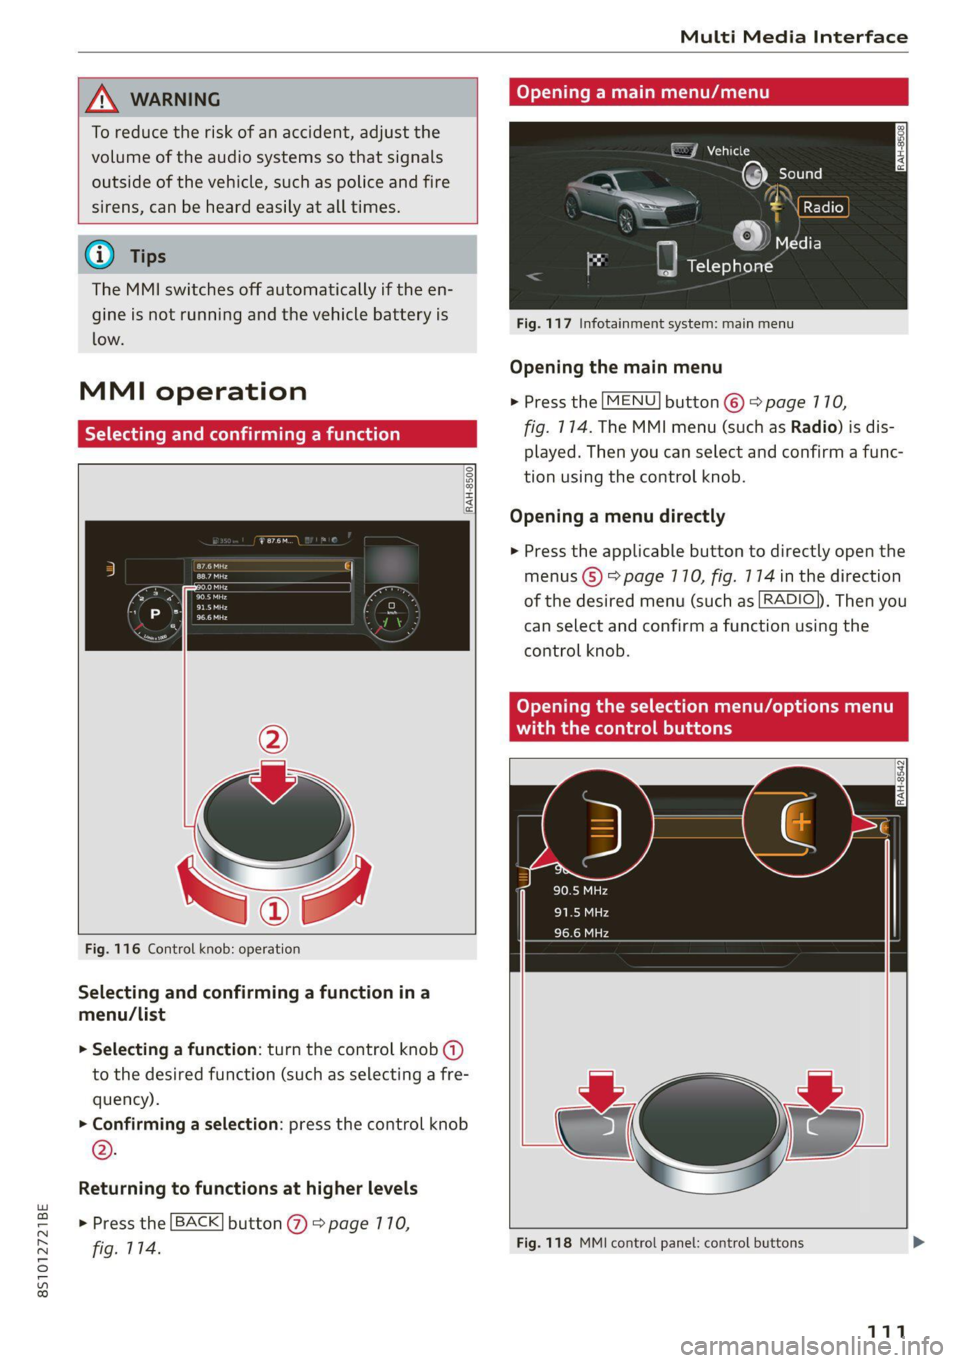
> Selecting a function: turn the control knob (a)
to the desired function (such as selecting a fre-
quency).
> Confirming a selection: press the control knob
®.
Returning to functions at higher levels
> Press the [BACK] button @ > page 770,
fig. 114. Fig. 118 MMI control panel: control buttons >
111
Page 114 of 280

Multi Media Interface
Selection menu
Requirement: the Selection menu symbol 3 must
appear in the Infotainment system display.
Through the selection menu, you can open addi-
tional functions within a menu item (such as Ra-
dio).
Opening the selection menu
> Press the left control button. Then you can se-
lect and confirm a function using the control
knob.
Options menu
Requirement: the Options menu symbol & must
be displayed in the Infotainment system display.
Using the options menu, you can select and con-
firm context-dependent functions as well as set-
tings within a menu item (such as Radio).
Opening the options menu
> Press the right control button. Then you can se-
lect and confirm a function using the control
knob.
Information about menu paths
This guide shows you at a glance the paths for
opening a desired menu and its settings and
functions.
Example of a path
> Select: [RADIO] button > left control button >
FM.
Following the path
> Press the [RADIO] button.
> Press the left control button.
> Turn the control knob to the FM menu item to
select it.
> Press the control knob to confirm the selected
FM menu item.
The selected and confirmed function is executed.
In this example, the FM frequency band is set.
112
MMI touch
MMI touch control pad
Applies to: vehicles with MMI touch
RAH-8760,
%-wmashire Blvd, Los Angeles
© 21 mi Wilshire Blvc Angele
ba 1)
Resa)
Ei E Locust St
Fig. 119 MMI touch: entering the navigation destination
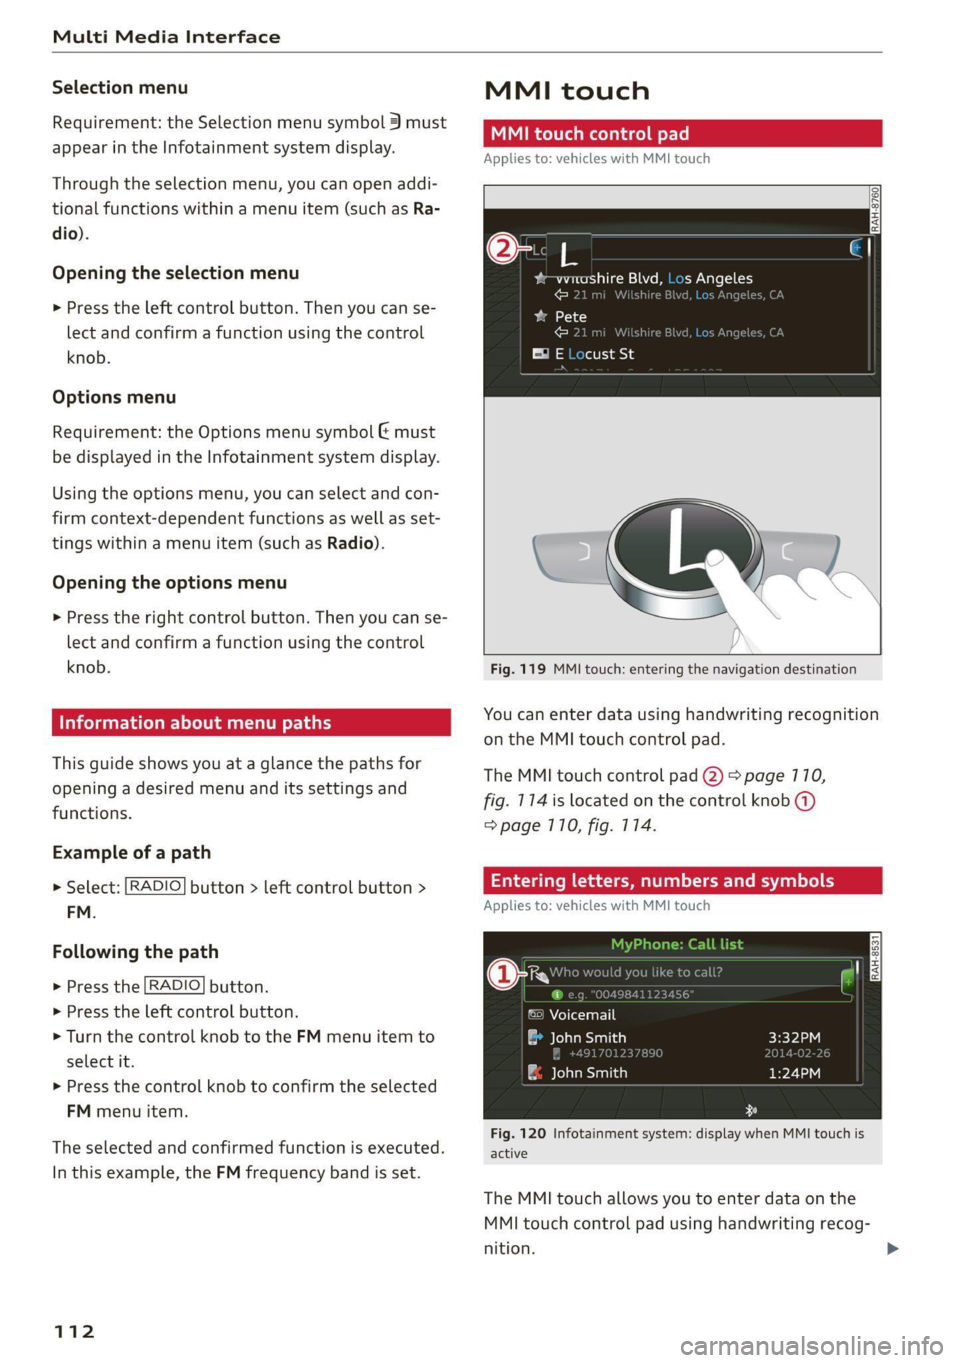
You can enter data using handwriting recognition
on the MMI touch control pad.
The MMI touch control pad (2) > page 110,
fig. 114 is located on the control knob (@)
=> page 710, fig. 114.
Entering letters, numbers and symbols
Applies to: vehicles with MMI touch
©) Voicemail
a John Smith
| ae elaaesiatien)
Fig. 120 Infotainment system: display when MMI touch is
active
The MMI touch allows you to enter data on the
MMI touch control pad using handwriting recog-
nition.
Page 115 of 280

8S1012721BE
Multi Media Interface
Requirement: it must be possible to enter text or
numbers and the symbol (4) must appear in the
Infotainment system display.
Basic input
> Write in individual upper case or lower case Let-
ters or numbers/characters on the MMI touch
control pad using your finger. A symbol that is
recognized clearly by the system is displayed in
the Infotainment system display 2)
=> page 112, fig. 119, confirmed with an audi-
ble signal if necessary, and transferred to the
input field.
Entering spaces
> Move your finger from Left to right on the MMI
touch control pad.
Deleting characters
> Move your finger from right to left on the MMI
touch control pad.
Deleting characters quickly
> Move your finger quickly from right to left on
the MMI touch control pad.
Selecting the input suggestion
> Press the control knob.
Switching directly to the results list
> Turn the control knob to the left or to the right.
Opening the speller
> Select: the right control button > Open speller.
Text or numbers are entered using the speller
=> page 117.
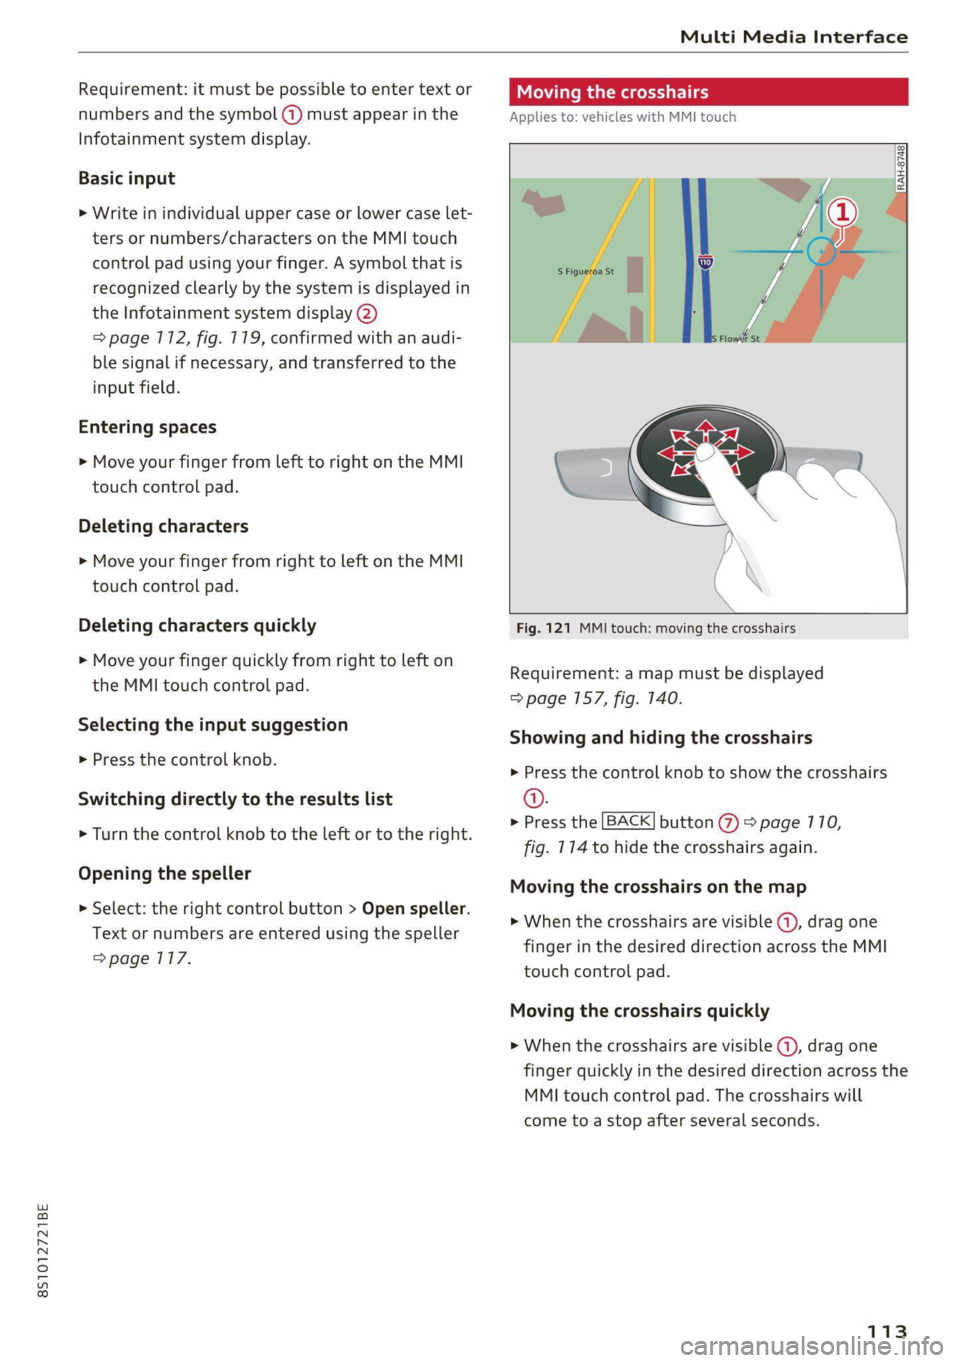
Moving the crosshairs
Applies to: vehicles with MMI touch
Fig. 121 MMI touch: moving the crosshairs
Requirement: a map must be displayed
=> page 157, fig. 140.
Showing and hiding the crosshairs
» Press the control knob to show the crosshairs
@.
> Press the [BACK] button % > page 110,
fig. 114 to hide the crosshairs again.
Moving the crosshairs on the map
> When the crosshairs are visible @, drag one
finger in the desired direction across the MMI
touch control pad.
Moving the crosshairs quickly
> When the crosshairs are visible (4), drag one
finger quickly in the desired direction across the
MMI touch control pad. The crosshairs will
come to a stop after several seconds.
113
Page 116 of 280

Multi Media Interface
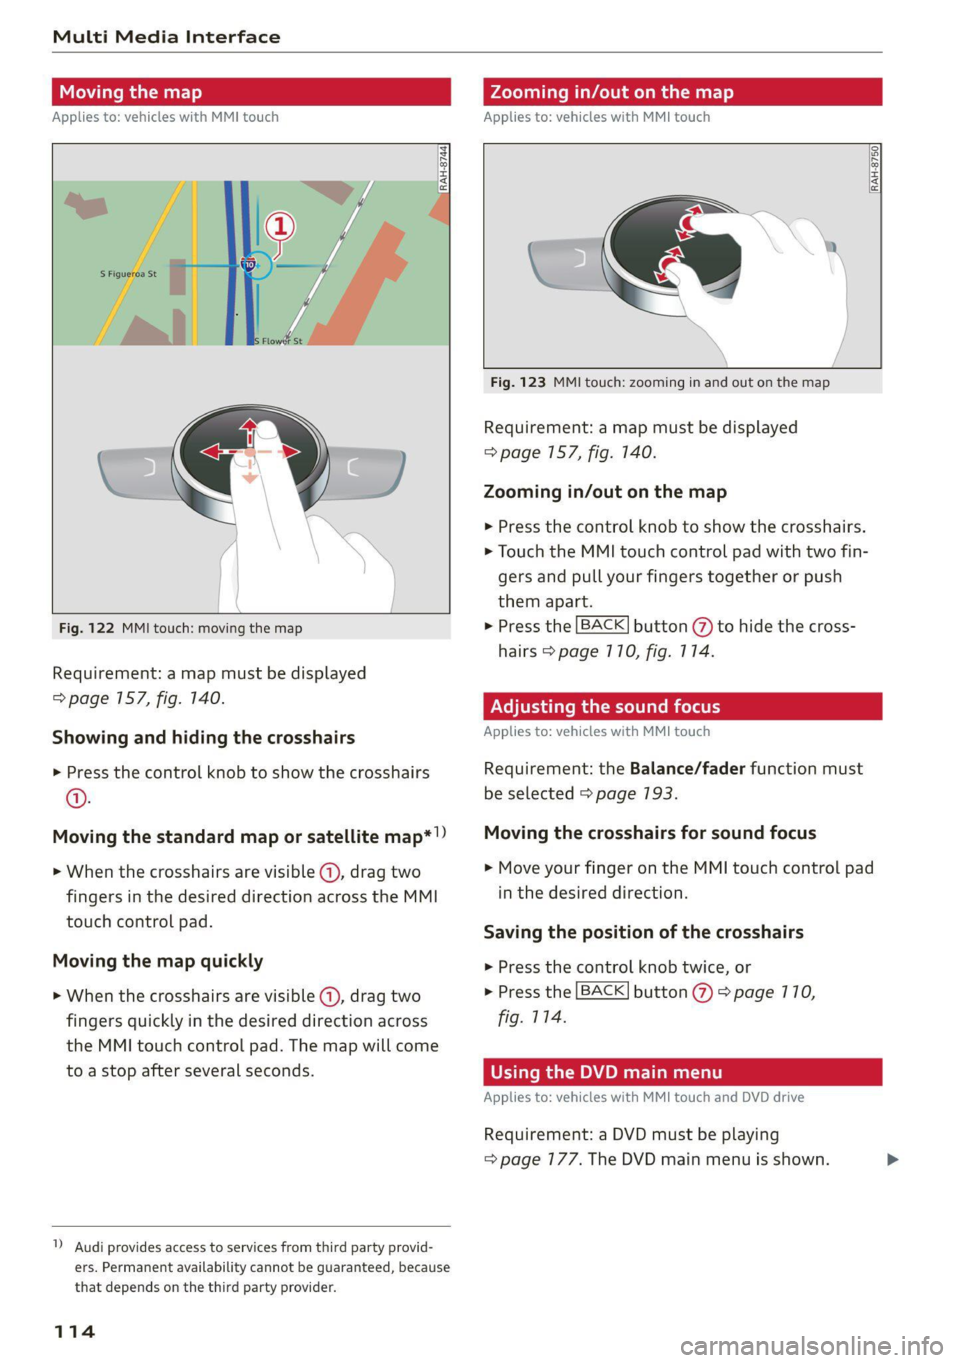
Moving the map
Applies to: vehicles with MMI touch
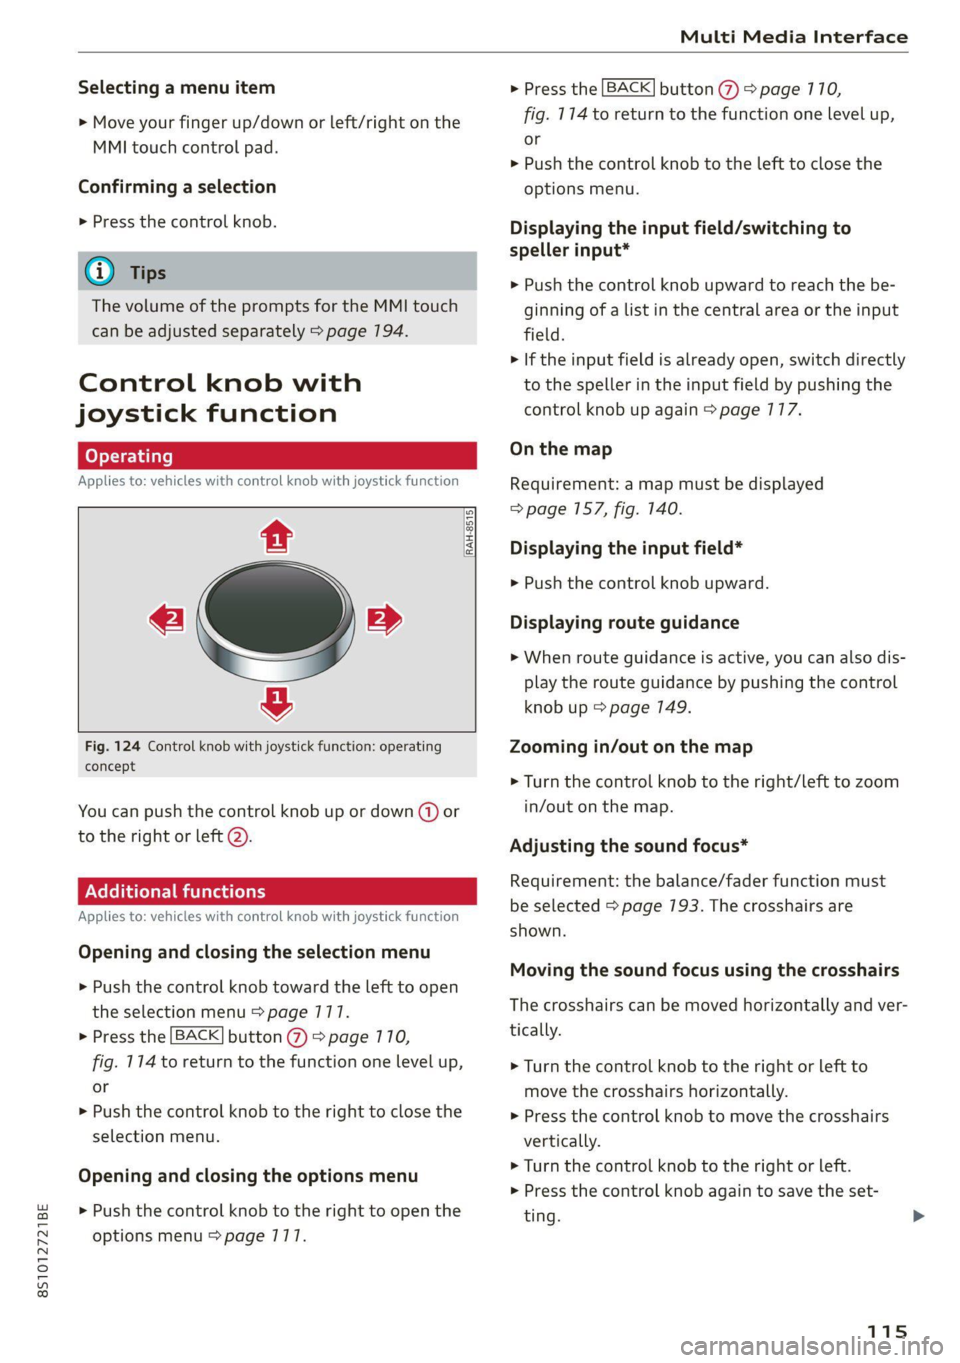
Zooming in/out on the map
Applies to: vehicles with MMI touch
DIRAH-8744
Fig. 122 MMI touch: moving the map
Requirement: a map must be displayed
=> page 157, fig. 140.
Showing and hiding the crosshairs
> Press the control knob to show the crosshairs
@.
Moving the standard map or satellite map*!)
>» When the crosshairs are visible @, drag two
fingers in the desired direction across the MMI
touch control pad.
Moving the map quickly
> When the crosshairs are visible @), drag two
fingers quickly in the desired direction across
the MMI touch control pad. The map will come
to a stop after several seconds.
1) Audi provides access to services from third party provid-
ers. Permanent availability cannot be guaranteed, because
that depends on the third party provider.
114
RAH-8750|
Fig. 123 MMI touch: zooming in and out on the map
Requirement: a map must be displayed
=> page 157, fig. 140.
Zooming in/out on the map
> Press the control knob to show the crosshairs.
> Touch the MMI touch control pad with two fin-
gers and pull your fingers together or push
them apart.
> Press the [BACK] button (%) to hide the cross-
hairs > page 710, fig. 114.
Adjusting the sound focus
Applies to: vehicles with MMI touch
Requirement: the Balance/fader function must
be selected > page 193.
Moving the crosshairs for sound focus
> Move your finger on the MMI touch control pad
in the desired direction.
Saving the position of the crosshairs
> Press the control knob twice, or
> Press the [BACK] button (2) > page 110,
fig. 114.
Using the DVD main menu
Applies to: vehicles with MMI touch and DVD drive
Requirement: a DVD must be playing
= page 177. The DVD main menu is shown.
Page 117 of 280

8S1012721BE
Multi Media Interface
Selecting a menu item
> Move your finger up/down or left/right on the
MMI touch control pad.
Confirming a selection
> Press the control knob.
@) Tips
The volume of the prompts for the MMI touch
can be adjusted separately > page 194.
Control knob with
joystick function
Applies to: vehicles with control knob with joystick function
2
RAH-8515|
© »
&
Fig. 124 Control knob with joystick function: operating
concept
You can push the control knob up or down (@) or
to the right or left @).
Additional functions
Applies to: vehicles with control knob with joystick function
Opening and closing the selection menu
> Push the control knob toward the left to open
the selection menu > page 177.
> Press the [BACK] button (7) > page 710,
fig. 114 to return to the function one level up,
or
> Push the control knob to the right to close the
selection menu.
Opening and closing the options menu
> Push the control knob to the right to open the
options menu > page 1717.
> Press the [BACK] button @ > page 110,
fig. 114 to return to the function one level up,
or
> Push the control knob to the left to close the
options menu.
Displaying the input field/switching to
speller input*
> Push the control knob upward to reach the be-
ginning of a list in the central area or the input
field.
> If the input field is already open, switch directly
to the speller in the input field by pushing the
control knob up again > page 177.
On the map
Requirement: a map must be displayed
=> page 157, fig. 140.
Displaying the input field*
> Push the control knob upward.
Displaying route guidance
> When route guidance is active, you can also dis-
play the route guidance by pushing the control
knob up > page 149.
Zooming in/out on the map
> Turn the control knob to the right/left to zoom
in/out on the map.
Adjusting the sound focus*
Requirement: the balance/fader function must
be selected > page 193. The crosshairs are
shown.
Moving the sound focus using the crosshairs
The crosshairs can be moved horizontally and ver-
tically.
> Turn the control knob to the right or left to
move the crosshairs horizontally.
» Press the control knob to move the crosshairs
vertically.
> Turn the control knob to the right or left.
> Press the control knob again to save the set-
ting.
115
Page 118 of 280

Multi Media Interface
Using the DVD main menu
Applies to: vehicles with a DVD drive
Requirement: a DVD must be playing
= page 177. The DVD main menu is shown.
Selecting a menu item
> Move the control knob with joystick function up
or down or to the left or right.
Confirming a selection
> Press the control knob.
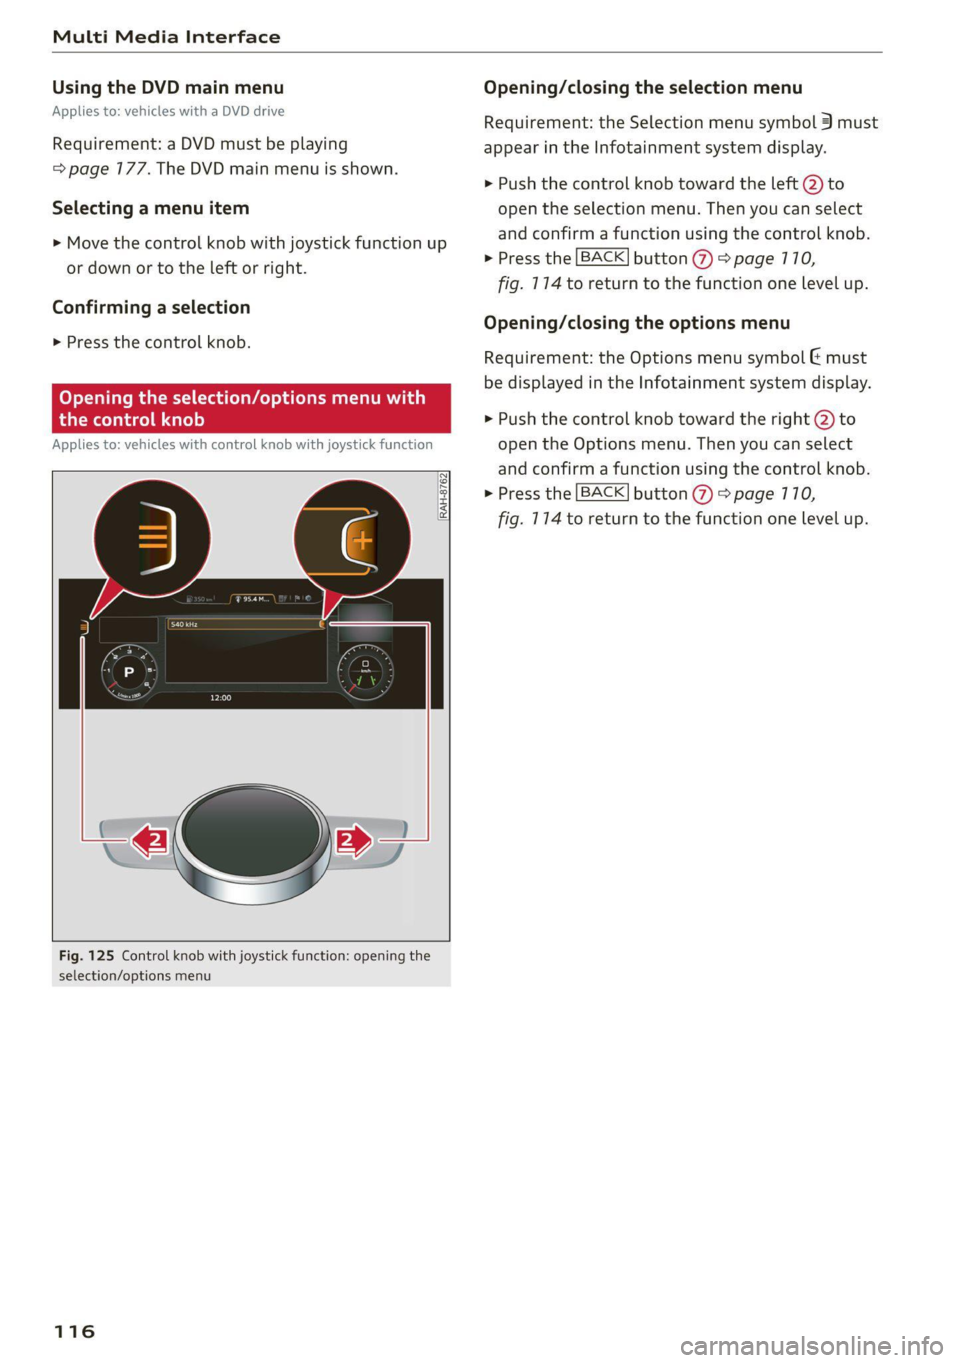
Opening the selection/options menu w
the control knob
Applies to: vehicles with control knob with joystick function
RAH-8762|
Fig. 125 Control knob with joystick function: opening the
selection/options menu
116
Opening/closing the selection menu
Requirement: the Selection menu symbol 3 must
appear in the Infotainment system display.
> Push the control knob toward the left @) to
open the selection menu. Then you can select
and confirm a function using the control knob.
> Press the [BACK] button (7) > page 710,
fig. 114 to return to the function one level up.
Opening/closing the options menu
Requirement: the Options menu symbol & must
be displayed in the Infotainment system display.
> Push the control knob toward the right @) to
open the Options menu. Then you can select
and confirm a function using the control knob.
> Press the [BACK] button @ > page 710,
fig. 114 to return to the function one level up.
Page 119 of 280

8S1012721BE
Multi Media Interface
Letter/number speller
UVWXYZ ® © fi Fe
@
o eee baa ale w= 10ce
cont
bate)
ee)
RAH-8764)
> Albert, Simon
id LoyTa ea 8
id loleu Me ealie
> len, Susan
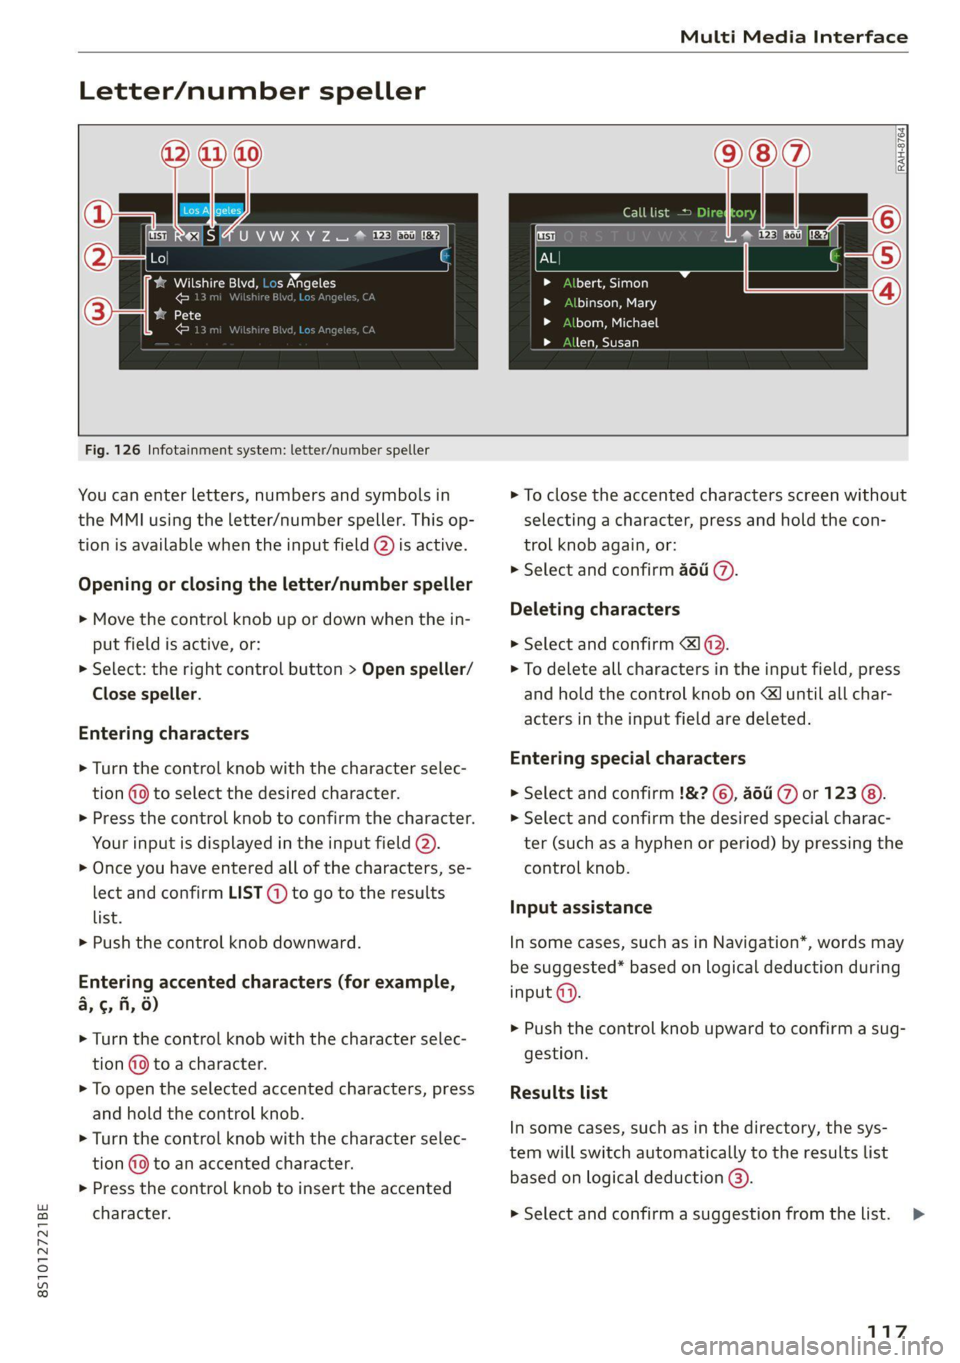
Fig. 126 Infotainment system: letter/number speller
You can enter letters, numbers and symbols in
the MMI using the letter/number speller. This op-
tion is available when the input field @) is active.
Opening or closing the letter/number speller
> Move the control knob up or down when the in-
put field is active, or:
> Select: the right control button > Open speller/
Close speller.
Entering characters
> Turn the control knob with the character selec-
tion (9 to select the desired character.
>» Press the control knob to confirm the character.
Your input is displayed in the input field @).
> Once you have entered all of the characters, se-
lect and confirm LIST (@) to go to the results
list.
> Push the control knob downward.
Entering accented characters (for example,
a, ¢, fi, 6)
> Turn the control knob with the character selec-
tion @9 to a character.
> To open the selected accented characters, press
and hold the control knob.
> Turn the control knob with the character selec-
tion (@9 to an accented character.
> Press the control knob to insert the accented
character.
> To close the accented characters screen without
selecting a character, press and hold the con-
trol knob again, or:
> Select and confirm a6u @.
Deleting characters
> Select and confirm 1 @.
> To delete all characters in the input field, press
and hold the control knob on & until all char-
acters in the input field are deleted.
Entering special characters
> Select and confirm !&? ©, ati (7) or 123 @).
> Select and confirm the desired special charac-
ter (such as a hyphen or period) by pressing the
control knob.
Input assistance
In some cases, such as in Navigation*, words may
be suggested* based on logical deduction during
input @).
> Push the control knob upward to confirm a sug-
gestion.
Results list
In some cases, such as in the directory, the sys-
tem will switch automatically to the results list
based on logical deduction @).
> Select and confirm a suggestion from the list.
117
>
Page 120 of 280

Multi Media Interface
Switching between the speller and MMI
touch*
Requirement: the input field (2) must be active.
The handwriting recognition for the MMI touch
control pad* is automatically activated. Simply
Overview of symbols in the speller
The symbols in the letter/number speller are ex-
plained in the following table:
start writing.
Symbol/Description Description
LIST orw Switches to the results list.
Input field Displays the current input.
Results list
Displays a list with suggestions based on the letters already en-
tered.
Switches from lower case to upper case letters or from upper case
t
to lower case letters.
& Opens additional speller options, for example Close speller and
Clear input field.
1&7 Punctuation marks and special characters (such as hyphens or peri-
-— ods) are shown.
aod Displays accented characters (such as 4, ¢, ff, 6).
123/ABC Switches from letter to number input or from number to letter in-
put.
Adds a space in the input field.
Character selection Highlights the selected character.
A Inserts the suggested word* when you push the control knob up.
=!)
Deletes the character to the left of the cursor.
Ololoeol
ee)
o|eo|o|e
woo
Tips
Accented characters are not available for ev-
ery letter.
Free text search
Applies to: vehicles with free text search
Sa
bert, Simon
binson, Mary
bom, Michael
len, Susan
len, Toby
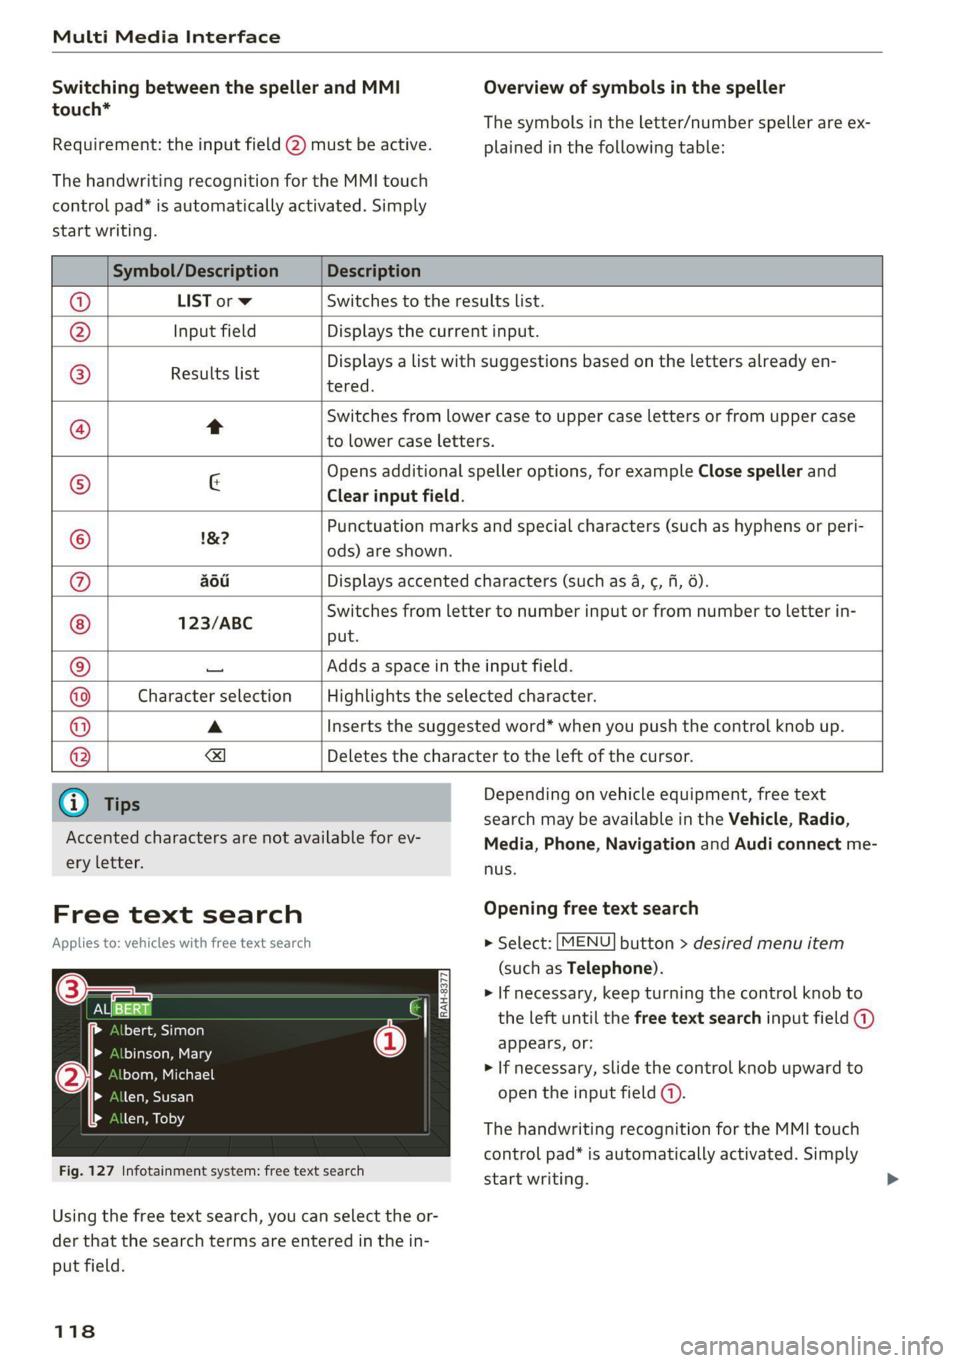
Fig. 127 Infotainment system: free text search
Depending on vehicle equipment, free text
search may be available in the Vehicle, Radio,
Media, Phone, Navigation and Audi connect me-
nus.
Opening free text search
> Select: [MENU] button > desired menu item
(such as Telephone).
> If necessary, keep turning the control knob to
the left until the free text search input field @)
appears, or:
> If necessary, slide the control knob upward to
open the input field (@).
The handwriting recognition for the MMI touch
control pad* is automatically activated. Simply
start writing.
Using the free text search, you can select the or-
der that the search terms are entered in the in-
put field.
118