2021 AUDI TT navigation
[x] Cancel search: navigationPage 5 of 280

8S1012721BE
Table of contents
Infotainment system............ 110
Multi Media Interface............ 110
Traffic safety information............. 110
Introduction sess x s eesia os woune ys mes vo 110
MMI On/Off knob with joystick function.. 110
MMUOpPeration ; xcsu « : wows & g eam 2 pe 111
MMIPtOUGR « sscsise oo score o oie oo mee 2 112
Control knob with joystick function..... 115
Letter/number speller................ 117
Free text search............22--0 eee 118
Menus and symbols.................. 119
Voice recognition system........ 122
Generalinformation................. 121
Operating......... 2... eee eee eae 122
Command overview information........ 123
COMAMMANES « ssssws = x csnawns » x contains © w emeoens a 123
Telephone....................-005 128
IMtrOdUCtION sevens & & ewe «8 wea oo wea oo 128
Setup... 2... eee eee eee 128
Using the Audi phone box............. 130
Using the telephone...............00- 132
Favorites 134
Messages 135
Listening to voicemail................ 137
Directory... . 0... ccc eee eee 137
Additional settings.................. 139
Troubleshooting « noas ss coos s ass as ners 140
Audi connect..................04. 141
General information................. 141
Audi connect Infotainment............ 141
Using a Wi-Fi hotspot................ 143
Audi connect Infotainment services..... 143
SOttinGSscves so seems 2 a seus wow sense oceans a 145
Troubleshooting ...............00000- 146
Navigation....................0008 148
Opening navigation.................. 148
Entering adestination................ 149
Home addressivici: < o sccna vs eecia ee ees « 154
FAVONIEES: scsane 6 9 sonics © wieneon ow eee aw otecmte 154
Directory contacts................... 154
Alternative routes). « ciss ss essa s se veess 155
Additional settings .................. 155
Map... cece cece eee eee eee 157
Satellite Map’: = « seas < s seee eee oe 160
Accessing traffic information.......... 161
Troubleshooting.............0e00ee ee 163
REGIE. wei ss tion a 2 aoe 6s maswa & & ease 164
Opening the radio................... 164
RadiGTUnctiOns ecas . wees as ewe ss ves 165
RadioiMeNy « « sess so soc & 2 sono + reve 166
Presets... 0.0... cee eee eee eee eee 166
Additional settings................0. 167
Troubleshooting seis ss news as eewa ae es 168
Media.......... 6.6.6. cece ee eee 169
IntrOduetion s sews 2 «gus + een x 2 meme as 169
INGEOS s suis wc inavins a a suncina a symrene ao atrrmns 169
Media drives........... 000 c eee eee eee 170
Bluetooth audio player............... 172
Wi-Fi audio player................... 173
Online media and Internet radio........ 174
Multimedia connections.............. 175
Playing media’. «+ sesso a x wees eo aman oo sew 177
Additional settings...............005 180
Supported media and file formats...... 183
Troubleshooting « wo sicc ss vices ss eens ov 184
Audi smartphone interface...... 187
SOtUD « saiex o & eam oo paws 2 oe REwS s Rees 187
OPerating is « a seseos « wanseee « canon « 6 were @ » 188
Troubleshooting ........--...0seeeee 188
System settings.................. 189
Setting the date andtime............. 189
MMIS@ttiNGS aes 5 ¢ seis s x saree so es 189
Connection manager...............5. 190
System update............0.--000 ee 192
Sound Settings sees < = sews sv een se eee 193
VOLUMEISEELINGS suisse & & susan 6 inane 6 3 snare 193
Restarting the MMI...............00. 194
Software license information.......... 154
Additional information.......... 195
Brands and licenses.................. 195
Maintenance and Care........... 196
Checking and Filling............. 196
Ful@lesas = 2 ewe @ anes 5 = siete ee norms Fe Ree 196
RETUCLINQ ais. ce cnciosis oo seevave wo arene © ¥ aoe 197
Emissions control system............. 200
Motor compartment..............5.. 200
Page 9 of 280

8S1012721BE
Quick access
©
©8080
QOOD®D
OOOOOOO®D
OO
O
Side assist display ..............
Door handle
Central locking switch ...........
Air vent with seat heating controls
Lever for:
—Turn signals and high beams ....
Multifunction steering wheel with:
— Horn be
— Driver's@irbag . ccis ss ewan sens
— Buttons for the virtual instrument
cluster, including the driver infor-
mation system, audio/video, tele-
phone, navigation and voice rec-
ognition system
—[START ENGINE STOP] button ...
— Audi drive select ..............
— Shift paddles ................
Audi virtual cockpit (instrument
cluster) ........ 2... ee eee eee ee
Windshield washer system lever ..
Starting the engine if there is a
malfunction ..............-0005
Adjustable steering column ......
Cruise controllever .............
Instrument illumination .........
Hood release ............--.00-
Headlight control switch ........
Power exterior mirror adjustment .
Power windows ................
Air vent including climate control
system controls ..............-.
Lockable glove compartment
Drives for CD, DVD, SIM/SD cards .
Front passenger's airbag ........
Rear window defogger button
Depending on equipment, buttons
for:
—drive select ..................
— Electronic Stabilization Control
(ESO) « ss mews ¢ x news 8 x eis eo es
—Emergency flashers ...........
— Retractable rear spoiler ........
Depending on equipment, center
console with:
— Audi music interface ..........
93
23
37
52 7S
96
85
10
41
77
48
89
39
200
36 39 27 69
170
52
96
104
38
108 176
— Audi phone box ............... 130
@ Infotainment system on/off button . 110
@5) Infotainment system unit ........ 110
@8 Wind deflector button .......... 33
@ Depending on equipment:
— Storage compartment
—Cup holder ...............0.. 63
@8 Power top button .............. 31
@9 Parking brake ................. 79
G0) Depending on equipment:
—[START ENGINE STOP] button ... 75
— Engine sound button
@) Selector lever (S tronic).......... 81
@) Tips
Some the equipment listed here is only instal-
led in certain models or is available as an op-
tion.
Indicator lights overview
The indicator lights in the instrument cluster
blink or turn on. They indicate functions or mal-
functions. Some warning and indicator lights
turn on when you switch the ignition on and must
turn off when the drive system is switched on or
while driving.
With some indicator lights, messages may ap-
pear and warning signals may sound. The indica-
tor lights and messages may be covered by other
displays. To show them again, select the second
tab for messages with the multifunction steering
wheel > page 72.
Some indicator lights in the display can display in
several colors.
OMe ile Lins
If the A or A indicator light turns on, check the
message in the instrument cluster.
COAT
The following indicator lights may be available,
depending on the vehicle equipment:
Page 14 of 280

Instrument cluster
At temperatures below 41 °F (+5 °C), a snowflake
symbol appears in front of the temperature dis-
play > A.
ZA WARNING
Do not assume the roads are free of ice based
on the outside temperature display. Be aware
that there may be ice on roads even when the
outside temperature is around 41 °F (+5 °C)
and that ice can increase the risk of accidents.
Fuel level
The display @ > page 10, fig. 3 only works when
the ignition is switched on. When the display has
reached the reserve mark, a red LED turns on and
the iy indicator light turns on > page 198.
For the tank capacity in your vehicle, refer to the
Technical Data > page 264.
@) Note
Never drive until the tank is completely emp-
ty. The irregular supply of fuel that results
from that can cause engine misfires. Uncom-
busted fuel will then enter the exhaust sys-
tem. This can cause overheating and damage
to the catalytic converter.
Multifunction steering
wheel
87.6 MHz
cS BAL
90.0 MHz
90.5 MHz
91.5 MHz
TRON Lard
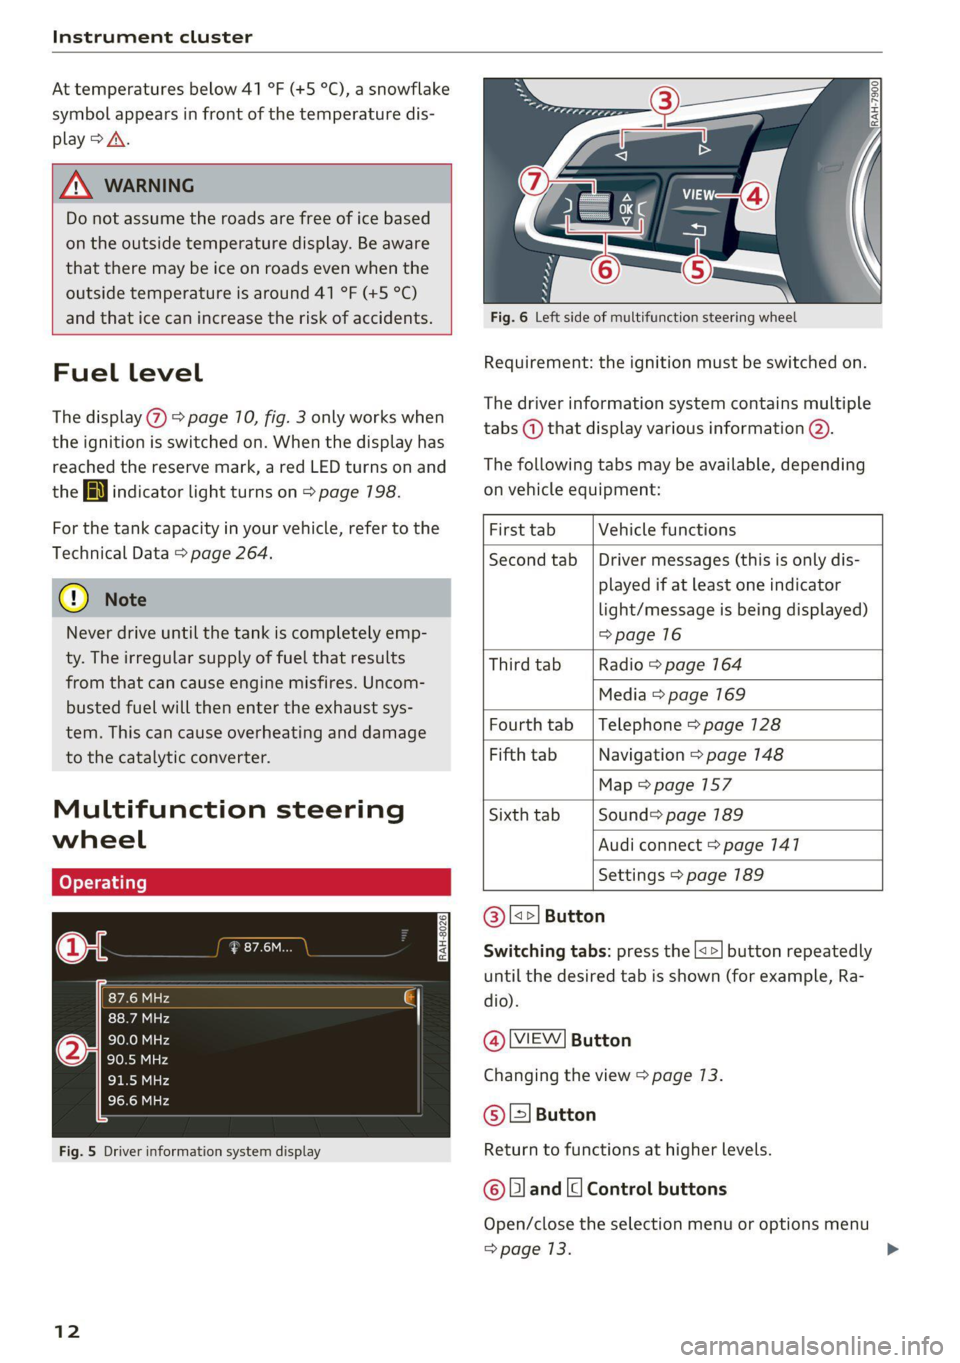
Fig. 5 Driver information system display
12
Fig. 6 Left side of multifunction steering wheel
Requirement: the ignition must be switched on.
The driver information system contains multiple
tabs (—) that display various information @).
The following tabs may be available, depending
on vehicle equipment:
First tab Vehicle functions
Second tab | Driver messages (this is only dis-
played if at least one indicator
light/message is being displayed)
=>page 16
Third tab Radio > page 164
Media > page 169
Fourth tab | Telephone > page 128
Fifth tab Navigation > page 148
Map > page 157
Sixth tab Sound> page 189
Audi connect > page 141
Settings > page 189
@|s=] Button
Switching tabs: press the [<>] button repeatedly
until the desired tab is shown (for example, Ra-
dio).
@ MEW] Button
Changing the view > page 13.
© [=] Button
Return to functions at higher levels.
© and [| Control buttons
Open/close the selection menu or options menu
=> page 13.
Page 16 of 280
![AUDI TT 2021 Owner´s Manual Instrument cluster
> Open the first vehicle functions tab using the
[<>] button on the multifunction steering
wheel.
> Select on the multifunction steering wheel: left
control button > Layout AUDI TT 2021 Owner´s Manual Instrument cluster
> Open the first vehicle functions tab using the
[<>] button on the multifunction steering
wheel.
> Select on the multifunction steering wheel: left
control button > Layout](/manual-img/6/40287/w960_40287-15.png)
Instrument cluster
> Open the first vehicle functions tab using the
[<>] button on the multifunction steering
wheel.
> Select on the multifunction steering wheel: left
control button > Layout > Sport layout or Clas-
sic layout.
Adjusting the additional display
Depending on the vehicle equipment, the addi-
tional displays that can be selected may vary.
> Open the first vehicle functions tab using the
[<>] button on the multifunction steering
wheel.
> Select on the multifunction steering wheel:
right control button > Additional display.
>» Select the desired additional display.
@) Tips
Applies to: vehicles with sport view
Always set the desired default view before
driving, because the display functions will not
be available for several seconds.
Preset buttons
Fig. 10 Multifunction steering wheel, right side
@ |e] Button
— Accepting a call: press the |¢] button when
there is an incoming call.
— Ending a call: press the [¢] button during a
phone call to end the call.
— Opening the call list: if no phone call is in prog-
ress and there are no incoming calls, press the
[4] button.
14
@ [2] Button
— Switching the voice recognition system on:
briefly press the [2] button. Say the desired
command after the Beep.
— Switching the voice recognition system off:
press and hold the |®| button. Or: say the com-
mand Cancel.
For more information about the voice recognition
system, see > page 122, Voice recognition sys-
tem.
@ Right thumbwheel
You can adjust the volume of an audio source or a
system message (for example, from the voice
recognition system) when the sound is playing.
— Increasing or decreasing the volume: turn the
right thumbwheel up or down.
— Muting or pausing: turn the right thumbwheel
down. Or: press the right thumbwheel.
—Unmuting or resuming: turn the right thumb-
wheel up. Or: press the right thumbwheel.
@ [ks] button [b>
— Selecting the previous/next track or station:
press the button.
— Fast forwarding/rewinding audio files: press
and hold the button until the desired
location in the file is reached.
kid] or [DDI
k<] or [D>
© [|] Button
— Programmable steering wheel button - open-
ing a function: press the |*] button.
— Programmable steering wheel button - re-
questing a function: press and hold the [*] but-
ton.
— Programmable steering wheel button - chang-
ing a function: select the first tab > Vehicle
settings > Steering wheel button assignment.
© [s«] Button
— Repeating the last navigation prompt: press
the [| button when route guidance is active.
— Changing the voice guidance volume: when
route guidance is active, turn the right thumb-
wheel upward or downward during a navigation
prompt.
Page 38 of 280

Lights and Vision
Lights and Vision
Exterior lighting
Switching the lights on and off
B8V-0430
Fig. 40 Instrument panel: light switch
Light switch ©
Turn the switch to the corresponding position.
When the lights are switched on, the »« symbol
turns on.
O - lights are off (in some markets, the daytime
running lights* are switched on when the ignition
is switched on.)
— USA models: the daytime running lights are au-
tomatically switched on when the ignition is
switched on and the light switch is set to the O
or the AUTO position (only in daylight). The
Daytime running lights can be switched on and
off in the MMI > page 37 > A.
— Canada models: the daytime running lights
switch on automatically when the ignition is
switched on and the light switch is set to the O
position, 24 or the AUTO position (only in day-
light) > A.
AUTO* - automatic headlights switch on and off
depending on brightness, for example in twilight,
during rain or in tunnels.
30a - Parking lights
2D - Low beam headlights
Buttons
When you turn the light switch to the AUTO or
low beam headlight position 20, you can activate
the following functions:
36
So - All-weather lights*. The headlights automat-
ically adjust so that there will be less glare, for
example when the road surface is wet.
Q# - Rear fog lights*
Automatic dynamic headlight range control
system*
Your vehicle is equipped with a headlight range
control system so that there is less glare for on-
coming traffic if the vehicle load changes. The
headlight range also adjusts automatically when
braking and accelerating.
Light functions
The following light functions are available de-
pending on vehicle equipment and only function
when the light switch is in the AUTO position.
Static cornering light* (vehicles with LED head-
lights) - the cornering light switches on automat-
ically when the steering wheel is turned at a cer-
tain angle at speeds up to approximately 44 mph
(70 km/h) and when the turn signal is activated
at speeds up to approximately 25 mph
(40 km/h). The area to the side of the vehicle is
illuminated better when turning.
Highway light function* (vehicles with LED head-
lights) - This function adapts the lighting for
highway driving based on vehicle speed.
Speed dependent light distribution* (vehicles
with LED headlights) - The speed dependent light
distribution adapts the light in towns and on
highways or expressways. Intersections can also
be illuminated on vehicles with a navigation sys-
tem*.
ZA WARNING
— Automatic headlights* are only intended to
assist the driver. The driver is still responsi-
ble for controlling the headlights and may
need to switch them on and off manually
depending on light and visibility conditions.
For example, fog cannot be detected by the
light sensors. So always switch on the low
beams under these weather conditions and
when driving in the dark ZO. >
Page 114 of 280

Multi Media Interface
Selection menu
Requirement: the Selection menu symbol 3 must
appear in the Infotainment system display.
Through the selection menu, you can open addi-
tional functions within a menu item (such as Ra-
dio).
Opening the selection menu
> Press the left control button. Then you can se-
lect and confirm a function using the control
knob.
Options menu
Requirement: the Options menu symbol & must
be displayed in the Infotainment system display.
Using the options menu, you can select and con-
firm context-dependent functions as well as set-
tings within a menu item (such as Radio).
Opening the options menu
> Press the right control button. Then you can se-
lect and confirm a function using the control
knob.
Information about menu paths
This guide shows you at a glance the paths for
opening a desired menu and its settings and
functions.
Example of a path
> Select: [RADIO] button > left control button >
FM.
Following the path
> Press the [RADIO] button.
> Press the left control button.
> Turn the control knob to the FM menu item to
select it.
> Press the control knob to confirm the selected
FM menu item.
The selected and confirmed function is executed.
In this example, the FM frequency band is set.
112
MMI touch
MMI touch control pad
Applies to: vehicles with MMI touch
RAH-8760,
%-wmashire Blvd, Los Angeles
© 21 mi Wilshire Blvc Angele
ba 1)
Resa)
Ei E Locust St
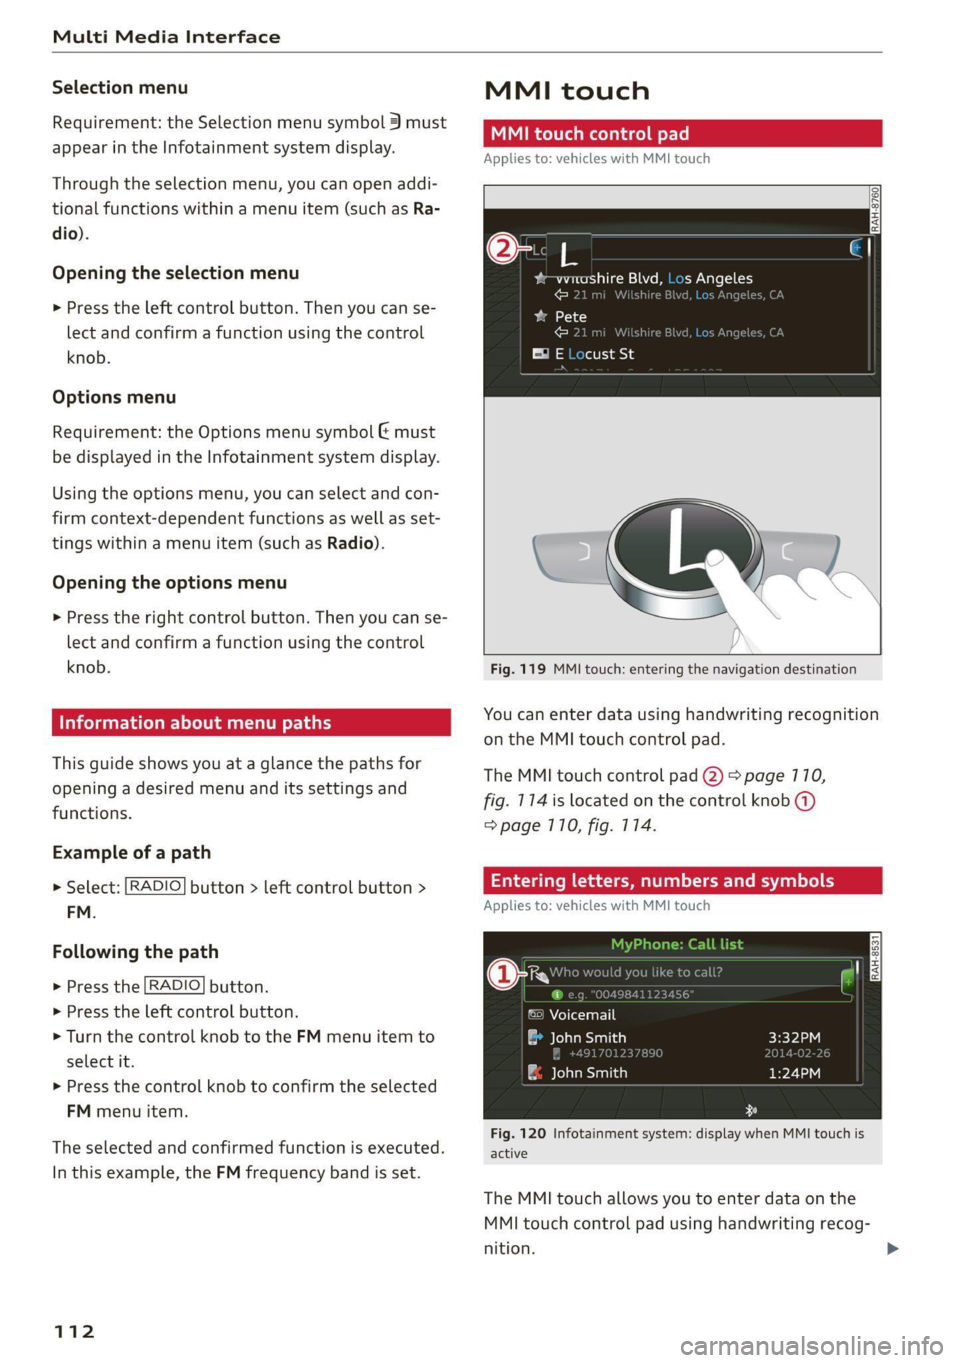
Fig. 119 MMI touch: entering the navigation destination
You can enter data using handwriting recognition
on the MMI touch control pad.
The MMI touch control pad (2) > page 110,
fig. 114 is located on the control knob (@)
=> page 710, fig. 114.
Entering letters, numbers and symbols
Applies to: vehicles with MMI touch
©) Voicemail
a John Smith
| ae elaaesiatien)
Fig. 120 Infotainment system: display when MMI touch is
active
The MMI touch allows you to enter data on the
MMI touch control pad using handwriting recog-
nition.
Page 119 of 280

8S1012721BE
Multi Media Interface
Letter/number speller
UVWXYZ ® © fi Fe
@
o eee baa ale w= 10ce
cont
bate)
ee)
RAH-8764)
> Albert, Simon
id LoyTa ea 8
id loleu Me ealie
> len, Susan
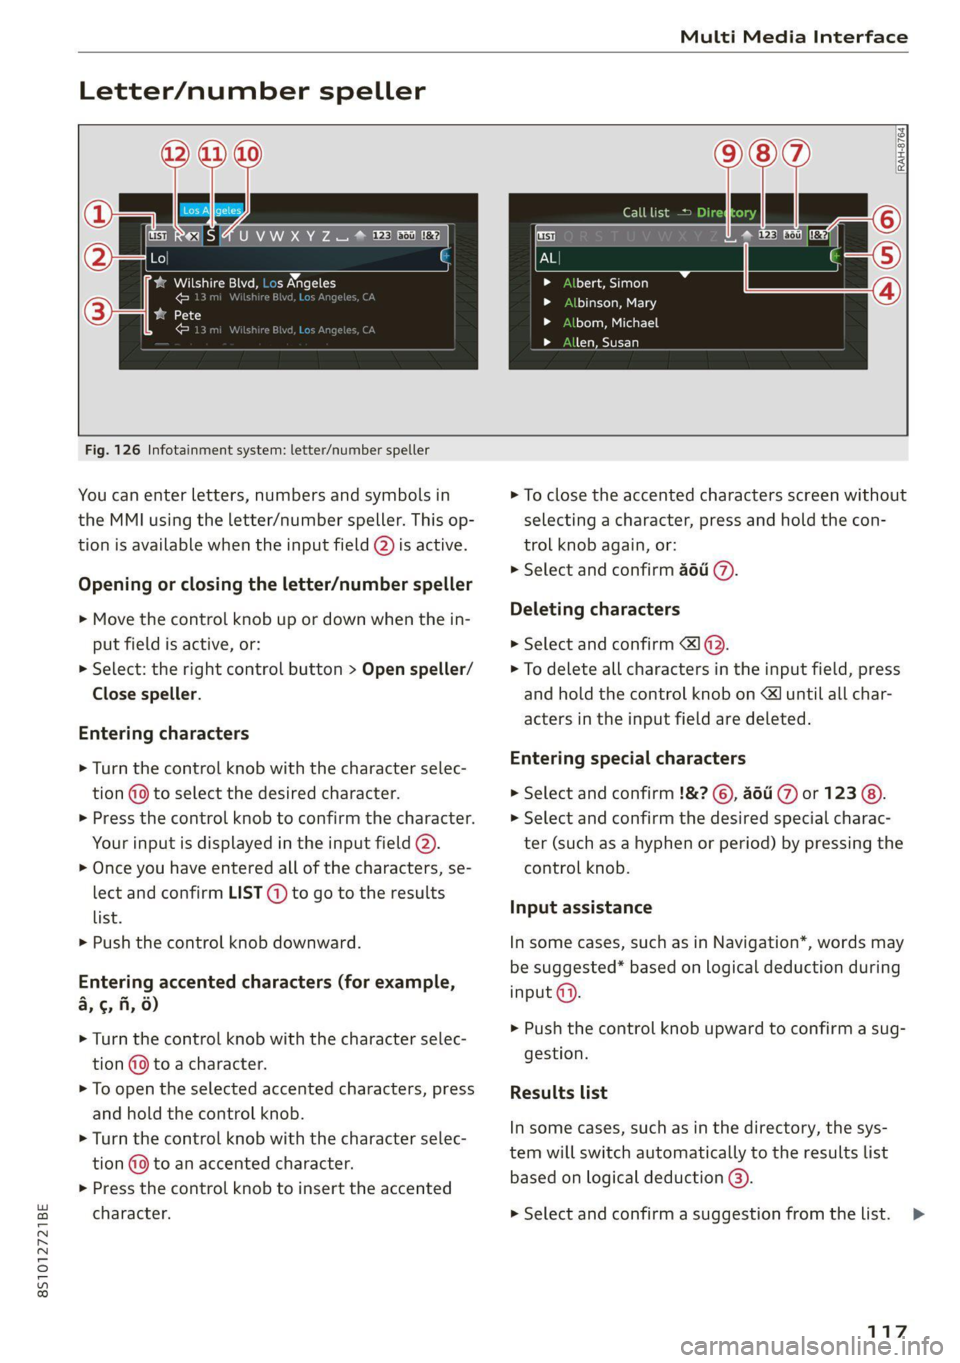
Fig. 126 Infotainment system: letter/number speller
You can enter letters, numbers and symbols in
the MMI using the letter/number speller. This op-
tion is available when the input field @) is active.
Opening or closing the letter/number speller
> Move the control knob up or down when the in-
put field is active, or:
> Select: the right control button > Open speller/
Close speller.
Entering characters
> Turn the control knob with the character selec-
tion (9 to select the desired character.
>» Press the control knob to confirm the character.
Your input is displayed in the input field @).
> Once you have entered all of the characters, se-
lect and confirm LIST (@) to go to the results
list.
> Push the control knob downward.
Entering accented characters (for example,
a, ¢, fi, 6)
> Turn the control knob with the character selec-
tion @9 to a character.
> To open the selected accented characters, press
and hold the control knob.
> Turn the control knob with the character selec-
tion (@9 to an accented character.
> Press the control knob to insert the accented
character.
> To close the accented characters screen without
selecting a character, press and hold the con-
trol knob again, or:
> Select and confirm a6u @.
Deleting characters
> Select and confirm 1 @.
> To delete all characters in the input field, press
and hold the control knob on & until all char-
acters in the input field are deleted.
Entering special characters
> Select and confirm !&? ©, ati (7) or 123 @).
> Select and confirm the desired special charac-
ter (such as a hyphen or period) by pressing the
control knob.
Input assistance
In some cases, such as in Navigation*, words may
be suggested* based on logical deduction during
input @).
> Push the control knob upward to confirm a sug-
gestion.
Results list
In some cases, such as in the directory, the sys-
tem will switch automatically to the results list
based on logical deduction @).
> Select and confirm a suggestion from the list.
117
>
Page 120 of 280

Multi Media Interface
Switching between the speller and MMI
touch*
Requirement: the input field (2) must be active.
The handwriting recognition for the MMI touch
control pad* is automatically activated. Simply
Overview of symbols in the speller
The symbols in the letter/number speller are ex-
plained in the following table:
start writing.
Symbol/Description Description
LIST orw Switches to the results list.
Input field Displays the current input.
Results list
Displays a list with suggestions based on the letters already en-
tered.
Switches from lower case to upper case letters or from upper case
t
to lower case letters.
& Opens additional speller options, for example Close speller and
Clear input field.
1&7 Punctuation marks and special characters (such as hyphens or peri-
-— ods) are shown.
aod Displays accented characters (such as 4, ¢, ff, 6).
123/ABC Switches from letter to number input or from number to letter in-
put.
Adds a space in the input field.
Character selection Highlights the selected character.
A Inserts the suggested word* when you push the control knob up.
=!)
Deletes the character to the left of the cursor.
Ololoeol
ee)
o|eo|o|e
woo
Tips
Accented characters are not available for ev-
ery letter.
Free text search
Applies to: vehicles with free text search
Sa
bert, Simon
binson, Mary
bom, Michael
len, Susan
len, Toby
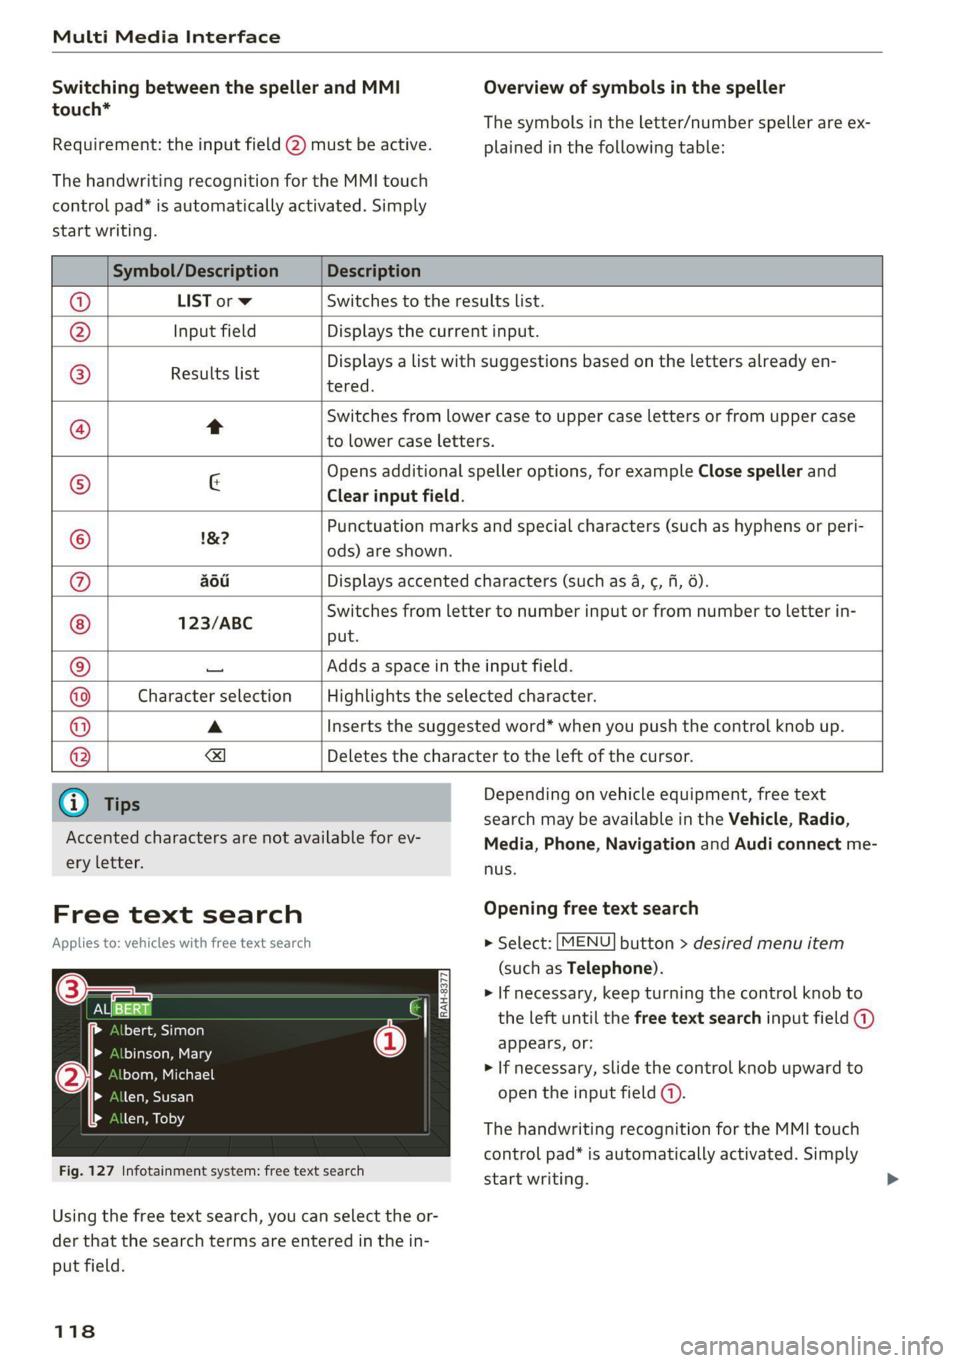
Fig. 127 Infotainment system: free text search
Depending on vehicle equipment, free text
search may be available in the Vehicle, Radio,
Media, Phone, Navigation and Audi connect me-
nus.
Opening free text search
> Select: [MENU] button > desired menu item
(such as Telephone).
> If necessary, keep turning the control knob to
the left until the free text search input field @)
appears, or:
> If necessary, slide the control knob upward to
open the input field (@).
The handwriting recognition for the MMI touch
control pad* is automatically activated. Simply
start writing.
Using the free text search, you can select the or-
der that the search terms are entered in the in-
put field.
118