2021 ALFA ROMEO STELVIO phone
[x] Cancel search: phonePage 60 of 280
GETTING TO KNOW YOUR VEHICLE
58
Your mobile phone must be designed for Qi
wireless charging.
NOTE:
Do not place the key fob or any other type of
metal/magnetized object inside the mobile
phone housing or near the wireless
charging pad.
Be sure to place the mobile device correctly
(display facing upward) on the wireless
charging pad.
The ignition must be in the ON/RUN position
in order for the phone to charge.
To avoid interference with the key fob
search, the wireless charging pad will stop
charging when any door is opened.The following messages will display in the
radio system:
“Your phone is being charged” — The phone
has begun to charge.
“Phone Fully Charged” — The phone has
completed charging its battery.
“Foreign Object Detected” — The phone is
not enabled for wireless charging or an
object that is not permitted has been placed
on the wireless charging pad.
“Unavailable System” — There is a malfunc
-
tion with the wireless charging pad.
The driver can deactivate these messages
through the radio system. Refer to the Infor -
mation and Entertainment System Owner’s
Manual Supplement for further information.
POWER WINDOWS
Power Window Controls
The power window switches work with the igni -
tion in the ACC or ON/RUN position and for
three minutes after the ignition has been
placed in the OFF position. When one of the
front doors is opened, this operation is
disabled.
The window controls on the driver's door
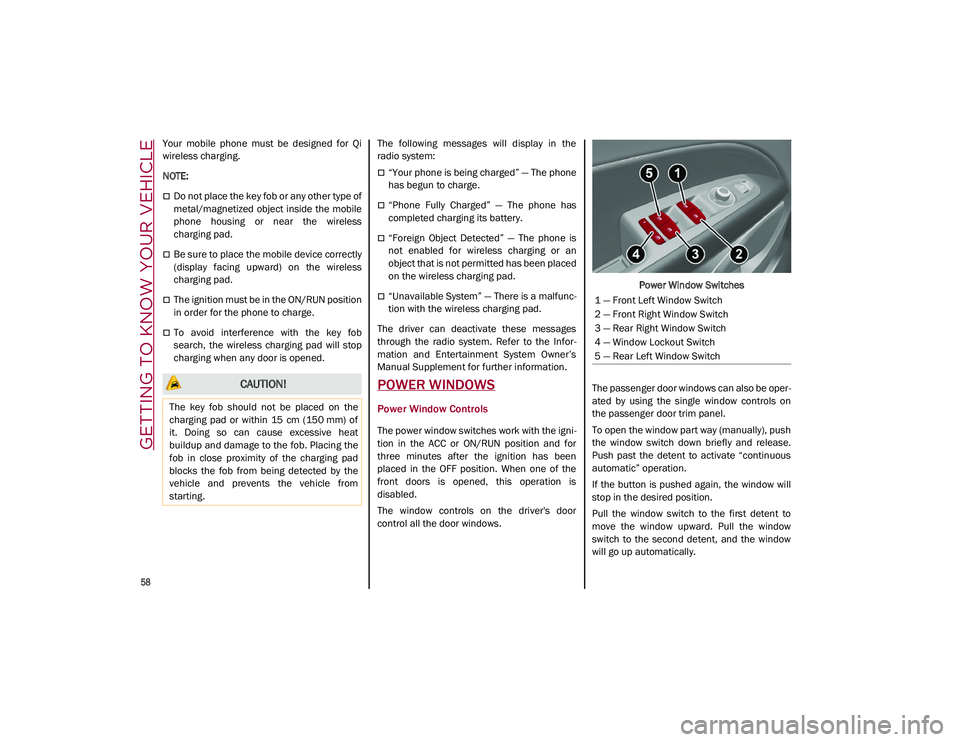
control all the door windows. Power Window Switches
The passenger door windows can also be oper -
ated by using the single window controls on
the passenger door trim panel.
To open the window part way (manually), push
the window switch down briefly and release.
Push past the detent to activate “continuous
automatic” operation.
If the button is pushed again, the window will
stop in the desired position.
Pull the window switch to the first detent to
move the window upward. Pull the window
switch to the second detent, and the window
will go up automatically.
CAUTION!
The key fob should not be placed on the
charging pad or within 15 cm (150 mm) of
it. Doing so can cause excessive heat
buildup and damage to the fob. Placing the
fob in close proximity of the charging pad
blocks the fob from being detected by the
vehicle and prevents the vehicle from
starting.
1 — Front Left Window Switch
2 — Front Right Window Switch
3 — Rear Right Window Switch
4 — Window Lockout Switch
5 — Rear Left Window Switch
21_GU_OM_EN_USC_t.book Page 58
Page 72 of 280
GETTING TO KNOW YOUR INSTRUMENT PANEL
70
7. Traffic Sign Recognition (TSR) InformationDisplay
8. Time
9. External Temperature
10. Main Display: Vehicle Speed Display, Trip Computer Information, etc...
The screens can be selected, on rotation,
by pushing the MENU selection button on
the windshield wiper stalk.
MENU Selection Button
Depending on the driving mode chosen us -
ing the Alfa DNA (Dynamic, Natural, and
Advanced Efficiency) the screens can be
graphically different. Navigation instruc -
tions and call information can be set and
displayed in the Information and Entertain -
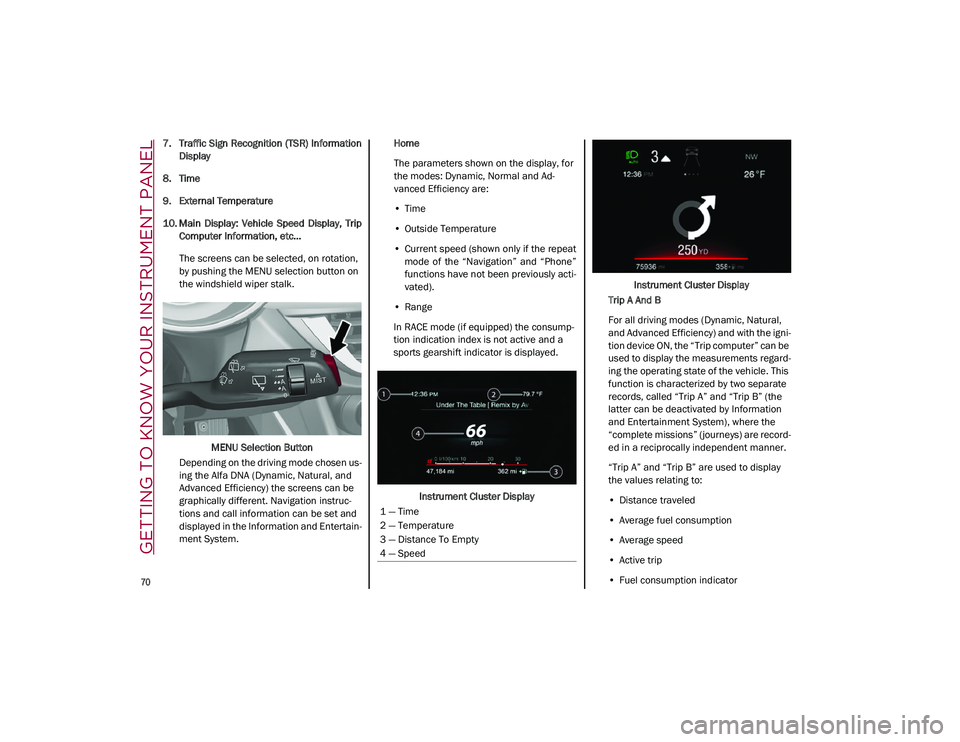
ment System. Home
The parameters shown on the display, for
the modes: Dynamic, Normal and Ad
-
vanced Efficiency are:
• Time
• Outside Temperature
• Current speed (shown only if the repeat
mode of the “Navigation” and “Phone”
functions have not been previously acti-
vated).
• Range
In RACE mode (if equipped) the consump -
tion indication index is not active and a
sports gearshift indicator is displayed.
Instrument Cluster Display Instrument Cluster Display
Trip A And B
For all driving modes (Dynamic, Natural,
and Advanced Efficiency) and with the igni -
tion device ON, the “Trip computer” can be
used to display the measurements regard -
ing the operating state of the vehicle. This
function is characterized by two separate
records, called “Trip A” and “Trip B” (the
latter can be deactivated by Information
and Entertainment System), where the
“complete missions” (journeys) are record -
ed in a reciprocally independent manner.
“Trip A” and “Trip B” are used to display
the values relating to:
• Distance traveled
• Average fuel consumption
• Average speed
• Active trip
• Fuel consumption indicator
1 — Time
2 — Temperature
3 — Distance To Empty
4 — Speed
21_GU_OM_EN_USC_t.book Page 70
Page 75 of 280
73
To access the settings list in the radio, proceed
as follows:
Press the Home button to access the main
menu.
Select Settings from the main menu using
the Rotary Knob or by pressing Settings on
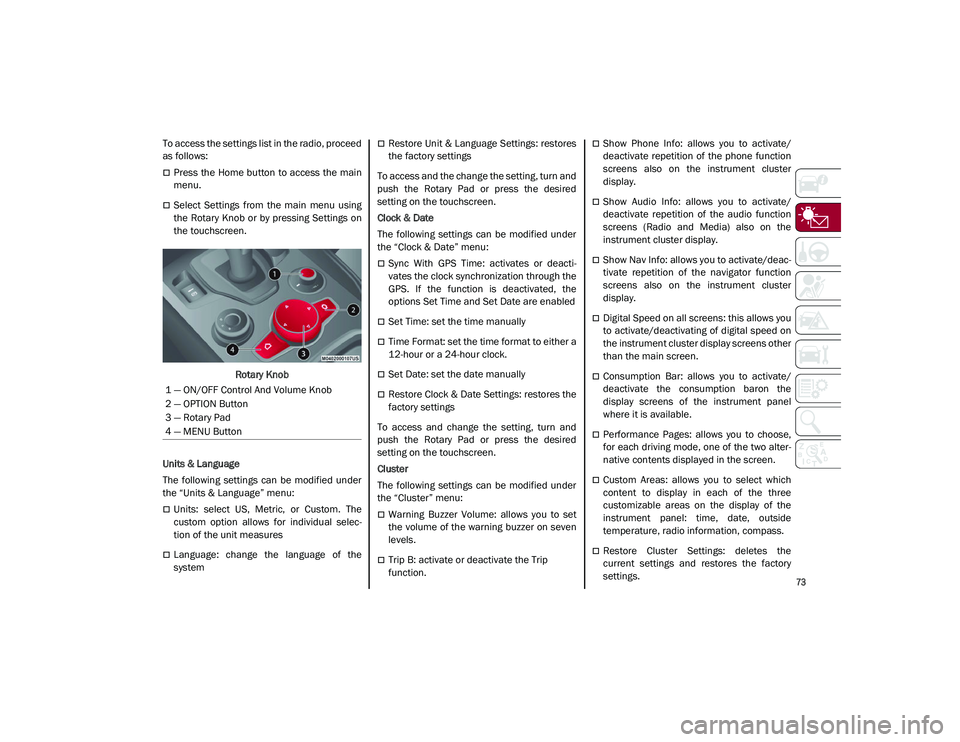
the touchscreen.Rotary Knob
Units & Language
The following settings can be modified under
the “Units & Language” menu:
Units: select US, Metric, or Custom. The
custom option allows for individual selec -
tion of the unit measures
Language: change the language of the
system
Restore Unit & Language Settings: restores
the factory settings
To access and the change the setting, turn and
push the Rotary Pad or press the desired
setting on the touchscreen.
Clock & Date
The following settings can be modified under
the “Clock & Date” menu:
Sync With GPS Time: activates or deacti -
vates the clock synchronization through the
GPS. If the function is deactivated, the
options Set Time and Set Date are enabled
Set Time: set the time manually
Time Format: set the time format to either a
12-hour or a 24-hour clock.
Set Date: set the date manually
Restore Clock & Date Settings: restores the
factory settings
To access and change the setting, turn and
push the Rotary Pad or press the desired
setting on the touchscreen.
Cluster
The following settings can be modified under
the “Cluster” menu:
Warning Buzzer Volume: allows you to set
the volume of the warning buzzer on seven
levels.
Trip B: activate or deactivate the Trip
function.
Show Phone Info: allows you to activate/
deactivate repetition of the phone function
screens also on the instrument cluster
display.
Show Audio Info: allows you to activate/
deactivate repetition of the audio function
screens (Radio and Media) also on the
instrument cluster display.
Show Nav Info: allows you to activate/deac -
tivate repetition of the navigator function
screens also on the instrument cluster
display.
Digital Speed on all screens: this allows you
to activate/deactivating of digital speed on
the instrument cluster display screens other
than the main screen.
Consumption Bar: allows you to activate/
deactivate the consumption baron the
display screens of the instrument panel
where it is available.
Performance Pages: allows you to choose,
for each driving mode, one of the two alter -
native contents displayed in the screen.
Custom Areas: allows you to select which
content to display in each of the three
customizable areas on the display of the
instrument panel: time, date, outside
temperature, radio information, compass.
Restore Cluster Settings: deletes the
current settings and restores the factory
settings.
1 — ON/OFF Control And Volume Knob
2 — OPTION Button
3 — Rotary Pad
4 — MENU Button
21_GU_OM_EN_USC_t.book Page 73
Page 194 of 280
192
IN CASE OF EMERGENCY
Have a flat tire or a burnt-out bulb?
At times, a problem such as these may inter-
fere with your driving experience.
The section on emergencies can help you to
deal with critical situations independently.
In an emergency, we recommend that you call
the phone number found in “Helpful
Addresses And Telephone Numbers” under
“How To Deal With Warranty Problems” in the
Warranty Book.
You may also consider contacting an autho -
rized dealer.
HAZARD WARNING FLASHERS
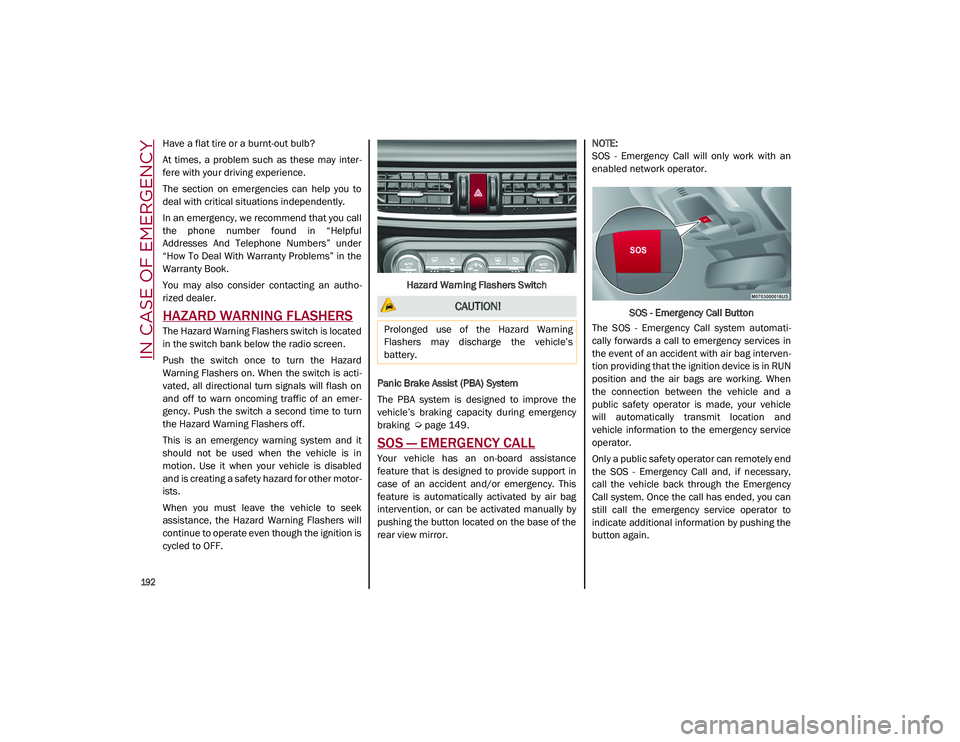
The Hazard Warning Flashers switch is located
in the switch bank below the radio screen.
Push the switch once to turn the Hazard
Warning Flashers on. When the switch is acti -
vated, all directional turn signals will flash on
and off to warn oncoming traffic of an emer -
gency. Push the switch a second time to turn
the Hazard Warning Flashers off.
This is an emergency warning system and it
should not be used when the vehicle is in
motion. Use it when your vehicle is disabled
and is creating a safety hazard for other motor -
ists.
When you must leave the vehicle to seek
assistance, the Hazard Warning Flashers will
continue to operate even though the ignition is
cycled to OFF. Hazard Warning Flashers Switch
Panic Brake Assist (PBA) System
The PBA system is designed to improve the
vehicle’s braking capacity during emergency
braking
Ú
page 149.
SOS — EMERGENCY CALL
Your vehicle has an on-board assistance
feature that is designed to provide support in
case of an accident and/or emergency. This
feature is automatically activated by air bag
intervention, or can be activated manually by
pushing the button located on the base of the
rear view mirror.
NOTE:
SOS - Emergency Call will only work with an
enabled network operator.
SOS - Emergency Call Button
The SOS - Emergency Call system automati -
cally forwards a call to emergency services in
the event of an accident with air bag interven -
tion providing that the ignition device is in RUN
position and the air bags are working. When
the connection between the vehicle and a
public safety operator is made, your vehicle
will automatically transmit location and
vehicle information to the emergency service
operator.
Only a public safety operator can remotely end
the SOS - Emergency Call and, if necessary,
call the vehicle back through the Emergency
Call system. Once the call has ended, you can
still call the emergency service operator to
indicate additional information by pushing the
button again.
CAUTION!
Prolonged use of the Hazard Warning
Flashers may discharge the vehicle’s
battery.
21_GU_OM_EN_USC_t.book Page 192
Page 195 of 280
193
To Use SOS - Emergency Call
Push and hold the SOS - Emergency Call
button for a few seconds. The LED, located
next to the SOS button, will blink once and
then stay on indicating a call has been placed.
NOTE:
If the SOS - Emergency Call button is acciden-
tally pushed, there is a 10 second delay before
the call is placed. The system will issue a
verbal alert that a call is about to be made. To
cancel the call connection, push the SOS -
Emergency Call button again.
Once a connection between the vehicle and an
emergency service operator is made, the SOS
- Emergency Call system will transmit the
following important vehicle information to the
operator:
Indication that the occupant placed an SOS
- Emergency Call.
The Vehicle Identification Number (VIN).
The last known GPS coordinates of the
vehicle.
You will then be able to speak with the emer -
gency service operator to determine if addi -
tional help is needed.
The SOS - Emergency Call has priority over
other audio sources, which will be muted. If
you have a phone connected via Bluetooth, it
is disconnected and reconnected at the end of
the SOS - Emergency Call. Voice prompts will
guide you during the SOS - Emergency Call. If a connection is made between an emergency
service operator and your vehicle, emergency
service operators may record conversations
and sounds within your vehicle once a connec
-
tion is made, and by using the service you
consent to having this information shared.
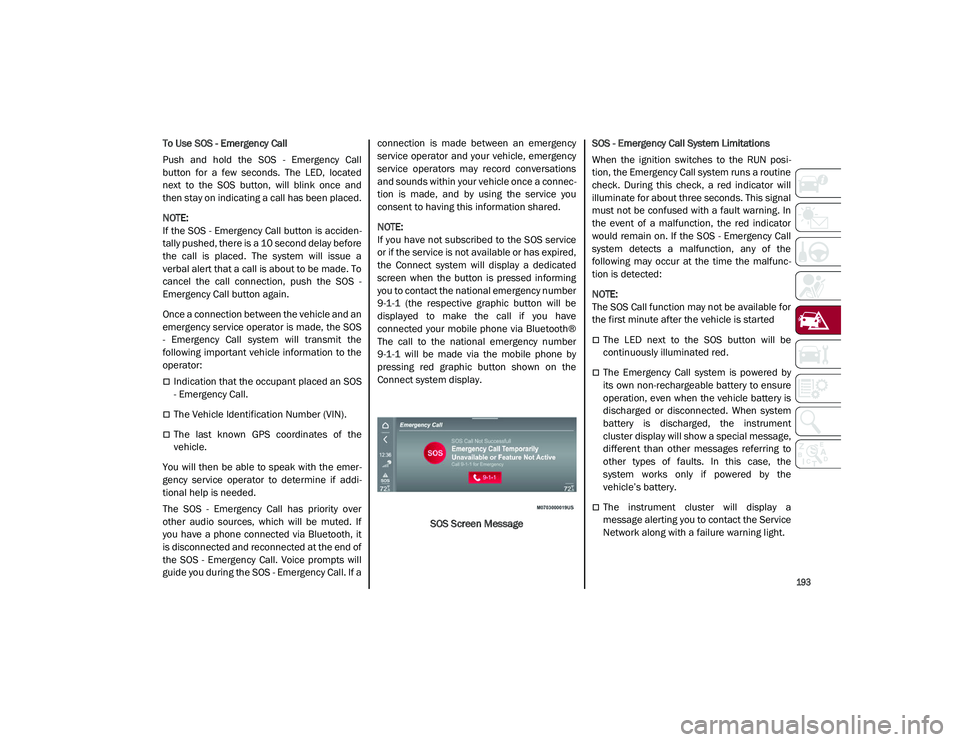
NOTE:
If you have not subscribed to the SOS service
or if the service is not available or has expired,
the Connect system will display a dedicated
screen when the button is pressed informing
you to contact the national emergency number
9-1-1 (the respective graphic button will be
displayed to make the call if you have
connected your mobile phone via Bluetooth®
The call to the national emergency number
9-1-1 will be made via the mobile phone by
pressing red graphic button shown on the
Connect system display.
SOS Screen Message SOS - Emergency Call System Limitations
When the ignition switches to the RUN posi
-
tion, the Emergency Call system runs a routine
check. During this check, a red indicator will
illuminate for about three seconds. This signal
must not be confused with a fault warning. In
the event of a malfunction, the red indicator
would remain on. If the SOS - Emergency Call
system detects a malfunction, any of the
following may occur at the time the malfunc -
tion is detected:
NOTE:
The SOS Call function may not be available for
the first minute after the vehicle is started
The LED next to the SOS button will be
continuously illuminated red.
The Emergency Call system is powered by
its own non-rechargeable battery to ensure
operation, even when the vehicle battery is
discharged or disconnected. When system
battery is discharged, the instrument
cluster display will show a special message,
different than other messages referring to
other types of faults. In this case, the
system works only if powered by the
vehicle’s battery.
The instrument cluster will display a
message alerting you to contact the Service
Network along with a failure warning light.
21_GU_OM_EN_USC_t.book Page 193
Page 206 of 280
IN CASE OF EMERGENCY
204
4. Disconnect the positive (+) end of thejumper cable from the positive (+) post of
the vehicle with the discharged battery.
If frequent jump starting is required to start
your vehicle, you should have the battery and
charging system inspected at an authorized
dealer.
Bump Starting
Never jump start the engine by pushing,
towing or coasting downhill.
NOTE:
You cannot start a vehicle with an automatic
transmission by pushing it.
ENGINE OVERHEATING
If your vehicle is overheating, it will need to be
serviced at an authorized dealer.
Engine overheating may occur in situations
such as (but not limited to) extreme environ -
mental temperatures or frequent engine
stops/starts. If the engine becomes over -heated, the Engine Temperature Warning
Light in the instrument cluster will illuminate
along with a dedicated message
Ú
page 79.
In any of the following situations, you can
reduce the potential for overheating by taking
the appropriate action.
On the highways — slow down.
In city traffic — while stopped, place the
transmission in NEUTRAL, but do not
increase engine idle speed.
NOTE:
There are steps that you can take to slow down
an impending overheat condition:
If your Air Conditioner (A/C) is on, turn it off.
The A/C system adds heat to the engine
cooling system and turning the A/C off can
help remove this heat.
You can also turn the temperature control
to maximum heat, the mode control to floor
and the blower control to high. This allows
the heater core to act as a supplement to
the radiator and aids in removing heat from
the engine cooling system.
NOTE:
If the cooling fan does not operate while the
engine is running, the engine temperature
will increase. Stop the engine and contact
an authorized dealer.
If the engine continues to overheat or
frequently overheats, have the cooling
system inspected. The engine could be seri
-
ously damaged unless repairs are made.
Contact an authorized dealer.
CAUTION!
Accessories plugged into the vehicle power
outlets draw power from the vehicle’s
battery, even when not in use (i.e., cellular
phones, etc.). Eventually, if plugged in long
enough without engine operation, the
vehicle’s battery will discharge sufficiently
to degrade battery life and/or prevent the
engine from starting.
WARNING!
You or others can be badly burned by hot
engine coolant (antifreeze) or steam from
your radiator. If you see or hear steam
coming from under the hood, do not open
the hood until the radiator has had time to
cool. Never try to open a cooling system
pressure cap when the radiator or coolant
bottle is hot.
CAUTION!
Driving with a hot cooling system could
damage your vehicle. If temperature gauge
reads “H”, pull over and stop the vehicle.
Idle the vehicle with the air conditioner
turned off until the pointer drops back into
the normal range. If the pointer remains on
the “H”, turn the engine off immediately,
and call for service.
21_GU_OM_EN_USC_t.book Page 204
Page 268 of 280
266
CUSTOMER ASSISTANCE
SUGGESTIONS FOR OBTAINING
SERVICE FOR YOUR VEHICLE
Prepare For The Appointment
All work to be performed may not be covered
by the warranty. Discuss additional charges
with the service manager. Keep a mainte-
nance log of your vehicle's service history, as
this can often provide a clue to the current
problem.
Prepare A List
Make a written list of your vehicle's problems
or the specific work you want done. If you've
had an accident or work done that is not on
your maintenance log, let the service advisor
know.
Be Reasonable With Requests
If you list a number of items and you must
have your vehicle by the end of the day,
discuss the situation with the service advisor
and list the items in order of priority. At many
authorized dealers, you may obtain a rental
vehicle at a minimal daily charge. If you need
a rental, it is advisable to make these arrange -
ments when you call for an appointment.
IF YOU NEED ASSISTANCE
FCA US LLC and its authorized dealers are
vitally interested in your satisfaction. We want
you to be happy with our products and
services.
Warranty service must be done by an autho -
rized dealer. We strongly recommend that you
take the vehicle to an authorized dealer. They
know your vehicle the best, and are most
concerned that you get prompt and high
quality service. FCA US LLC's authorized
dealers have the facilities, factory-trained
technicians, special tools, and the latest infor -
mation to ensure the vehicle is fixed correctly
and in a timely manner.
This is why you should always talk to an autho -
rized dealer’s service manager first. If for
some reason you are still not satisfied, talk to
the general manager or owner of the autho -
rized dealer. They want to know if you need
assistance. If an authorized dealer is unable to
resolve the concern, you may contact FCA US
LLC's Customer Assistance center.
Any communication to FCA US LLC's customer
center should include the following information:
Owner's name and address
Owner's telephone number (mobile, home
and office)
Authorized dealer name
Vehicle Identification Number (VIN)
Vehicle delivery date and mileage
Alfa Romeo Customer Center
P.O. Box 21–8004
Auburn Hills, MI 48321–8004
Phone: 1-844-Alfa-USA (1-844-253-2872)
Alfa Romeo Customer Care (Canada)
P.O. Box 1621
Windsor, Ontario N9A 4H6
Phone: 1-877-230-0563 (English) Phone:
1-877-515-9112 (French)
Customer Assistance For The Hearing Or
Speech Impaired (TDD/TTY)
To assist customers who have hearing difficul -
ties, the manufacturer has installed special
Telecommunication Devices for the Deaf
(TDD) equipment at its customer center. Any
hearing or speech impaired customer, who
has access to a TDD or a conventional tele -
typewriter (TTY) in the United States, can
communicate with the manufacturer by dialing
1-800-380-2479.
Canadian residents with hearing difficulties
that require assistance can use the special
needs relay service offered by Bell Canada.
For TTY teletypewriter users, dial 711 and for
Voice callers, dial 1-800-855-0511 to connect
with a Bell Relay Service operator.
21_GU_OM_EN_USC_t.book Page 266
Page 270 of 280
CUSTOMER ASSISTANCE
268
PUBLICATION ORDER FORMS
To order the following manuals, you may use
either the website or the phone numbers listed
below.
Service Manuals
These comprehensive Service Manuals
provide a complete working knowledge of the
vehicle, system, and/or components and is
written in straightforward language with illus-
trations, diagrams, and charts.
Diagnostic Procedure Manuals
Diagnostic Procedure Manuals are filled with
diagrams, charts and detailed illustrations.
These manuals make it easy to find and fix
problems on computer-controlled vehicle
systems and features. They show exactly how
to find and correct problems, using
step-by-step troubleshooting and drivability
procedures, proven diagnostic tests and a
complete list of all tools and equipment.
Owner's Manuals
These Owner's Manuals have been prepared
with the assistance of service and engineering
specialists to acquaint you with specific FCA
US LLC vehicles. To access your Owner's Information online,
visit
alfaromeousa.com/owners/
owners-service-manual
(US)
alfaromeo.ca/fr/owners/
owners-service-manual
(Canada)
To order a hard copy of your Owner’s Informa -
tion, visit:
www.techauthority.com
(US)
Or
Call Tech Authority toll free at:
1-800-890-4038 (US)
1-800-387-1143 (Canada)
General Information
The following regulatory statement applies to
all Radio Frequency (RF) devices equipped in
this vehicle:
This device complies with Part 15 of the FCC
Rules and with Innovation, Science and
Economic Development Canada license-
exempt RSS standard(s). Operation is subject
to the following two conditions:
1. This device may not cause harmful inter -
ference, and
2. This device must accept any interference received, including interference that may
cause undesired operation. Le présent appareil est conforme aux CNR
d`Innovation, Science and Economic Develop
-
ment applicables aux appareils radio exempts
de licence. L'exploitation est autorisée aux
deux conditions suivantes:
1. l'appareil ne doit pas produire de brouil -
lage, et
2. l'utilisateur de l'appareil doit accepter tout brouillage radioélectrique subi, même si le
brouillage est susceptible d'en comprom -
ettre le fonctionnement.
La operación de este equipo está sujeta a las
siguientes dos condiciones:
1. es posible que este equipo o dispositivo no cause interferencia perjudicial y
2. este equipo o dispositivo debe aceptar cualquier interferencia, incluyendo la que
pueda causar su operación no deseada.
NOTE:
Changes or modifications not expressly
approved by the party responsible for compli -
ance could void the user’s authority to operate
the equipment.
21_GU_OM_EN_USC_t.book Page 268