2021 ALFA ROMEO STELVIO change time
[x] Cancel search: change timePage 10 of 280

8
DEAR CUSTOMER
READ THIS CAREFULLY
Refueling..................................................... 2
Starting The Engine .................................... 2
Parking On Flammable Material ............... 2
Respecting The Environment .................... 2
Electrical Accessories ................................ 2
Scheduled Servicing .................................. 2
Rollover Warning ........................................ 3
VEHICLE CHANGES / ALTERATIONS
Accessories Purchased By The Owner ...... 4
Installing Electrical/Electronic Devices .... 4
Radio Transmitters And Mobile Phones ... 5
GETTING TO KNOW YOUR VEHICLE
KEYS..........................................................18
Key Fob................................................... 18
ENGINE IMMOBILIZER SYSTEM ..............20
IGNITION SWITCH ...................................20
Keyless Push Button Ignition ................ 20
REMOTE START — IF EQUIPPED .............22
How To Use Remote Start ..................... 22
To Exit Remote Start Mode ................... 22
Remote Start Comfort Systems —
If Equipped ............................................. 23
VEHICLE SECURITY SYSTEM —
IF EQUIPPED............................................. 23
To Arm The System................................ 23
To Disarm The System .......................... 23
Volumetric/Anti-Lift Protection —
If Equipped ............................................. 24
DOORS ...................................................... 24
Power Door Locks.................................. 24
Locking The Doors With A Depleted
Battery .................................................... 25 Passive Entry System ........................... 25
Power Lock Safety Device..................... 27
Automatic Door Locks — If Equipped .. 27
Child-Protection Door Lock System — Rear
Doors ...................................................... 27
STEERING WHEEL.................................... 28
Manual Tilt/Telescoping Steering
Column ................................................. 28 Heated Steering Wheel —
If Equipped ............................................ 29
DRIVER MEMORY SETTINGS —
IF EQUIPPED............................................. 30
Programming The Memory Feature ..... 30
Memory Position Recall ........................ 30
SEATS ...................................................... 30
Sparco Racing Seats (Quadrifoglio
Vehicles) — If Equipped ......................... 30 Split Folding Rear Seat ......................... 31
Power Adjustment (Front Seats)........... 33
Heated Seats — If Equipped ................ 34
Head Restraints .................................. 35
MIRRORS ..................................................37
Automatic Dimming Mirror ....................37
Vanity Mirror ...........................................37
Outside Power Mirrors .........................38
Power Folding Outside Mirrors ..............38
Outside Automatic Dimming Mirrors —
If Equipped .............................................39 Heated Mirrors .....................................39
UNIVERSAL GARAGE DOOR OPENER
(HOMELINK®) ..........................................39
Before You Begin Programming
HomeLink® ............................................39 Erasing All The HomeLink®
Channels ................................................. 39 Identifying Whether You Have A Rolling
Code Or Non-Rolling Code Device .........40 Programming HomeLink® To A
Garage Door Opener ..............................40 Programming HomeLink® To A
Miscellaneous Device ............................ 41 Reprogramming A Single HomeLink®
Button .....................................................41 Canadian/Gate Operator
Programming .......................................... 41
EXTERIOR LIGHTS ....................................42
Headlight Switch ..................................42
Daytime Running Lights (DRLs) .........42
High Beam Headlights ..........................43
Automatic Headlights ...........................43
Flash-To-Pass .........................................43
21_GU_OM_EN_USC_t.book Page 8
Page 43 of 280
41
2. Push the programmed HomeLink® buttonto confirm that the garage door opener
motor operates. If the garage door opener
motor does not operate, repeat the steps
from the beginning.
Programming HomeLink® To A
Miscellaneous Device
Follow the procedure on programming Home -
Link® to a garage door opener
Ú
page 40. Be
sure to determine if the device has a rolling
code, or non-rolling code before beginning the
programming process.
NOTE:
Canadian radio frequency laws require trans -
mitter signals to time-out (or quit) after several
seconds of transmission, which may not be
long enough for HomeLink® to pick up the signal during programming. Similar to this
Canadian law, some U.S. gate operators are
designed to time-out in the same manner. The
procedure may need to be performed multiple
times to successfully pair the device to your
HomeLink® buttons.
Reprogramming A Single HomeLink®
Button
To reprogram a single HomeLink® button that
has been previously trained, without erasing
all the channels, follow the procedure below.
Be sure to determine whether the new device
you want to program the HomeLink® button to
has a Rolling Code, or Non-rolling Code.
1. Place the ignition in the ON/RUN position,
without starting the engine.
2. Push and hold the desired HomeLink® button until the HomeLink® indicator light
begins to flash after 20 seconds. Do not
release the button.
3. Without releasing the button , proceed with
Step 2 in “Programming HomeLink® To A
Garage Door Opener” and follow all
remaining steps.
Canadian/Gate Operator Programming
The programming of transmitters in Canada/
United States require the transmitter signals
to “time-out” after several seconds of trans -
mission. Canadian radio frequency laws require trans
-
mitter signals to time-out (or quit) after several
seconds of transmission – which may not be
long enough for HomeLink® to pick up the
signal during programming. Similar to this
Canadian law, some U.S. gate operators are
designed to time-out in the same manner.
It may be helpful to unplug the device during
the cycling process to prevent possible over -
heating of the garage door or gate motor.
1. Place the ignition in the ON/RUN position.
2. Place the hand-held transmitter 1 to 3 inches (3 to 8 cm) away from the Home -
Link® button you wish to program while
keeping the HomeLink® indicator light in
view.
3. Continue to press and hold the Home -
Link® button, while you press and release
(cycle) your hand-held transmitter every
two seconds until HomeLink® has
successfully accepted the frequency
signal. The indicator light will flash slowly
and then rapidly when fully trained.
4. Watch for the HomeLink® indicator to change flash rates. When it changes, it is
programmed. It may take up to 30 seconds
or longer in rare cases. The garage door
may open and close while you are
programming.
5. Press and hold the programmed Home -
Link® button and observe the indicator
light.
WARNING!
Your motorized door or gate will open and
close while you are programming the
universal transceiver. Do not program the
transceiver if people or pets are in the
path of the door or gate.
Do not run your vehicle in a closed garage or
confined area while programming the transceiver.
Exhaust gas from your vehicle contains Carbon
Monoxide (CO) which is odorless and colorless.
Carbon Monoxide is poisonous when inhaled and
can cause you and others to be severely injured or
killed.
21_GU_OM_EN_USC_t.book Page 41
Page 46 of 280
GETTING TO KNOW YOUR VEHICLE
44
Parking Lights
To turn on the parking lights and instrument
panel lights, rotate the headlight switch clock-
wise to the position. All of the parking lights
will turn on for eight minutes, and opening the
door activates an audible warning.
To leave only the lights on one side (right/left)
illuminated, move the multifunction lever
(located on the left side of the steering wheel)
to the side that you want to remain on. With
the parking lights on, the indicator light on
the instrument panel will illuminate.
To turn off the parking lights, rotate the head -
light switch back to the O (off) position.
Headlight Off Delay
To assist when exiting the vehicle, the “Head -
light Off Delay” feature will leave the head -
lights on for up to 90 seconds. This delay is
initiated when the ignition is placed in the OFF
position while the headlight switch is on, and
then the headlight switch is cycled off. Head -
light delay can be canceled by either turning
on the headlights or side lights, or by placing
the ignition in the ON position.
The function can be activated from the radio
system by selecting the following functions in
sequence on the main menu:
1. “Settings.”
2. “Lights.”
3. “Headlight Off Delay.”
Rear Fog Lights
The rear fog light switch is located within the
headlight switch.
Push the button, located in the center of
the headlight switch, to turn the rear fog lights
on/off.
The rear fog lights turn on only when the head -
lights or parking lights are also turned on. The
lights can be turned off by pushing the
button again or by turning the headlight switch
to the O (off) position.
When the engine is stopped with the rear fog
lights on, they will be off the next time the
engine is started.
Adaptive Headlight System (AFS) — If
Equipped
This is a system combined with Xenon head -
lights (Bi-Xenon 35 W headlamp, if equipped)
which directs the headlights horizontally, and
continuously and automatically adapts them
to the driving conditions around bends or
when cornering.
The system directs the headlights to light up
the road in the best way, taking into account
the speed of the vehicle and the bend or
corner angle, as well as the speed at which the
steering wheel is turned.
The adaptive lights are automatically activated
when the vehicle is started.
Turn Signals
Move the multifunction lever up or down to
activate the turn signals. The arrows on each
side of the instrument cluster flash to show
proper operation.
The or turn signal will blink on the instru -
ment panel.
Lane Change Assist
Lightly push the lever up or down once, without
moving beyond the detent, and the turn signal
will flash five times then automatically turn off.
To turn off the flashing before the end of the
cycle, move the lever in the opposite direction
until the first click (about half way).
INTERIOR LIGHTS
Courtesy lights are turned on when the front
doors are opened or when the dimmer control
is rotated to its farthest upward position. The
glove compartment light turns on automati -
cally when the glove compartment is opened
and turn off when it is closed. The door cour -
tesy lights illuminate when one of the front
doors is opened, and turn off when it is closed.
The liftgate courtesy lights turn on automati -
cally when the liftgate is opened and turn off
when it is closed. All of these lights turn on and
off regardless of the ignition status.
21_GU_OM_EN_USC_t.book Page 44
Page 54 of 280
GETTING TO KNOW YOUR VEHICLE
52
NOTE:
When the A/C is off, the Climate Control
system can not produce air that is colder than
the current outside temperature. Under
certain environmental conditions, windows
could fog up rapidly since the air is not dehu-
midified.
Air Recirculation And Air Quality System (AQS)
Air Recirculation is managed
according to the following operating
mode:
Automatic engagement: indicator is illumi -
nated above the “A” on the Air Recirculation
Button
Forced activation (air circulation always
activated): indicator illuminated above the
icon on the Air Recirculation Button
Forced deactivation (air recirculation
always off with intake of outside air): both
indicators not illuminated on the Air Recir-
culation Button
The three operating conditions are obtained by
pushing the Air Recirculation Button in
sequence.
Enabling The Air Quality System (AQS) Func -
tion — If Equipped
When the automatic recirculation function is
selected, the AQS function automatically acti -
vates internal air recirculation when the
outside air is polluted (e.g. in heavy traffic and
tunnels). At low external temperatures or in high
humidity, the automatic function turns off to
avoid fogging up the windows. The user can
select the function again by pushing the Air
Recirculation Button.
In automatic operation, air recirculation will be
controlled by the system according to outside
environmental conditions.
NOTE:
With the AQS function active and after the
internal air recirculation system has been
functioning for a set amount of time, the
Climate Control System enables air intake
to cycle the air in the passenger compart
-
ment for a set time. The AQS function is
disabled during the air changes.
The engagement of the recirculation system
makes it possible to reach the required
heating or cooling conditions faster. It is,
however, inadvisable to use it on rainy/cold
days as it can increase the possibility of the
windows fogging. When the outside
temperature is low, recirculation is forced
off to prevent the windows from fogging up.
Front Defrost
Air comes from the windshield and
side window demist outlets. Use
Defrost mode with maximum
temperature settings for best wind -
shield and side window defrosting and defog -
ging.
Rear Defrost
Push the Rear Defrost button to acti -
vate (indicators illuminated) the
Rear Defroster.
The Rear Defrost will turn off after 20 minutes
or once the engine is turned off.
NOTE:
To avoid damage, do not apply stickers over
the interior heating filaments of the Rear
Defroster.
Front Defrost And MAX-DEF Function
Push the MAX-DEF button (indicator
illuminated) to defrost the wind -
shield and side windows.
While in MAX-DEF function, the air conditioner
will:
Activate the air conditioner compressor
when the weather allows
Turn air recirculation off
Set the maximum air temperature (HI) on
both the driver and passenger side
Activate a blower speed based on the
temperature of the engine coolant
Adjust the air flow towards the windshield
and front side windows
Activate the Rear Window Defrost
Display the fan speed (indicators illumi -
nated) and current air distribution setting
21_GU_OM_EN_USC_t.book Page 52
Page 56 of 280
GETTING TO KNOW YOUR VEHICLE
54
the flow of air. The air vanes of the center
outlets and outboard outlets can be moved up
and down or side to side to regulate airflow
direction. There is a shut off wheel located
below the air vanes to shut off or adjust the
amount of airflow from these outlets.
Bi-Level Mode
Air comes from the instrument panel
outlets and floor outlets. A slight
amount of air is directed through the
defrost and side window demister
outlets.
NOTE:
Bi-Level mode is designed under comfort
conditions to provide cooler air out of the
panel outlets and warmer air from the floor
outlets.
Floor Mode
Air comes from the floor outlets. A
slight amount of air is directed
through the defrost and side window
demister outlets. This setting heats
the passenger compartment the quickest.
Mix Mode
Air is directed through the floor,
defrost, and side window demister
outlets. This setting works best in
cold or snowy conditions that require
extra heat to the windshield. This setting is
good for maintaining comfort while reducing
moisture on the windshield.
Front Defrost And Panel Mode
Air flow is distributed between the
windshield demisting/defrosting
vents and side/central dashboard
vents. This setting allows air to flow
to the windshield on sunny days.
Front Defrost And Bi-Level Mode
Air flow is distributed to all vents.
Switching The Climate Control System On/
Off
To Turn Off The Climate Control System
Rotate the Air Speed Adjustment Knob
completely counterclockwise to turn off the
Climate Control system.
With the air conditioner is off:
Air recirculation is on
The A/C compressor is off
The fan is off
The heated rear window can be activated/
deactivated
NOTE:
The Climate Control system stores the previ -
ously set temperatures and resumes opera -
tion when any button on the system is pushed. To Turn On The Climate Control System
To switch the Climate Control system on in
automatic mode, push the AUTO button.
Operating Mode
The Climate Control system can be activated
in different ways. It is recommended to use the
automatic function. Push the AUTO button and
set the desired temperatures.
The automatic system adjusts the tempera
-
ture, quantity, and distribution of air intro -
duced into the passenger compartment. It
also controls air recirculation and the activa -
tion of the air conditioner.
At any time during automatic operation, you
can change the temperature, activate or deac -
tivate the Rear Defrost, activate SYNC, acti -
vate or deactivate the air conditioner, and
activate or deactivate air recirculation. The
system will automatically adjust to the new
settings.
Climate Control Display Settings
The Climate Control settings are visible on the
radio screen.
The display on the radio system is a pop up
window, which is activated by pushing the
buttons or turning the knobs on the Climate
Control system. The indicator lights located on
the buttons and knobs indicate that the
selected feature is on/off. If no operation is
performed for a predetermined time, the
pop-up will close on the display.
21_GU_OM_EN_USC_t.book Page 54
Page 75 of 280
73
To access the settings list in the radio, proceed
as follows:
Press the Home button to access the main
menu.
Select Settings from the main menu using
the Rotary Knob or by pressing Settings on
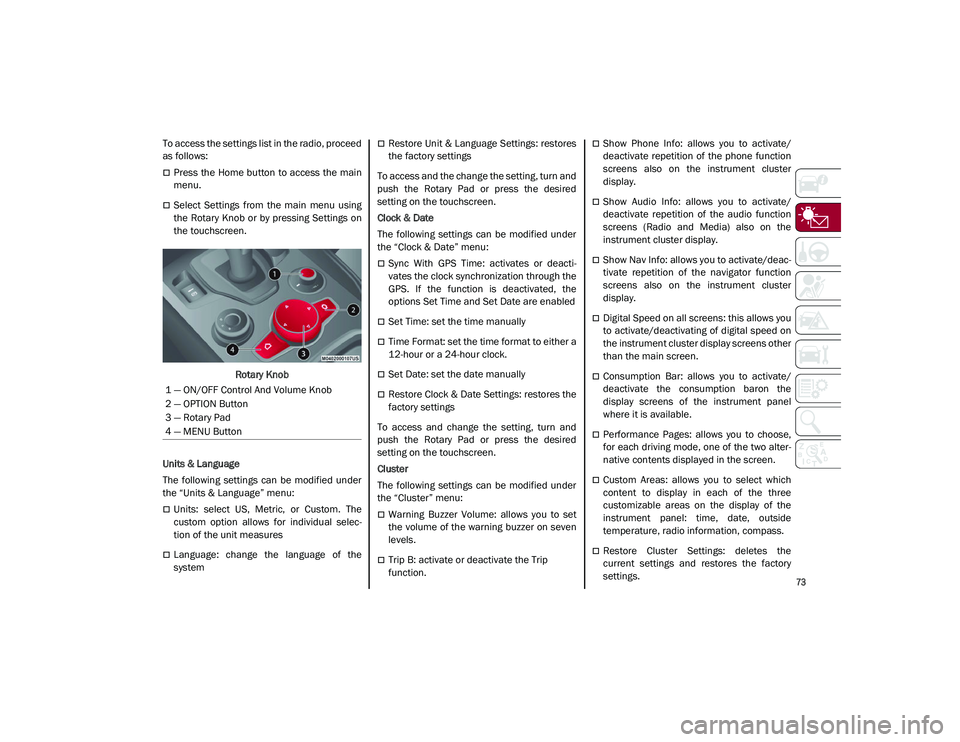
the touchscreen.Rotary Knob
Units & Language
The following settings can be modified under
the “Units & Language” menu:
Units: select US, Metric, or Custom. The
custom option allows for individual selec -
tion of the unit measures
Language: change the language of the
system
Restore Unit & Language Settings: restores
the factory settings
To access and the change the setting, turn and
push the Rotary Pad or press the desired
setting on the touchscreen.
Clock & Date
The following settings can be modified under
the “Clock & Date” menu:
Sync With GPS Time: activates or deacti -
vates the clock synchronization through the
GPS. If the function is deactivated, the
options Set Time and Set Date are enabled
Set Time: set the time manually
Time Format: set the time format to either a
12-hour or a 24-hour clock.
Set Date: set the date manually
Restore Clock & Date Settings: restores the
factory settings
To access and change the setting, turn and
push the Rotary Pad or press the desired
setting on the touchscreen.
Cluster
The following settings can be modified under
the “Cluster” menu:
Warning Buzzer Volume: allows you to set
the volume of the warning buzzer on seven
levels.
Trip B: activate or deactivate the Trip
function.
Show Phone Info: allows you to activate/
deactivate repetition of the phone function
screens also on the instrument cluster
display.
Show Audio Info: allows you to activate/
deactivate repetition of the audio function
screens (Radio and Media) also on the
instrument cluster display.
Show Nav Info: allows you to activate/deac -
tivate repetition of the navigator function
screens also on the instrument cluster
display.
Digital Speed on all screens: this allows you
to activate/deactivating of digital speed on
the instrument cluster display screens other
than the main screen.
Consumption Bar: allows you to activate/
deactivate the consumption baron the
display screens of the instrument panel
where it is available.
Performance Pages: allows you to choose,
for each driving mode, one of the two alter -
native contents displayed in the screen.
Custom Areas: allows you to select which
content to display in each of the three
customizable areas on the display of the
instrument panel: time, date, outside
temperature, radio information, compass.
Restore Cluster Settings: deletes the
current settings and restores the factory
settings.
1 — ON/OFF Control And Volume Knob
2 — OPTION Button
3 — Rotary Pad
4 — MENU Button
21_GU_OM_EN_USC_t.book Page 73
Page 82 of 280
GETTING TO KNOW YOUR INSTRUMENT PANEL
80
the oil level can be checked on the display
upon entering the vehicle and also by acti-
vating the “Oil level” function on the Informa -
tion and Entertainment System.
Contact an authorized dealer as soon as
possible.
Trunk Lid Not Properly Shut
The telltale turns on when the trunk
lid is not properly closed, along with
the icon, an image of the vehicle with
an open trunk lid appears on the
display.
A buzzer is heard when the trunk lid is open
and the vehicle is moving.
Close the trunk lid properly.
Amber Symbols
Engine Immobilizer Failure/Break-In
Attempt
Engine Immobilizer System Failure
The telltale will illuminate to report a
failure of the Engine Immobilizer
system. Break-In Attempt
The telltale will illuminate
when the ignition is cycled to ON position, to
indicate a possible break-in attempt detected
by the alarm system.
Electronic Key Not Recognized The telltale will
illuminate when the engine is started and the
electronic key is not recognized by the system.
Alarm System Failure The telltale will illumi -
nate to report an alarm system failure.
Contact an authorized dealer as soon as
possible.
Fuel Cut-Off Indicator Light
The telltale will illuminate after an
accident has occurred and the
system has shut the fuel off.
For reactivating the fuel cut-off system
Ú
page 163. If it is not possible to restore the
fuel supply, contact an authorized dealer.
Park Sensors System Failure
The telltale will illuminate when the
system has failed or is not available.
Contact an authorized dealer to have
the system checked.
Engine Oil Change Required — If Equipped
The telltale is illuminated only for a
limited time.
NOTE:
After the first indication, each time the engine
is started the symbol will continue to illumi
-
nate as described above until the oil is
changed.
If the telltale flashes, this does not mean that
there is a fault on the vehicle, rather it simply
reports that it is now necessary to change the oil
as a result of regular use of the vehicle. The dete -
rioration of engine oil is accelerated by using the
vehicle for short drives, preventing the engine
from reaching operating temperature.
Contact an authorized dealer as soon as
possible.Engine Oil Pressure Sensor Failure
The telltale will illuminate in the
event of engine oil pressure sensor
failure.
Contact an authorized dealer as soon as
possible.
CAUTION!
If the LOW ENGINE OIL PRESSURE symbol
switches on when driving, stop the engine
immediately and contact an authorized
dealer.
CAUTION!
Deteriorated engine oil should be replaced as
soon as possible after the symbol is switched
on, and never more than 500 miles (805 km)
after it first switches on. Failure to observe the
above may result in severe damage to the
engine and invalidate the New Vehicle Limited
Warranty. When this symbol comes on, it does
not mean that the level of engine oil is low, so if
it flashes you do not need to top up the engine
oil.
21_GU_OM_EN_USC_t.book Page 80
Page 89 of 280
87
How To Use Remote Start
All of the following conditions must be met
before the engine will remote start:
Gear selector in PARK (P).
Doors closed.
Hood closed.
Liftgate closed.
Hazard switch off.
Brake switch inactive (brake pedal not
pressed).
Battery at an acceptable charge level.
PANIC button not pushed.
System not disabled from previous remote
start event.
Vehicle Security System indicator flashing.
Ignition in the OFF mode (if equipped with
keyless ignition system).
Fuel level meets minimum requirement.
Remote Start Comfort Systems — If Equipped
When Remote Start is activated, the heated
steering wheel and driver heated seat features
will automatically turn on in cold weather.
These features will stay on through the dura -
tion of remote start until the ignition is placed
in the ON/RUN mode. Remote Start Windshield Wiper De–Icer Acti
-
vation — If Equipped
When remote start is active and the outside ambient
temperature is less than 39°F (4°C), the Windshield
Wiper De-Icer will be enabled. Exiting remote start will
resume previous operation, except if the Windshield
Wiper De-Icer is active.
The Windshield Wiper De-Icer timer and oper -
ation will continue.
Cold Weather Operation
To prevent possible engine damage while
starting at low temperatures, this vehicle will
inhibit engine cranking when the ambient
temperature is less than –22°F (–30°C) and
the oil temperature sensor reading indicates
an engine block heater has not been used. An
externally-powered electric engine block
heater is available as optional equipment or
from an authorized dealer.
The message “plug in engine heater” will be
displayed in the instrument cluster when the
ambient temperature is below 5°F (–15°C) at the
time the engine is shut off as a reminder to avoid
possible crank delays at the next cold start.
Extended Park Starting
If the vehicle has not been started or driven for
at least 30 days, it is advisable to follow the
indications below.
To start the engine, proceed as follows:
1. Briefly push the ignition button
2. If the engine does not start, wait five seconds and let the starter cool down and
then repeat the starting procedure
3. If the engine does not start after eight attempts, let the starter cool down for at
least 10 seconds, and then repeat the
starting procedure
If the problem persists, contact an authorized
dealer.
NOTE:
After prolonged vehicle inactivity, very difficult
starting, that can be noticed through rapid
fatigue of the starter, might also be due to a
partially drained battery
Ú
page 201.
If Engine Fails To Start
Starting the Engine with Key Fob Battery Run
Down or Drained
If the ignition does not respond when the
button is pushed, the key fob battery might be
run down or drained. Therefore, the system
does not detect the presence of the key fob in
the vehicle, and will display a dedicated
message
Ú
page 20. CAUTION!
Use of the recommended oil and adhering
to the prescribed oil change intervals is
important to prevent engine damage and
ensure satisfactory starting in cold
conditions.
21_GU_OM_EN_USC_t.book Page 87